Java installation
Ancestris needs Java. Check the Versions compatibility page.
If Ancestris does not start, or shows the Ancestris splash screen and stops, it is most generally related to an issue with the Java installation. Either Java is not installed or Ancestris does not find it or finds an incompatible version or finds a corrupted version.
The following sections offer a step-by-step check to ensure Ancestris is using a valid Java version.
General principle
- Ancestris works with all Java versions listed in the Compatibility page.
- Ancestris has been tested with several versions which are LTS (Long Term Support) versions.
- We do not systematically test Ancestris with Short Term versions. They are quickly obsolete and cannot be downloaded after 18 months but some users regularly confirm that Ancestris works well with all java versions.
- Ancestris is compiled with a former long-term version for better compatibility with most users.
- If a functioning version of Java is available on your system, Ancestris will find it without having to configure anything.
- Otherwise, you can install Java from any vendor. Our users find it easier to download it from Adoptium.
- To know whether Java is installed on your system, follow these instructions.
- In case Ancestris does not start although Java is installed, please check the Troubleshooting section.
- You can have multiple versions of Java installed on your system. To tell Ancestris which one to use, you will need to
- either update the Ancestris configuration file. For this, follow these instructions.
- or change the default Java version. For this, follow these instructions.
- either update the Ancestris configuration file. For this, follow these instructions.
Install Java
A simple way to get an official Java version is to get it from Adoptium.net
- On macOS and Windows, Adoptium provides installable packages that you simply need to run.
- On Linux, it may be easier to install it via the command line.
For example, on Ubuntu, you would use the command ‘sudo apt install openjdk-21-jdk’ to install version 21.
If Java is not installed or if you want the latest or a specific version of Java, just download it from the site above.
If you use Windows, when you install Java with Adoptium, install the registry keys Javasoft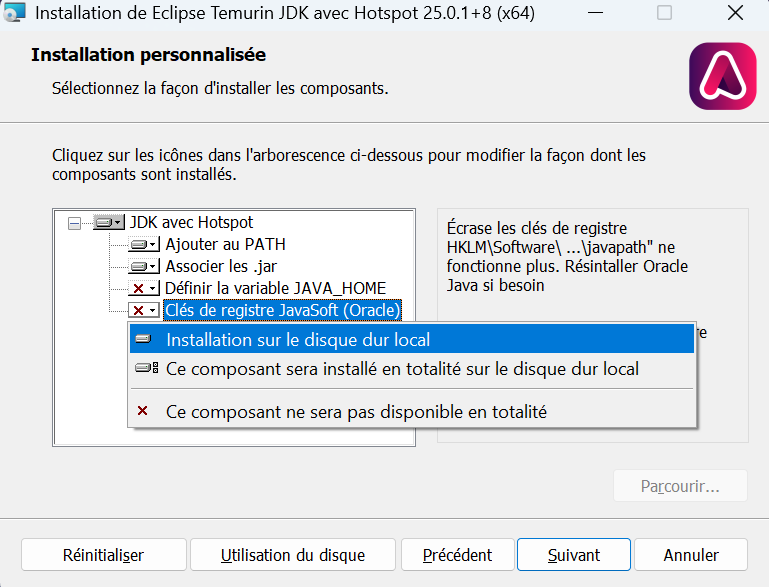
This allow to all software to detect Java.
If you use Linux, another easy way to install java is simply to type the following in a terminal: sudo apt install openjdk-17-jdk( replace the version number 17 by the version you want to install)
Identify if Java is already installed
If you don't know if Java is installed or which version is installed, open a command line terminal and type the command line:
java -version- If you see an error message in the terminal, then Java is not installed on your system. Ancestris cannot run. Please follow the Install section below to install Java.
- If you see something like this below where Java version is displayed, it means Java is installed with the indicated version. You may have several versions installed, but this one is the one Ancestris will find, unless you configured Ancestris to do differently.
java version "1.8.0_251"
Java(TM) SE Runtime Environment (build 1.8.0_251-b08)
Java HotSpot(TM) 64-Bit Server VM (build 25.251-b08, mixed mode)
According to the display above, we can see that the installed Java version set by default is version 1.8, aka version 8.
If you have a Java version installed as per the example above, and are happy to use this version, you may disregard the rest of this page.
Troubleshooting
If Java is installed and Ancestris does not start, either Ancestris does not find Java or finds an incompatible version or finds a corrupted version.
Whether only one version of Java or several versions are installed on your system, you will then need to check and potentially update the configuration file to tell Ancestris where to look for Java.
Rather than changing the Ancestris configuration file, and if several version of Java are available on your system, an alternative would be to change the default Java version.
- The default Java version is the one appearing when you type
java -versionlike indicated in the section above. This is the one Ancestris will use if an Ancestris configuration file does not exist or does not include the instruction of where to find Java.
If in doubt, please run Ancestris manually from a terminal window, and send us the trace that is displayed on the screen.
- Regardless of the OS you use, open a terminal window
- Go to the application directory called
ancestris/bin - Start Ancestris manually
- by typing
./ancestrisfrom macOS or Linux, - by typing
ancestris.exeorancestris64.exefrom Windows
- by typing
- The terminal window displays what it is doing
- Send us this display
Update the Ancestris configuration file
You only need to worry about what is detailed below if Java is installed and Ancestris does not start.
You need to update the Ancestris configuration file to tell where Ancestris should look for Java, if Ancestris does not seem to find it.
The principle is the following:
- If a configuration file exists which includes a jdkhome parameter indicating where to find java, Ancestris will use the corresponding java version
- Otherwise Ancestris will use the default Java version indicated in the section above
Ancestris uses two configuration files, both named ancestris.conf
1/ The first one is the Application Configuration file, which is part of the Application directory and it is created during the installation of Ancestris.
2/ The other one is the User Configuration file, which is part of your User directory, and created when you change some Preferences when using Ancestris.
The User Configuration file takes precedence over the Application Configuration file
So the configuration file to check and update is the User Configuration file if it exists, the Application Configuration file otherwise.
- If you are installing Ancestris, you will probably need to update the Application Configuration file.
- If you have already used Ancestris and want to change the java version, you will probably need to update the User Configuration file.
Chech here to know where the configuration file is depending on your system.
The path to Java in the configuration file
So open the configuration file with a regular text editor.
1. Check the line defining default_options
This line should look like this:
default_options="--branding ancestris -J-Xms96m -J-Xmx1g --laf javax.swing.plaf.nimbus.NimbusLookAndFeel"
If one of the options in this line includes --jdkhome="/path/to/java, make sure the path specified in this option is the path to the Java version you want to use.
If this line does not include a java path, locate jdkhome elsewhere.
2. Check the line defining jdkhome
If the line looks like jdkhome="/path/to/java", then make sure the path specified in this option is the path to the Java version you want to use.
If the line starts with "#", a comment markup, Ancestris will disregard as if it did not exist.
If Ancestris does not start, it could be that the jdkhome folder name is incorrectly spelt or points to an incorrect Java version.
Whatever your operating system is, if the default active Java version is different from the one to be used with Ancestris, you have to modify the jdkhome line like this:
jdkhome="/path/to/java"Case of macOS
For macOS, if for example Java 21 and Java 17 are installed on your Mac and you want to force the use of Java 17 for Ancestris, the complete manipulation to force the version of Java would be the following:
-
Edit the Ancestris User Configuration file if it exists:
- The file is
/Users/<yourname>/Library/Application Support/ancestris/<version or trunk>/etc/ancestris.conf. - Replace <your name> with the name you use on your Mac
- Replace <version or trunk> with the version number of Ancestris you use: the current stable and official version is a number: 11 for instance ; the daily version is called 'trunk'.
- To see the Library folder in the Finder, you need to press Command+J. It is hidden by default
- The file is
-
If the user configuration file does not exist, because you never used Ancestris before, edit the Ancestris Application Configuration file (if this is a first install)
/Applications/Ancestris.app/Contents/Resources/ancestris/etc/ancestris.conf -
Look for the line
#jdkhome="/path/to/java"and suppress the starting character # in order to uncomment the line so that Ancestris takes it into account. - Replace the value to the Java path you want to use, for instance temurin-17 here, so that the line reads:
jdkhome="/Library/Java/JavaVirtualMachines/temurin-17.jdk/Contents/Home"
- Save the modified ancestris.conf file and check that it has been saved correctly.
- Restart Ancestris.
Case of Windows and Linux
For Windows or Linux for example, if the java executable is /usr/java/jdk1.8.0_291-amd64/bin/java, then you must indicate
jdkhome="/usr/java/jdk1.8.0_291-amd64/"Note: you have to exclude /bin/java in the path description.
Change the default Java versions in case multiple versions are installed
If several versions are available on your systems and you need to swap Java versions so that Ancestris uses the default one, the swap procedure depends on your operative system.
Swap default version for macOS
To swap between different Java versions, open a Terminal window and follow the steps below.
In the following example, the instructions let you set Version 8 (aka 1.8) by default, without removing Java Version 10:
1/6 - Check which version of Java is set by default
java -version
echo $jdkhome
You can see the java version you are running.
2/6 - Get a list of all installed versions on your system and check Version 8 or 11 is among them
/usr/libexec/java_home -VIf the version you want is not in the list, then install it as explained in this section.
If it is in the list, but not the one you had above, force the path to the java version with the following step.
3/6 - Type in the following 2 lines in the Terminal
echo 'export JAVA_HOME=`/usr/libexec/java_home -v 1.8`' >>~/.bash_profile
echo 'export jdkhome==`/usr/libexec/java_home -v 1.8`' >>~/.bash_profile
These two lines will add the command to set your default Java version in your personal profile. Here, we force version 1.8 (or 8). Replace with your java version.
The first line defines the default Java version for all programs (JAVA_HOME, in uppercase).
The second line defines the default Java version to use for Ancestris (jdkhome, lowercase).
4/6 - Close the Terminal
exit5/6 - Reopen a Terminal and check that the running Java is now the one you want (version 8 in our example)
java -version
echo $jdkhome
You can now start Ancestris.
6/6 - Start Ancestris
When Ancestris starts, a Terminal window opens at the same time.
You can see in the title bar that version 8 of Java is being used by Ancestris.
Swap default version for Windows
You have to create a BAT file per Java version you wish to keep.
Use your favourite text editor to create those files, using the code below, and place them in a folder available from your PATH.
JAVA8.BAT
@echo off
echo Setting JAVA_HOME
set JAVA_HOME=C:\Program Files\Java\jdk1.8.0_12
echo setting PATH
set PATH=C:\Program Files\Java\jdk1.8.0_12\bin;%PATH%
echo Display java version
java -version
JAVA11.BAT
@echo off
echo Setting JAVA_HOME
set JAVA_HOME=C:\Program Files\Java\jdk1.11.0_11
echo setting PATH
set PATH=C:\Program Files\Java\jdk1.11.0_11\bin;%PATH%
echo Display java version
java -version
While creating these files, make sure you specify the correct name for the Java files for the lines JAVA_HOME, depending on your Java installation
When you decide to change the Java version, just run the corresponding BAT file: JAVA8 for version 1.8, or JAVA11 for version 11. The Java version at use will be shown on the terminal.
To check if the change is really in effect, type java -version on a console or check this page.
Swap default version for Linux
Type the following on a console :
sudo update-alternatives --config java
Select from the list the version needed.
To get help using this tool :
sudo update-alternatives -l