Manage medias files
The Media manager lets you ensure that all media files used in your genealogy exist, either on your local disks or on the Internet, that they are used, and that they correctly link to your Gedcom file events.
A typical situation where you need to use this tool is if you have modified your photo folders for instance, or if you have just migrated your genealogy from another software.

Description
The windows is made of 2 areas:
- A statistics area providing the number of files by category, the full directory name of the location of the Gedcom file, from which relative path files are to be considered, and a button to see all the media files.
- An edition area where you can make 3 types of modifications and undo them
- Swap paths from relative to absolute and vice versa
- Edit folder's paths
- Download remote files from the Internet to your local disks and change the link accordingly in your Gedcom file
Statistics
The indicators have the following meaning.
- Total number of files is the total number of physical file references in your Gedcom file, either on your local disks or on the Internet. File references are written as FILE properties. Empty file names are included in this number. This number adds up local and remote files below. It also adds up to files attached to media entities and media properties.
- Number of distinct files is the number of distinct physical files referenced by the genealogy. It can be lower than the number above. Indeed, the same physical file can be indicated in multiple FILE properties.
A warning is displayed if some physical files are referenced more than once. It is inefficient because changing the file name on disk will require you to update the genealogy in more than one place. Click the "Show all files" button to identify which are these "duplicate" files and consolidate them into the same media entity.
- Local files: this is the number of files physically located on your disks (hard drive, USB keys, etc). It is made of relative path files and absolute path files.
- relative path files start from the location of the Gedcom file. The path string does not start with "/" or "C:\" for instance.
- absolute path files start from the root disk folder, usually "/" or "C:\".
- Remote files: this is the number of physical files located somewhere on Internet web sites.
- A Check existence button lets you check if all remote file really exist. If you click this button, Ancestris will scan all remote files and try to access them. This can take a long time depending on your Internet connection and the response time of the various web sites involved. If there are no remote files in your genealogy, this button will be disabled.
- Files attached to media entities: the file references (FILE) are sub-properties of media entities, and can therefore be used as references multiple times throughout the Gedcom file.
- Files attached to media properties: the file references (FILE) are sub-properties of media properties, and cannot be used anywhere else in the Gedcom file.
The next information is the full path name of your Gedcom file, from which relative paths will be starting.
Finally, the "Refresh" button updates the statistics in case some files have changed locally or remotely, and the "Show all files" button opens the Media viewer with all the pictures of the genealogy.
This Media viewer is the same viewer as the one accessed from the Cygnus editor with one difference: the list of pictures in Cygnus is limited to either events media or sources media.
Edition
This section includes various elements:
- A table listing all folders used by the genealogy, split into different lines depending on whether the included files are found or not, local or remote, attached to entities or properties, relative or absolute.
- Above the table are filters to only display certains lines.
- To the right-hand side of the filters are the Clear and Select buttons to help you select and unselect lines more quickly. You can also select lines using the mouse.
- Actions field and buttons below the table let you to make global changes to several folders at the same time.
Changes made in this editor are made in the Gedcom file and can be undone either via the undo button below, or using the Ancestris main menu bar undo/redo buttons.
Folders table
Each line in the table correspond to a group of files within the same folder and with the same attributes, found/unfound, local/remote, entity/property, and relative/absolute.
- The columns on the left-hand side are for information only.
- Files: number of physical file references included in the mentioned folder, that have the found, local and entity attributes indicated
- Found: checked if files in this group are found, otherwise they are unfound
- Local: checked if files in this group are local, otherwise they are remote
- Entity: checked if files in this group are attached to entities, otherwise they are attached to properties
- Folder: folder name. This is the FILE property value of the Gedcom file. For empty FILE values, Ancestris will display a blank folder name, as shown in the main window above. Please note empty files will be considered 'unfound'.
- The columns on the right-hand side let you make some modifications on the folders and identify unfound files in particular.
- Relative: checked if files in this group have a relative path, otherwise they have an absolute path. Clicking on the checkbox changes this attribute. It swaps from relative to absolute path and vice versa.
- Action: this button opens a window which lists all the files included in this group to help you search for them when they are unfound. The window differs if the group is made of local files, or remote files. See below an example of each window.
-
Selection: click on the checkbox to select or unselect the line. The Replace button and Download button will apply to this selection.
Numbers in column headers of the attributes indicate the number of files with the corresponding attribute.
The number in the Selection header column indicates the number of lines selected.
This is an example of the Search window for local files. An explanation of this window is provided in the corresponding usage section below. 
This is an example of the Search window for remote files.
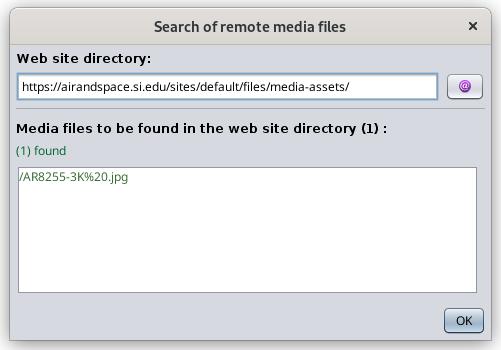
In this "Search of remote media files" window, the Internet button opens up your browser on the corresponding web site directory.
In the list of media files, clicking on a file will try to open it in your browser. The files are listed in green if they could be accessed, in red otherwise.
Filters
- Unfound: check this filter to only display unfound files.
Please note remote files are initially assumed to be found until an action has revealed there are unfound. Such action is for instance the "Check existence" button in the Statistic section, opening a remote file in your browser from the "Search of remote media files" window, or accessing media files via the Media viewer window, which can be opened via the Show all files" button or the Cygnus editor.
- Local: check this filter to only display local files.
- Remote: check this filter to only display remote files. In particular used when you want to download them.
- Relative: check this filter to only display relative path files.
- Absolute: check this filter to only display absolute path files.
- Selected: check this filter to only display selected files.
Once a filter is applied, the numbers in the column headers adjust themselves to only count the filtered files.
Clear and Select buttons
These actions apply to filtered lines only.
- Clear: click this button to unselect filtered lines.
- Select/Unselect: click this button to swap the selection of mouse-highlighted filtered lines. If no line is mouse-highlighted, swaps the selection box of filtered lines.
Action field and buttons
- Replace subpath field:
- Applies to selected lines (selection check box).
- When lines are selected, this field displays the longest common path of selected lines.
- It can be edited and the new path string will replace the former one when the Replace button is pressed.
- Applies to selected lines (selection check box).
- Replace button: if the subpath string has been changed, replaces the old subpath with the new one.
- Relative button:
- Applies to all filtered lines, whether selected or not
- Swaps all relative paths to absolute paths and vice versa
- Applies to all filtered lines, whether selected or not
- Download button:
- Applies to selected lines (selection check box).
- Downloads all remote files in a folder of your choice and modified the path to be the corresponding local one.
- The local folder structure will be the one of the Internet web site.
- Undo button:
- Reverse any change made within this editor, up to the situation of the Gedcom file when the Media manager window was last open.
- To undo changes made before that, use the Undo button of the Ancestris main menu bar.
Usage
The main use cases of the Media manager tool are the following.
- To "reconnect" media files to your genealogy if you are migrating from another software or if you have moved files on your computer. This is the problem of 'unfound files" described below.
- To check if all your files are still well connected to your genealogy, in particular remote files.
- To make all files relative rather than absolute
- To download remote files, for instance when importing your genealogy from Geneanet or any genealogy web site, in order to make a local backup copy.
- To simply access and view all your media files
In case you have your main genealogy on a website like Geneanet and Ancestry.com, it is our topmost recommendation to make sure you have usable local copies of this genealogy, including media files, in distinct locations.
A 'usable' copy means a file in Gedcom format with separate media files properly attached to the Gedcom file events and sources.
Best practice
A general best practice is to place your media files in directories located under your Gedcom genealogy file.
Ancestris uses media files where they already exist. It does not move nor copy your media files. It simply references them by indicating the path where the media is located on the disk or on the internet.
Therefore, when you want to transfer your genealogy and the attached media, you must copy all the media files as well as the directory structure in which they are located.
To simplify the work, we recommend that you create a ‘media’ directory in the directory that contains your Gedcom genealogy file and place your media files there, creating any subdirectories you deem necessary. An example can be found on this page.
Then, associate these media files in Ancestris. Ancestris will automatically detect that the media path is relative to the Gedcom file and reference it relatively to the Gedcom file. When you want to change computers or transfer your data to a USB stick, all you have to do is to zip the whole thing (Gedcom file + media directory), move it to your other computer and unzip it. Since the paths to the media files are relative, when you open your genealogy in Ancestris, everything will be restored exactly as it was.
Problem of 'unfound files'
Where can the problem come from?
1. Have you renamed your media folder or your media file?
If your photo is in a /mygenealogy/photos/MyPicture.jpg file and your Individual entity references this photo in a FILE tag with value of /mygenealogy/photos/MyPicture.jpg, then the link is valid. Everything is fine.
Now, if you rename your photos directory or just the media file, it may generate a broken link. For instance, if your photo file becomes /mygenealogy/media/MyPicture.jpg with media instead of photos, Ancestris will not find it because it still thinks it is in the "photos" folder, not "medias".
This is enough to break the link. The Media Manager above will consequently display your photo as an unfound media.
2. Have you moved your Gedcom file?
Rather than renaming a media folder or a file, you may have just moved your Gedcom file.
Relative position between your Gedcom and your media
- If your media files are described in relative position with respect to your Gedcom file, the link is lost, because in this case you would have had to move your media files at the same time as your genealogy Gedcom file.
- We recommend that you only specify your media in relative position of your Gedcom file location as this allows you to move your files without renaming the links.
Absolute position between your Gedcom and your media
- If your media files are described in absolute position, the link to the media is not lost because it is not using the position of the Gedcom file.
- But the downside is that if you move your genealogy to a USB key, for example, your media will have remained on your hard drive and you will only be able to see your media if the USB key remains on your computer.
- If it is to show your genealogy to one of your relatives, you will have to move the media to the USB key. But suddenly the links will be broken because the Gedcom file will think that they are still on your computer. You will have to rename them by one in Gedcom or else you use this Media manager tool.
3. Have your files been deleted?
Another possible reason for a loss of link between your Gedcom file and your media files can also come from file deletions on the disk. It's more annoying because you have first to get hold of these files before continuing with the media manager or else removing the links in the Gedcom file.
The Media manager does not remove the links, it just renames them.
4. Case of remote files
In the case of remote files, 'unfound files' can just be the result of the web site being reorganised, or renamed or any other web site structural modifications.
Resolution of the 'unfound files' problem for local files
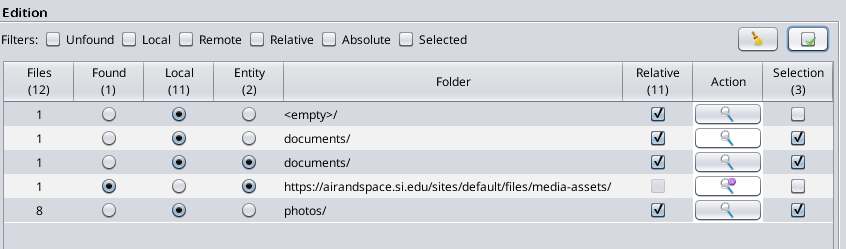
Let us consider the following example with the unfound line below where 1 file is missing in the documents folder.
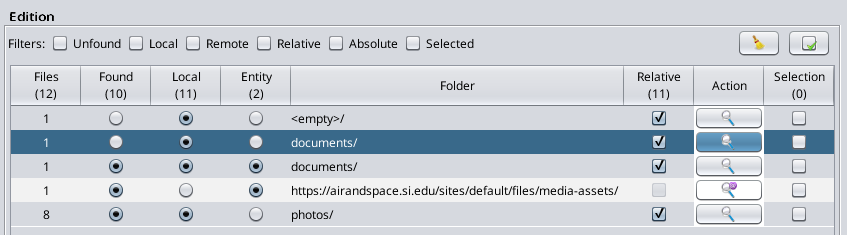
If you are confident that your media file is somewhere on your computer, click on the "Search" button in the Action column to locate the corresponding media file.
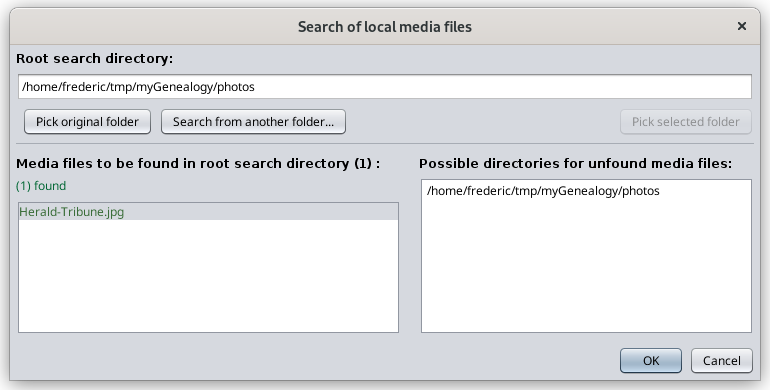
The following "Search of local media files" appears.
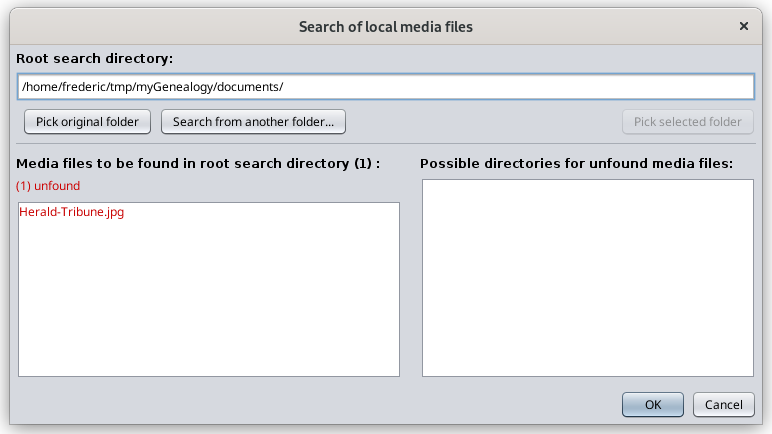
This window will help you find the lost file.
In the window above, Ancestris will search for the missing files in all directories underneath the root directory indicated at the top. You can change it using the "Search from another folder..." button, or 'Pick original folder" to go back to the original root directory where the Gedcom file is located.
The files to be found are listed in red in the left column. Otherwise, they will appear in green. In this example, the file to be found is "Herald_Tribune.jpg".
Please note unfound files can also be quickly located using the "Validate Gedcom compliance and Data consistency" tool if you have indicated in the Preference window that files not found are to be considered invalid. However it does not help you find them.
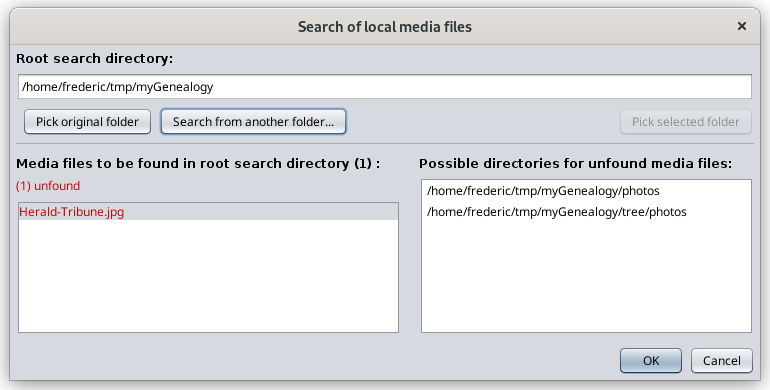
The directories where the files exist are listed in the right-hand-side column.
- If no directory appears on the right, it means the file does not exist in any of the folders underneath the root directory indicated on top. If you change the root folder and still no directory appear, it means the file is either deleted or its name has changed. You would have to use your file explorer on your PC to identify its new name or else recreate the media file.
- If one or more folder is listed on the right, select one of them. The Pick selected folder button should become available. Press it to set the found directory as the new root directory. You can also directly double click on the directory to be selected.
For instance, using the "Search from another folder..." button, I changed the root directory, to myGenealogy and two folders appear on the right-hand-side. It means the missing file - or at least a file with the same name as the missing file - sits within both folders.
If I would rather move the missing file from one of these folders to the one it was supposed to be in before (in this example the documents/ folder), I would use my computer file explorer to do that and reopen the main panel of the Media manager, or press the "Refresh" button to refresh the statistics.
Otherwise, if I want to leave the missing file in that folder, I have to "re-attach" it to the Gedcom file from where it is.
I select the first folder for instance. I get the following window where the "Pick selected folder" becomes enabled.

I press the "Pick selected folder" button and then, the root folder is updated to point to the "photos" folder and the file on the left becomes green again.
I click OK to go back to the Media manager window. The line now appears as found. This is the line with 9 found files in folder "photos/". I was showing 8 found files before. Now it is showing 9, and the line with the missing file is no longer there.

Done!
Downloading remote files
Let's look at a use case where you might want to download remote files.
For instance, you have been working days and nights for two years on your genealogy and have used a web site such as Geneanet, Ancestry.com or Genoom. You have now more than 5000 individuals and 500 media files referenced on Geneanet for instance. This actually happened to a friend of mine.
Of course, you can export your genealogy from Geneanet and open the corresponding Gedcom file from Ancestris. It will work. You will see your genealogy tree with all the pictures as well, even though the pictures are still on the Geneanet web site.
Three issues may arise:
- The first time you display each picture, the response time from Ancestris might be a bit long. This is because the picture is read from the Internet and cached in memory. With many pictures, and depending on the memory size of your computer and the quality of your Internet connection, it might be a bit annoying. Nothing serious though.
- A bit more serious is if you loose your connection temporarily. Ancestris will not see your picture which are only on a remote web site.
- Finally, an issue is much more serious. If the web site disappears - this happened to all Genoom users, you no longer have access to your pictures. You have to make a local copy.
In this situation, you will want to have a copy of your pictures on your computer or a USB drive. But you need all your Gedcom file links to be modified and link to the local files rather than the remote files. Of course!
Here is an example of what you would see and do.
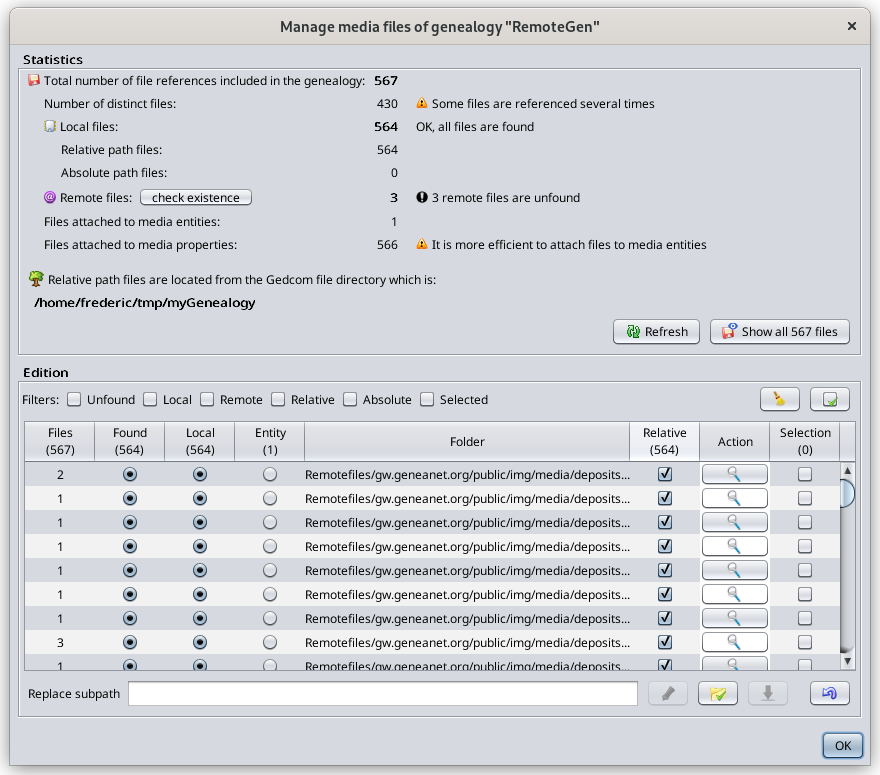
The following window shows the Media manager window right after importing the genealogy called RemoteGen from Geneanet and opening it. It contains 430 files linked 567 times throughout the genealogy.

As we can see, all files are in separate folders on the web site. We are now going to download them all.
By default, all remote files are assumed to be found.
First, we will check that remote files exist on the Internet to only download those that do exist. It would not differ much to just download them all right away, and just get the one that exist.
Ok, so we press the "check existence" button. The progress bar shows the checking process.

Once completed, we can see this on the statistics.

All but 3 files exist.
Select all files using the "Select/Unselect" button next to the filters. If you want, unselect the unfound ones to exclude them.
Then click the Download button. The following window lets you choose the destination folder.

Then click the Choose button. The download process starts.

Upon completion, the following result window appears.
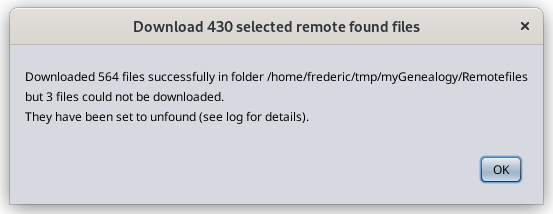
Here, it says that 564 files out of the 567 have been downloaded successfully. The 3 unfound files have been set to unfound in case there were not already.
Press OK and the Media manager window now shows 564 local files in their local folders, with the same folder structure as there is on Geneanet.
Done!
Editing the path of multiple folders
Now let's see how to edit multiple paths at the same time.
Let's consider the following situation where we would like to tell Ancestris that the three following folders have actually been moved to a "tree" folder which is in the same folder as the Gedcom file.

The folders are highlighted with the mouse. So now let's click the "Select/Unselect" button. It will check the 3 corresponding check boxes.
The Subpath field is empty. This is because there is no common path between the 3 folders. We will see below another example where it is not empty.
In the empty field, type "tree/".

Then press the "Replace" button with the pencil. Ancestris has added "tree/" in front of the previous path names.

You will notice the "undo" button becomes enabled if it was not already.

Press it to cancel the previous change. We are back to the initial situation.
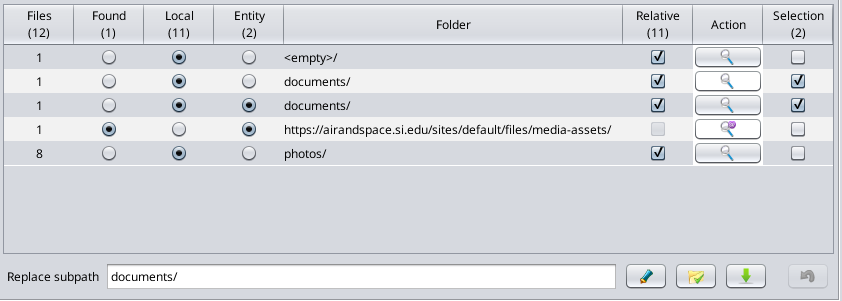
Let's now select both lines with the "documents" folders.
The subpath field now says "documents/" because this is the longest common string between both lines.
Add "Other/" after "documents/" in the text field.

Upon pressing the "Replace" button, the paths have changed accordingly.

Done!