Crea la teva genealogia
Veureu el senzill que és crear una genealogia des de zero amb Ancestris. Creeu un primer individu, els pares i la família propera, tenint així el vostre primer arbre genealògic amb una o dues generacions.
La creació d’una genealogia sol començar per dibuixar una primera persona i especificar informació com la data i lloc de naixement, per exemple. Després dibuixa altres persones, els pares, i vincula-les amb la primera persona. Després, els avis, etc. Bé, amb Ancestris, podeu fer exactament el mateix.
Creeu el primer individu
Durant la visita guiada, hem utilitzat la genealogia borbònica, fitxer Bourbon. Aquest és un exemple de genealogia subministrada amb Ancestris.
Tanquem-lo i en creem un de nou. Per tancar Borbon, només cal que feu clic a la creu vermella de la barra d’eines quan s’activi una de les finestres dels Borbons. I ara, creem la vostra pròpia genealogia.
Des de la pàgina de Benvinguda, feu clic al botó Crea una genealogia o feu clic  a la barra d'eines.
S'iniciarà l'assistent de creació. Seguiu els passos fins que obtingueu la vista de l'arbre dinàmic d'un arbre amb vosaltres mateixos al centre.
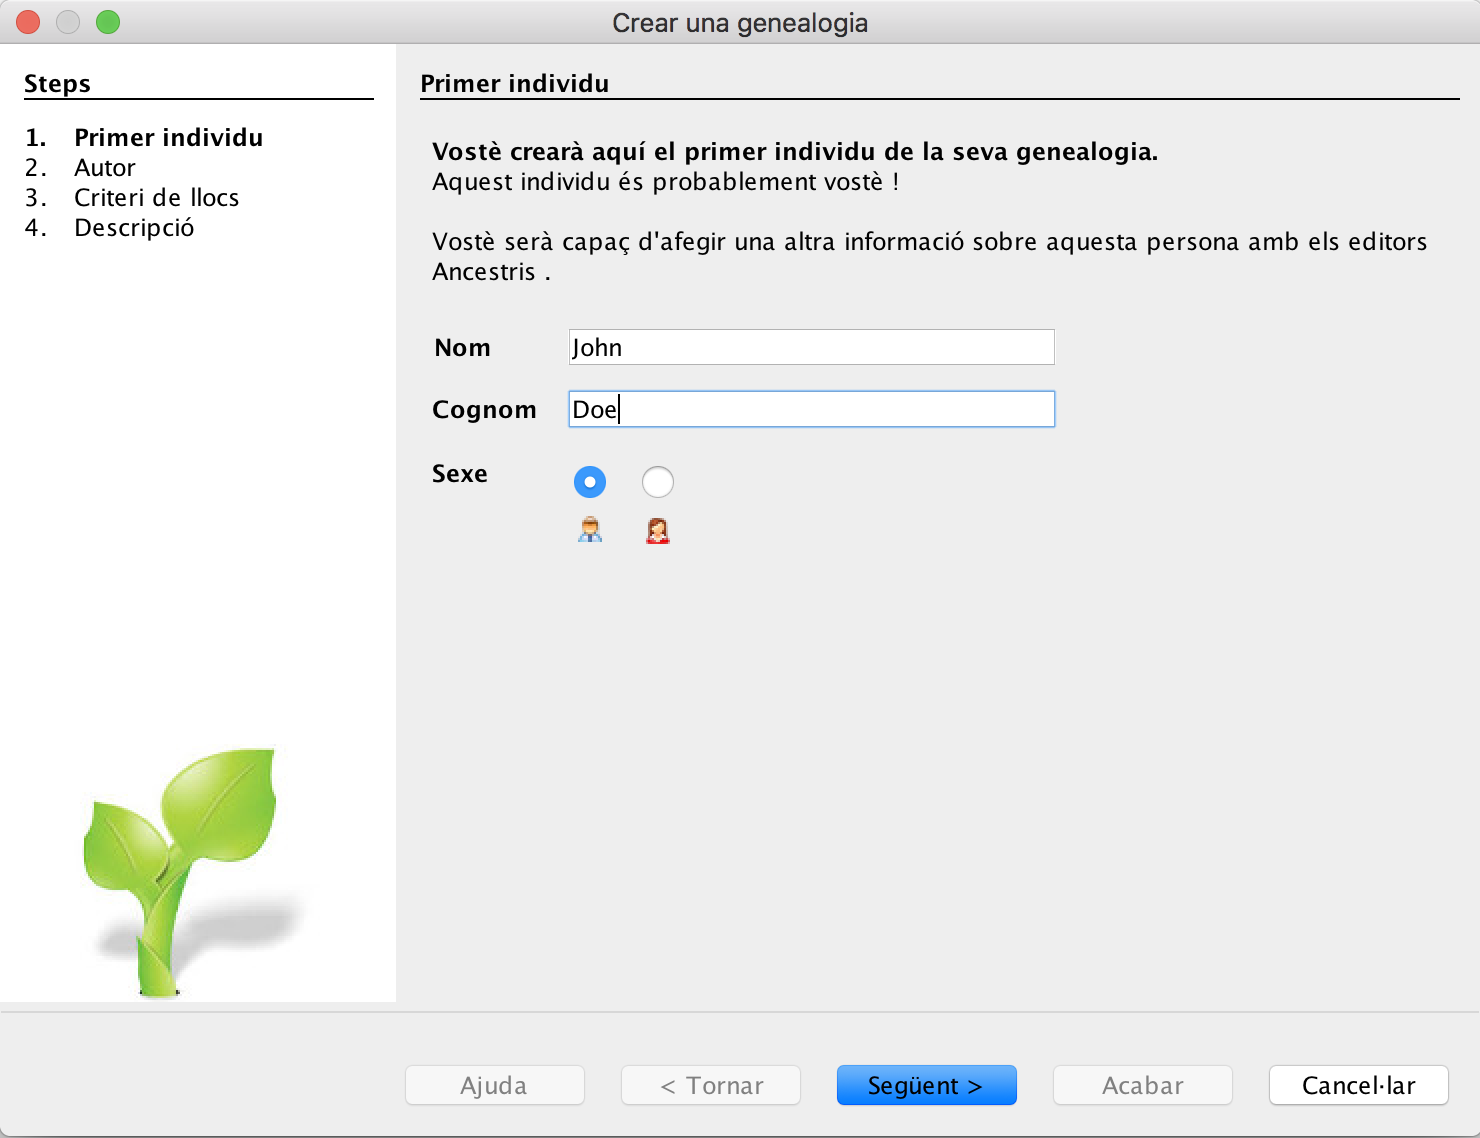
A la primera pantalla de l'assistent, introduïu el vostre nom i el vostre sexe i feu clic a Següent.
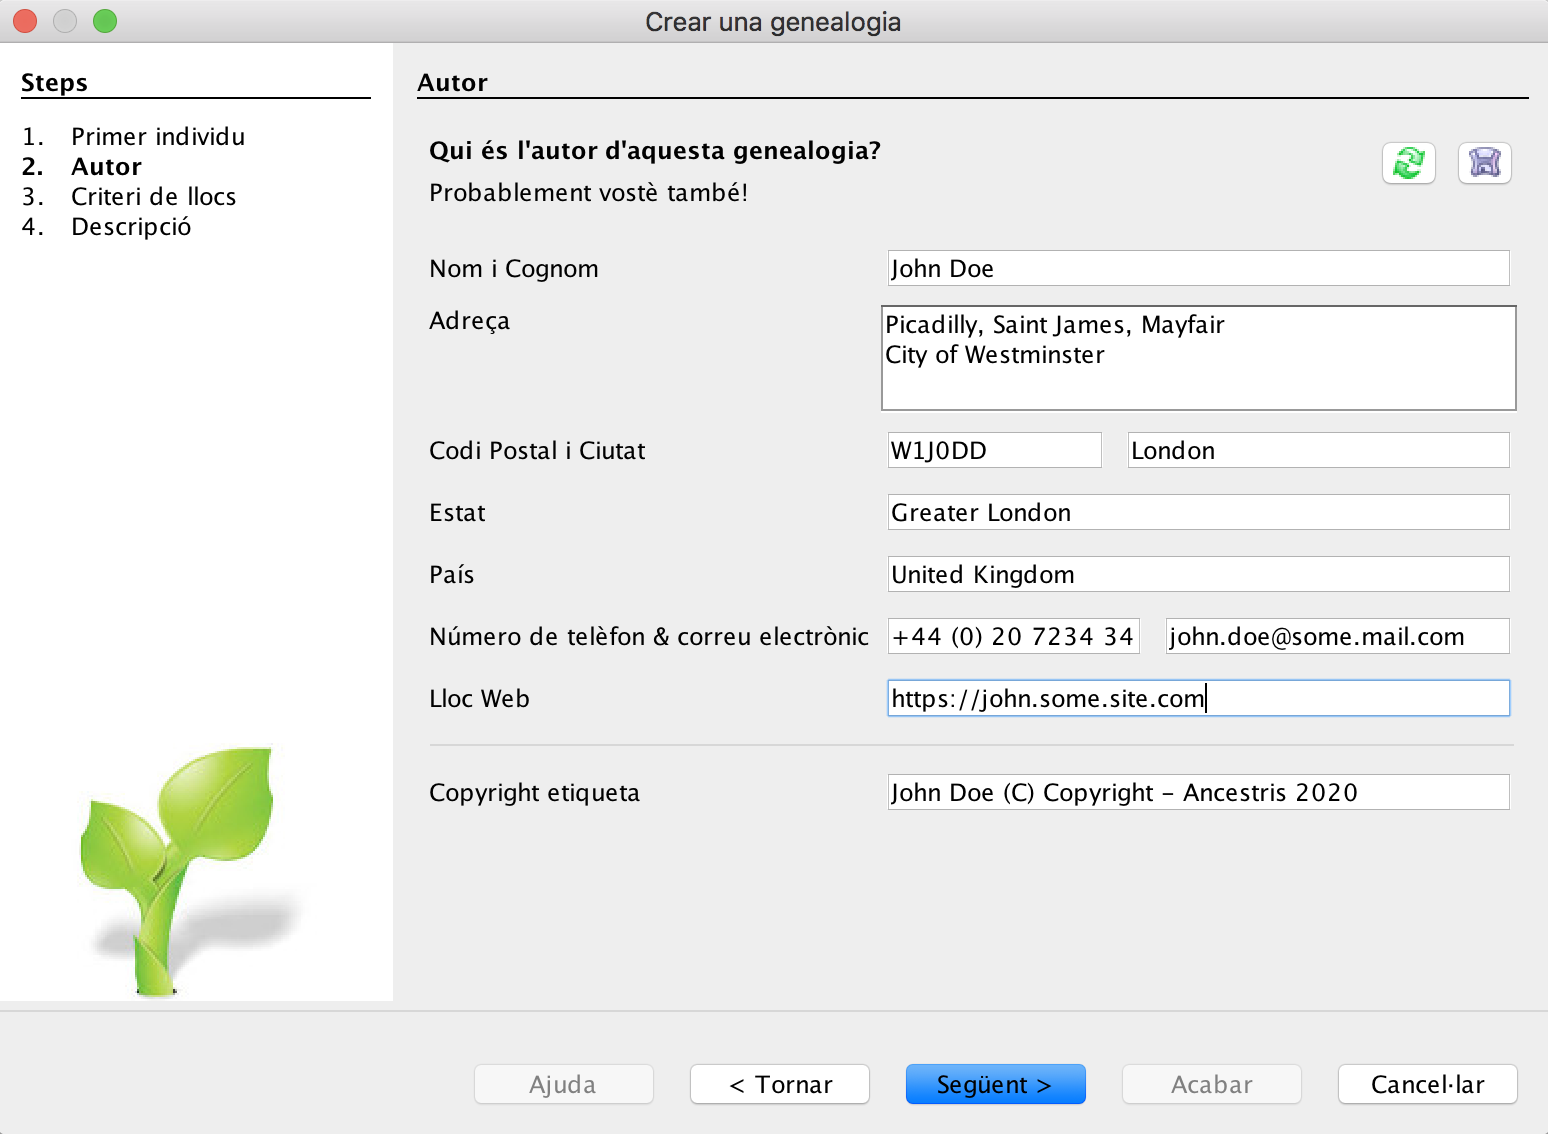
A continuació, introduïu la informació sobre l'autor d'aquesta nova genealogia, probablement vostè. Feu clic a Següent.
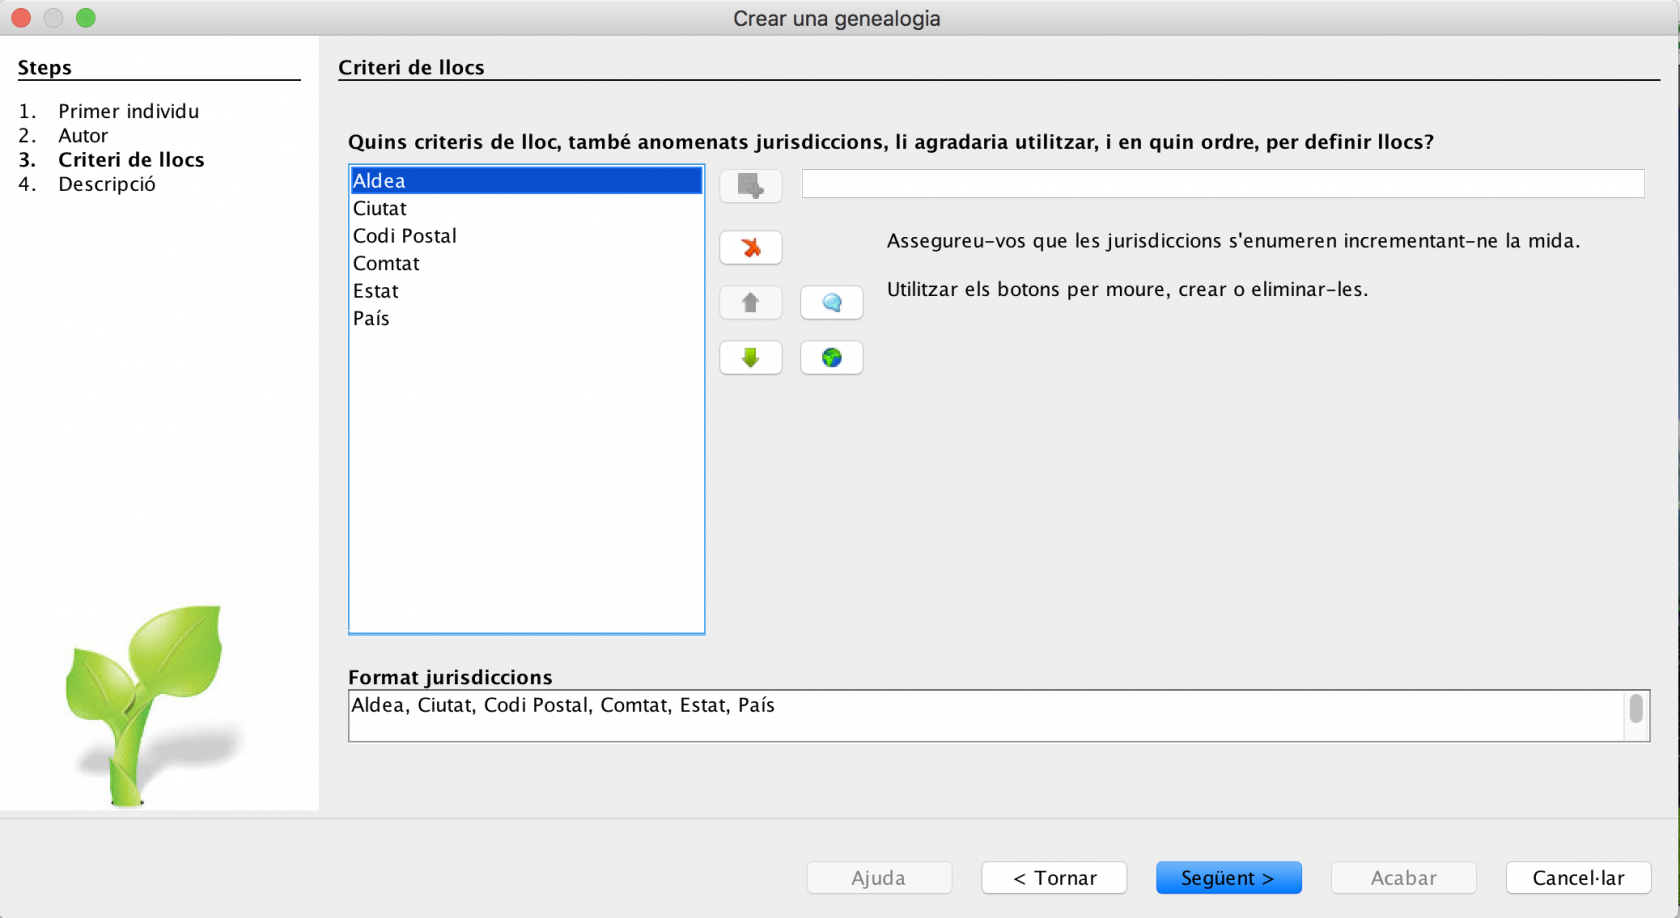
Definiu el format de llocs que cal utilitzar a tota la genealogia. A continuació es mostra el format estàndard. Si ara no sabeu què ha de ser, feu clic a Següent. Es pot canviar més endavant.
Altrament, utilitzeu els botons disponibles per afegir, canviar o suprimir criteris de lloc, també anomenats jurisdiccions. A continuació, feu clic a Següent.
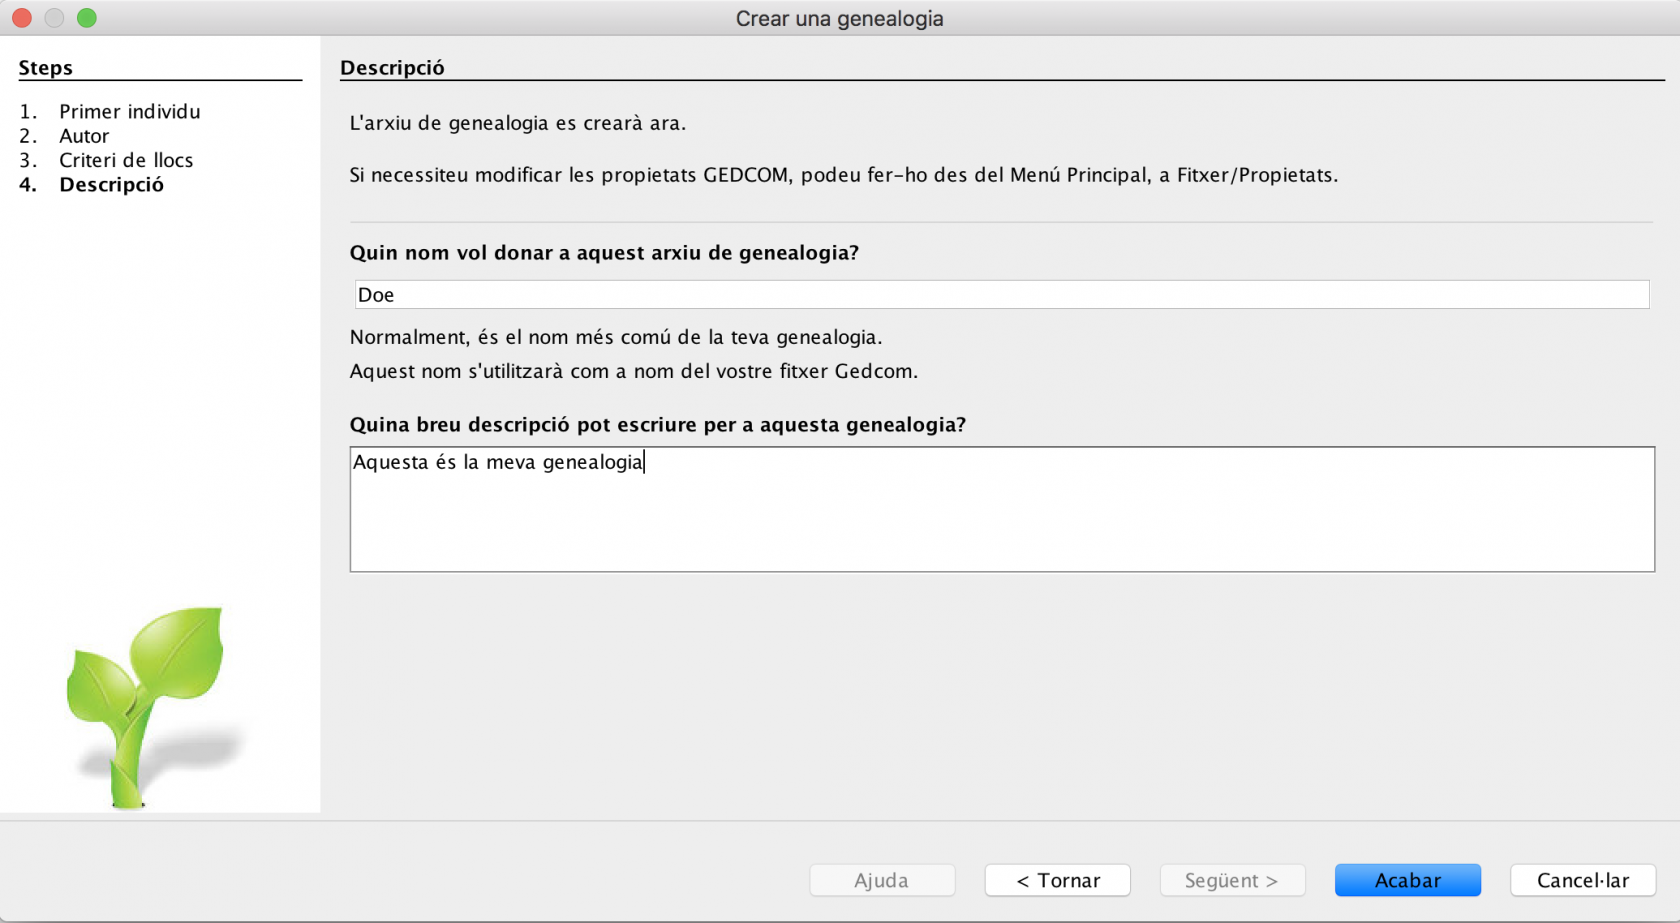
Introduïu una descripció de la vostra nova genealogia i feu clic a Acabar.
Ancestris us demanarà la ubicació i el nom del fitxer per desar la informació genealògica.
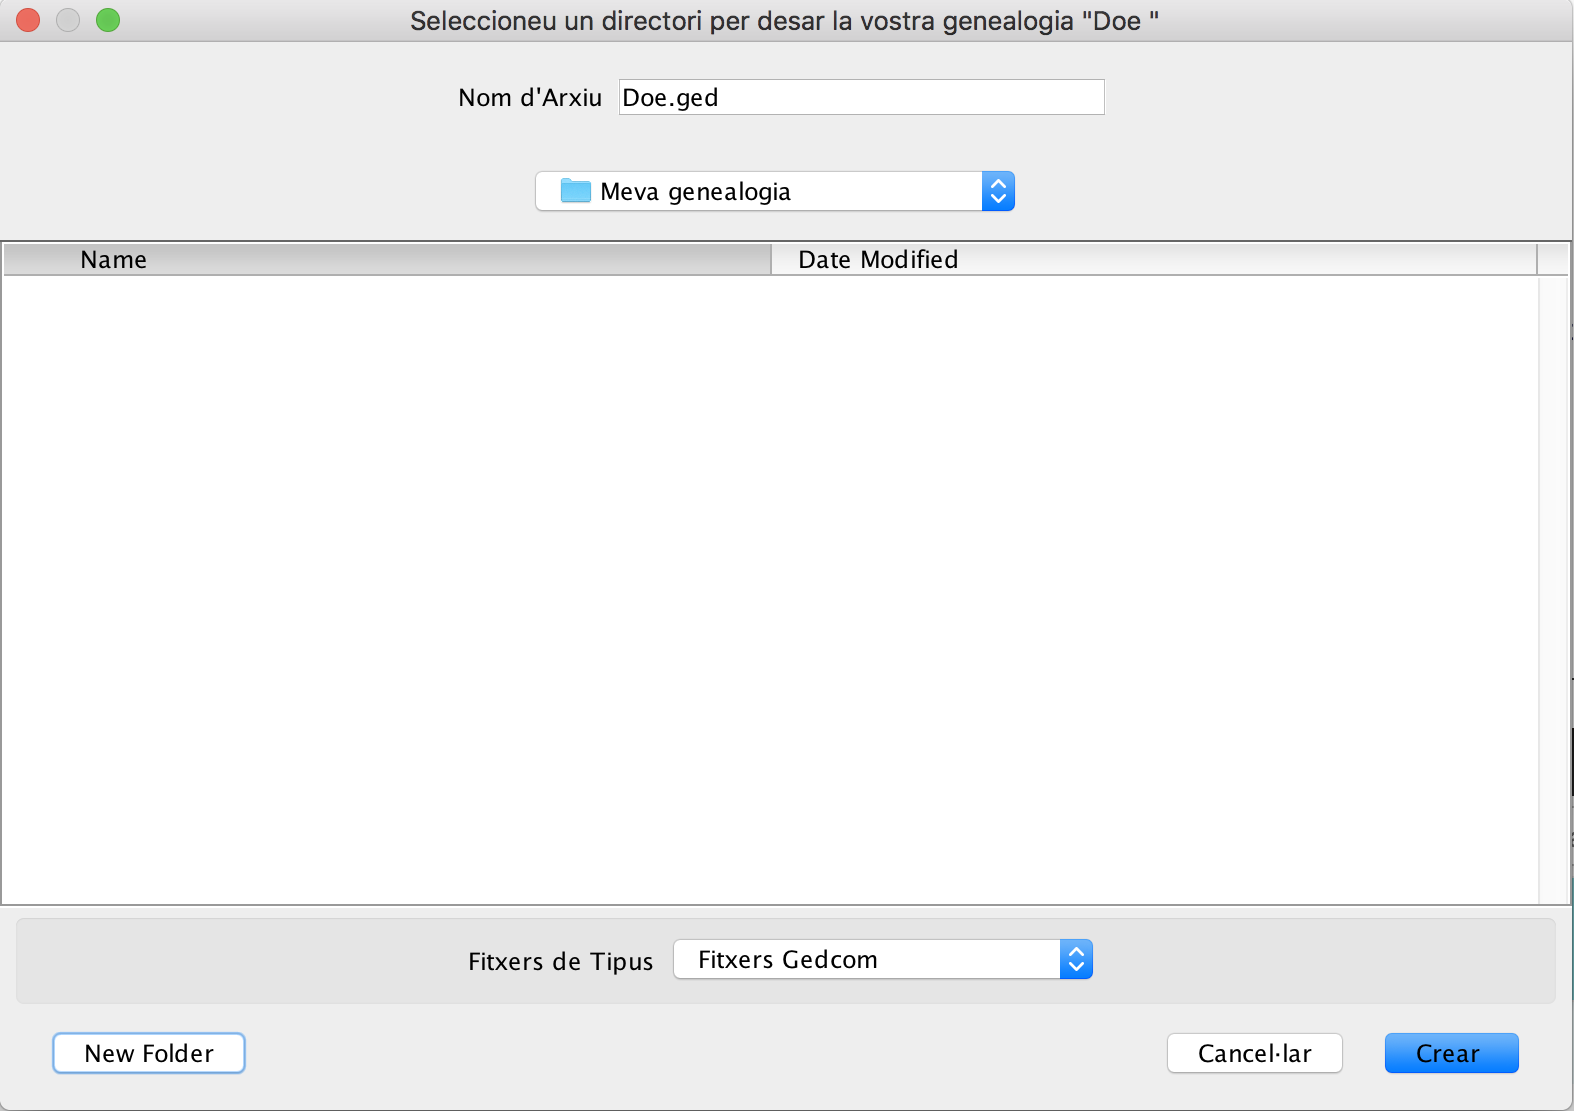
Com podeu veure, la informació es desa directament com a fitxer Gedcom. Els fitxers Gedcom tenen l'extensió ".ged".
Premeu Crea per desar. Això és tot.
Ancestris mostrarà ara un arbre de genealogia a la Vista d'arbre dinàmic. Aquest arbre està format només per una persona: vostè.
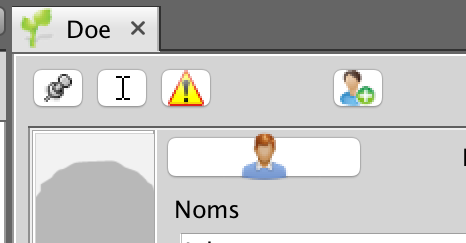
A la part dreta, també s’obre l'editor Cygnus. Mostra els detalls d'informació individual de la persona seleccionada actualment a l'arbre.

Amb l’editor Cygnus, ara podeu completar la informació que falta, per exemple la data i el lloc de naixement.
Afegiu una fotografia vostra fent clic a la zona respectiva.
Afegiu altres noms si cal.
Quan hàgiu acabat, per desar els canvis realitzats, feu clic al botó D'acord que apareixerà a l'extrem inferior dret, tan bon punt canvieu les dades a l'editor.
Adopteu les millors pràctiques
Si continueu afegint persones, ben aviat arribareu a centenars de registres: persones, famílies, etc.
Us recomanem que adopteu immediatament una forma coherent i harmonitzada per escriure la informació que s’utilitza amb freqüència, com ara:
- cognoms (1a lletra majúscula o no)
- descripcions d'ocupació
- testimonis (utilitzen l’oncle del marit més que l’oncle de Peter) per evitar repetir noms
- noms de lloc (ortografia antiga o ortografia nova?)
- etc.
A més, si teniu a mà el certificat de naixement, documenteu-lo ara com a font i el més exhaustivament possible. Ancestris és molt bo per mantenir tota la informació detallada.
Crea els teus pares
La creació d'un pare es pot fer des de la visualització de l'arbre dinàmic o des de l'editor Cygnus.
A l'arbre, feu clic amb el botó dret del ratolí sobre la persona desitjada.
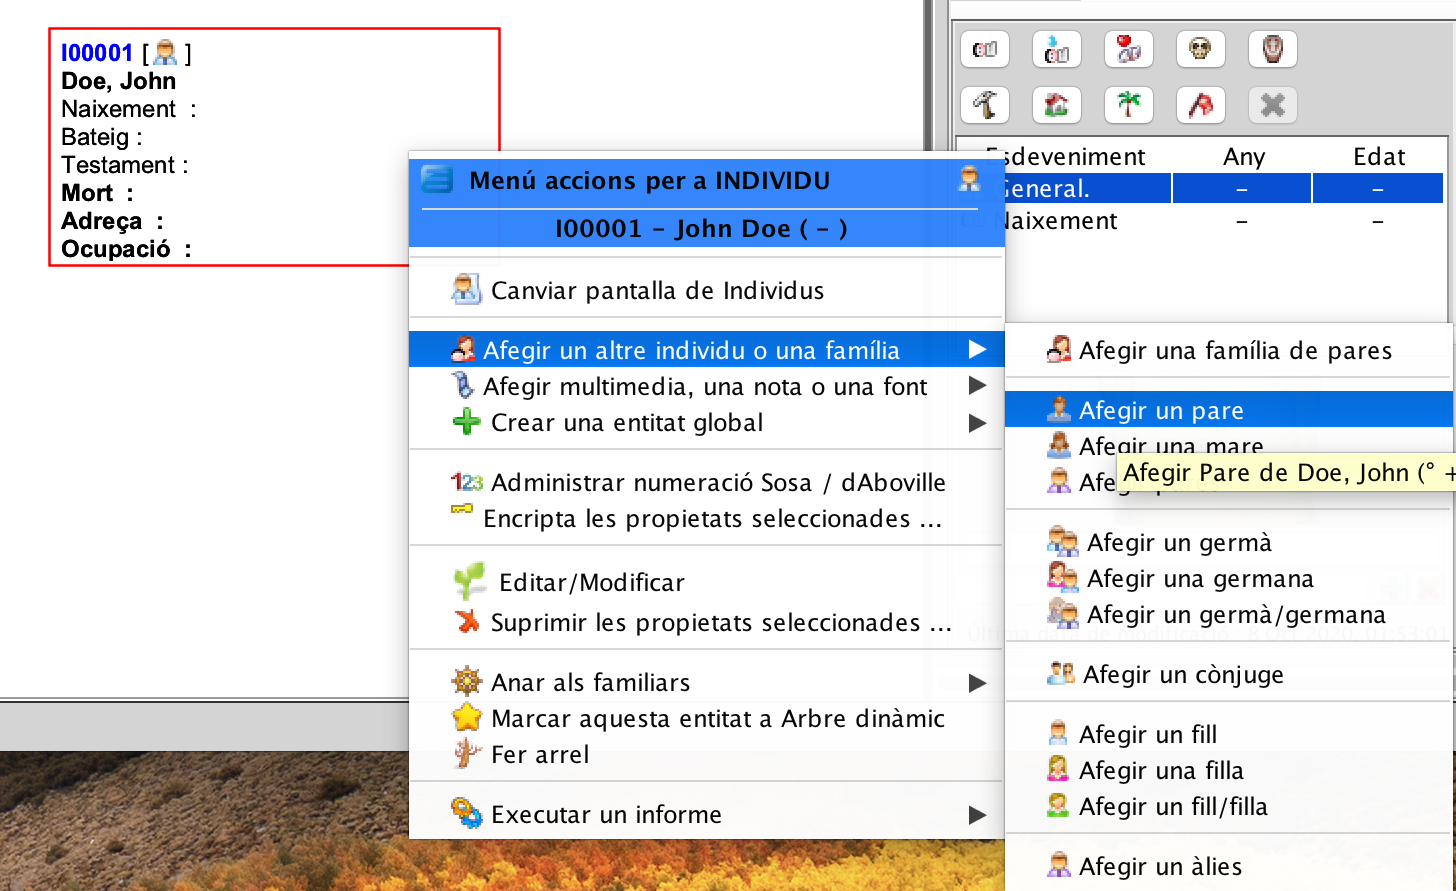
Des de Cygnus, fem servir els botons per als pares nous. Aquest és un mètode més ràpid. El botó "Pare" es troba a la part superior esquerra de l'editor de Cygnus.
In either case, you get two more boxes on the tree, above your own: your parents. Your father is created, but only a placeholder is visible for your mother. The entity corresponding to her is not yet created.
Ancestris default settings create only one parent at a time. It could be interesting to try and create both. To do so, go to preferences, using the main menu Options / Preferences / Editing, or click on  at the top right of the main window.
In the preferences, select the Editing panel, and check the option Automatically create both spouses when adding a parent.
On the father's box, the family name is automatically derived from the individual from which the father was created.
On the Cygnus editor, enter your father's information (name, date and place of birth, etc.). Click the OK button once done, to save the data.
To create the mother, whether right click on the individual and choose Add a spouse or click the corresponding button on the Cygnus editor, or right click your own box and choose Add a mother.
Create your close relatives
Next you can create your brothers and sisters, your wife and children, etc. in the same manner.
If you make a mistake, it is always possible to correct the information directly or simply undo the creation of the new individual by clicking on Undo button on the toolbar and start over.
Once you have created all the individuals of your close family, just click on your box to return to yourself.
Add information about your family
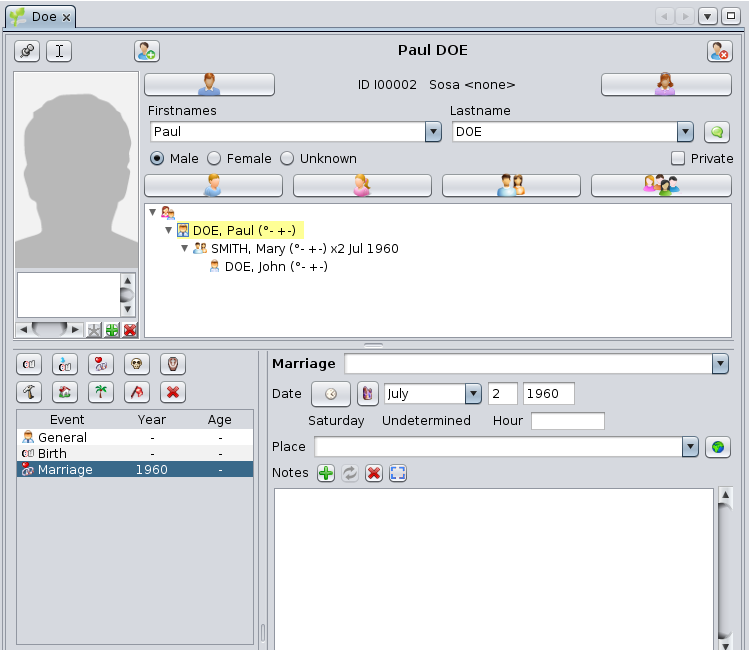
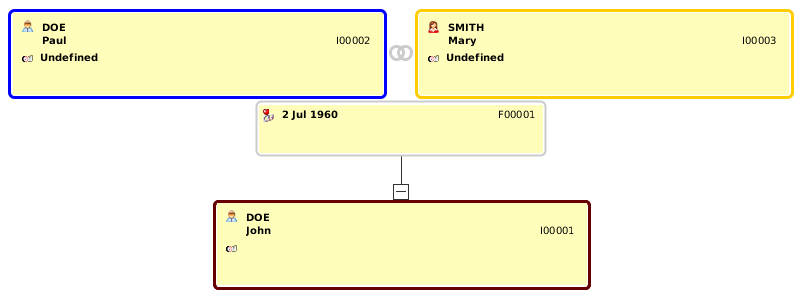
Let's suppose you want to enter your parents wedding date.
Click on the family box, the one between yours and your parents's. It is box number F00001 on the Dynamic tree view below.
In Cygnus, you will see your father's information, and Cygnus will select the nuclear family he constitutes with your mother.
From there, click on the "Marriage" button on the Cygnus editor. The marriage event is created. Indicate the type of marriage (for example : Religious), enter the date and place, if known.
Click OK and that's it. Here is the result:
This is the current tree:
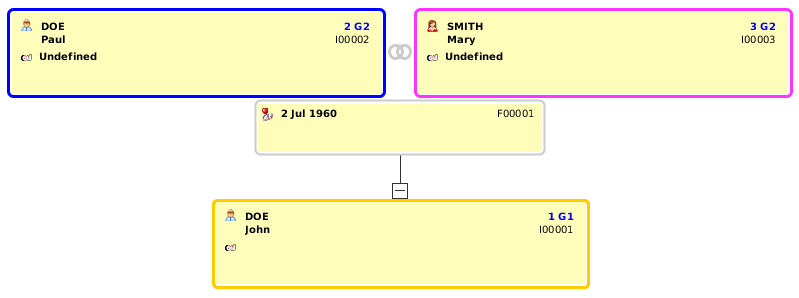
Let's now generate the Sosa numbering for this 3 people family.
Right click on the box representing yourself and choose "Manage Sosa / d'Aboville numbering". A window will open. Just click OK and the Sosa numbering will be created like the following: number 1 for yourself, 2 for your father and 3 for your mother. G1 and G2 codes are the generation numbers.
You should now have something similar to the view below, where the Sosa numbering is visible on every box at the top right corner, above the identification numbers.
This first tree is now finished. Save it on disk by clicking  on the toolbar.
You can now close your genealogy file by clicking the red cross on the toolbar.
If you hadn't saved your data before, a window would have poped-up, asking you to save the file.
We will then see the Welcome page again, since it is now the only one opened.
From there, your genealogy will show on the "My Ancestris" tab of the Welcome panel, and at the top left on the section "Last opened genealogies".
From then on, you will probably adopt the habit of opening your genealogy from the Welcome panel.
You are now ready to take advantage of all the other features of Ancestris. The other chapters of this book will help you do so.
We wish you all the best.