Blueprints
A blueprint is description usedSzablon to customizeopis thesłużący displaydo ofdostosowania anwyświetlania entityelementu inw certainwybranych viewswidokach ofprogramu Ancestris.
ViewsWidoki usingużywające blueprintsszablonów
OnlyTylko thenastępujące followingwidoki viewskorzystają usez blueprints.szablonów. ForDla eachkażdego ofz them,nich anpokazany examplejest showsprzykład, whatjak themogą blueprintswyglądać could look like.szablony.
DynamicDrzewo treedynamiczne
TheDrzewo Dynamic Treedynamiczne usesużywa blueprintsszablonów fordla individualsosób andi families.rodzin. BlueprintsSzablony areto theobszary areaswyświetlane displayedwewnątrz insidekolorowych the coloured frames.ramek.

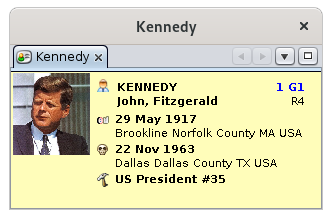
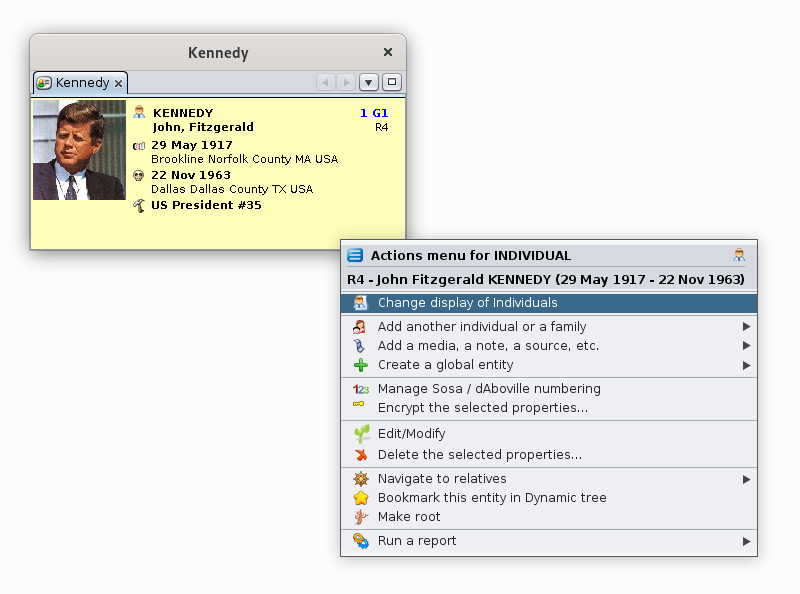
EntityKarta cardelementu
TheKarta Entity Cardelementu usesużywa blueprintsszablonów fordla allwszystkich categorieskategorii of entities.elementów.
BlueprintsSzablony canmogą bebyć reusedponownie forużywane severalw views.kilku Here,widokach. theTutaj blueprintszablon usedużyty fordla individualsosób inw thedrzewie dynamicdynamicznym treejest isużywany usedw insidekarcie the Entity card.elementu.
ExtendedRozszerzony navigator
BelowPoniżej areszablony blueprintsużywane useddla forosób thez individualswybranej ofpary. theMożesz selectedzauważyć, couple.że Younie maysą notice that they are not thetakie same. TheSzablon spousedla blueprintmałżonka doesnie notpokazuje displaynumeru theSosa, Sosaa numberwyświetla andnumer displayselementu thenad entity number above the name.nazwiskiem.
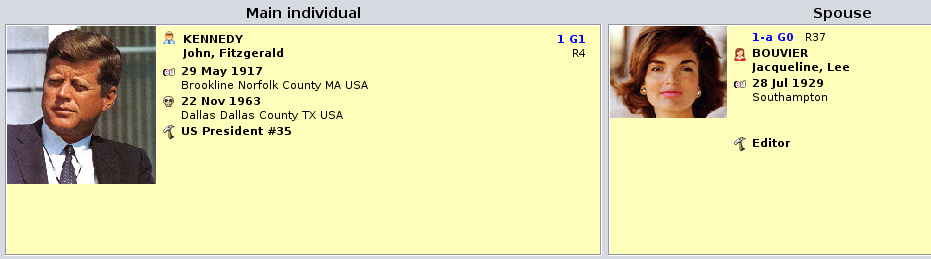
AndA thisto isjest aszablon blueprintdla forkażdego eachdziecka childz ofwybranej the selected family.rodziny.

GedcomEdytor editorgedcom
TheEdytor Gedcom Editor usesużywa blueprintsszablonów inw itsswojej lowerdolnej partczęści fordla allwszystkich entitykategorii categories.elementów.
AsPodobnie forjak thew entitykarcie card,elementu, theEdytor Gedcom Editorużywa usesszablonów blueprintsdla forosób individualslub orrodzin, families,ale buttakże alsodla forinnych other entities.elementów.
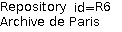
ForNa exampleprzykład heretutaj isprosty aszablon simpleelementu blueprint of a Repository entity.Repozytorium.
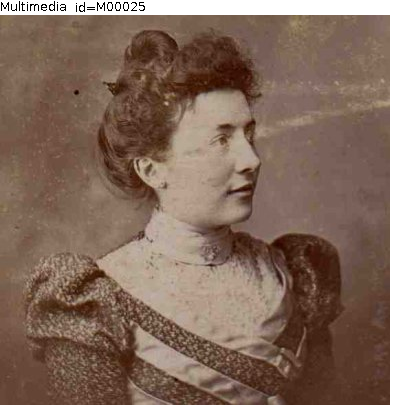
OrLub aprosty simpleszablon blueprintelementu of a Multimedia entity.Multimedia.
NowTeraz, thatgdy youjuż havewidzisz, seenjak whatwyglądają blueprintsszablony looki likegdzie andsą whereużywane, theyzobaczmy arejak used, let us see how they work.działają.
GeneralZasady principlesogólne
A blueprint is a template defining whatSzablon to displaywzorzec ofdefiniujący anco entity,i andjak howwyświetlać todla displaydanego it.elementu.
ASzablon blueprintjest isprzypisany assigneddo todanej akategorii given entity categoryelementów (individual,osoba, family,rodzina, source,źródło etc.itd.) fordla adanego given viewwidoku (Dynamicdrzewo tree,dynamiczne, Entitykarta file,elementu etc.itd.).
YouMożesz candefiniować definewłasne yourszablony ownzamiast blueprintsużywać rathertych, thanktóre usingsą thejuż onesdostępne already provided withinw Ancestris.
Several blueprints exist withinW Ancestris andistnieje arekilka alreadyszablonów selectedi bysą defaultone fordomyślnie eachwybrane ofdla thekażdej entitykategorii categories,elementów andi inw eachkażdym viewwidoku, wheregdzie blueprintsszablony apply.mają zastosowanie.
Blueprints constitute a waySzablony to customizesposób na dostosowanie Ancestris. YouMożesz arezachować freeszablony totakimi, keepjakie blueprintssą aslub theyzmodyfikować areje orwedług modifyswoich them to your needs.potrzeb.
YouMożesz canzdefiniować definewłasne yourszablony, ownczyli blueprints,zarówno i.e.informacje bothdo thewyświetlenia informationdla toosoby displaylub for an individual or a familyrodziny (name,imię, address,adres etc.itd.) andjak howi tosposób displaywyświetlania thistych informationinformacji (colour,kolor, font,czcionka, alignment,wyrównanie, layout,układ etc.itd.).
IfJeśli youchcesz wantwprowadzić zmiany w dostępnych szablonach, musisz dowiedzieć się o nich trochę więcej. To jest temat kolejnych sekcji na tej stronie.
Technicznie, szablon to makefragment some changes to the available blueprints, you will need to learn a little more about them. This is the subject of the following sections in this page.
Technically, a blueprint is a piece ofkodu HTML codezapisany writtenw intopliku ana fileTwoim locateddysku. onZobacz your disk. Refer to the paragraphakapit DirectoryKatalog containingzawierający blueprintspliki filesszablonów fordla morewięcej information.informacji.
ManagingZarządzanie blueprintsszablonami
ManagingZarządzanie blueprintsszablonami consistspolega inna performingwykonywaniu twodwóch typesrodzajów of activities.czynności.
assignprzypisywanieblueprintsszablonówtodoentitiesjednostekandiviewswidokówbuildtworzenieyourwłasnychown blueprintsszablonóworlubdeleteichthemusuwanie
ThisOdbywa issię doneto usingza thepomocą Blueprintokna windowSzablonów.
TheOkno BlueprintSzablonów windowzarządza managesszablonami thedla blueprintsjednej forkategorii onejednostek categoryna of entity at a time.raz.
TheOkno windowjest istakie thesamo samebez regardlesswzględu ofna thekategorię categoryjednostki, ofale entity,zawiera buttylko itszablony onlyprzypisane containsdo blueprintsdanej attachedkategorii to the given category of entity.jednostek.
ToAby accessuzyskać thedostęp Blueprintdo windowokna forSzablonów adla givendanej entitykategorii category,jednostek, younależy mustużyć usemenu thekontekstowego Ancestris contextna menujednostce fromz anodpowiadającej entity of the corresponding entity.kategorii.
Right-clickKliknijonprawymanprzyciskiemindividualmyszyinnatheosobieEntitywcardwidokuview,kartythenjednostki,selectnastępnie"Changewybierzdisplay„Zmieńofwyświetlanieindividuals"osób”, aby otworzyć okno Szablonów dla osób.- Podobnie kliknij prawym przyciskiem myszy na rodzinie w widoku karty jednostki, a następnie wybierz „Zmień wyświetlanie rodzin”, aby otworzyć okno Szablonów dla rodzin.
- Tak samo dla Notatek, Źródeł, Multimediów, Repozytoriów itd. Można to
openzrobićthezBlueprintkartywindowjednostkiforlubindividual. Right-click on a family in the Entity card view, then select "Change display of families" to open the Blueprint window for families.Ditto for Notes, Sources, Multimedia, Repositories, etc. This can be done from the Entity card or theedytora GedcomEditordlaforodpowiednichthe corresponding entities.jednostek.
HereOto isjak howuzyskać todostęp accessdo theokna BlueprintSzablonów windowdla forosób, individuals,z fromkarty the Entity card, Contextualjednostki, menu bykontekstowego right-clicking,po thenkliknięciu chooseprawym "Changeprzyciskiem, displaynastępnie ofwybierz individuals"„Zmień wyświetlanie osób”.
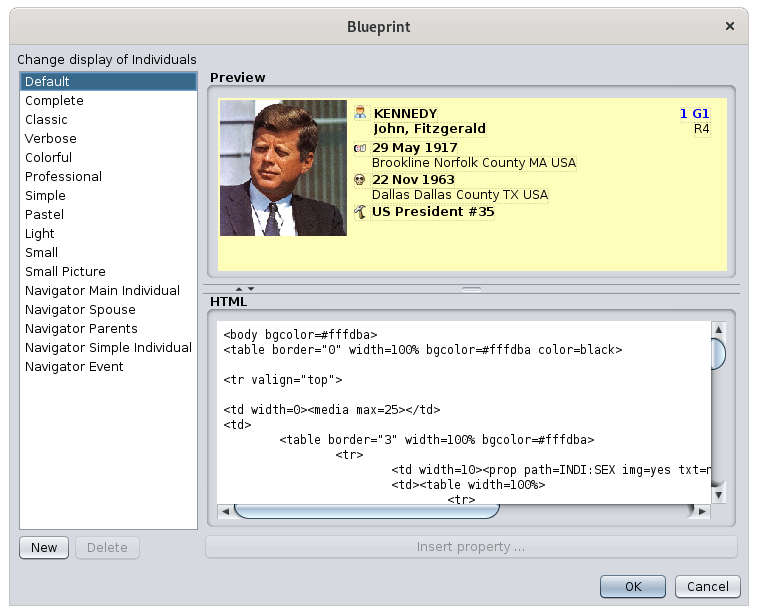
ThePojawia Blueprintsię windowokno forSzablonów Individualsdla appears.osób.
WhateverNiezależnie theod categorykategorii ofjednostki, entity,operacje thew operationstym inoknie thissą window are thetakie same. WeW willdalszym useopisie theposłużymy examplesię ofprzykładem theokna BlueprintSzablonów windowdla for individuals in the description that follows.osób.
Description Opis
TheOkno BlueprintSzablonów windowzawiera containsnastępujące the following areas.obszary.
TheListalistszablonówofpoblueprintslewejonpokazujetheaktualnieleftdostępneshowsszablonythedlablueprintswcześniejcurrentlywybranejavailablekategoriiforjednostek.theAbypreviouslypracowaćselectednaentityszablonie,category.wybierzTogoworkzon a blueprint, select it from the list.listy.
TheObszarpreviewpodgląduareauatgórythepotopprawejrightpokazujeshowspodglądawybranegopreviewnaofliściethe blueprint selected in the list.szablonu.
TheEdytor HTMLeditornaatdolethepobottomprawejrightwyświetladisplays thekod HTMLcodewybranegoofnatheliścieblueprintszablonuselectediinumożliwiathejegolistedycję.onPoziomąthelinięleft,oddzielającąandobszarwherepodgląduyouodcanedytoraedittrzebatheprzeciągnąćcode.wThegóręhorizontalmyszą,separatorabybarzobaczyćunderkodthe preview area must be dragged up with the mouse to see the code below.poniżej.
MeaningZnaczenieof the buttons:przycisków:
TheRozmiar Blueprintokna windowSzablonów sizemożna canzmieniać beprzeciągając changeddolny byprawy pulling the lower right corner.róg.
TheObszar previewpodglądu areai andobszar theedytora Texttekstu Editormożna areadostosować can be adjusted by moving theprzesuwając separator oftych thesedwóch twoobszarów areasmyszą withlub theklikając mousena orstrzałki byseparatora clickingpo on the arrows of the separator on the left:lewej:

UsageUżytkowanie
TheOkno BlueprintSzablonów windowspełnia coversnastępujące the following needs:potrzeby:
DiscoverOdkrywaniethedostępnychavailable blueprintsszablonów.ToAbydiscoverzobaczyćthedostępneavailableszablonyblueprintsbezwithoutichactivating themaktywowania (therefore,czyliwithoutbezclosingzamykaniathe panel)panelu),clickklikajsuccessivelykolejnoonnaeachkażdymofzthemnichinnatheliścieleft-handposidelewejlist,iandobserwujcheckefektthewresultobszarzein the preview area.podglądu.ChooseWybór innego szablonu. Aby przypisać inny szablon do aktualnie wybranej kategorii jednostek w jednym z widoków, kliknij wybrany szablon na liście, adifferentnastępnieblueprint.zatwierdźToprzyciskiemassign another blueprint to the currently selected entity category in one of the views, click a blueprint in the list, then validate by pressing the OK button.OK.ModifyModyfikacjaa blueprintszablonu.ForZesecuritywzględówreasons,bezpieczeństwathedostępnychblueprintsszablonówalreadynieavailablemożnacannotmodyfikowaćbebezpośrednio.modified.AbyTozmodyfikowaćmodifyistniejącyanszablon,existingnajpierwblueprint,należyyougomustskopiować.firstWybierzmakegoanacopyliście,ofkliknijit.NowySelectiitnadajinnowąthenazwę.list,NastępnieclickużyjNewpaneluandedytoragiveHTML,itbyawprowadzićnew name. Then use the HTML editor panel to make your changes.zmiany.-
CreateTworzeniea blueprintszablonu.ToAbycreateutworzyćanowynewszablon,blueprint,zalecaitsięisskopiowanierecommendedistniejącego.toPatrzcopy an existing one. See above.wyżej. -
DeleteUsuwaniea blueprintszablonu.ToAbydeleteusunąćaszablon,blueprint,wybierzselectgoitnainliścietheilistkliknijandUsuń.clickNastępniethepotwierdźDeleteusunięcie,button.któreYoubędzieareostateczne.thenUwaga:askedzetowzględówconfirmbezpieczeństwatheszablonydeletiondostarczanewhich will be final. Note: for security reasons, blueprints provided withz Ancestriscannotniebemogądeleted.być usuwane.
CaseStudium studyprzypadku
SupposeZałóżmy, weże havemamy aprosty simpleszablon blueprintbez withoutzdjęcia adla photoosób forw thedrzewie individualsdynamicznym ini thechcemy dynamicwstawić tree,zdjęcie. and we want to insert a photo. The steps toKroki do thiswykonania wouldsą be the following:następujące:
IdentifyZnajdź,wheregdzietheznajdujephotosiędatadaneitem iszdjęcieinsidewewnątrzthedanychdataosoby.ofUżyjthedoindividual.tegoUseedytorathe Gedcom editor for that.Gedcom.OpenOtwórztheoknoBlueprintSzablonówwindowdlafor individualsosóbCreateUtwórzanowynew blueprintszablonbykopiująccopying„prosty'simpleszablon”blueprint'bezwithoutobrazka.image.ZmieńRenamenazwęitna 'MyBlueprint-Indi-Tree'ModifyZmodyfikujthe blueprintszablon,toabyinsertwstawićthewłaściwośćphotozdjęciapropertyznalezionąidentifiedpowyżejabove,ianddostosujadjustrozmiaritswsizeramceinużywającthe frame using the previewpodgląduSaveZapisztheszablonblueprintiandsprawdźcheck the resultefekt
EachKażdy ofz thesetych stepskroków isjest detailedszczegółowo below.opisany poniżej.
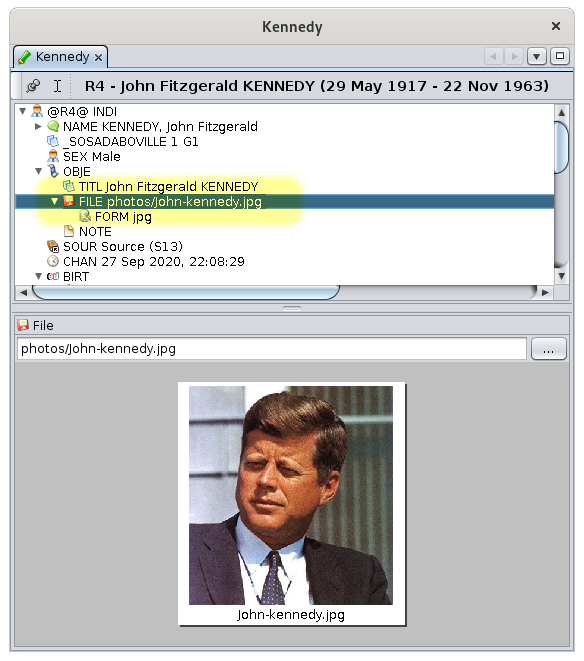
IdentifyZidentyfikuj, wheregdzie theznajduje photosię dataelement itemdanych iszdjęcia
TheEdytor Gedcom editor willpokaże showCi, yougdzie whereznajdują thesię photoelementy itemszdjęć aredla locatedwszystkich forosób. allWidzimy individuals.poniżej, Weże seezdjęcie belowznajduje thatsię thew phototagu isFILE, locateddołączonym indo thetagu FILEOBJE, tag,który attachedsam tojest thedołączony OBJEdo tag,tagu whichINDI. itselfPodsumowując, ismusisz attachedzapamiętać, toże thepliki INDIzdjęć tag.znajdują Allsię together,pod you will need to remember that photo files are at the addressadresem 'INDI:OBJE:FILE'. ThatTo iswłaśnie whatchcieliśmy we wanted to know.wiedzieć.
OpenOtwórz theokno Blueprintszablonów windowdla for individualsosób
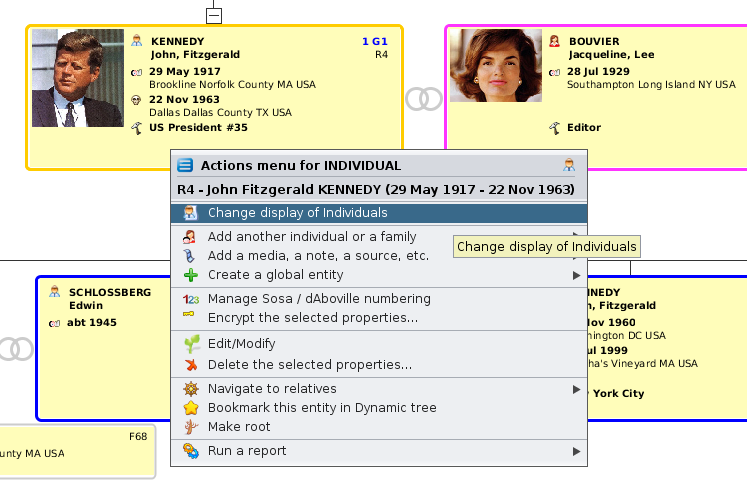
AsPonieważ wechcemy wantzmienić toszablon changedla theosób blueprintw forWidoku Individualsdynamicznym, innajpierw themusimy Dynamicwybrać view,osobę wew needWidoku to first select an individual in the Dynamic view.dynamicznym.
ThenNastępnie weklikamy right-clickprawym onprzyciskiem themyszy individual.na Inwybraną theosobę. W pojawiającym się contextmenu menukontekstowym that appears, we choosewybieramy "ChangeZmień displaywyświetlanie of individualsosób".
CreateUtwórz anowy new blueprintszablon
ThePojawia Blueprintsię windowokno forszablonów Individualsdla appears.osób.
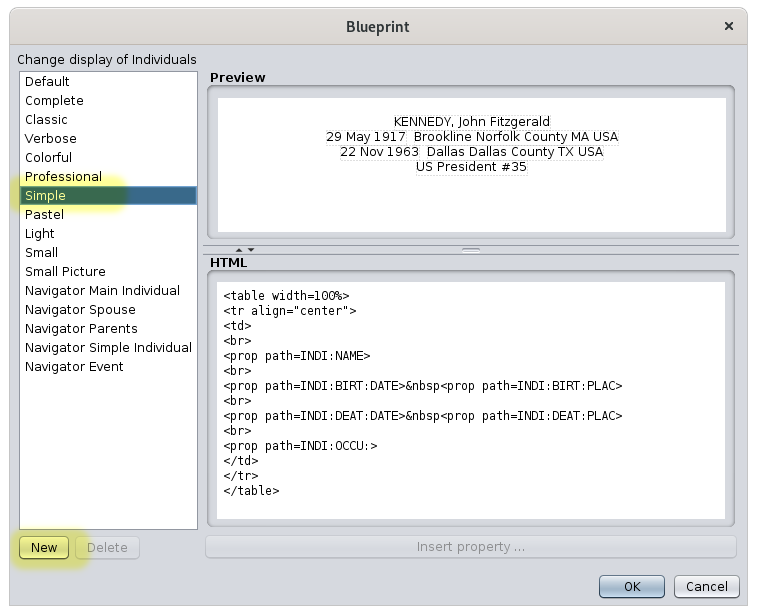
AsPonieważ wechcemy wantstworzyć nowy szablon jako rozszerzenie szablonu "Prosty", najpierw kopiujemy szablon "Prosty".
Aby to makezrobić, awybieramy newgo blueprintz aslisty. anNastępnie extensionw ofpodglądzie thewidzimy, "Simple"co blueprint,ten weszablon firstwyświetla makedla aosoby: copyprosty oftekst thebez "Simple"zdjęcia. Blueprint.Chcemy dodać zdjęcie osoby.
To do so, we select it in the list. Then in the preview, we see what this Blueprint displays for an individual : simple text without a photo. What we want to do is to add the photo of the individual.
We then clickKlikamy "NewNowy". Ancestris asksprosi theo namenazwę ofnowego the new blueprint:szablonu:

We typeWpisujemy 'MyBlueprint-Indi-Tree' andi pressklikamy OK.
WeWracamy aredo thenpoprzedniego onokna theszablonów previousz Blueprintnowym windowedytowalnym with a new editable blueprint.szablonem.
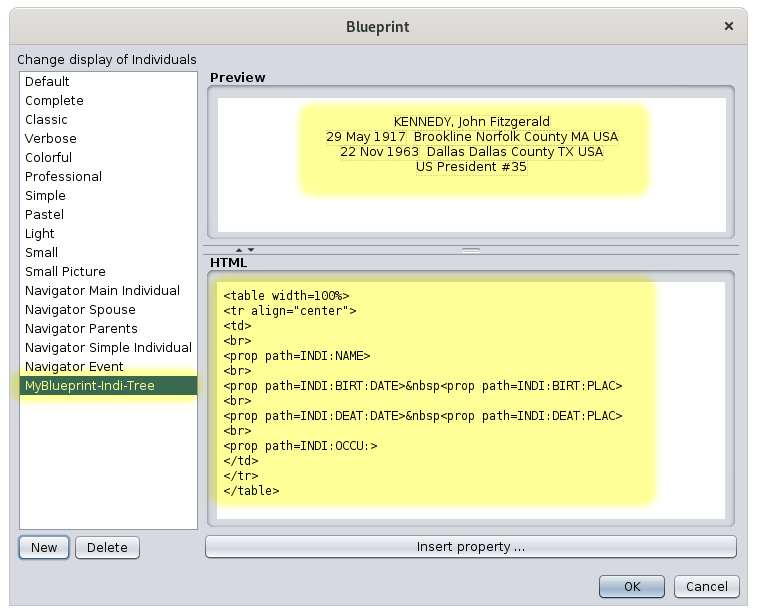
WeNowy haveszablon thejest newwybrany blueprintna selectedliście inpo thelewej, listten onsam thepodgląd left,na thegórze samepo previewprawej ati the top right, and thekod HTML codena atdole thepo bottom right.prawej.
WeWidzimy, seeże thatten thisszablon blueprintjest isedytowalny, editable,ponieważ becausewidoczne thei buttonsaktywne są przyciski "DeleteUsuń" andoraz "InsertWstaw property.właściwość..." are visible and enabled..
WeTeraz willzmienimy nowkod changeHTML, theaby HTMLwyświetlał code so that it displays the photo.zdjęcie.
ModifyZmodyfikuj the blueprintszablon
WeWidzimy, canże seew thatkodzie thereHTML aresą 4 lineslinie ofwłaściwości: propertiesimię, inurodzenie, theśmierć, HTML code: name, birth, death, occupation.zawód.
TheTag HTML <prop> tag,i andwszystko everythingw innim it,jest isspecyficzne Ancestrisdla specific.Ancestris. This makes it possiblePozwala to manipulatena themanipulowanie genealogicaldanymi datagenealogicznymi ofz thepliku Gedcom file.Gedcom.
WeChcemy wantumieścić tozdjęcie putna thedole photowyświetlania, atwięc thewstawiamy bottomkolejną ofwłaściwość, thetę display,zidentyfikowaną so we insert another property, the one identified above,wyżej, INDI:OBJE:FILE, after thepo 4 propertiesjuż alreadypokazanych showing.właściwościach.
WeUmieszczamy placekursor the cursor underpod </table>, theczyli labeletykietą thatkończącą marks the end of a table.tabelę.
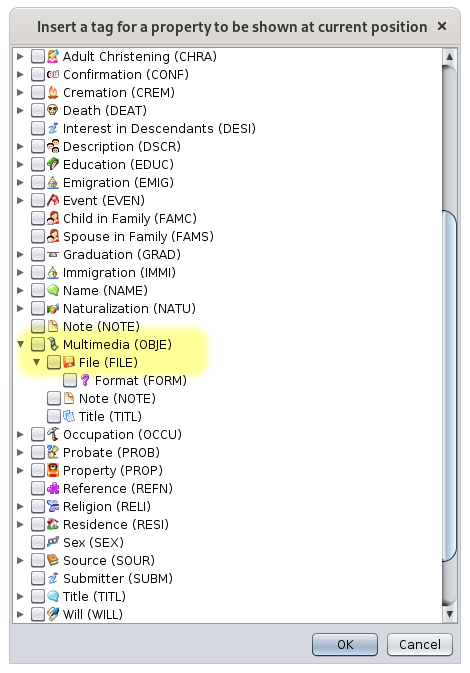
InW thistym window,oknie weznajdujemy find thelinię Multimedia OBJEOBJE, line,rozwijamy welistę, unfoldaby thepokazać flap to show the content ofzawartość OBJE, andi wewidzimy see the linelinię File. WeZaznaczamy checkją thei box. And we pressklikamy "OK".
WeTeraz nowwidzimy, seeże thatpodgląd thesię preview has changed.zmienił.

ButTo that'sjeszcze notnie finishedkoniec, yet,ponieważ becausew inpodglądzie thewidać, previewże youzdjęcie canjest seeza thatduże. theZmieniliśmy phototeż iszdanie tooco big.do Andpołożenia wezdjęcia. changedChcemy ourumieścić mindzdjęcie asw well.prawym Wegórnym wantrogu tekstu.
Ponieważ tekst był zorganizowany w tabeli, należy umieścić obraz w tabeli, po prawej stronie tekstu. Aby to positionzrobić, themodyfikujemy photokod atHTML thenastępująco: topprzenosimy rightwłaśnie cornerwstawioną of the text.
As the text was structured inside a table, it is in fact necessary to put the image in the table, to the right of the text. Tolinię do this,struktury wetabeli, modifydodając thekomórkę HTMLza codepomocą as follows: we move the line that we have just inserted in the table structure by adding a cell using thetagów <td> </td> tags..
AsChcemy werównież alsoograniczyć wantrozmiar toobrazu, limitwięc thedodajemy sizespecyfikę ofAncestris: thena image,końcu, wewewnątrz add an Ancestris specificity: we add "max = 20" at the end, inside thetagu <prop ...>, tag,dodajemy which"max means= to20", limitco theoznacza photoograniczenie sizerozmiaru atzdjęcia do 20% ofdostępnej theszerokości. availablePodgląd width.zmienia Thesię previewwraz changesze aszmianą youkodu, changeco thejest code.bardzo Thiswygodne, ispozwala handyod andrazu immediatelyzobaczyć letsefekt. youPo seezmianie ifkodu whatpodgląd youwygląda arepoprawnie, doinga isokno right.wygląda Once the code has changed, the preview looks correct, and the window looks like this.tak.
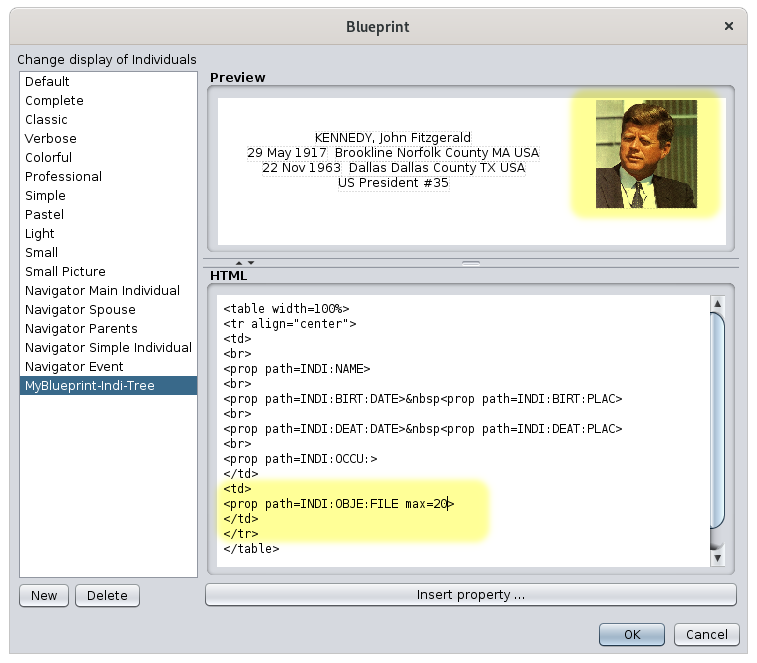
TheKod codena inżółto yellowwykonuje doesswoje itszadanie: job:zdjęcie thejest photow iskomórce inpo aprawej cellstronie ontabeli thei rightograniczone of the table and limited todo 20% of the width.szerokości.
SaveZapisz theszablon blueprinti andsprawdź check the resultwynik
WeMożemy canteraz savezapisać ournaszą workpracę. now. We click onKlikamy OK andi wejednocześnie lookpatrzymy atna thedrzewo dynamicdynamiczne. treeSzablon atsię the same time. The blueprint changes.zmienia.

It'sJest good,dobrze, wemamy haveto, whatczego we wanted!chcieliśmy!
GoingIdąc furtherdalej
OfOczywiście course,najtrudniejszą theczęścią hardestpozostaje part therefore remains to knowznajomość HTML onz onejednej hand,strony andi toznajomość know the specificities added byspecyfik Ancestris todo handleobsługi genealogicaldanych datagenealogicznych onz thedrugiej other hand.strony.
AsJeśli farchodzi aso język HTML, jest wiele stron, które pomogą Ci się go nauczyć. Proszę odnieść się do nich.
Jeśli chodzi o specyfikę Ancestris, tagi dodane do HTML language is concerned, there are many sites to help you. Please refer to them.
Regarding Ancestris specificities, the tags added to the HTML are:to:
- <prop>
orlub <ifvalue> - <name>
orlub <i18n> - <media>
- <mark>
TheNastępujące followingsekcje sectionsopisują, describejak hownimi to manipulate them.manipulować.
<prop> orlub <ifvalue> tagstagi
<prop | ifvalue path="path:to:prop[ścieżka:do:własności[?i][:end:of:prop]koniec:własności]" [default="path:to:other:propścieżka:do:innej:własności"] [format="format"] [max="n"] [length="n"] [img="yes"] [txt="no"] [underline="yes"]>
DisplaysWyświetla thewłaściwość propertyencji ofzdefiniowaną the entity defined by theprzez pathścieżkę. IfJeśli aokreślono także default, pathto isjest alsoona specified,używana, itgdy ispierwsza thewłaściwość onenie thatzostanie is used if the first property is not found.znaleziona.
ForDla multiplewielu propertieswłaściwości, amożna rankwskazać canrangę bew indicatedścieżce in the path usingużywając "?i", wheregdzie i isto thenumer rankwłaściwości. ofPo thetej property.liczbie Followingmożna thispodać number,resztę theścieżki, restjeśli ofistnieje. theZobacz pathprzykład canz be provided if any. See example below with the occupations.zawodami.
TheParametry format, length andoraz max parameterssą arewyjaśnione explained below.poniżej.
TheParametr img parametermożna canustawić be set tona 'yes' orlub 'no' toaby displaywyświetlić theikonę property'swłaściwości. icon.Domyślnie By default, it isjest 'no'.
TheParametr txt parametermożna canustawić be set tona 'yes' orlub 'no' toaby displaywyświetlić thenazwę propertywłaściwości namelub ornie. not.Domyślnie Default isjest 'yes'.
TheParametr underline parametermożna canustawić be set tona 'yes' orlub 'no' toaby underlinepodkreślić thetekst property'swłaściwości. text.Domyślnie By default, it isjest 'no'.
ParametersParametry inw squarenawiasach bracketskwadratowych aresą optional.opcjonalne.
EitherMożna użyć 'prop' orlub 'ifvalue' can be used..
CasePrzypadek of namesnazw (NAMEwłasność property)NAME)
ToAby customizedostosować thewyświetlanie displaynazw, ofmożna theużyć name,podwłasności you can use the name sub-properties.nazwy.
Example :Przykład: <prop path=INDI:NAME > a.k.a <prop path=INDI:NAME:NICK> willwyświetli displaypełne theimię fulloraz name and the nick name.przezwisko.
Example :Przykład: John F. Kennedy a.k.a Jack
CasePrzypadek of placesmiejsc (PLACwłasność property)PLAC)
ItMożna iswymusić possiblepoziom tojurysdykcji, forcektóre themają levelbyć ofwyświetlane jurisdictionsdla that you want to see displayed for a place.miejsca.
TheSkładnia syntaxlinii ofw the line to put in theedytorze HTML editorjest is of the following formnastępująca:
<prop path=INDI:BIRT:PLAC format="1 (4)">wheregdzie 1 andi 4 areto therangi jurisdictionjurysdykcji ranksw indefinicji thekryterium Place criteria definitionMiejsca (seezobacz File/PropertiesPlik/Właściwości).
Example:Przykład: assumingzakładając, thatże allwszystkie ournasze placesmiejsca follow the followingmają format (aszgodnie perz thetagiem PLAC tagw in thepliku Gedcom filelub orw in File/Properties)Plik/Właściwości):
Suburb,Przedmieście, City,Miasto, ZIPKod code,pocztowy, State,Stan, CountryKrajStartingLicząc countingod fromlewej, theranga left#0: at rank #0 : rankranga #1 isto theMiasto, City and rankranga #4 isto the country.kraj.
InW thistym case:przypadku:
<prop path=INDI:BIRT:PLAC format="1 (4)">displayswyświetlaCityMiasto (Country)Kraj)<prop path=INDI:BIRT:PLAC format="1, 0">displayswyświetlaCity,Miasto,SuburbPrzedmieście<prop path=INDI:BIRT:PLAC format="1, 3, 2 - 4">displayswyświetlaCity,Miasto,State,Stan,ZIPKodCodepocztowy -CountryKraj
CasePrzypadek ofwłaściwości awielokrotnej, multiplenp. property, such as occupationszawody (OCCUwłasność property)OCCU)
InDla thewłaściwości casewielokrotnych ofmożna multiplewymusić properties,wyświetlanie itwłaściwości iso possibledanym to force the rank of the property to be displayed.numerze.
TheSkładnia syntaxlinii ofw the line to put in theedytorze HTML editorjest is of the following formnastępująca:
<prop path=INDI:OCCU?2>ThisWyświetli willto displaydrugi thezawód second occupation of a person.osoby.
YouMożna canuzyskać accessdostęp todo theostatniej lastwartości valueza withpomocą thesłowa kluczowego LAST. keyword.Ostatnia Thewartość lastmoże valuebyć canpierwszą bedla thejednej firstosoby, ofa onetrzecią persondla and the third for another one.innej.
<prop path=INDI:OCCU?LAST >IfJeśli youchcesz wantwyświetlić todatę displaydrugiego thezawodu dateosoby, ofkod thebędzie secondwyglądał occupation of a person, the code would be the following:tak:
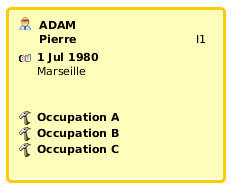
<prop path=INDI:OCCU?2:DATE>ItMożna iszatem thereforewyświetlić possible to display the firstpierwszych 5 occupationszawodów ofkażdej everyosoby personsw liketen this.sposób. InW theDomyślnym Defaultszablonie, blueprint,kod younależy wouldzmienić changei the code and insert thewstawić 5 blocksbloków likejak this:poniżej:
<tr>
<td><prop path=INDI:OCCU?1 img=yes txt=no></td>
<td valign="top">
<b><prop path=INDI:OCCU?1 max=67></b> <br>
</td>
</tr>
<tr>
<td><prop path=INDI:OCCU?2 img=yes txt=no></td>
<td valign="top">
<b><prop path=INDI:OCCU?2 max=67></b> <br>
</td>
</tr>
<tr>
<td><prop path=INDI:OCCU?3 img=yes txt=no></td>
<td valign="top">
<b><prop path=INDI:OCCU?3 max=67></b> <br>
</td>
</tr>
<tr>
<td><prop path=INDI:OCCU?4 img=yes txt=no></td>
<td valign="top">
<b><prop path=INDI:OCCU?4 max=67></b> <br>
</td>
</tr>
<tr>
<td><prop path=INDI:OCCU?5 img=yes txt=no></td>
<td valign="top">
<b><prop path=INDI:OCCU?5 max=67></b> <br>
</td>
</tr>
For a person with 3 occupations, and using the code above, you would see the following in the tree view for instance:
Text formatting possibilities [format="format"]
This format only applies to monoline text.
format="$D": displays the full date of an event
- Example :
<prop path="INDI:BIRT" format="{$D}">displays 10 feb 1876 as the date of birth (BIRT)
- Example :
format="$y": displays the year of the date of an event
- Example :
<prop path="INDI:BIRT" format="{$y}">displays 1876
- Example :
format="$P": displays the full location of an event
- Example :
<prop path="INDI:BIRT" format="{$P}">displays Hyde Park,02136,Boston,Suffolk,Massachusetts,USA
- Example :
format="$p": displays the city of the event
- Example :
<prop path="INDI:BIRT" format="{$p}">displays Boston
- Example :
format="$n": displays the name of the related entity if it exists
- Example :
<prop path="INDI:CHR:XREF" format="{$n}">displays Marie STUART, the godmother of the event (CHR)
- Example :
format="$N": displays the full name of the related entity if it exists
- Example :
<prop path="INDI:CHR:XREF" format="{$N}">displays STUART, Marie (° 30 march 1909 + 16 December 2008) (I0298)
- Example :
format="$v": displays the type of related entity followed by the full name of the related entity
- Example :
<prop path="INDI:CHR:XREF" format="{$v}">displays Godmother : STUART, Marie (° 30 march 1909 + 16 December 2008) (I0298)
- Example :
format="$V": displays the entity number only
- Example :
<prop path="INDI:CHR:XREF" format="{$V}">displays I0298 if we use the same example as above - Example :
<prop path="INDI:BIRT:SOUR" format="{$V}">displays S134, the ID number of the SOURce entity supporting the BIRTh event
- Example :
format="text{$e}": displays the text "text" if the data exists, nothing otherwise.
- Example :
<prop path="INDI:NAME:SOUR" format="{(*)$e}">displays (*) if INDI:NAME:SOUR exists, nothing otherwise - Example:
<prop path=INDI:NAME:SPFX max=50><prop path=INDI:NAME:SPFX format=" {$e}"><prop path=INDI:NAME:SURN max=50> <prop path=INDI:NAME:NSFX max=50>displays surname prefix with a space in between but the space is only displayed if the surname prefix exists. In this example, note that the first 3 <prop> statements are plugged together without any space in between, while space can be always included between surname and suffix, because an ending space does not show anyway.
- Example :
max="n": limits the display to n% of the available width. Valid for an image or for text.
- Example :
<prop path="INDI:NAME" max=10">displays the full name truncated to 10% of the available width
- Example :
length="n": limits the display to n characters. Valid for a text.
- Example :
<prop path="INDI:NAME" length=10">displays the full name truncated to 10 characters.
- Example :
<media> tag
<media [path="path:to:media"] [max="n"]>
Displays the media of the entity. If a path is specified, the corresponding media is used, otherwise any first media found in the entity is displayed.
The "max" parameter limits the size in width as above.
Parameters in square brackets are optional.
<name> or <i18n> tag
<name|i18n [tag="tag"] [path="path:to:prop"] [entity="tag"] [underline="yes"] >
Displays the name of the label given by tag, path or entity.
One of the 3 attributes must be specified. tag takes precedence over path, which takes precedence over entity.
The underline parameter can be set to 'yes' or 'no' to underline the text. By default, it is 'no'.
Example:
<name tag="NAME">displays Name<name path="INDI:NAME">displays Name<name entity="SUBM">displays Submitter
<mark>
<mark path="path:to:prop" [test="value"] [repeat="n"] [default="path:to:other:prop"] [notpresent="true"] >
Displays a square marker on a blueprint.
The marker is only displayed if the indicated property (path) exists in the entity, and if the value of the property is the same as the value of the "test" attribute.
The repeat attribute is optional and specifies the number of times the marker should be repeated.
The default attribute is optional and allow to check this property if the property indicated by path doesn't exist.
The notpresent="true" parameter allow to display a marker only if the property doesn't exist.
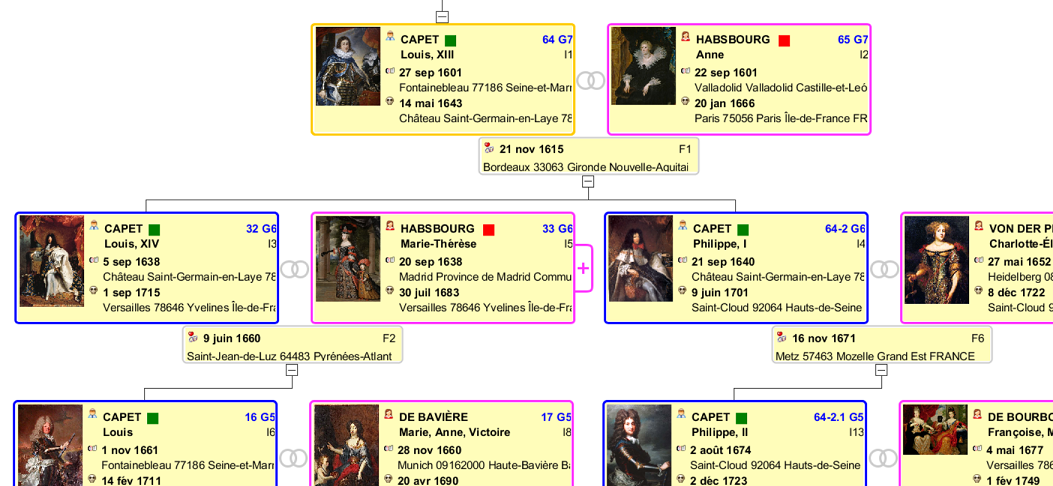
For instance, the following code displays a green marker for individuals whose name is CAPET, and a red marker for individuals whose name is HABSBOURG.
<font color=green><mark path=INDI:NAME:SURN test=CAPET></font>
<font color=red><mark path=INDI:NAME:SURN test=HABSBOURG></font>
This results in the following view in the dynamic tree for instance:
Another example . The following code displays 5 markers for individuals whose sex is unknown.
<mark path=INDI:SEX test=Unknown repeat=5>
<mark path=INDI:BIRT:SOUR notpresent="true"> : Displays a marker if no source is defined for the birth.
User example
Here is an example of marking provided by Sylvain, a user, to put a color marker depending on the source of an event.
<td width=0><table>
<font color=#38b020><mark path=INDI:BIRT:SOUR test="Acte de Baptême (S198)"></font>
<font color=#38b020><mark path=INDI:BIRT:SOUR test="Acte de Naissance (S199)"></font>

<font color=#3f81d1><mark path=INDI:BIRT:SOUR test="Acte de Baptême collatéral (S95)"></font>
<font color=#3f81d1><mark path=INDI:BIRT:SOUR test="Acte de Naissance collatéral (S500)"></font>
<font color=#3f81d1><mark path=INDI:BIRT:SOUR test="INSEE - Fichier des personnes décédées (S421)"></font>
<font color=#3f81d1><mark path=INDI:BIRT:SOUR test="Livret de Famille (S2)"></font>

<font color=#7326d1><mark path=INDI:BIRT:SOUR test="Relevé France Naissances/Baptêmes 1546-1896 FamilySearch (S411)"></font>
<font color=#7326d1><mark path=INDI:BIRT:SOUR test="Relevé Geneanet (S126)"></font>
<font color=#7326d1><mark path=INDI:BIRT:SOUR test="Relevé Généalogie en Corrèse (S252)"></font>
<font color=#7326d1><mark path=INDI:BIRT:SOUR test="Relevé Cercle Généalogique d'Alsace (S364)"></font>
<font color=#7326d1><mark path=INDI:BIRT:SOUR test="Relevé Allemagne Naissances/Baptêmes 1558-1898 FamilySearch (S657)"></font>
<font color=#7326d1><mark path=INDI:BIRT:SOUR test="Relevé Généalogie Entraire Recherche Côte d'Or (S657)"></font>
<font color=#7326d1><mark path=INDI:BIRT:SOUR test="Relevé Centre Généalogique de Haute-Marne (S725)"></font>

<font color=#ffa60d><mark path=INDI:BIRT:SOUR></font>

<font color=#ff053b><mark path=INDI:BIRT:DATE></font>
<font color=#ff053b><mark path=INDI:BIRT:PLAC></font>

<font color=black><mark path=INDI:BIRT:SOUR notpresent="true"></font>
</table></td>
This code puts a coloured marker for births whose source is filled in, with a different colour depending on the origin of the source, and a black marker otherwise.
Directory where blueprints files are stored
Blueprints are files of HTML codes that are stored in the User Directory, in a sub-directory called "ancestris/blueprints".
The blueprints directory itself contains several sub-directories, each of them having the title corresponding to the entity to which it applies: it is in each of these sub-directories that the different blueprints are located.
- INDI for blueprints about individuals
- FAM for blueprints about families
- OBJE for blueprints about multimedia objects
- NOTE for blueprints about notes
- SOUR for blueprints about sources
- SUBM for blueprints about submitters
- REPO for blueprints about repositoris
As these are HTML format files, you can open them with your favorite internet browser.
Tutorial
We have written a tutorial in PDF format. It is written in French. Please feel free to download it from here.