Registros de registros
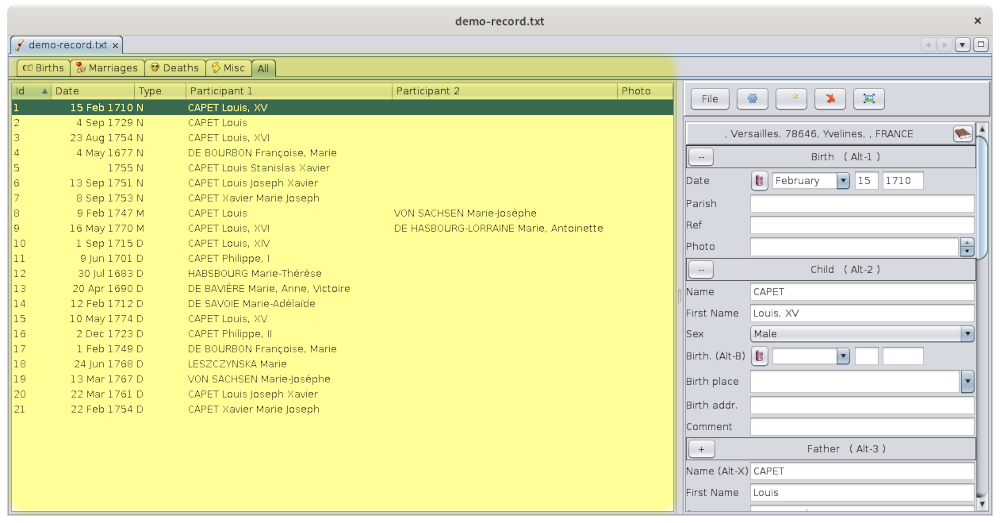
La herramienta Registros de registros está diseñada para desarrollar su genealogía a partir de registros genealógicos ingresados por usted u otros.
Esta herramienta es muy potente y le permite realizar la entrada masiva de registros genealógicos (civiles, parroquiales, etc.), para luego recuperarlos en su genealogía por diferencia, o exportarlos en beneficio de otros
Está diseñado para facilitar también la entrada de registros de actos aislados.
Esta herramienta no se instala de forma predeterminada al instalar Ancestris. Para instalarlo, vaya al Menú Herramientas y seleccione Administrar extensiones.
Un inventario de registro es una operación de entradas masivas por parte de un individuo o una asociación genealógica de todos los actos de un registro parroquial o de estado civil con una transcripción más o menos completa y exhaustiva de la información. Fuente: Wikipedia
En nuestro caso, hablaremos tanto de un registro completo como de unos pocos registros de él, el principio sigue siendo el mismo.
Principio
Los análisis se llevan a cabo por ciudad, los actos de registro se registran por ciudad en un archivo.
Por lo tanto, para ser explotado por otros, cada archivo solo debe incluir actos de una sola ciudad. Esto proviene del hecho de que es un archivo en formato de texto simple donde cada línea representa un acto precedido por la dirección de la ciudad, que es la misma en todas las líneas.
Los actos de la ciudad se ingresan uno por uno gracias a un editor en el lado derecho de la ventana.
Los actos introducidos se organizan en tablas en el lado izquierdo de la ventana, según los tipos de eventos que transcriben.
Desde las tablas de actos, es posible arrastrar y soltar filas una por una a la vista de árbol dinámico Árbol Dinámico para enriquecer la genealogía. Consulte la sección Arrastrar y Soltar para obtener más detalles.
Demostración
Para descubrir la herramienta Registro de Registros, es más fácil utilizar el ejemplo de registros proporcionados, que incluye unos veinte registros Borbón.
Haga clic en el botón Archivo y luego elija Archivo de demostración para abrirlo.
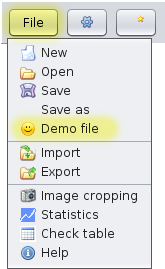
Se cargará el archivo, correspondiente a la ciudad de Versalles, con los actos correspondientes.
Es una copia del archivo Demo. Siéntete libre de modificarlo si quieres practicar.
Abre también la genealogía Borbón. A continuación, podrá experimentar las instrucciones ilustradas en las siguientes secciones.
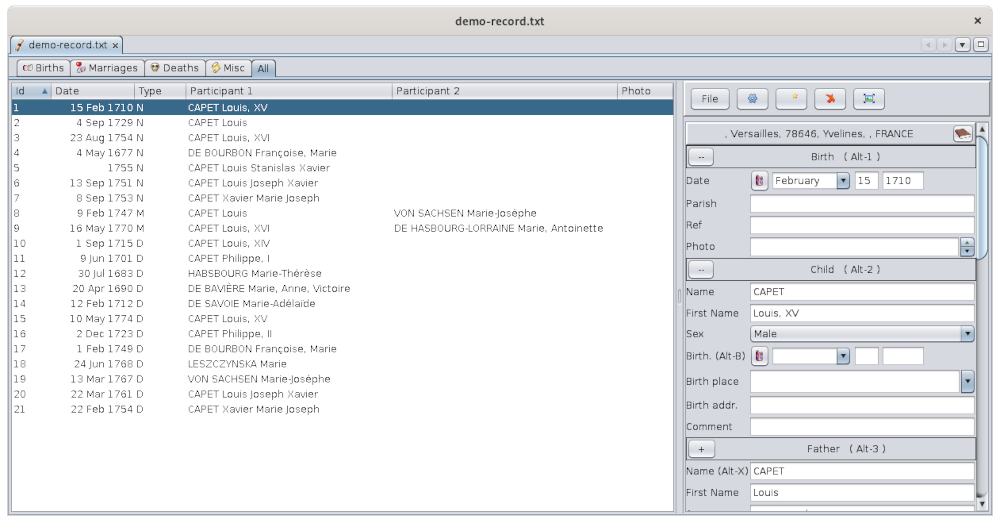
Descripción
En el lado izquierdo de la ventana hay cinco tablas donde se almacenarán los registros de los registros.
Estas son las tablas de Actos, o tablas de Registros.
- La tabla de nacimientos
- La tabla de matrimonios
- La tabla de defunciones
- La tabla de registros / actos varios tales como publicaciones matrimoniales, contratos matrimoniales, testamentos, recibos, etc.
- la tabla resumen de todos los registros, que es la suma de las cuatro tablas anteriores
En el lado derecho está el Editor de Actos. Administra los archivos de registros y edita los registros de una ciudad determinada.
Notará que la Tabla de Actos y el Editor de Actos trabajan juntos.
- Cuando se selecciona una tabla en la parte izquierda, el Editor se adapta al tipo de acto a introducir
- Cuando se selecciona un acto en una tabla, el Editor muestra los datos correspondientes
Ajuste los anchos de las columnas de la tabla para una mejor vista. La barra de separación entre las tablas y el editor también es ajustable.
Tablas de actos
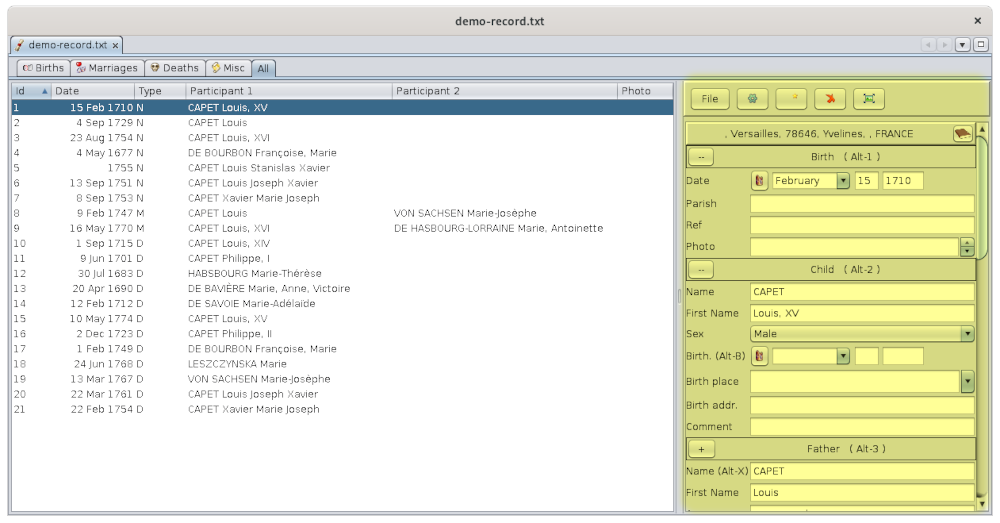
Los actos se clasifican en cinco tablas: Nacimientos, Matrimonios, Defunciones, Varios y Todo (el cuadro resumen de actos).
Cada tabla se muestra en una pestaña. Para ver el contenido de una tabla, haga clic en la pestaña correspondiente.
Cada línea representa un acto. Cada columna representa un registro de un acto, o para simplificar, un acto.
Las columnas mostradas difieren según el tipo de acto. Aquí, es la tabla de resumen de todos los actos que se selecciona, y la columna Tipo muestra el tipo del acto de cada fila: N para nacimiento (naissance en francés), D para defunción, M para matrimonios.
Ver el detalle de un acto
Haga clic en una línea de la tabla para que los detalles del acto se muestren en el editor en el lado derecho.
En este ejemplo, se selecciona un nacimiento para que el editor se haya adaptado para introducir los datos que generalmente se encuentran en los certificados de nacimiento.
Menú desplegable
Al hacer clic con el botón derecho en cualquier parte de la parte izquierda de la ventana, se muestra un menú desplegable que le permite manipular y volver a numerar los actos.
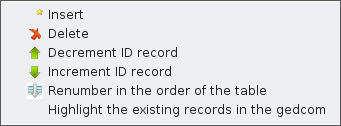
El uso de la casilla de verificación "Resaltar los registros existentes en Gedcom" se describe a continuación.
Vínculo entre tablas de actos y otras ventanas de Ancestris
Solo para actos destacados, hay dos posibilidades de sincronización con las otras ventanas de Ancestris.
- Un simple clic en el acto de un individuo muestra al individuo en las otras vistas de Ancestris.
- Un doble clic en un acto permite reconstruir el árbol a partir del individuo del acto como raíz
Ordenar columnas
Haga clic en el título de la columna para ordenar la tabla alfabéticamente o por fecha según el tipo de datos de la columna.
Mover columnas
Para mover una columna, haga clic en el título de la columna y mueva el mouse hacia los lados mientras mantiene presionado el botón.
Editor de actos
El Editor de Actos le permite administrar los archivos de registro y registrar los actos para una ciudad determinada.
El editor de actas se compone de un título que indica el nombre de la ciudad, el formulario para registrar los actos, una barra de herramientas, cuyo Menú Archivo da acceso a la gestión de archivos de registro y a las herramientas.
El nombre de la ciudad

Este título indica el nombre de la ciudad del registro que se está registrando o leyendo. Esta es una dirección.
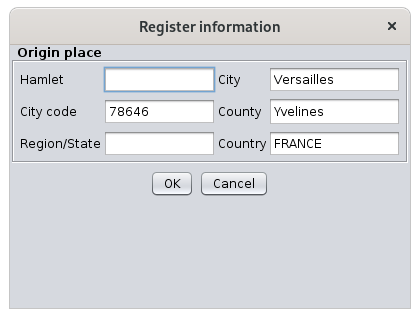
Todos los actos introducidos se guardarán en el mismo archivo. El nombre del archivo será el nombre de la ciudad.
Cada línea del archivo comenzará con esta dirección.
El formulario para registrar los actos
El formulario de entrada de datos depende del tipo de acto que debe registrarse y corresponde al tipo de acto seleccionado en la tabla de actos.
- Muestra un formulario de nacimiento para un nacimiento, un formulario de matrimonio para un matrimonio, un formulario de defunción para una defunción.
- Muestra un formulario Varios para otros actos, que le permite introducir cualquier tipo de acto. Un menú desplegable al principio del formulario le permite dar un nombre al tipo de acto.
Cada formulario está dividido en secciones y cada sección tiene un título con un botón a la izquierda.
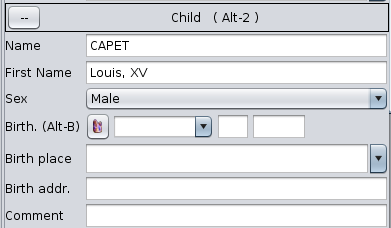
- El título de la sección indica el tipo de parte interesada a la que se refieren los datos.
- El botón a la izquierda del título en la parte superior le permite agregar o eliminar líneas que se introducirán
- El '--' botón indica que sólo puede eliminar líneas.
- El "+" botón indica que puede agregar algunos
- Al hacer clic en el botón, aparece el menú desplegable de campos que se pueden mostrar. Tienes que verificarlos para mostrarlos.
Por ejemplo, aquí está el menú desplegable de los datos que se pueden introducir para el niño de un certificado de nacimiento (todos estos están marcados por defecto)
- El '--' botón indica que sólo puede eliminar líneas.

En el formulario, el campo que se está editando aparece con un fondo azul.

El formulario se beneficia de la ayuda de entrada y los métodos abreviados de teclado que se describen a continuación.
Barra de herramientas

La barra de herramientas incluye las siguientes acciones.
Botón Archivo
Este botón abre el Menú Archivo que le permite administrar los archivos de registros (solo 1 ciudad por archivo), acceder a una herramienta para recortar imágenes de actos y verificar los datos de los actos introducidos.
Botón Opciones
Este botón abre las preferencias de Ancestris, el panel Extensiones y la pestaña Registros. Esto le permite establecer sus preferencias para el editor Act, el navegador de fotos de certificados y la forma de copiar registros a un archivo Gedcom.
Botón Crear Acto
Primero seleccione la pestaña de la tabla de actos correspondiente al tipo de acto que va a introducir antes de crearlo.
Botón Eliminar Acto
Este botón elimina el acto seleccionado en la tabla actos.
Botón Editor flotante
Este botón abre una ventana flotante que contiene un segundo Editor de actos que se puede combinar con un Visor de Actos.
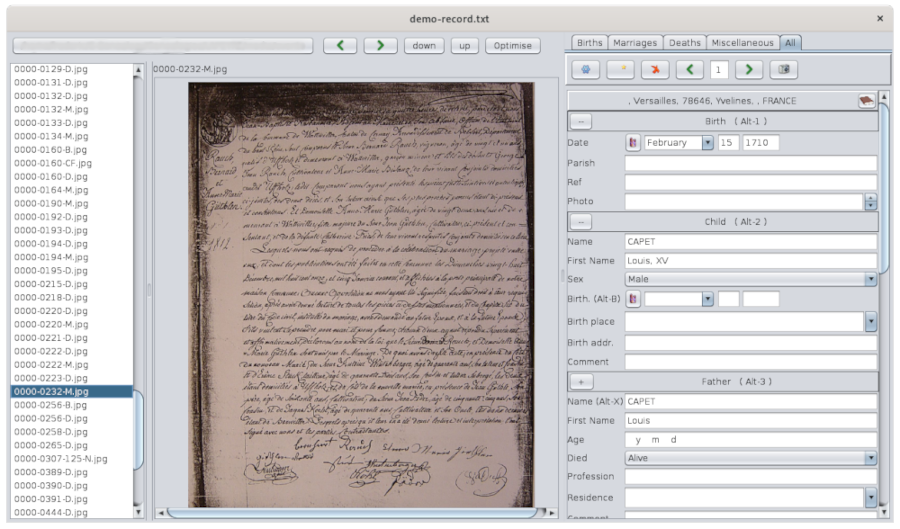
El tamaño de su ventana es lo suficientemente pequeño como para colocarse junto a las fotos de los actos para hacer la edición masiva.
Está unido a la ventana flotante del Editor de Actos en el lado derecho. El visor muestra la lista de imágenes de actos en la columna izquierda y el acto que se está viendo en el medio.
Este editor flotante contiene una barra de herramientas ligeramente diferente del Editor de Actos principal.

Las flechas izquierda y derecha le permiten moverse a través de los actos, y el botón Foto le permite mostrar u ocultar el visor de fotos de los actos.
Este menú le permite abrir o guardar archivos de registro. Estos archivos no se pueden abrir con el menú Archivo de la barra de menús de Ancestris. Este menú es el siguiente:
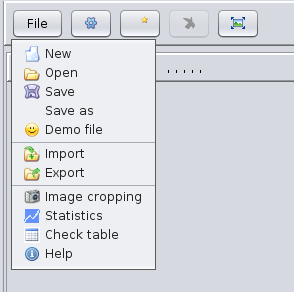
Nuevo
Crea un nuevo archivo de registro de actos para otra ciudad.
Si se estaban introduciendo datos, un mensaje le advierte que guarde lo que estaba haciendo.
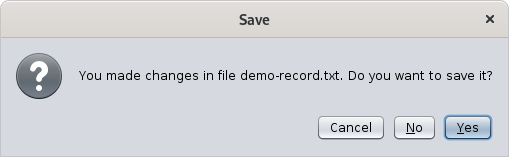
Si se confirma, la tabla de actos se borrará y Ancestris ofrecerá comenzar a crear un nuevo registro.
Abrir
Abre un archivo de registro de actos previamente guardados por Ancestris o procedentes de otras fuentes.
- Los diferentes formatos de archivo se reconocen automáticamente (formato Ancestris, formato EGMT o formato NIMEGUE).
- Si Ancestris detecta líneas que no cumplen con un formato de archivo conocido, se muestra un mensaje de error que indica la lista de líneas erróneas.
Guardar
Guarda los datos en un archivo en formato Ancestris. Si la lectura ya se ha registrado una vez, los datos se guardan en el mismo archivo. Si es la primera vez que se guarda el archivo, primero se solicita un nombre de archivo.
Guardar como
Solicita un nuevo nombre de archivo y guarda los datos de este nuevo archivo en formato Ancestris.
Archivo demostración
Abre un archivo de demostración Borbón y muestra sus registros.
Importación
Agrega datos de otro archivo a los datos ya presentes. Esto combina el archivo importado con el archivo ya abierto.
Todos los datos en memoria deben relacionarse con la misma ciudad. Si algunas lecturas en el archivo importado se relacionan con una ciudad diferente, se sugiere ignorar las lecturas o reemplazar su ciudad por la ciudad de los datos en memoria.
Exportación
Exporta los datos a un archivo en formato EGMT o formato NIMEGUE.
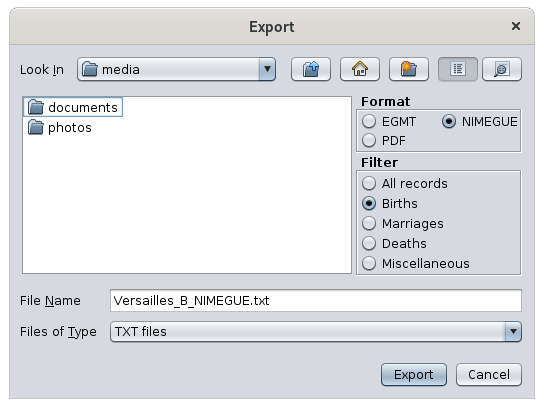
Es necesario especificar,
- El formato elegido del archivo de exportación
- el tipo de registros que se exportarán (Nacimientos, Matrimonios, Defunciones, Varios o todos los registros)
- El nombre del archivo de exportación
Recortar fotos
Permite recortar fotos de actos. Al hacer clic en el botón, se muestra la herramienta de recorte de Imágenes, en la que es posible recortar las fotos del acto.
Estadística
Muestra el número de registros de lecturas del archivo.
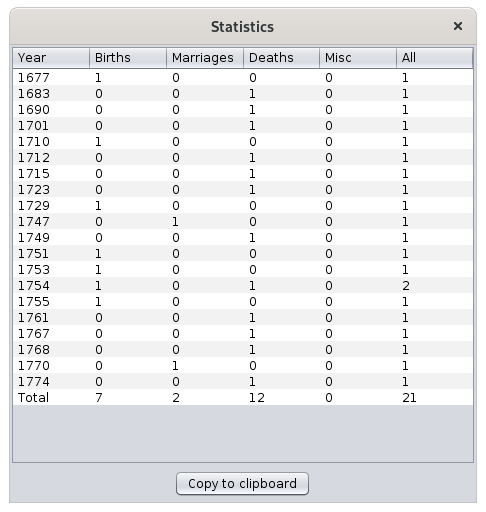
Tabla de verificación
Muestra una tabla con todos los datos contenidos en el archivo para la comprobación global.
Existe la posibilidad de buscar un acto en particular y un botón para abrir el editor flotante.

Uso
Metodología
La herramienta Registros de registros cubre varias necesidades.
Desarrolla tu genealogía
- De las fotos de los actos que puedes haber encontrado u obtenido:
- la herramienta primero permite introducirr los actos simplemente desde las fotos
- y luego recuperar los datos para desarrollar la genealogía.
- De archivos de registro hechos por otros:
- la herramienta permite recuperar los actos que interesan para alimentar la genealogía.
Ayudar a otros a desarrollar su genealogía
-
Entradas masivas de actos de registros o fotos durante un "inventario de registro"
-
A continuación, exportar el archivo para el beneficio de otros.
En cualquier caso, si tiene fotos de los actos, puede elegir si desea o no vincular automáticamente las fotos a los actos.
- al navegar por los actos: Esto le permite cambiar de un acto a otro y se muestra la foto correspondiente.
- al consultar su genealogía desde una vista de Ancestris: la visualización de una fuente le muestra el acto original utilizado durante el análisis.
Metodología sugerida
El resto de la página es una descripción de cómo utilizar las diferentes funciones de la herramienta Registrar registros y registrar actos de acuerdo con un método genérico que se puede adaptar libremente.
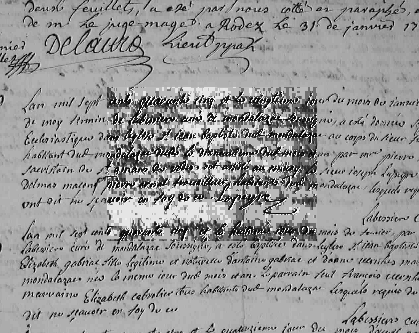
- Comience desde el stock de fotos digitales en bruto de los actos originales, y recórtelas para extraer una foto por acto, que colocará en carpetas por ciudad, de fotos oficiales referenciadas por su registro y su número en el registro.
- Estas fotos pueden contener varios actos, a menudo con escritos que son difíciles de leer. Para facilitar la lectura a largo plazo, es preferible separar los actos.
- Este paso se puede hacer con la herramienta de recorte de Imágenes.
- Cada foto se puede guardar con el nombre del archivo, la referencia de su dimensión en el registro y un número.
- Comience con las fotos recortadas para capturar los actos por ciudad, con las probabilidades correctas y los números de fotos correctos.
- This step is done with the Act viewer. When you are more familiar with the editing, you can set the input options that best suit you in the Preferences.
- To ensure the link between the act and its photo, it will be necessary to specify it beforehand to Ancestris in the Preferences and to indicate where the official photos are located.
- Each city entered will be the subject of a separate file, which you will place in a registers folder.
- For the input part, the Act editor allows a great efficiency of use thanks to keyboard shortcuts, input controls, and a function of auto-completion of the information being entered.
- Move the acts by commune and chronologically, from a register to your genealogy
- This step requires Highlighting the already existing acts in the Gedcom in Ancestris.
- Then you have to Copy by drag and drop the acts in the Dynamic Tree view. Ancestris determines the correspondence and suggests how to integrate the act
- You may also need to give Ancestris a first and last name equivalence to improve the matches
- Then you will be able to view the photos of the acts from the Ancestris views.
- There is an appendix describing the Mapping between the registers data and the Gedcom data of your genealogy.
- Export statements by municipality and send them to interested parties, if applicable.
- There are several official file formats for the counts: the NIMEGUE format and the EGMT format.
- These formats and the Ancestris format are described in the Appendix on File Formats
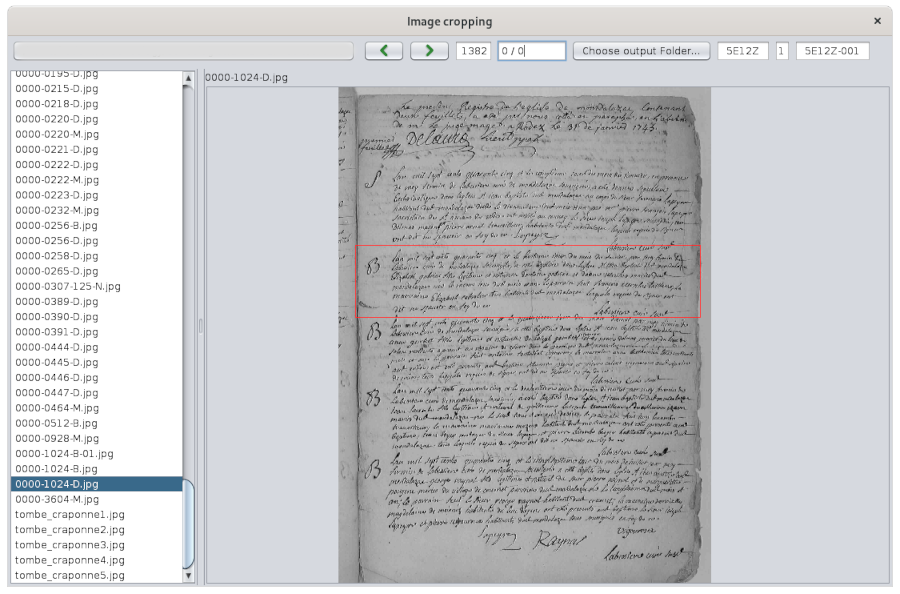
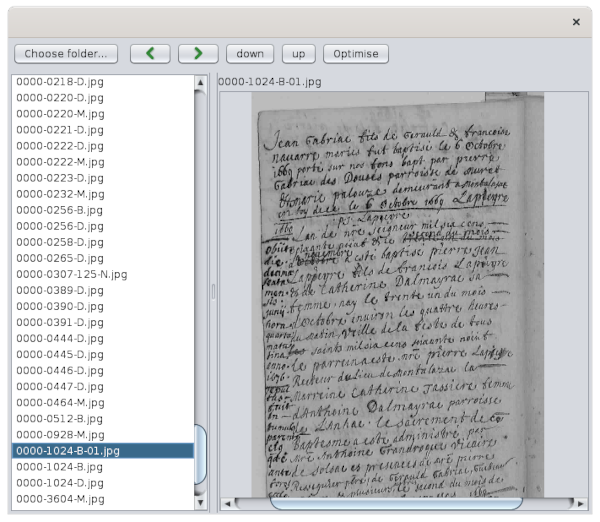
Image cropping tool
This window is different from the Act viewer, even though it is very similar. It is accessed through the File menu of the Act Editor, item Image cropping.
Hovering over the buttons or fields gives a tooltip to know what they do.
The principle of this tool is as follows.
- With the left button, you define an entry directory where your raw photos are stored, and with the right button you define the one where they will be saved.
- You choose the format of the names of the photos when they are saved in the two fields on the right (register number and photo number).
- You navigate through the photos with the forward and backward arrows.
- On each photo, you move the edges of the red frame to define the crop lines of the photo. It keeps a fixed position from photo to photo
- A double click on the photo performs the cut and moves to the next photo. Go back to the previous photo with the arrow if it contained other acts to be cut out.
- A right click of the mouse allows you to place / remove an extra aiming-cross, which allows you to move the photo at the time of cutting.
- This is optional. To understand how it works, wedge the photo on the top left corner: the top left part of the aiming-cross will disappear, the photo will move to the top left, and then the cut will be made according to the red frame.
- This allows to have all the photos of the same size, that of the red frame.
The act viewer
The act viewer capture the acts from their photo, and then maintain the link afterwards.
It is then possible to display the photo of an act from its act selected in the Editor.
The act viewer is accessed from the button  on the toolbar of the Act Editor.
Entering acts
To enter the acts, indicate the act directory with the button on the top left, select the act, and create the act to be entered on the right, fill in the address of the city. After the first entry, you should have something like this

The arrows are used to view the previous or next photo.
The photo can be moved and zoomed with the mouse.
Then refer to the description of the act editor and the editing features to enter the act.
View a photo from the act
To view a photo of an act .
- If you are already in the act viewer, simply select the act with the navigation arrows on the right, above the input form or open the viewer panel if it is hidden. If the act does not have a photo reference, the displayed image remains unchanged.
- If you are in the main act editor and the viewer is closed, just open it with the viewer button
The automatic correspondence between the act and the photo only works under 3 conditions.
- the act must indicate the reference of the photo in the line 'photo'. This reference can be a number or an alphanumeric text that must be uniquely located somewhere in the filename of the photo. It does not need to be the full name of the photo. If there are several photos with this reference, the last one is displayed.
- in the Ancestris preferences, you must have checked the box 'Show image in standalone editor' and added the photo folder in the list like this.

- the folder of the photos on the disk indicated in the image above, must include a subfolder with the name of the city of the register, in or under which the photo of the act must be located.
Suggestions for storage of files containing photos of the acts
Several file organizations are possible. The viewer simply needs that there is a folder with the name of each city somewhere in the tree structure.
|
Example with subfolders by county, |
Example with subfolders by city |
|---|---|
/mydocuments/genealogy/acts
       /Yvelines
          /Versailles
             /5MI_123
                /DSC00117.jpg
                /DSC00118.jpg
             /5MI_222
                /DSC00200.jpg
                /DSC00201.jpg
             /photos_a_trier
                /DSC00251.jpg
                /DSC00252.jpg
          /Saint-Germain-en-Laye
             /5MI_333
                /DSC00300.jpg
                /DSC00301.jpg
       /Essonne
          /Palaiseau
             /5MI_108
                /SAM00400.jpg
                /SAM00401.jpg
|
/mydocuments/genealogy/atcs
       /Versailles
          /DSC00117.jpg
          /DSC00118.jpg
          /DSC00200.jpg
          /DSC00201.jpg
          /photo_a _trier
             /DSC00251.jpg
             /DSC00252.jpg
       /Saint-Germain-en-Laye
          /DSC00300.jpg
          /DSC00301.jpg
       /Palaiseau
          /SAM00400.jpg
          /SAM00401.jpg
|
Different ways to indicate the city, the reference and the photo
|
Example 1: the Photo section may contain only the number of the photo, i.e. the last digits of the name of the photo. City=Versailles Note: in this example the viewer is looking for a photo whose name ends with "117" in the folder "Versailles" in the folder "5MI_123" which is a sub-folder of "Versailles" and sub-folder of /mydocuments/genealogy/acts |
Example 2 :
Note: In this example the viewer looks for the photo whose name contains "DSC00117" in the folder "5MI_123" which is a sub-folder of "Versailles" and sub-folder of /mydocuments/genealogy/acts. |
Example 3: The Reference is optional.
Note: In this example the viewer searches for a photo whose name contains "DSC00200" in the whole folder of the commune "Versailles". |
Example 4: the photo can be in any sub-folder of the city, for example the sub-folder "photos_to_sort".
Note: In this example, the viewer first searches for the photo in the subfolder of the city of Versailles containing the name of the reference 2E_456 . If the folder corresponding to this reference does not exist, or if it does not contain the photo, it then looks for the photo in the other sub-folders of the city. |
|
Example 5: the municipality is mandatory
Note: In this example the viewer cannot find the photo because the name of the city is mandatory and here it is missing. |
Example 6
Note : In this example, the viewer looks for the photo of the act in the folder "5MI_123" which is a sub-folder of "Versailles" and sub-folder of /mydocuments/genealogy/acts. |
Example 7: the reference is optional in the SOUR:PAGE tag.
Note: In this example the viewer searches for a photo whose name contains "DSC00200" in the whole folder of the city "Versailles". |
Example 8 : the SOUR:PAGE tag can only contain the number of the photo, i.e. the last digits of the name of the photo.
Note : In this example the viewer is looking for a photo whose name ends with "117" in the "Versailles" folder. |
Editing features
Keyboard shortcuts for the Editor
All the editor commands are accessible with the mouse or with "shortcut" keys on the keyboard. The use of shortcut keys is optional. However it allows faster mass input, avoiding the need to use the mouse and keyboard alternately.
The arrow keys
- TAB to go to the next field
- SHIFT-TAB to go to the previous field
Shortcut keys to create or delete an act
- ALT-N to create a birth record
- ALT-M to create a marriage record
- ALT-D to create a death record
- ALT-V to create a miscellaneous statement
- ALT-S to delete the current reading
The Quick Move Keys
- ALT-1 Date of the event
- ALT-2 Individual or Representant No. 1
- ALT-3 Father
- ALT-4 Mother
- ALT-5 Wife or Representant #2
- ALT-6 Father
- ALT-7 Mother
- ALT-8 Witnesses
- ALT-9 General Comment
Input help keys and the cancel key
- ALT-X: copies the name of the individual in the field of the individual's father's name
- ALT-Y: copies the wife's name in the field of the wife's father's name
- ALT-B: copies the date of the event from the record in the date of birth field of the individual
- ALT-=: copies the value of the same field from the previously entered record. This shortcut is particularly useful when the witnesses are the same from one act to another, for example
- ESC: cancels the entry of a field as long as the field is being entered and returns to the original value as long as the field is being entered.
- ALT-Z: cancels the changes made previously after leaving the field. Warning: the CTRL-Z key usually used for this does not work here.
- Space: enters a space at the end of the field to reject the other terms proposed by the completion function. This space is then automatically deleted. For example, if there are compound first names beginning with the first name you are currently entering, you must type an additional space at the end of the first name to refuse the secondary first names proposed by the completion function.
Automatic checks and formatting on entry
Alert on Missing date of event and name (or first name)
Alert on Duplicate
If there is already a record with the same date, first and last name, an alert message is displayed to indicate a possible duplicate.
This function can be disabled in the control panel.
Alert on New Name
Name Case
Case of the first name
Case of the occupation
Removal of extra spaces
Automatic copy of the photo number
When a new act is created, the photo number is filled in automatically by copying the photo number from the previously created act.
This feature can be disabled in the control panel.
Tip: The photo number can be easily incremented by clicking on the buttons that appear to the right of the field, or by using the UP and DOWN arrow keys.
Completion of surnames, first names, occupations and places
As you type a name, names are suggested among those already existing in the register file. When the desired name appears, press the Tab key to interrupt the current input and move on to the next field.
This avoids having to enter all the letters of a name already known.
Exclude names
Completion with the current Gedcom
It is possible to add the names present in a Gedcom file to the list of names proposed by the completion function by activating the option Completion with the current Gedcom in the Preferences window.
When this option is activated, the assistance uses the names, first names and accupations from the current Gedcom file to complete the words as you type. This option is particularly useful when starting a register and there are still few terms available for completion among the registers themselves.
When this option is disabled, completion uses only the words present in registers already entered.
Note: It is preferable to select a Gedcom that contains data from a place and date close to the register to be entered so that completion can provide data similar to that to be entered.
Highlight existing acts in Gedcom
Once acts have been entered in register files, we will copy them into the Gedcom file. But before that, we will have to know which ones have to be copied.
- You may already have copied acts in your genealogy yourself.
- Or similar data may already be up to date in your genealogy.
It is possible to see which acts have similar data in your genealogy, i.e. in the Gedcom file currently open in the other Ancestris views.
To do so, you must highlight them using the drop-down menu in the table of acts.
You have to uncheck / recheck the box to show the new acts recently copied or used in the Gedcom file.
The acts existing in your genealogy are those in red in the table.
- An act corresponds to an event in your genealogy if the two events are of the same nature, if both have the same date, and if the two individuals compared have the same first and last name.
- The location does not need to be filled in or the same to report a match.
- In case of duplicate individuals, the first one found will be the one compared, the other will be ignored.
If the box is checked, the highlighting will automatically update if you open or close a Gedcom file in Ancestris.
In the example below, 16 acts (Id in red) are already present in the currently open Gedcom file.

Drag and Drop in the Dynamic Tree
Once the acts are highlighted, it is easier to know which ones are left to be used, and how to integrate them into your genealogy.
Register information can be copied to the dynamic tree using Drag and Drop . Thus it is not necessary to re-enter all the information of the register with an Ancestris editor to put it in your genealogy.
To copy, you must have both your Gedcom file open and your registers records, side by side.
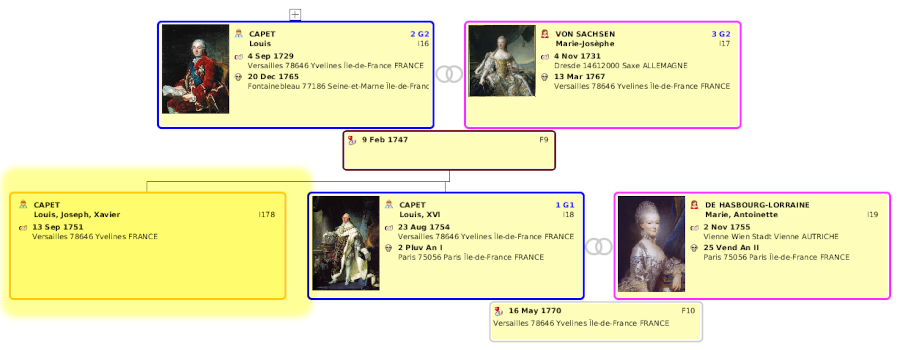
Take the example provided of the Bourbons and place the Bourbons dynamic tree on the left, and the Demo file of the Recording tool on the right open on the 'All' tab.
We see that the acts in red are already filled in the Bourbons genealogy.
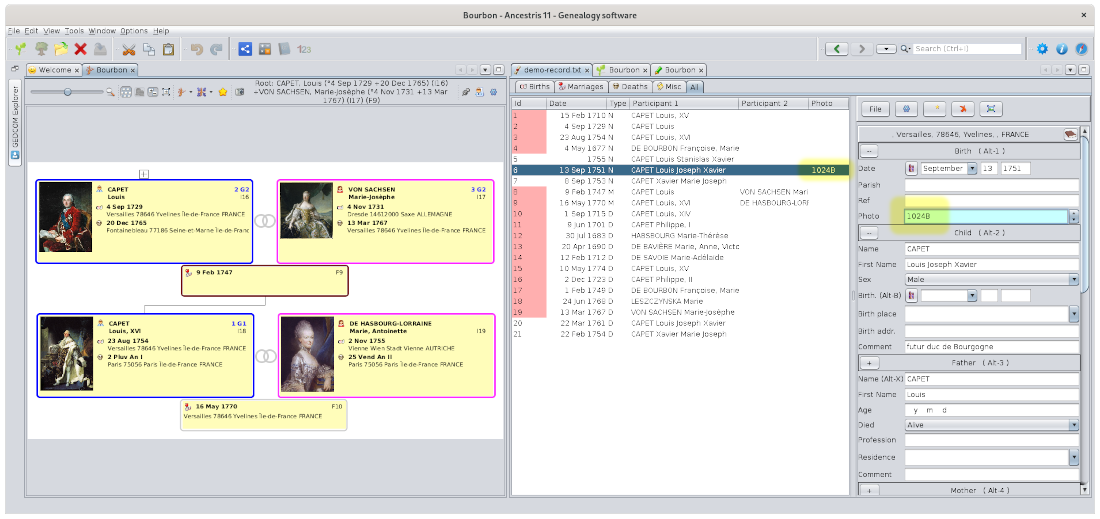
Copy a birth certificate
We will copy Louis Joseph Xavier CAPET's birth certificate of September 13, 1751, from the record of births to the marriage of his parents in the dynamic tree.
It is not already present in the Gedcom because it is not highlighted in red.
The photo of the birth certificate has been filled in in the photo above. It is highlighted in yellow. When we copy, the source will then be documented in the Gedcom file.
Proceed this way to copy the act in the Gedcom:
- click in the table on the birth certificate,
- move it with the mouse by holding down the left button onto the family box dated February 9, 1747 in the tree and release the button.

After releasing the mouse button, a validation window appears. It will intelligently merge the data in the tree. It is up to you to make some choices, but they are suggested by Ancestris.
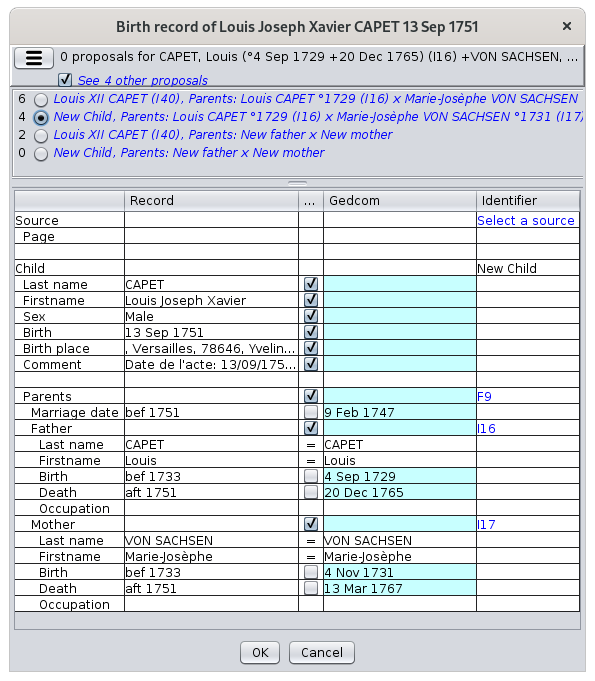 |
Choosing the merge option
Choice of data to merge
Choice of identifiers
In the example, a new individual will be created as a child of the F9 family. |
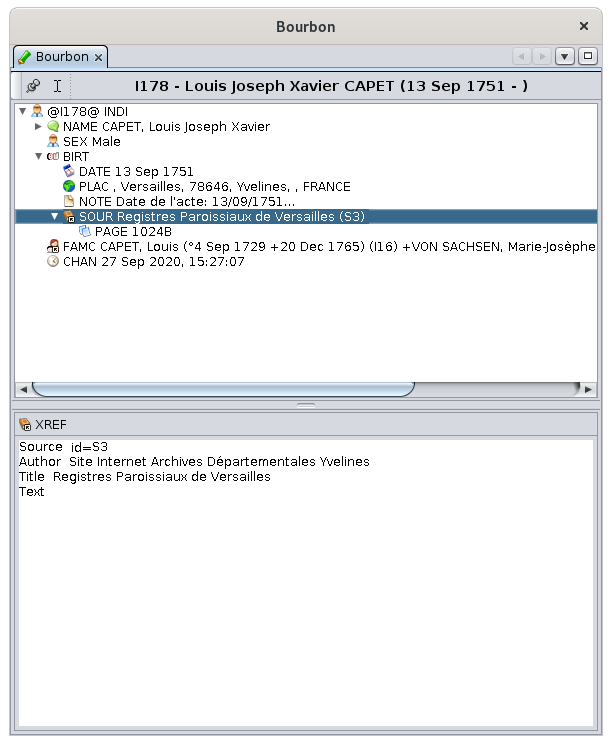
After choosing S3 as the source, and clicking on the OK button, the new individual with ID I178 is created in the tree :
Below is the result of the data created for the new individual in the Gedcom editor.
The birth event is visible and you can see how Ancestris documented it.
The source has been added with the reference of the photo in the PAGE property. If I had documented the reference, it would also appear in the PAGE property, just before the photo number.
Depending on whether the act is deposited on an individual, a family or in the empty space of the dynamic tree, the merging rule changes.
- If the target is an individual
- The tool indicates if there is another individual with the same name and date of birth in the GEDCOM to possibly avoid creating a duplicate in the GEDCOM.
- By default, the birth record is applied to the individual
- If the target is a family
- The tool indicates if there is another individual with the same name and date of birth in the GEDCOM even in another family.
- By default, the birth record is applied to the child of the family having the same surname, first name and possibly the closest date of birth if there are homonyms. A new child is created if there is no corresponding child.
- If the target is neither an individual nor a family (bottom of the dynamic tree for instance)
- The tool indicates if there is another individual with the same name and date of birth in the GEDCOM.
- By default, a new individual is created and the birth record is applied to it
Copy a marriage certificate
Now let's try to copy a marriage certificate.
Drag and drop the May 16, 1770 marriage record from the table onto the relevant marriage in the tree.

When you release the mouse button, the window already seen above appears with other choices to be made for the merge.
If you noticed above, the act was highlighted indicating that the data were already partly filled in in the Gedcom.
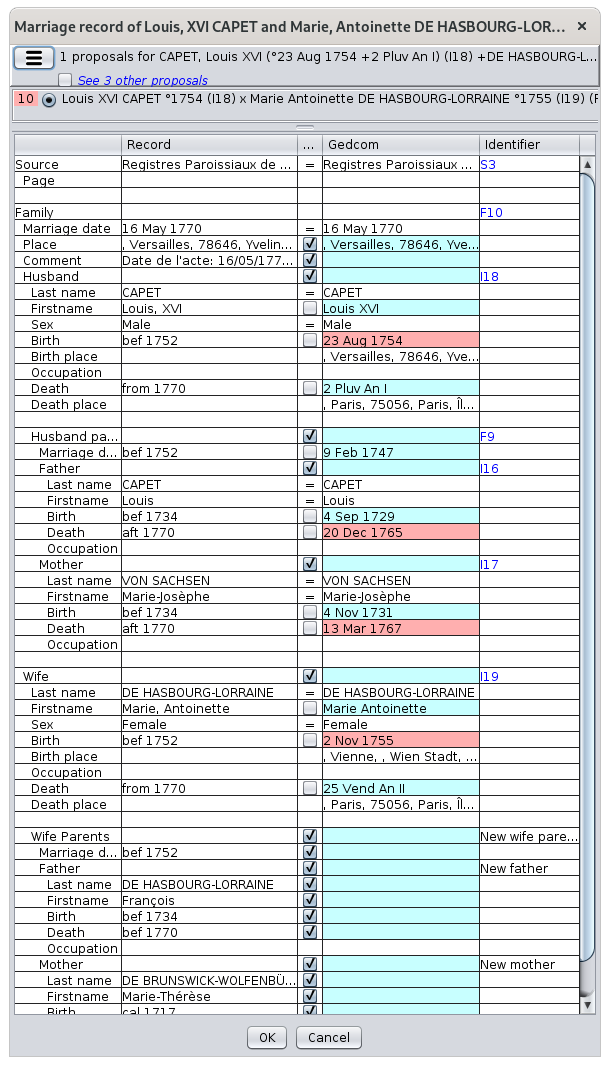 |
Choosing the merge option
Choice of data to merge
Choice of identifiers
Deduction of dates
|
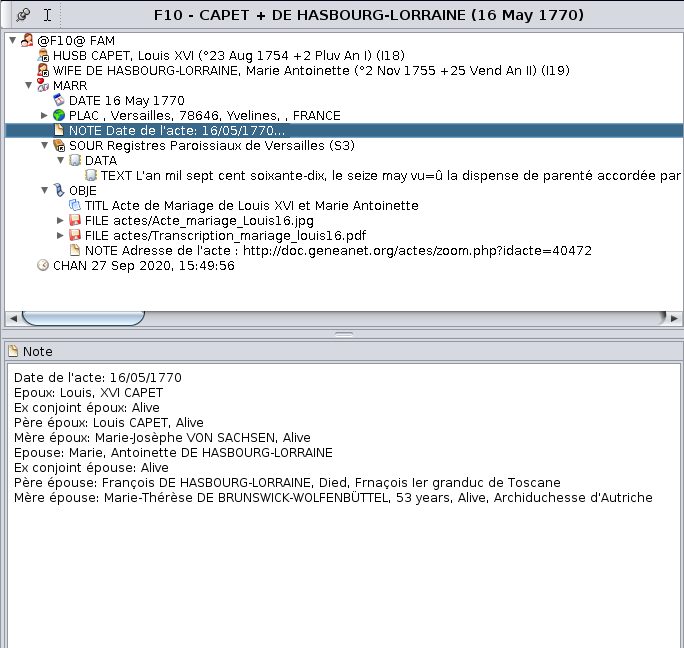
After clicking the OK button, the wife's parents are added to the tree and the F10 familly is updated.

Tips for use and limitations
Add in chronological order
It is best to copy the records in chronological order. To do this it is better to use the tab "ALL" sorted by date and add the records from the oldest to the most recent, rather than adding the birth records first, then the marriages, then the deaths. This improves the search results for individuals matching the records.
Drag and drop outside of a tree entity
It is possible to drop an act anywhere in the dynamic tree window, outside of a tree entity.
In this case, the tool searches for the individual or family that best matches the act and displays a list of proposals ranked in descending order of relevance.
- Advantage: it avoids having to search the tree for the relevant individual.
- Disadvantage: the tool may not find any suggestions if an act data is incompatible with the individuals in the tree, or, on the contrary, the tool may find several dozen suggestions if the act data is too vague.
Undo a drag and drop
To undo the changes made in the tree after drag and drop, click anywhere in the tree to select the Gedcom and press the CONTROL and Z keys or press the Undo button  on the Ancestris main Toolbar. A single undo will delete all individuals created and all data that has been added by drag and drop.
Rules for calculating dates
Date deductions are made according to the following rules which are not configurable:
- Minimum age of marriage: 18 years
- Minimum age of parent: 15 years old
- Maximum age of parent: 60 years old
- Maximum age of an individual: 100 years old
- Uncertainty interval for approximate dates (EST, ABT, CALC dates): +/- 5 years
View an act from an Ancestris view
To view an act from an Ancestris view, you must already have copied the act to your Gedcom file, which we did in the paragraph on copying acts. See the corresponding section to do so.
Next, let's take the individual created above by copying the Birth act, from the Gedcom Editor, and let's call the Context Menu by right-clicking anywhere on the properties of the individual. Here is the menu that appears.
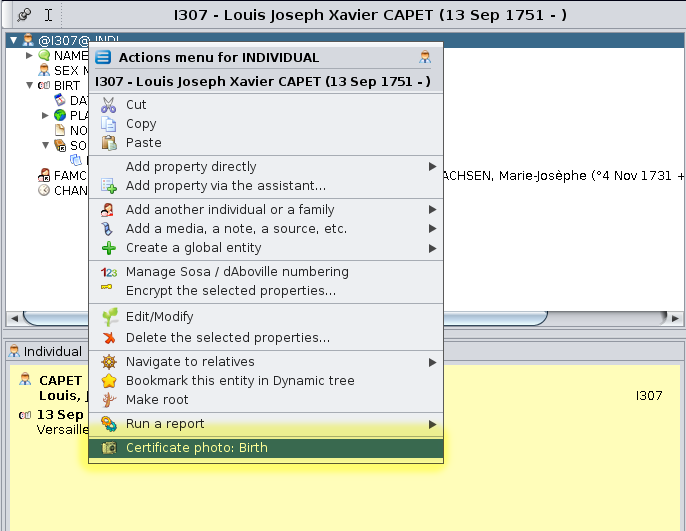
You notice the last action in the menu: "Certificate photo: Birth".
Clicking on this action displays the Act viewer, on the birth certificate of the individual we had entered and copied above.
The automatic correspondence between the Ancestris view and the photo of the act only works under 3 conditions.
- The information in the Gedcom file must include the event of the act as follows
- an event of the type of the act
- a place where the name of the city is that of the act. A setting exists at this level in the Ancestris preferences of the Registers records tool. It is when dragging and dropping that Ancestris uses them to make sure that the definition of jurisdictions is well aligned with the data of the place of the acts.
- a source must be indicated with a PAGE sub-property, which must indicate the photo's dimension and reference, separated by a comma
- In the Ancestris preferences, you must have checked the box Show "Certificate photo" menu in the views and add the photos folder in the list like this
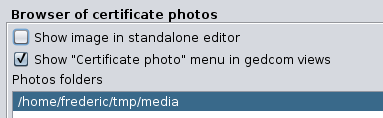
- the folder of the photos on the disk, indicated in the image above, must include a subfolder with the name of the city of the register, in or under which the photo of the act must be located.
Customization
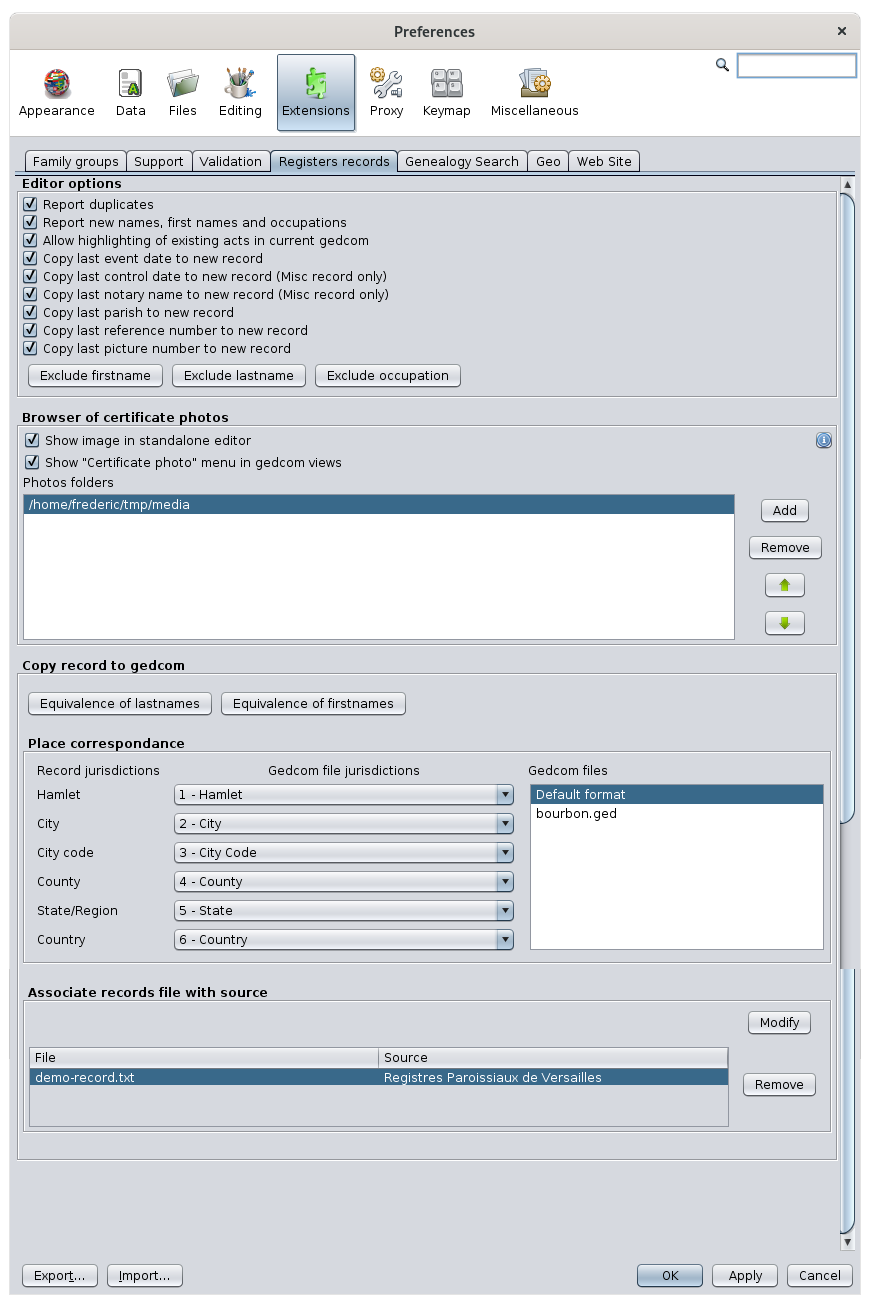
Customization of the tool is done using the Preferences button on the toolbar of the Act Editor (which is the same as going through the Ancestris toolbar, Preferences, Extensions panel, Registers records tab).
The options are organized in 3 sections and their roles and use have been seen above.
- Editor options
- Browser of certificate photos
- Copy record to Gedcom
Tutorial
There is an educational B-A-BA on registers records in PDF format and in French.
It corresponds to version 9 of Ancestris, but the main part is still current.
It gives you detailed instructions on how to create and use the registers records tool.
You can download it here.