Menu Bar - Mainmenu: File, Edit, View, Tools, Window, Options, Help

Using the menus
Like the menu bar in many software programs, each menu in the Ancestris menu bar can be opened in two ways.
- or by clicking on it
- or by typing the key combination: <Alt> + the underlined letter in the name of the corresponding menu. For example, to open the Tools menu, type <Alt>+t.
Each action of the menu has:
- an icon illustrating the action, when this icon exists
- the name of the action
- a keyboard shortcut to launch this action without going through the menu, when it exists
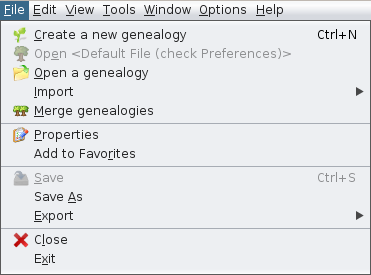
Here is an example with the File menu
Similarly, each action can be initiated in several ways:
- either by clicking on it in the menu
- or when the menu is opened by typing the key combination: <Alt> + the underlined letter in the action name
- or when the menu is closed by typing the keyboard shortcut of the action (Ctrl-N or Ctrl-S in the example above)
Jumplist to the separate Mainmenu items.
Logic of the menu organisation
To easily find the actions you are looking for, here is the organisation we chose for the menus.
1. File Menu
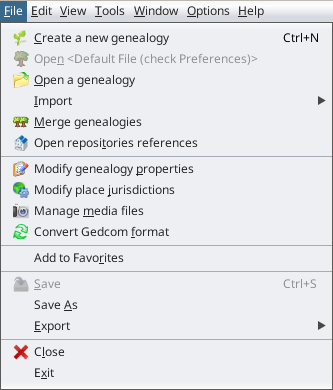
In Ancestris, a genealogy file is a Gedcom file.
Each of these actions is described below.
When the action has its own description page - it is bold - click on it to get all the details about it.
-
Create a new genealogy
-
- Starts a wizard to help you create a new genealogy from scratch.
-
-
Open <Default File> (check Preferences).
-
- Opens the default genealogy file. This file can be set in the Preferences, menu Options/Preferences, Files tab. This option is only available when a default file has been defined in the Preferences. Otherwise, it is greyed out.
-
-
Open a genealogy
-
- Opens an existing genealogy, from a Gedcom file. If the Gedcom file comes from a different software, Ancestris will automatically detect it and start the import process.
-
-
Import.
-
- Migrates to Ancestris a genealogy created by a different genealogy software.

Currently we can only import Gedcom files. This action is available to help you choose the original software, when the automatic detection of the Open a genealogy menu action would not detect it correctly.
- Migrates to Ancestris a genealogy created by a different genealogy software.
-
-
Merge genealogies.
-
- Merges two genealogies together. This simply adds two different Gedcom files together without analysing potential duplicates.
-
-
Open repositories references.
-
- Opens a list of official repositories contact details and internet links. The list is open as part of a Gedcom file. It allows you to quickly visit their respective sites, as well as drag-n-drop the repositories you need to your own genealogy.
-

-
Modify genealogy properties.
-
- Opens a window to edit the properties of the Gedcom file. You can edit: description, language and author. This action is only available if you have a Gedcom file currently open.
-
-
Modify place jurisdictions.
-
- Opens a window to edit the place jurisdictions of the Gedcom file. In other words: the way a place is stored in terms of place structure (e.g. city, zip code, region, country). This action is only available if you have a Gedcom file currently open.
-
-
Manage medias files.
-
- Opens a window to adjust the media file links to the genealogy information they are related to. This action is only available if you have a Gedcom file currently open.
-
-
Convert Gedcom format.
-
- Opens a window to modify the Gedcom norm or its encoding. This action is only available if you have a Gedcom file currently open.
-
-
Add to Favorites.
-
- Adds the selected Gedcom file to your Favorite links. This window can be accessed from the Menu / Window / Favourites. This action is only available if you have a Gedcom file currently open.
-
-
Save.
-
- Saves the selected Gedcom file.
If other Gedcom files are open, they will not be saved.
For security reasons, Ancestris keeps a number of backup copies : this number can be changed on Options / Preferences / Files, Number of backup copies.
This function is only available if the selected Gedcom file was changed and not yet saved.
- Saves the selected Gedcom file.
-
-
Save as.
-
- Saves all or part of a file under another name. In particular, you can use this action to extract a branch or part of your genealogy and save it in an independent Gedcom file.
-
-
Export.
-
- Exports a genealogy to other genealogy sites, such as Geneanet, Geneweb or CousinsGenWeb.

It is important to note that since Ancestris saves the content of your genealogy directly in a Gedcom format, the Ancestris Gedcom file is directly usable by all genealogy software worldwide. Geneanet is a French genealogical data repository. The Geneanet export includes the ability to guide you in the process and opens the Geneanet upload page. The other export actions are French specific and only available as additional plugins to install.
- Exports a genealogy to other genealogy sites, such as Geneanet, Geneweb or CousinsGenWeb.
-
-
Close.
-
- Closes the selected Gedcom file, without exiting Ancestris.
-
-
Exit.
-
- Exits Ancestris.
-

2. Edit Menu
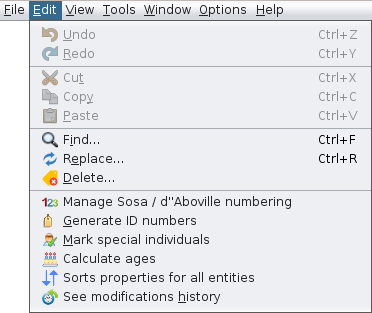
Each of these actions is described below.
When the action has its own description page - it is bold - click on it to get all the details about it.
-
Undo
-
- Undoes the last change that was made to the selected Gedcom file. It is possible to undo up to 10 modifications. This parameter can be changed in Preferences, Editing, Maximum number of cancellations. This menu item is only available when unsaved changes have been made and are not saved yet. It is not possible to undo saved changes. But, it is always possible to restore a backup copy.
-
-
Redo
-
- Redoes the last modification previously undone on the selected Gedcom file. It is possible to redo all undone modifications. This action is only available if at least one modification has been cancelled.
-
-
Cut
-
- Deletes the selected text after putting a copy on the clipboard.
- The text can then be pasted somewhere else.
- This menu item is only available when the cursor is in a text field.
-
-
Copy
-
- Copies the selected text to the clipboard. The text can then be pasted somewhere else. This menu item is only available when the cursor is in a text field.
-
-
Paste
-
- Pastes the clipboard content at the cursor position, in a text field. This can be a content from another software, something copied from the Internet, etc. This menu item is only available when the cursor is in a text field.
-
-
Find...
-
Replace ...
-
- Opens an assistant to help you replace a string of characters with another one anywhere in the genealogical file. It works in combination with the Find function above.
-
-
Delete...
-
- Deletes a data element globally throughout the genealogy. This is particularly useful to delete empty data.
-
-
Generate Sosa Numbers
-
- Generates Sosa, d'Aboville or Sosa d'Aboville numbering for a chosen individual or deletes numbering for the whole genealogy.
-
-
Generate ID Numbers
-
- Generates or modifies Identification numbers, globally or one by one.
-
-
Mark special individuals
-
- Marks or displays certain special individuals in your genealogy such as implex families, top individuals, multiple ancestors, Y-DNA or mtDNA individuals.
-
-
Calculate ages
-
- Calculates ages of all the individuals at their respective life events.
-
-
Sort properties for all entities
-
- Sorts all properties of all entities according to a relevant and consistent order. It directly updates the genealogy. The result can only be seen from the Gedcom editor. No window appears as no settings are required.
-
-
See modifications history
-
- Displays all changes made to a Gedcom file.
If needed, the list of changes can be cleared by clicking on .
.
- Displays all changes made to a Gedcom file.
-

3. View Menu
This menu regroups all the actions to access the genealogical views.
These views show specific aspects of your genealogy and some let you edit your genealogy as well (e.g. editors, dynamic tree).
4. Tools Menu
This menu regroups all the actions to explore, manipulate and analyse genealogical data.
- Genealogical Search among Ancestris users,
- Consult registers records and use them to enrich your genealogy
- Miscellaneous utilities (date calculation, calculator)
- Verify data (anomalies, duplicates)
- Analyse data (common ancestors, lists and reports)
- Publish locally on disk or on the Internet
- Print the active view
5. Window Menu
This menu regroups all the actions to handle Ancestris windows.
- Access to special windows
- Handling windows : open, close, float, dock, clone, set to full screen
6. Options Menu
This menu regroups the main actions to customize Ancestris.
- Preferences
- Save display settings
- Configure tools bar
- Update Ancestris
- Manage Plugins
7. Help Menu
This menu regroups all the actions to get help and to help Ancestris.
- All the documentation
- Contact Ancestris support team
- Make a donation
- Ancestris website
- About Ancestris