Cygnus editor (TSL)
The Cygnus editor is one of the three main editors of Ancestris.
The philosophy of the Cygnus editor comes from the desire for simplicity of use.
The simplicity of being able to manipulate individuals and everything around at a glance,
Without worrying about how information is stored behind the scenes,
All other information, families, sources, notes, etc. are ultimately only complementary information relating to the life of the individual in question. Example: shouldn't the seizure of an individual's marriage be done in the same place and in the same way as the seizure of his birth or death? This is what Cygnus can do.
The advantage is to see almost everything at a glance, like a bird watching the earth from the sky.
Did you know that? Its name comes from the large and brilliant constellation of the Swan. With its stars mainly arranged according to a large cross, it is represented as a bird spreading its wings.
Cygnus efficiently does a lot of work for you behind the scenes. Creating a spouse, for example, takes just one click, whereas it requires a lot of action in the other two editors.
The compromise is that only the most important genealogical information can be edited with this editor, but still covers the needs of 80% of users.
There is something for everyone, and Ancestris users often choose to use two main editors: Cygnus + Gedcom, or Aries + Gedcom. Some prefer to use only the Gedcom editor. Here is a comparison of the 3 editors if you still had to make a choice.
| Cygnus | Gedcom | Aries | |
| Focus | The individual and his close environment | The Gedcom standard |
Completeness of |
| Ease of use | ++ | +++ | + |
| Ergonomics | +++ | + | +++ |
| Coverage of needs | 80% | 100% | 100% |
| Data Transparency | + | +++ | ++ |
| Efficiency | +++ | + | + |
| Editable Gedcom entities | Many | All | All |
| Compliance with Gedcom standard | 100% | 100% | 100% |
Description and Usage
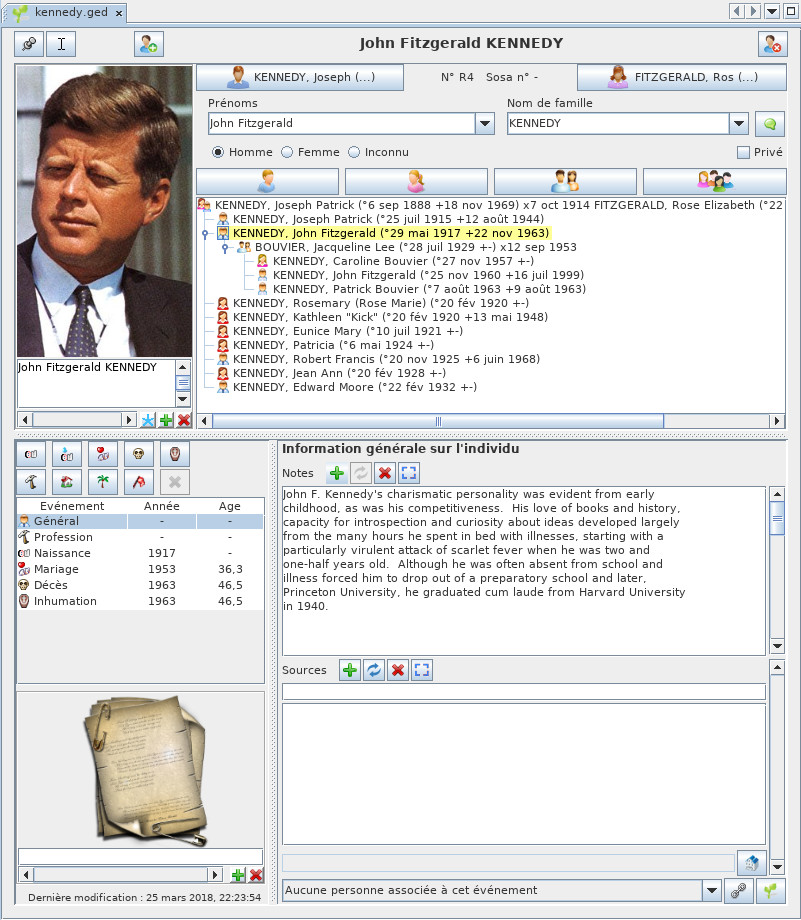
Cygnus presents the individual in the upper part of the window with the Title bar, his family nucleus just below, and the details of his life in the lower part, with the associated life events.
Title bar
The title bar displays the name of the selected individual and buttons.
Hovering over the buttons displays a tooltip.
Pin Button
Freezes the editor on this individual even if another entity is selected in Ancestris.
Cursor Button
Keeps the focus on the editor when changing entities.
A mouse selection of an individual in the entity table or in the tree, for example, normally causes the focus on the Cygnus Editor to be lost.
If you want to keep the focus on the editor, this button brings the focus back to the first name of the individual and positions the cursor there.
Create a new individual Button
Creates a new individual and places him/her in the editor.
Delete this individual Button
Deletes the individual displayed with a confirmation request.
Contextual menu
Right-clicking on this title bar displays the contextual menu.
Separation bar
The separation bar shown in yellow below can be moved with the mouse. It allows you to adjust the respective sizes allocated to the family nucleus and life events.
The position of the separation bar is kept from one time to another by genealogy / Gedcom file.
Family nucleus
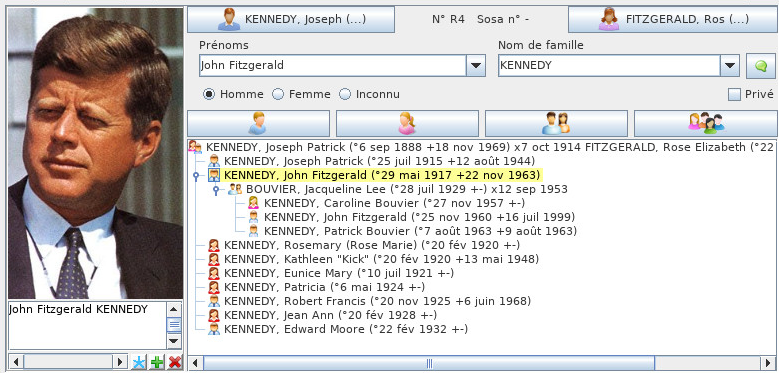
Above the separation bar is the individual's family nucleus.
Photo frame
This frame displays all the photos and other media (video, soundtrack, etc.) of the individual and his or her life events.
The photos displayed at each moment are those of the event selected in the life events section.
Media included in the sources are not displayed here, but in the Life Events photo frame.
The photo media display the photo. Other media (sounds, videos, documents) display a representative media icon.
A horizontal scroll bar allows you to scroll through the photos of a given event.
You can specify a short description for each photo.
Several actions are possible regarding the displayed media.
- A single left click changes the media, whatever it is
- Right-clicking displays the media in your computer's media viewer.
- If it's a photo, the photo will be displayed in large size in your image viewer.
- If it is a video or soundtrack, it is played in your favorite media player.
- When the media is a photo
- Drag and drop with the mouse to crop the photo
- The thumbwheel allows you to zoom in and out.
- Finally a Ctrl+Click allows to freeze and save the photo cropping
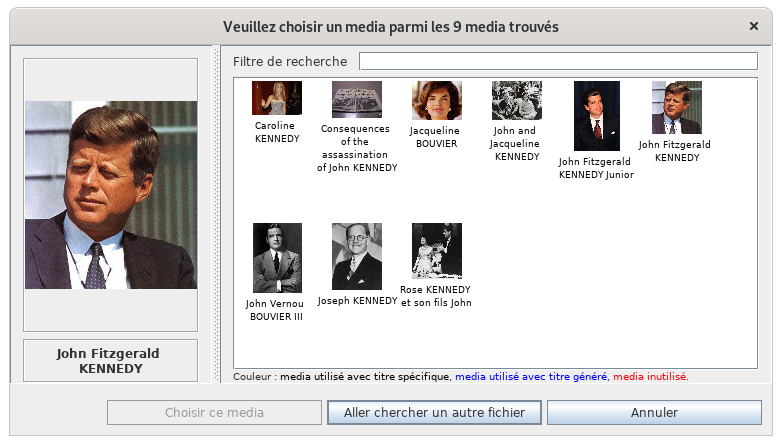
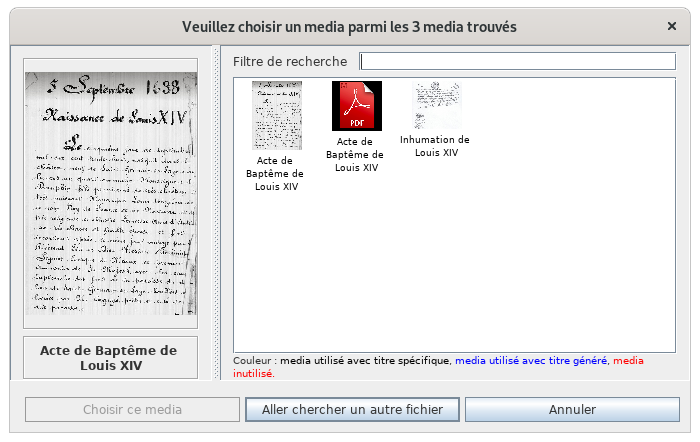
The choice of a photo is made via the media selection window.
The media are displayed on the right side.
The left side displays the selected media.
The media titles have three possible colors.
- In black the media whose title is filled in with the media
- In blue the media whose title is deduced from the entity that uses it
- In red unused media
The Choose this media button associates it with the individual and closes the window.
Description of the individual
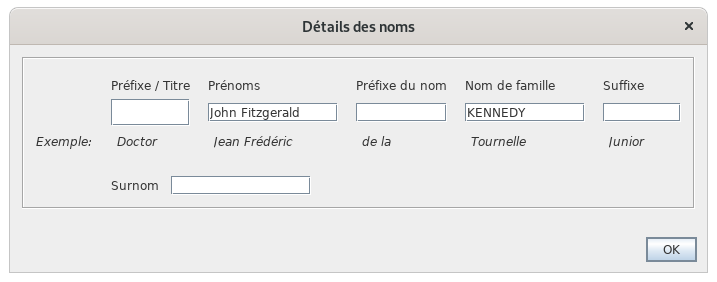
This section allows you to specify the name and gender of the individual.
- The First names drop-down menu allows you to select a first name among those already used in genealogy.
- The Surnames drop-down menu allows you to select a surname from those already used in genealogy.
The checkbox  allows to mark this individual as private. For more details on this subject, see the Private data page of the Preferences)
Above the first and last names is indicated the identification number of the individual and his Sosa number when it was generated.
Around this description are arranged 6 buttons Relationships concerning the parents of the individual, his brothers and sisters, his spouse and his children.
These Relationship buttons are multi-function.
- A left click on the button will not have the same result depending on whether the individual in relation already exists or not yet.
- If the individual already exists, it is selected and the editor will navigate to this individual and display it.
- If the individual in relationship does not exist, he is created.
- Right-clicking displays a menu with the choices that seem most relevant to that individual and the relationship in question.
- These choices are arranged in four categories
- Navigation to the individuals concerned, if there are several brothers, sisters, spouse or children
- Creating an individual in genealogy and connecting him/her with others
- Add an individual relationship already existing in genealogy
- Detach the individual relationship
Close Family Tree
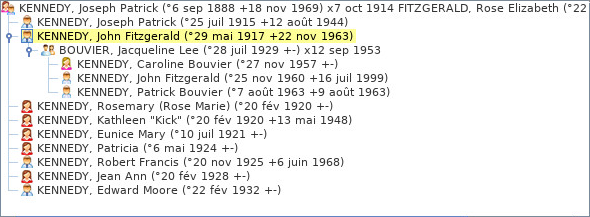
This tree structure presents.
- in yellow, the selected individual,
- his parents at the upper level
- his siblings at his level in the order of births
- his or her spouse(s) are listed below
- and the corresponding children at the lower level
A double-click on one of the individuals selects it.
Life events
This part of the Cygnus editor details the events of an individual's life.
A vertical separation bar delimits on the left the list of events and the media of the associated sources, and on the right the details of these events. It can be moved and its position is memorized from one time to another.
Events
List of events
We distinguish the General event from the others.
- It is a particular event that allows you not to define a particular event precisely.
- It allows to associate notes and sources to the individual to characterize the whole of his life, without attaching them to a particular moment of life.
All other events are those that the Gedcom standard allows to define. They are very numerous (birth, marriage, profession, residence, death, burial, etc.).
All events are listed in a single lifeline, including unions. You can therefore create a baptism event and a wedding event in the same place and in the same way.
Indeed, unlike the other two editors, Cygnus being centered on the individual, there is no distinction of capture between the events of the individual entity and the events of the family entities concerning him/her as spouse.
The list displays the default events in chronological order, using date as the event logic (a death occurs after a birth).
The list can be sorted by clicking on the column header, in ascending order with one click, or descending order with a second click.
The width of the columns can be adjusted with the mouse.
Selecting an event displays its details on the right side, and its associated photos in the photo frame at the top of the editor, and source documents in the source media frame at the bottom left of the editor.
Les boutons de création ou de sélection d'événements
Un ensemble de 10 boutons permet de gérer plus efficacement les événements les plus courants.
- Les 8 premiers en partant du haut sont les événements les plus courant utilisés en généalogie
- Le premier est celui de la naissance. Un clic sur ce bouton crée l'événement naissance s'il n'existe pas déjà, et sélectionne l'événement naissance sinon
- Celui en dessous est celui de la profession. Comme il peut y avoir plusieurs professions pour un même individu, un clic sur le bouton affiche un menu déroulant demandant si vous voulez créer une profession ou vous propose de sélectionner l'une des professions existantes. Quand il n'y en a aucune, il en crée une
- L'avant-dernier bouton est un bouton qui fait apparaître tous les autres événements possibles dans une liste. A vous de choisir celui que vous voulez créer
- Le dernier bouton supprime l'événement sélectionné. L'événement Général ne peut être supprimé
Détails d'un événement
Pour chaque événement sélectionné, la partie droite permet de renseigner les mêmes informations, sauf pour l'événement Général qui n'a pas besoin de certaines d'entre elles. Toutes ces informations sont prévues dans la norme Gedcom.
La description de l'événement
C'est une liste déroulante permettant de mémoriser les données déjà renseignées pour d'autres événements si la description peut être réutilisée.
La date et l'heure
Voir la page sur les dates pour plus de détail.
Sous la date s'affiche le jour de la semaine s'il est daté, et l'âge de la personne au moment de cet événement hormis le jour de sa naissance.
Le lieu
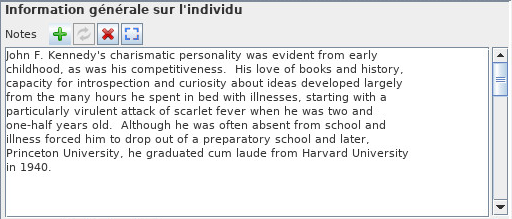
Les notes
Il est possible de saisir une ou plusieurs notes, spécifiques ou partagées. Voir la différence dans la section Informations partagées.
Cygnus reconnaît, affiche et édite les notes spécifiques mais ne crée que des notes partagées.
La molette de la souris permet de faire défiler le texte de la note s'il nécessite plus de lignes qu'il n'y a de place pour les afficher. L'ascenseur de droite permet de faire la même chose. Il apparaît lorsque toutes les lignes ne peuvent être affichées.
La touche Ctrl enfoncée et l'utilisation de la molette de la souris permet de faire défiler les notes. L'autre ascenseur de droite permet de faire la même chose.
Un survol de l'ascenseur de droite avec la souris affiche le rang de la note visualisée par rapport au nombre total de notes rattachées à l'événement.
Les 3 premiers boutons permettent de créer, modifier et supprimer une note.
Le dernier bouton permet de saisir la note dans une grande fenêtre dans laquelle il est possible d'agrandit la taille des caractères.
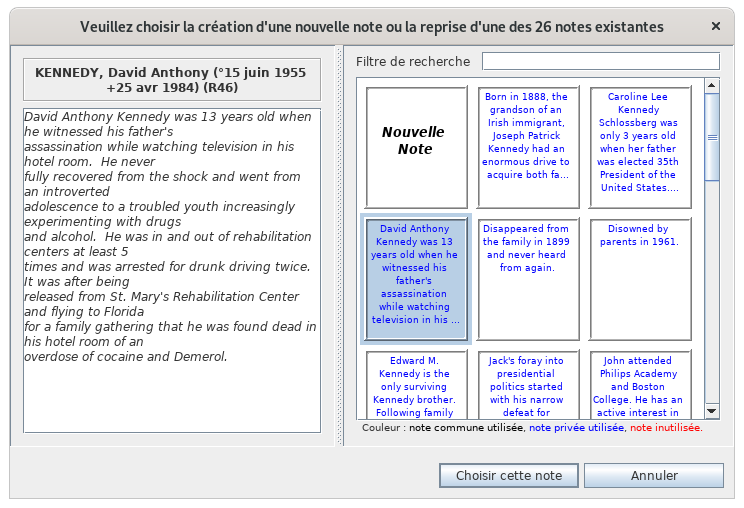
La création et la modification d'une note avec la fenêtre de sélection d'une note existante.
La partie droite liste toues les notes connus de la généalogie. Elles sont de trois origines.
- En noir, les notes utilisées par la généalogie et contenues dans des Entités Note (notes partagées)
- En bleu, les notes utilisés par la généalogie et contenues dans des notes propres à des entités données.
- En rouge, les notes inutilisées.
Les sources
Il est possible de saisir une ou plusieurs sources, spécifiques ou partagées.
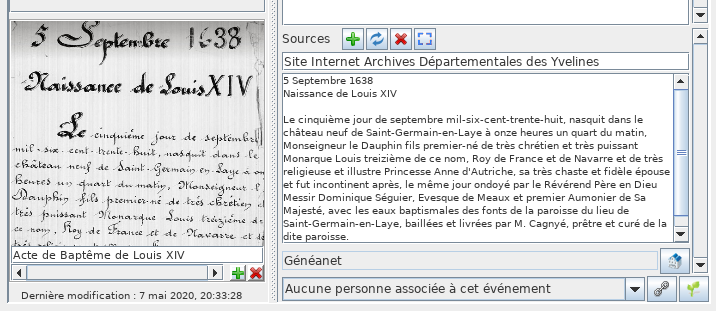
Voici par exemple une source de l'acte de baptême de Louis XIV.
Les informations pour les sources sont les suivantes :
- Un nom de la source
- Un texte qui est généralement utilisé pour présenter une transcription du texte de la source. En effet, il vaut mieux faire l'effort une seule fois de déchiffrer un texte manuscrit difficile à lire, plutôt que de le faire à chaque lecture.
- Un nom de dépôt
- Les médias associés à une même source
Les sources fonctionnent sur le même principe que les notes pour ce qui est :
- des 4 boutons
- des ascenseurs
- l'utilisation de la souris
Le cadre photo de la source d'un événement fonctionne sur le même principe que le cadre photo de l'individu.
Un clic sur le média affiche la fenêtre de sélection des sources.
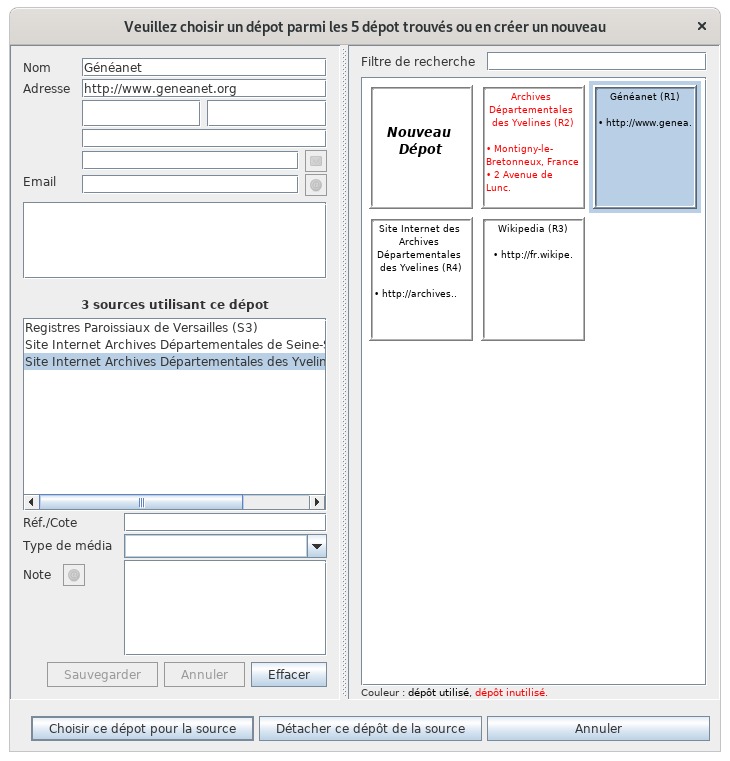
Le champ Dépôt permet de choisir le dépôt d'où est tiré la source avec le bouton à droite  .
.
Cette fenêtre contient toutes les informations des dépôts déjà créés ou bien que vous souhaiteriez créer à l'occasion de l'édition de l'individu en cours.
Les relations
C'est ici que l'on saisit les autres individus en relation avec un événement, comme les témoins d'un mariage ou les parrain et marraine d'un baptisé.
Le champ relation est en fait un menu déroulant listant toutes les relations actuellement saisies pour cet événement.
Il est possible d'en sélectionner une puis de cliquer sur le Le bouton  pour naviguer vers l'individu correspondant.
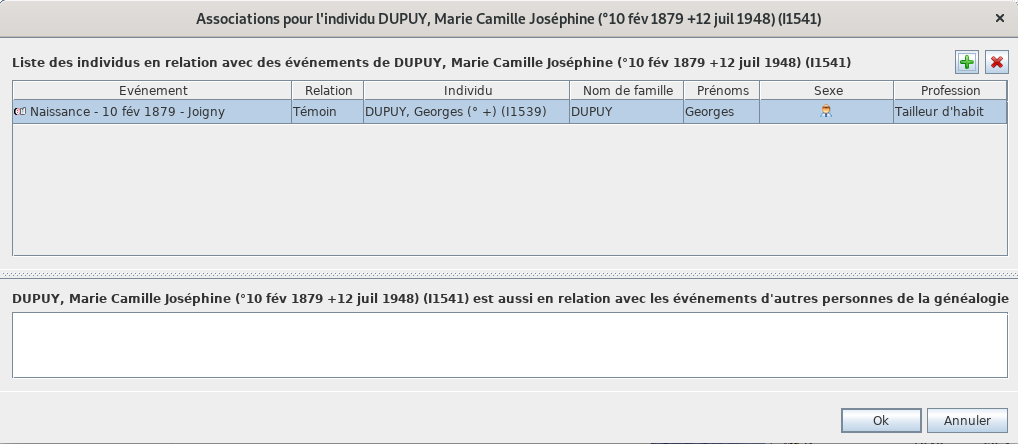
Le bouton  permet dde gérer les individus en relation avec l'événement sélectionné. Un clic sur ce bouton fait apparaître la fenêtre suivante.
Dans la partie supérieure, cette fenêtre permet d'ajouter, modifier ou supprimer des relations.
Pour chaque relation de la liste des relations qui apparaît, il est possible de définir l'événement auxquel on souahite associer une relation, le type de relation (témoin, déclarant, etc.), le nom de la relation, son sexe et sa profession.
Dans la partie inférieure, elle affiche pour information seulement, les événements d'autres individus pour lesquels l'individu sélectionné est lui-même associé.
Horodatage de dernière modification de l'entité
La dernière information visible dans l'Éditeur Cygnus est la date de dernière modification de l'individu.
Cette date se met à jour automatiquement à chaque mise à jour.
Synchronisation avec les autres vues
Nous l'avons vu, dans Ancestris, à chaque instant une entité est sélectionnée pour être l'objet de la zone de travail.
Quand cette entité est un individu, celui-ci apparaît en personne principale dans l'éditeur Cygnus.
Quand cette entité n'est pas un individu (une famille, une note, etc.), l'éditeur Cygnus affiche l'individu relié à cette entité à partir duquel cette entité pourra être éditée.
L'événement sélectionné est celui auquel est rattaché l'entité sélectionnée dans Ancestris.

