Espacio de trabajo y ventanas
El espacio de trabajo de Ancestris está organizado en grupos de pestañas.
Grupos de pestañas
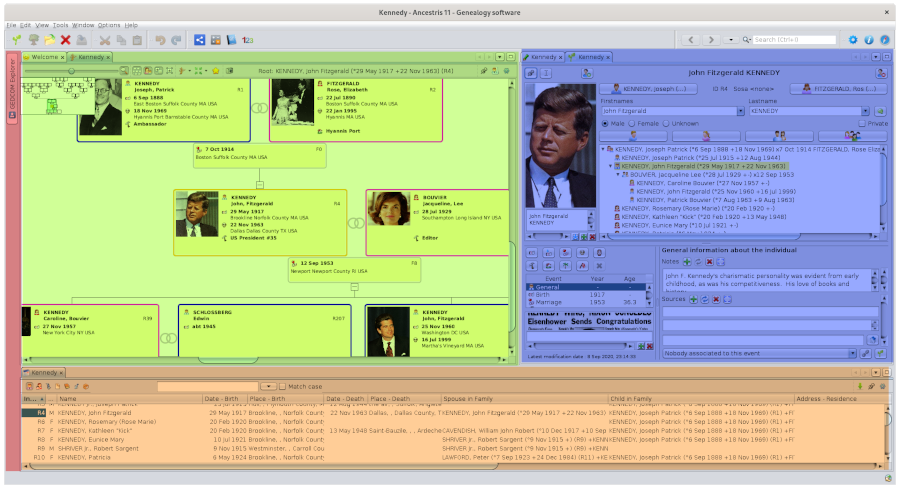
En el siguiente ejemplo, tenemos cuatro grupos de pestañas. Se han resaltado con 4 colores diferentes.
Se pueden tener tantos grupos como se quiera.
Puedes tener tantos grupos como quieras.
Los grupos de pestañas se pueden colocar en varias posiciones en el espacio de trabajo de Ancestris. En general, su posición es a lo largo de un borde, pero es posible tener un grupo de pestañas en el centro de la pantalla.
- Un grupo de pestañas puede maximizarse, cerrarse, flotar o acoplarse con un clic derecho en el borde superior. Se mostrará un menú contextual. Consulte el menú de ventanas para obtener más detalles.
- Un grupo de pestañas se puede mover a una posición diferente con solo arrastrar y soltar el borde superior del mismo modo que mueve una ventana. Consulte Mover una Ventana para obtener más detalles.
Cada grupo de pestañas contiene una o más ventanas. Solo aparecerá una ventana en el grupo en cualquier momento.
Ventana
Una ventana es una vista o una herramienta aplicada a una genealogía. En otros casos, se aplica a varias genealogías.
Here is the Cygnus editor's window, for example, with a view of the Kennedy genealogy.
Una ventana se identifica mediante una pequeña pestaña que contiene un icono y su nombre.
Diferentes ventanas pueden tener diferentes formas, pero todas funcionan de la misma manera (abriendo, cerrando, moviendo y redimensionando).
Además, es posible personalizar ciertos aspectos: como mostrar al inicio, su posición y tamaño.
A continuación se ofrece una explicación de los conceptos básicos de las ventanas y cómo personalizarlas.
Pestaña
La pestaña es el título de la ventana. Contiene un icono que representa la naturaleza de la vista o la herramienta utilizada en esta ventana, seguido del nombre de la genealogía que se muestra en la ventana.
En general, una ventana trata con una sola genealogía, como en la ventana anterior. En este caso, la pestaña tiene este aspecto:
Gracias a esta pestaña, reconocemos el editor Cygnus por su icono, y la genealogía por su nombre completo.
Es el mismo nombre que se muestra en la barra de título de la ventana principal, como ya se describió en la página de la Ventana Principal.
Puede tener los árboles genealógicos de dos genealogías diferentes en dos ventanas diferentes, una al lado de la otra. En este caso, el icono será el mismo para ambas ventanas, pero el nombre de la genealogía será diferente.
También puede tener una vista de árbol y una vista geográfica de la misma genealogía en dos ventanas diferentes. En este caso, el nombre será el mismo pero sus iconos serán diferentes.
Ejemplos :
- Aquí tenemos 1 genealogía Kennedy con dos editores diferentes, Cygnus y Gedcom:
- Aquí tenemos dos genealogías diferentes, Kennedy y Bourbon, cada una con Cygnus abierto:
- Aquí tenemos dos genealogías diferentes, Kennedy y Bourbon, con Cygnus para Borbones y Gedcom para Kennedy:
La pestaña puede estar sola o tener algunos vecinos.
Si está solo, significa que la ventana también está sola en el grupo.
Si hay vecinos, significa que las ventanas correspondientes comparten el mismo grupo y solo una está llenando todo el espacio disponible para el grupo: aquella cuya pestaña está resaltada. Para ver una ventana diferente, simplemente haga clic en su pestaña.
Aquí tenemos el árbol dinámico de Kennedy en el mismo grupo de pestañas que la página de bienvenida. Se muestra el árbol dinámico, su pestaña está resaltada y frente a la pestaña de Bienvenida.
Tenga en cuenta que la ventana de bienvenida no muestra un nombre de genealogía porque no se ocupa de una genealogía.
De hecho, si la ventana no contiene ninguna genealogía (por ejemplo, Bienvenida, Datulator, Calculadora), o cuando contiene varias genealogías (por ejemplo, Búsqueda de genealogía), el nombre de la pestaña es el nombre de la herramienta.
Ejemplo :
A la derecha del nombre también tenemos una pequeña cruz: 'x'. Se usa para cerrar la ventana.
Si pasa el cursor sobre esta cruz, una ventana emergente mostrará algunos consejos sobre cómo cerrar las ventanas del grupo. Volveremos a esto más tarde.
La pestaña de una ventana también es un identificador que le permite manipular la ventana con el ratón y, en particular, moverla a otro grupo de ventanas. El grupo de ventanas ya puede existir en la pantalla o crearse al moverse.
También es posible manipular la ventana a través del Menú Ventana.
Ventana Acoplada o ventana Flotante
A window can have two different states : docked, or floating.
Una ventana puede tener dos estados diferentes: acoplada o flotante.
Está acoplada cuando se adjunta a un área específica de la ventana principal.
Es flotante cuando es independiente de la ventana principal de Ancestris. Luego se puede colocar en cualquier lugar de la pantalla, mientras que la ventana principal podría estar fuera de la vista.
Utilice la acción correspondiente del menú de la ventana para acoplar o hacer flotar una ventana.
Ventana oculta
La pestaña también puede adoptar la forma de un botón. Esto significa que la ventana está oculta, o en forma de cajón, en uno de los bordes de la ventana principal.
Para ocultar una ventana, arrastre su pestaña a uno de los bordes de la ventana principal e incluso más allá de ese borde.
Una vez acoplada en el borde, la ventana está en la posición abierta. Simplemente haga clic en el botón superior derecho para cerrar el cajón.
Esto muestra la ventana de la Tabla de Entidades:
Después de la reducción, la Tabla de Entidades ahora está oculta:
Simplemente coloque el cursor sobre este botón de pestaña o haga clic en él para plegar/desplegar la ventana.
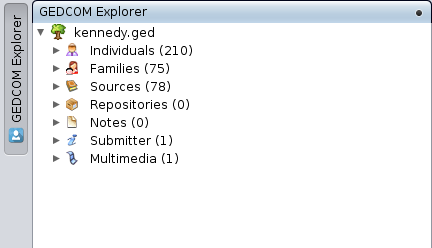
Este es el caso de la ventana del Explorador de GEDCOM, en la parte superior izquierda de Ancestris, aquí visible desplegada:
When visible, it can be temporarily hidden pressing Ctrl + 0 on the numeric keypad.
To anchor a retracted window in an unfolded position, it is necessary to click on the Pin icon (the square button containing a black dot in the top right corner) which will then turn into the Reduce Window icon that will set the window in its initial open state (button already seen above).
Resizing a window
The window border is used to resize the window. To do so, simply drag one of the four sides of the border or one of its four corners.
If none of the four sides of the border is visible, it is probably because the window is currently full screen: to display them again, simply click on the Restore Window button in the upper right corner.
Changing the size of a window also changes the size of the window group in which it is located.
Moving a window
To move a window, you have to make a drag and drop the tab: left click maintained during the movement, then release the mouse to lock the window position.
While moving, Ancestris shows a red preview rectangle shape to indicate its realeased position.
During drag and drop, the future position of the pane you are moving will differ depending on whether you are hovering over the centre of an area or over its edge.
- When the tab is next to another tab, this tab will move to the new position, in the current window group or in a new one.
- When the tab is on the edge of a tab group, a new group will be created, this tab will move into this new group, and its window will occupy this space alone.
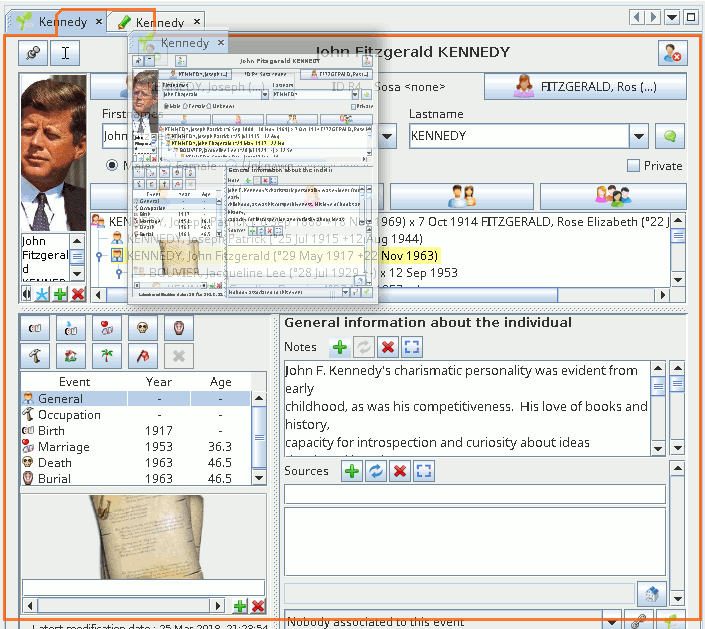
Below is an example where the Kennedy Cygnus Editor window is being moved: a thumbnail image of the window appears and moves with the mouse, while red borders appearing to indicate where it will be repositioned.
Following your attempts to move windows, if you have found the layout that you find most convenient and would like to use it again for all genealogies, save your windows configuration via Menu / Options / Save display settings.
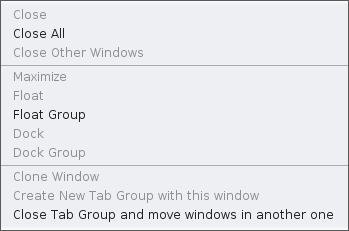
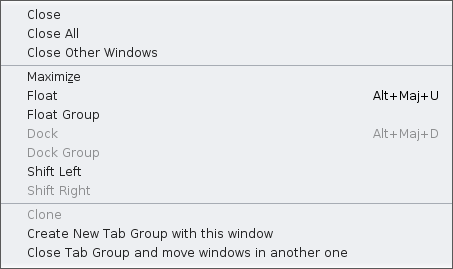
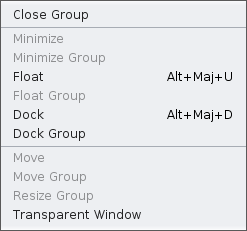
This menu will open with a right click at the top of any window. It includes different actions, used to manipulate the window.
The list of actions depends on where you click, if it was on the group or on the tab.
Examples of window menus
 |
 |
 |
|
Actions for a tab group (right-click on the top border) |
Actions for a window (right click on the window tab) |
Actions for a concealed window (right click on the window tab) |
Description of the various window actions
Close
Removes the window from the tab group.
To open the window again, you have to go through the menu bar.
Be careful if you had uncommitted modifications, they will be lost. If you had validated your modifications without saving them, they will not be lost.
If the window you close is the last one to deal with a given genealogy, the genealogy will be closed. If any of the validated changes were not saved, Ancestris will ask you to do so.
Close All (the group and its windows)
Closes all windows in the group. The tab group will disappear.
The other tab groups will then take the place freed by the closed group.
The same considerations given for closing a window also apply here.
Close Other Windows
Only the selected window will remain in its group.
The same considerations given in the Close description also apply here for windows that are about to close.
Maximise
When this line has the check mark, it means the window (and the window group it is in) in displayed full screen.
The window occupies the entire screen, but hides the border.
If you wish to restore the initial display, simply uncheck the box.
Float
Releases an anchored window from the main Ancestris window. It can then be visible without the main window or float above the other windows.
Float Group
Same as for one window, but applied to all windows on the group.
Dock
Send a previously freed window to its former group.
Dock Group
Same as for one window, but applied to all windows on the group.
Shift Left
Move the window tab to the left within the group. Basically, swap tab's position with the one on the left.
Shift Right
Move the window tab to the right within the group. Basically, swap tab's position with the one on the right.
Clone
Duplicate the window within the group.
Create new Tab Group with this window
Create a new tab group and place the window in it.
Close Tab Group and move windows in another one
Moves all the windows in the group to another existing tab group, and closes the group.
Warning: if this action is performed on the last remaining group, the windows will be closed and the considerations indicated for 'Close' description apply (genealogy will be closed, etc.).
Move
Moves a concealed window which is in the locked-open position. After you click this action, you will be able to move a red rectangle with the cursor keys. Press the Enter key to validate the choice or Esc to cancel.
Move Group
Moves a concealed tab group which is in the locked-open position. After you click this action, you will be able to move a red rectangle with the cursor keys. Press the Enter key to validate the choice or Esc to cancel.
Resize Group
Changes the size of a concealed group which is in the locked-open position. Once this action is clicked, allows you to enlarge the window group with the cursor keys. Press Esc and Enter to exit this resize mode.
This action is only available for certain groups (example: Entity Table).
Transparent Window
Clicking on this action displays an information message about the keys to use to make the concealed window pane transparent: "Press and hold [Ctrl + Numpad 0] key to make concealed window transparent".
This action is only available for a concealed windows.
Tab group buttons
To the right of the tabs of a given tab group are four buttons whose functions you can see by tooltip.
Scroll the tabs to the left or right
Represented by arrows on the left and right, allow you to scroll through the tabs when there are a lot of them and it is not possible to see them all.
Show opened documents list
Represented by a down arrow, displays a small menu containing the list of windows of the group, and which allows to choose directly the window to be displayed in the group.
Maximize or Restore Window
Depending on the situation of the tab group, opens the tab group to full screen or restores it to its previous position.

