Blauwdrukken - Blueprints
Vensters die blauwdrukken gebruiken
- Stamboom overzicht (de stamboom als boomstructuur).
- Entiteiten kaart.
- De (uitgebreide) Navigator.
- De Gedcom editor.
Entiteits kaart


Gedcom editor
Algemene principes
Een blauwdruk is een sjabloon die bepaalt wat er van een entiteit moet worden weergegeven en hoe deze moet worden weergegeven.
Een blauwdruk wordt toegewezen aan een bepaalde entiteitscategorie (individu, familie, bron, enz.) voor een bepaalde weergave (dynamische boom, entiteitsbestand, enz.).
U kunt uw eigen blauwdrukken definiëren in plaats van de blauwdrukken te gebruiken die al in Ancestris aanwezig zijn.
Er bestaan al verschillende blauwdrukken binnen Ancestris en deze zijn standaard al geselecteerd voor elk van de entiteitscategorieën en in elke weergave waar blauwdrukken van toepassing zijn.
Blauwdrukken vormen een manier om Ancestris aan te passen. U bent vrij om blauwdrukken te behouden zoals ze zijn of ze aan te passen aan uw behoeften.
U kunt uw eigen blauwdrukken definiëren, d.w.z. zowel de informatie die moet worden weergegeven voor een individu of een gezin (naam, adres, enz.) als wel hoe deze informatie moet worden weergegeven (kleur, lettertype, uitlijning, lay-out, enz.).
Blauwdrukken beheren
- blauwdrukken toewijzen aan entiteiten en weergaven
- eigen blauwdrukken maken of verwijderen
- Persoon: Klik met de rechtermuisknop op een persoon in de Entiteitskaartweergave en selecteer vervolgens "Weergave van personen wijzigen" om het blauwdrukvenster voor een persoon te openen.
- Familie: Klik met de rechtermuisknop op een familie in de Entiteitskaartweergave en selecteer vervolgens "Wijzig weergave van families" om het blauwdrukvenster voor families te openen.
- Overig: Idem voor Notes, Sources, Multimedia, Repositories, enz. Dit kan worden gedaan vanaf de Entity-kaart of de Gedcom Editor voor de overeenkomstige entiteiten.

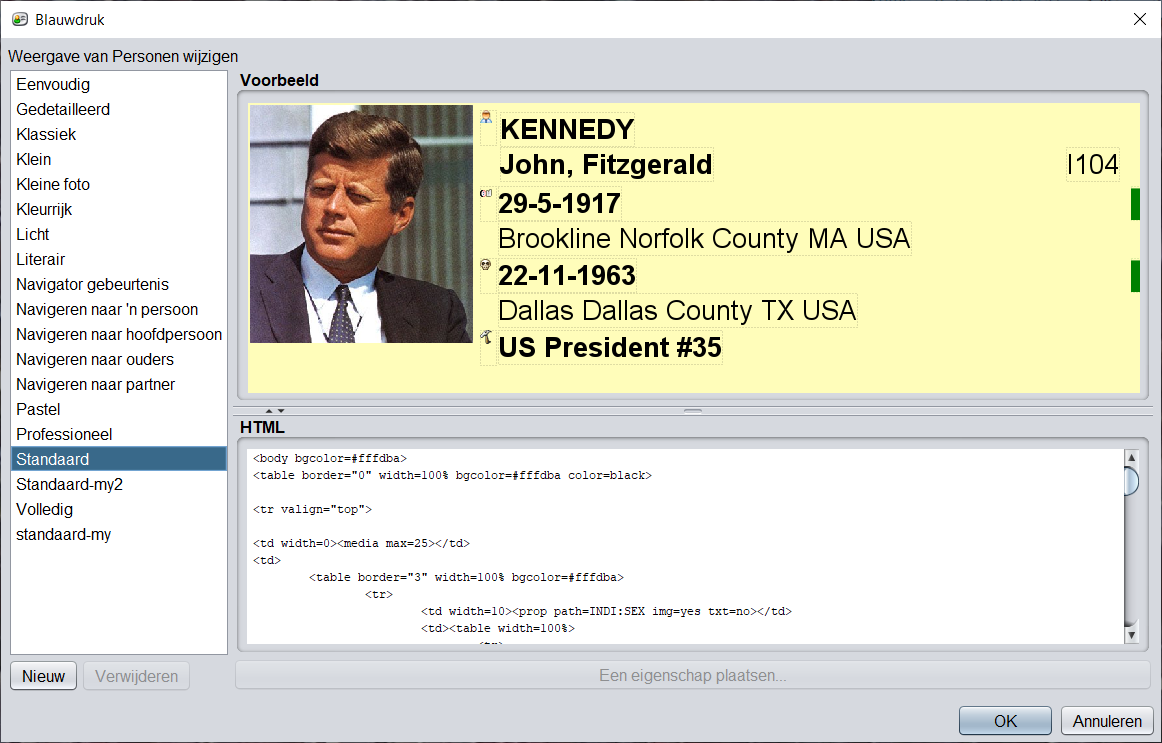
Beschrijving
- De lijst met blauwdrukken aan de linkerkant toont de blauwdrukken die momenteel beschikbaar zijn voor de eerder geselecteerde entiteitscategorie. Om aan een blauwdruk te werken, selecteert u deze in de lijst.
- Het voorbeeldgebied rechtsboven toont een voorbeeld van de blauwdruk die in de lijst is geselecteerd.
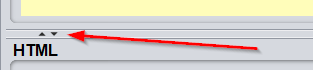
- De HTML-editor rechtsonder geeft de HTML-code weer van de blauwdruk die is geselecteerd in de lijst aan de linkerkant, en waarvan u de code kunt bewerken. De horizontale scheidingsbalk onder het voorbeeldgebied moet met de muis omhoog worden gesleept om de onderstaande code te zien.
- Betekenis van de knoppen:
- De knop Nieuw voegt een kopie van de momenteel geselecteerde blauwdruk toe aan de lijst en vraagt u een andere naam in te voeren. Dit wordt de nieuw geselecteerde blauwdruk en u kunt deze wijzigen.
- De knop Verwijderen verwijdert de geselecteerde blauwdruk uit de lijst
- De knop Eigenschap invoegen... verschijnt wanneer u HTML-code bewerkt. Gebruik het om een TAG in de HTML-code in te voegen. Het zal het invoegen op de cursorpositie.
- De knop OK valideert de wijzigingen en verlaat het venster.
- De knop Annuleren sluit het venster zonder de wijzigingen te valideren.
Whatever the category of entity, the operations in this window are the same. We will use the example of the Blueprint window for individuals in the description that follows.
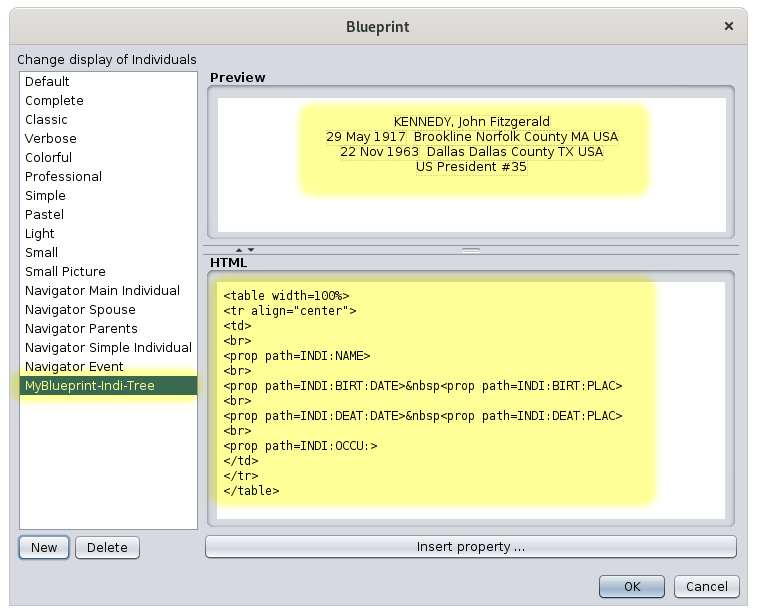
Description
The Blueprint window contains the following areas.
- The list of blueprints on the left shows the blueprints currently available for the previously selected entity category. To work on a blueprint, select it from the list.
- The preview area at the top right shows a preview of the blueprint selected in the list.
- The HTML editor at the bottom right displays the HTML code of the blueprint selected in the list on the left, and where you can edit the code. The horizontal separator bar under the preview area must be dragged up with the mouse to see the code below.
- Meaning of the buttons:
The Blueprint window size can be changed by pulling the lower right corner.
The preview area and the Text Editor area can be adjusted by moving the separator of these two areas with the mouse or by clicking on the arrows of the separator on the left:

Usage
The Blueprint window covers the following needs:
- Discover the available blueprints. To discover the available blueprints without activating them (therefore, without closing the panel), click successively on each of them in the left-hand side list, and check the result in the preview area.
- Choose a different blueprint. To assign another blueprint to the currently selected entity category in one of the views, click a blueprint in the list, then validate by pressing the OK button.
- Modify a blueprint. For security reasons, the blueprints already available cannot be modified. To modify an existing blueprint, you must first make a copy of it. Select it in the list, click New and give it a new name. Then use the HTML editor panel to make your changes.
-
Create a blueprint. To create a new blueprint, it is recommended to copy an existing one. See above.
-
Delete a blueprint. To delete a blueprint, select it in the list and click the Delete button. You are then asked to confirm the deletion which will be final. Note: for security reasons, blueprints provided with Ancestris cannot be deleted.
Case study
Suppose we have a simple blueprint without a photo for the individuals in the dynamic tree, and we want to insert a photo. The steps to do this would be the following:
- Identify where the photo data item is inside the data of the individual. Use the Gedcom editor for that.
- Open the Blueprint window for individuals
- Create a new blueprint by copying 'simple blueprint' without image. Rename it 'MyBlueprint-Indi-Tree'
- Modify the blueprint to insert the photo property identified above, and adjust its size in the frame using the preview
- Save the blueprint and check the result
Each of these steps is detailed below.
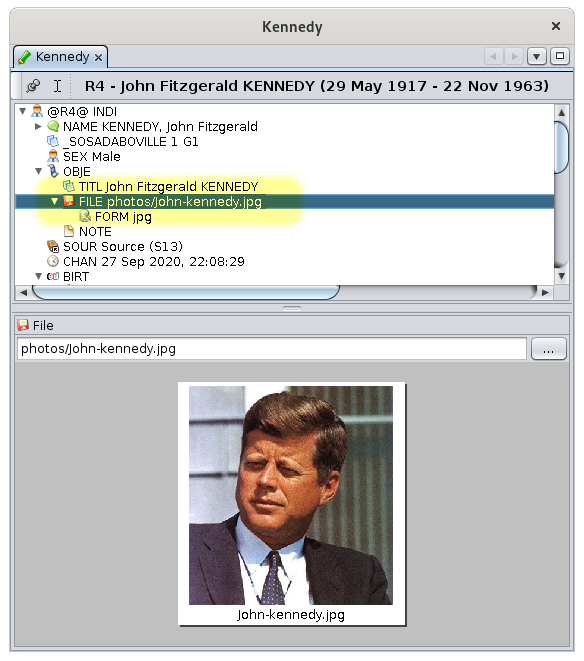
Identify where the photo data item is
The Gedcom editor will show you where the photo items are located for all individuals. We see below that the photo is located in the FILE tag, attached to the OBJE tag, which itself is attached to the INDI tag. All together, you will need to remember that photo files are at the address 'INDI:OBJE:FILE'. That is what we wanted to know.
Open the Blueprint window for individuals
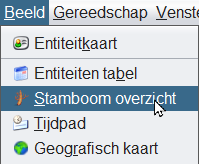
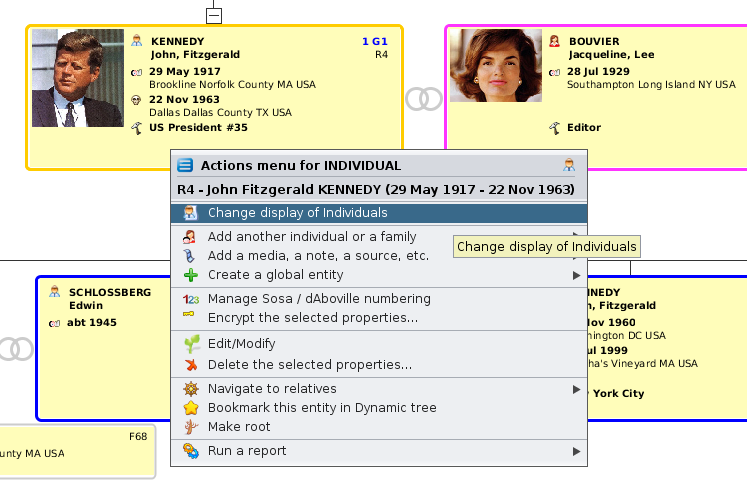
As we want to change the blueprint for Individuals in the Dynamic view, we need to first select an individual in the Dynamic view.
Then we right-click on the individual. In the context menu that appears, we choose "Change display of individuals".
Create a new blueprint
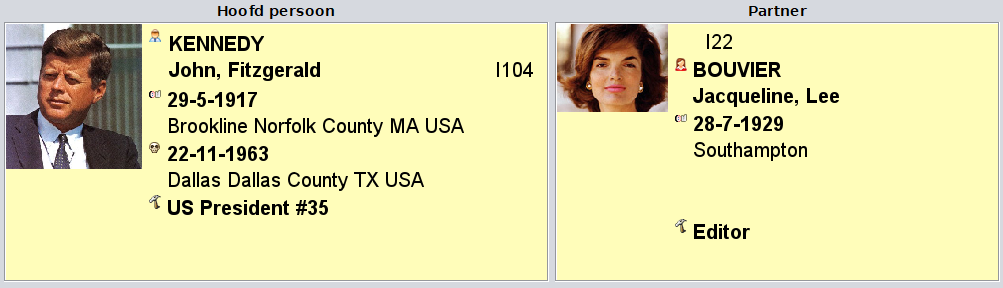
The Blueprint window for Individuals appears.
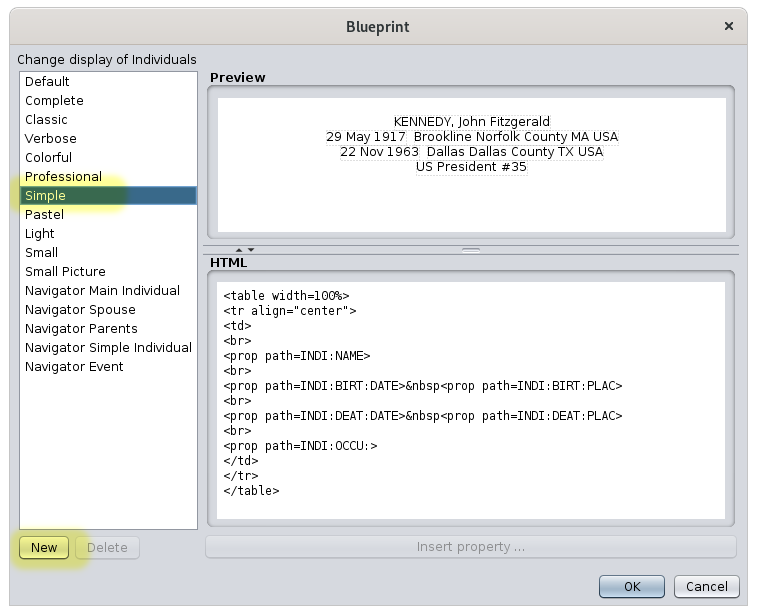
As we want to make a new blueprint as an extension of the "Simple" blueprint, we first make a copy of the "Simple" Blueprint.
To do so, we select it in the list. Then in the preview, we see what this Blueprint displays for an individual : simple text without a photo. What we want to do is to add the photo of the individual.
We then click "New". Ancestris asks the name of the new blueprint:

We type 'MyBlueprint-Indi-Tree' and press OK.
We are then on the previous Blueprint window with a new editable blueprint.
We have the new blueprint selected in the list on the left, the same preview at the top right, and the HTML code at the bottom right.
We see that this blueprint is editable, because the buttons "Delete" and "Insert property..." are visible and enabled.
We will now change the HTML code so that it displays the photo.
Modify the blueprint
We can see that there are 4 lines of properties in the HTML code: name, birth, death, occupation.
The HTML <prop> tag, and everything in it, is Ancestris specific. This makes it possible to manipulate the genealogical data of the Gedcom file.
We want to put the photo at the bottom of the display, so we insert another property, the one identified above, INDI:OBJE:FILE, after the 4 properties already showing.
We place the cursor under </table>, the label that marks the end of a table.
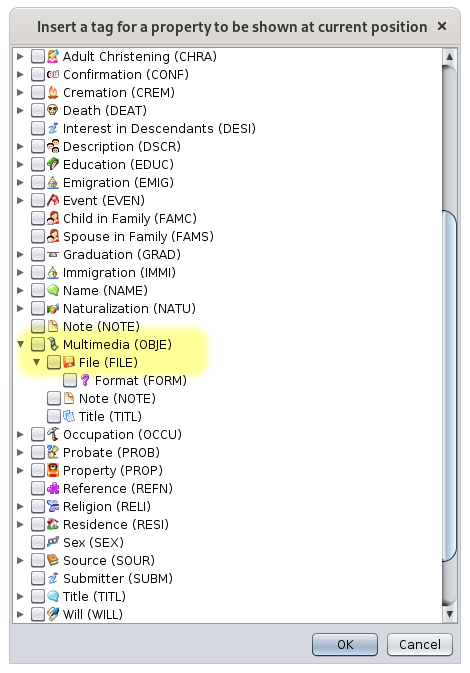
In this window, we find the Multimedia OBJE line, we unfold the flap to show the content of OBJE, and we see the line File. We check the box. And we press "OK".
We now see that the preview has changed.

But that's not finished yet, because in the preview you can see that the photo is too big. And we changed our mind as well. We want to position the photo at the top right corner of the text.
As the text was structured inside a table, it is in fact necessary to put the image in the table, to the right of the text. To do this, we modify the HTML code as follows: we move the line that we have just inserted in the table structure by adding a cell using the <td> </td> tags.
As we also want to limit the size of the image, we add an Ancestris specificity: we add "max = 20" at the end, inside the <prop ...> tag, which means to limit the photo size at 20% of the available width. The preview changes as you change the code. This is handy and immediately lets you see if what you are doing is right. Once the code has changed, the preview looks correct, and the window looks like this.
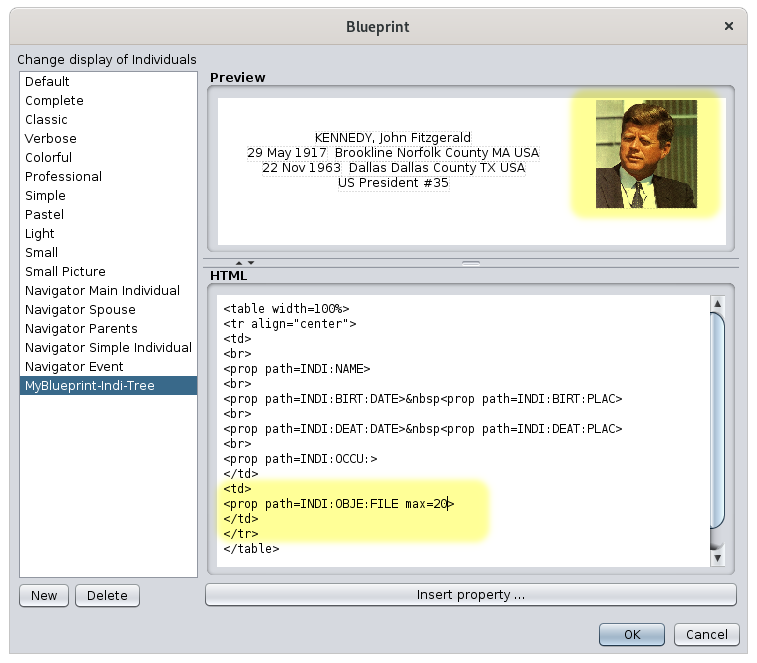
The code in yellow does its job: the photo is in a cell on the right of the table and limited to 20% of the width.
Save the blueprint and check the result
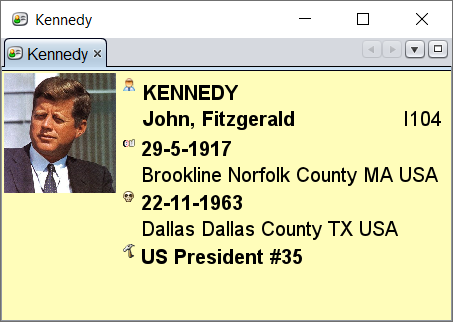
We can save our work now. We click on OK and we look at the dynamic tree at the same time. The blueprint changes.

It's good, we have what we wanted!
Going further
Of course, the hardest part therefore remains to know HTML on one hand, and to know the specificities added by Ancestris to handle genealogical data on the other hand.
As far as HTML language is concerned, there are many sites to help you. Please refer to them.
Regarding Ancestris specificities, the tags added to the HTML are:
- <prop> or <ifvalue>
- <name> or <i18n>
- <media>
- <mark>
The following sections describe how to manipulate them.
<prop> or <ifvalue> tags
<prop | ifvalue path="path:to:prop[?i][:end:of:prop]" [default="path:to:other:prop"] [format="format"] [max="n"] [img="yes"] [txt="no"]>
Displays the property of the entity defined by the path. If a default path is also specified, it is the one that is used if the first property is not found.
For multiple properties, a rank can be indicated in the path using "?i" where i is the rank of the property. Following this number, the rest of the path can be provided if any. See example below with the occupations.
The format and max parameters are explained below.
The img parameter can be set to 'yes' or 'no' to display the property's icon. By default, it is 'no'.
The txt parameter can be set to 'yes' or 'no' to display the property name or not. Default is 'yes'.
Parameters in square brackets are optional.
Either 'prop' or 'ifvalue' can be used.
Case of names (NAME property)
To customize the display of the name, you can use the name sub-properties.
Example : <prop path=INDI:NAME > a.k.a <prop path=INDI:NAME:NICK> will display the full name and the nick name.
Example : John F. Kennedy a.k.a Jack
Case of places (PLAC property)
It is possible to force the level of jurisdictions that you want to see displayed for a place.
The syntax of the line to put in the HTML editor is of the following form
<prop path=INDI:BIRT:PLAC format="1 (4)">
where 1 and 4 are the jurisdiction ranks in the Place criteria definition (see File/Properties).
Example: assuming that all our places follow the following format (as per the PLAC tag in the Gedcom file or in File/Properties):
Suburb, City, ZIP code, State, Country
Starting counting from the left at rank #0 : rank #1 is the City and rank #4 is the country.
In this case:
<prop path=INDI:BIRT:PLAC format="1 (4)">displays City (Country)<prop path=INDI:BIRT:PLAC format="1, 0">displays City, Suburb<prop path=INDI:BIRT:PLAC format="1, 3, 2 - 4">displays City, State, ZIP Code - Country
Case of a multiple property, such as occupations (OCCU property)
In the case of multiple properties, it is possible to force the rank of the property to be displayed.
The syntax of the line to put in the HTML editor is of the following form
<prop path=INDI:OCCU?2>
This will display the second occupation of a person.
You can access to the last value with the LAST keyword. The last value can be the first of one person and the third for another one.
<prop path=INDI:OCCU?LAST >
If you want to display the date of the second occupation of a person, the code would be the following:
<prop path=INDI:OCCU?2:DATE>
It is therefore possible to display the first 5 occupations of every persons like this. In the Default blueprint, you would change the code and insert the 5 blocks like this:
<tr>
<td><prop path=INDI:OCCU?1 img=yes txt=no></td>
<td valign="top">
<b><prop path=INDI:OCCU?1 max=67></b> <br>
</td>
</tr>
<tr>
<td><prop path=INDI:OCCU?2 img=yes txt=no></td>
<td valign="top">
<b><prop path=INDI:OCCU?2 max=67></b> <br>
</td>
</tr>
<tr>
<td><prop path=INDI:OCCU?3 img=yes txt=no></td>
<td valign="top">
<b><prop path=INDI:OCCU?3 max=67></b> <br>
</td>
</tr>
<tr>
<td><prop path=INDI:OCCU?4 img=yes txt=no></td>
<td valign="top">
<b><prop path=INDI:OCCU?4 max=67></b> <br>
</td>
</tr>
<tr>
<td><prop path=INDI:OCCU?5 img=yes txt=no></td>
<td valign="top">
<b><prop path=INDI:OCCU?5 max=67></b> <br>
</td>
</tr>
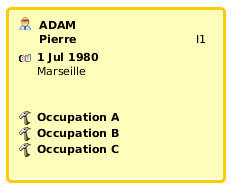
For a person with 3 occupations, and using the code above, you would see the following in the tree view for instance:
Other formatting possibilities
format="$D": displays the full date of an event
- Example :
<prop path="INDI:BIRT" format="{$D}">displays 10 feb 1876 as the date of birth (BIRT)
- Example :
format="$y": displays the year of the date of an event
- Example :
<prop path="INDI:BIRT" format="{$y}">displays 1876
- Example :
format="$P": displays the full location of an event
- Example :
<prop path="INDI:BIRT" format="{$P}">displays Hyde Park,02136,Boston,Suffolk,Massachusetts,USA
- Example :
format="$p": displays the city of the event
- Example :
<prop path="INDI:BIRT" format="{$p}">displays Boston
- Example :
format="$n": displays the name of the related entity if it exists
- Example :
<prop path="INDI:CHR:XREF" format="{$n}">displays Marie STUART, the godmother of the event (CHR)
- Example :
format="$N": displays the full name of the related entity if it exists
- Example :
<prop path="INDI:CHR:XREF" format="{$N}">displays STUART, Marie (° 30 march 1909 + 16 December 2008) (I0298)
- Example :
format="$v": displays the type of related entity followed by the full name of the related entity
- Example :
<prop path="INDI:CHR:XREF" format="{$v}">displays Godmother : STUART, Marie (° 30 march 1909 + 16 December 2008) (I0298)
- Example :
format="$V": displays the entity number only
- Example :
<prop path="INDI:CHR:XREF" format="{$V}">displays I0298 if we use the same example as above - Example :
<prop path="INDI:BIRT:SOUR" format="{$V}">displays S134, the ID number of the SOURce entity supporting the BIRTh event
- Example :
format="text{$e}": displays the text "text" if the data exists, nothing otherwise.
- Example :
<prop path="INDI:NAME:SOUR" format="{(*)$e}">displays (*) if INDI:NAME:SOUR exists, nothing otherwise
- Example :
max="n": limits the display to n% of the available width. Valid for an image or for text.
- Example :
<prop path="INDI:NAME" max=10">displays the full name truncated to 10% of the available width
- Example :
<media> tag
<media [path="path:to:media"] [max="n"]>
Displays the media of the entity. If a path is specified, the corresponding media is used, otherwise any first media found in the entity is displayed.
The "max" parameter limits the size in width as above.
Parameters in square brackets are optional.
<name> or <i18n> tag
<name|i18n [tag="tag"] [path="path:to:prop"] [entity="tag"] >
Displays the name of the label given by tag, path or entity.
One of the 3 attributes must be specified. tag takes precedence over path, which takes precedence over entity.
Example:
<name tag="NAME">displays Name<name path="INDI:NAME">displays Name<name entity="SUBM">displays Submitter
<mark>
<mark path="path:to:prop" [test="value"] [repeat="n"] [default="path:to:other:prop"] [notpresent="true"] >
Displays a square marker on a blueprint.
The marker is only displayed if the indicated property (path) exists in the entity, and if the value of the property is the same as the value of the "test" attribute.
The repeat attribute is optional and specifies the number of times the marker should be repeated.
The default attribute is optional and allow to check this property if the property indicated by path doesn't exist.
The notpresent="true" parameter allow to display a marker only if the property doesn't exist.
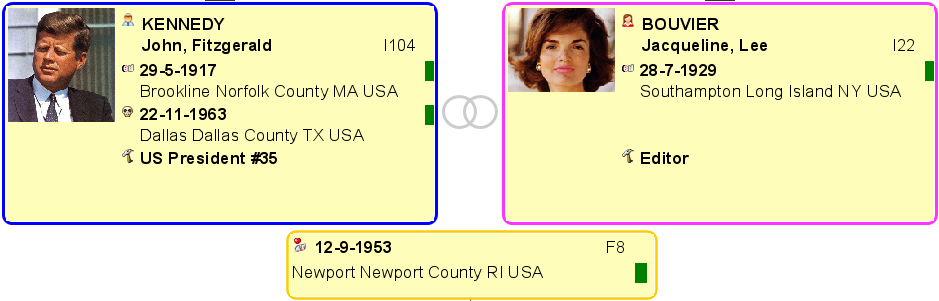
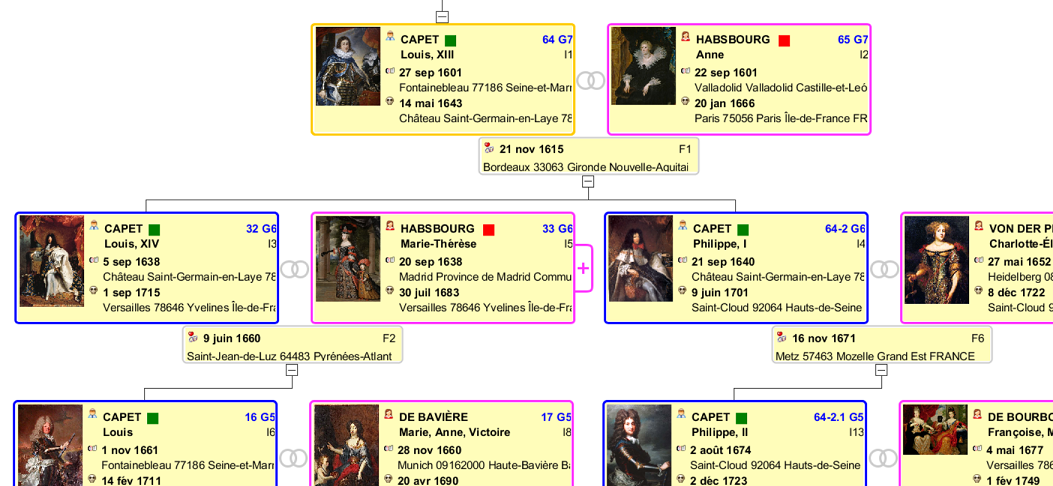
For instance, the following code displays a green marker for individuals whose name is CAPET, and a red marker for individuals whose name is HABSBOURG.
<font color=green><mark path=INDI:NAME:SURN test=CAPET></font>
<font color=red><mark path=INDI:NAME:SURN test=HABSBOURG></font>
This results in the following view in the dynamic tree for instance:
Another example . The following code displays 5 markers for individuals whose sex is unknown.
<mark path=INDI:SEX test=Unknown repeat=5>
<mark path=INDI:BIRT:SOUR notpresent="true"> : Displays a marker if no source is defined for the birth.
Directory where blueprints files are stored
Blueprints are files of HTML codes that are stored in the User Directory, in a sub-directory called "ancestris/blueprints".
The blueprints directory itself contains several sub-directories, each of them having the title corresponding to the entity to which it applies: it is in each of these sub-directories that the different blueprints are located.
- INDI for blueprints about individuals
- FAM for blueprints about families
- OBJE for blueprints about multimedia objects
- NOTE for blueprints about notes
- SOUR for blueprints about sources
- SUBM for blueprints about submitters
- REPO for blueprints about repositoris
As these are HTML format files, you can open them with your favorite internet browser.
Tutorial
We have written a tutorial in PDF format. It is written in French. Please feel free to download it from here.