2.8. Context Menu
Deze pagina moet nog vertaald worden.
Context menu acties
Wijzig de display van Individuen / of Families
Knip, Kopiëer, Plak
Voeg rechtstreeks een Eigenschap toe
Voeg Eigenschap toe via Assistent
Geselecteerde Eigenschap Propageren.
Voeg een andere Persoon of Familie toe
Voeg Media, Notitie, Bron (Source) en dergelijke toe.
Voeg een Globale Entiteit toe.
Beheer SOSA / d'Arboville nummering.
Vervang...
Zet de plaats jurisdicties.
Versleutel de geselecteerde Eigenschappen.
Bewerk / Verander
Verwijder de geselecteerde Eigenschap.
Navigeer naar verwanten.
Bookmark deze Entiteit in de Dynamische Stamboom.
Kies als Voorkeurs Familie in de Dynamische Stamboom
Voer een Rapport uit.
Verwissel Partners.
Registreer : Geboorte | Huwelijk | Overlijden | Overig
====================================================================================
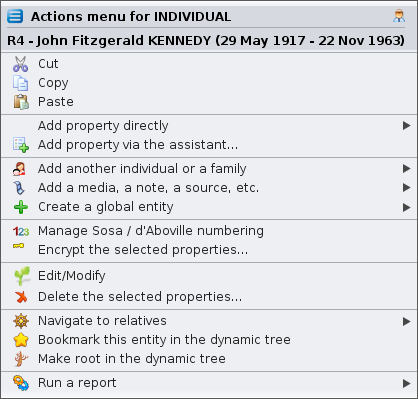
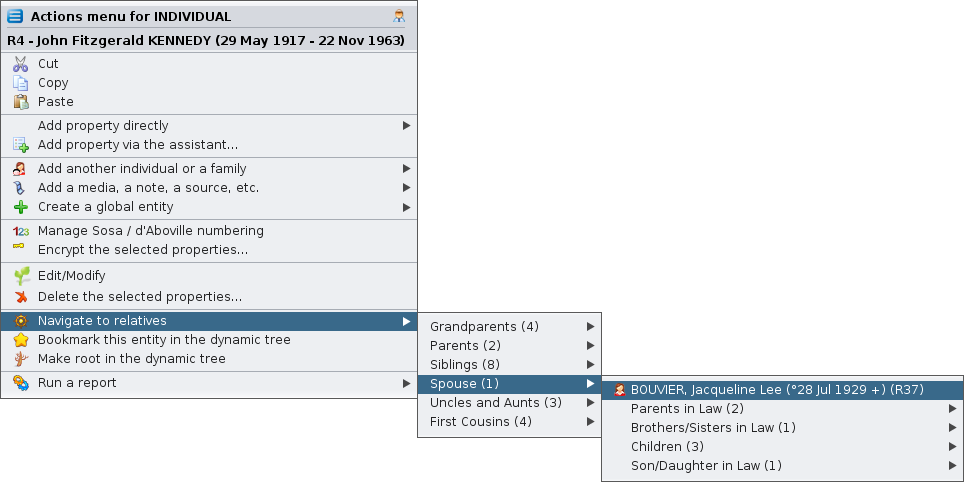
The Context menu provides actions that depend on an object and that will apply to it.
Most of these actions are additional to the ones you can find in the menu bar, keyboard shortcuts, or the toolbar.
You access the context menu when you right-click an object, usually an entity (individual, family, source, etc.).
The title is the name of the 'clicked' entity.
The list of action items depends on the entity you clicked on and the window it is in. That is why it is called a "context" menu. Each proposed action applies to the entity in its specific context.
The example above is the Context Menu when clicking on an individual Entity in the Dynamic tree view.
Only certain views offer a context menu.
They are as follows:
- The Dynamic Tree, for individuals and families. The right click must be made on an individual box or a family box.
- The Entities Table, for all entity categories. The right click must be made on one of the cells, preferably in the column including the identification number.
- The Cygnus editor, for the individual displayed. The right click must be made on the upper banner giving the full name of the individual.
- The Gedcom editor, for all categories of entities and the information it contains. The right click must be made on any of the lines of the entity or on the lower panel where it displays the entity's description.
- The Entity Card, for all entity categories. The right click must be made on the displayed area.
- The GEDCOM Explorer, for all entity categories. The right click must be made on an entity.
Context menu actions
Below is a description of all the possible actions when the context menu is called from an entity.
Change display of Individuals / of Families
Configures the layout and the data content of the entity's information to be displayed. This is done by creating or modifying a blueprint.
This action item only appears when you click an entity in its blueprint.
Cut, Copy, Paste
Cuts, copies or pastes the elements clicked.
This action item only appears when you click an entity in one of the editors.
Add property directly
Adds a property to the entity. Ancestris will only suggest Gedcom compliant properties to be added at the location clicked. You cannot go wrong there.
This action item only appears when you click an entity or a property in the Gedcom editor.
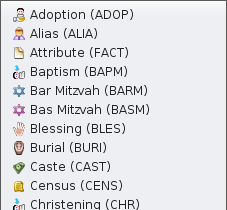
Here is an example of properties than can be added to an individual.
Add property via the assistant...
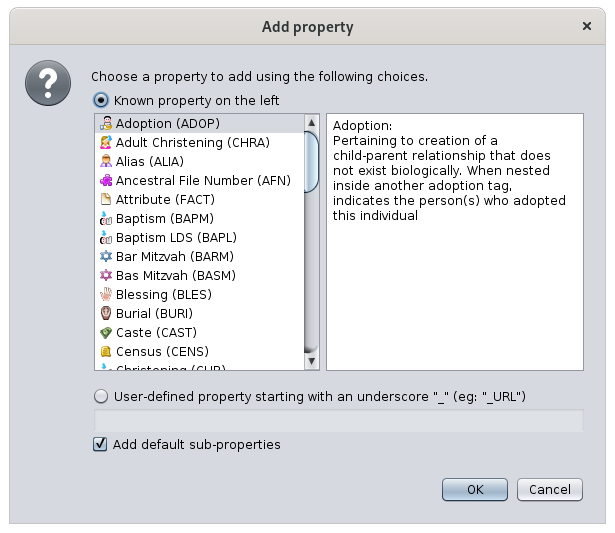
Adds a property to the entity using the following window to guide you:
A list of possible properties is provided. The selection is made by clicking a property item in the left column. The description of this property appears in the right-hand side column.
To create a user-defined property, click on the corresponding radio-button, and enter its name as shown in the text field.
To automatically create sub properties to that property, check the corresponding box. For instance, a MAP property will automatically add the LATI and the LONG properties.
This action item only appears when you click an entity or a property in the Gedcom editor.
Propagate selected property...
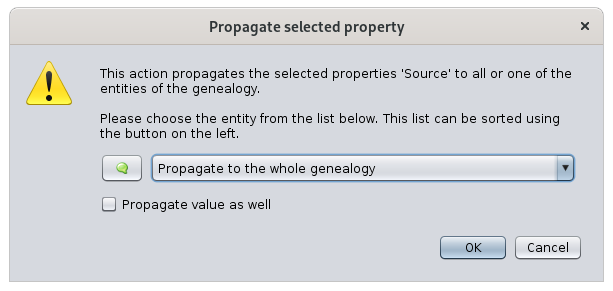
Propagates the property on which you have right-clicked:
- either, to all entities of the category in the whole genealogy
- or, to a particular entity, to be selected from the drop-down menu that will appear.
The Propagate also the value of this property, check the box. It will automatically propagate the property and its value.
This action item only appears when you click a property in the Gedcom editor.
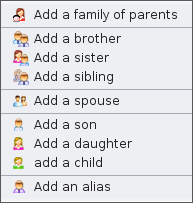
Add another individual or a family
Links an individual or a family to the selected entity.
Depending on the entity or on the property clicked, not all sub-actions will be available.
Here is the actions items when clicking on an individual:
- Add a family of parents: adds the two boxes representing the locations of the two parents of the selected individual
- Add a brother/sister/sibling: adds a brother or a sister to an individual
- Add a spouse: adds a spouse to an individual.
- Add a son/daughter/child: adds a child to an individual or to a family. For individuals with multiple families, this should be done from the family. From the individual, the child is added to the first family.
- Add an alias: adds an alias to the individual. An alias is another individuals who is supposedly distinct originally but who might designate the same person.
When the context menu is on a property, the menu shows this:
- Associate a person: adds a relationship person to the property, usually an event.
Add a media, a note, a source, etc.
Links an entity, new or existing, to the clicked entity.
These are the possible sub-actions, which depend from the category of the entity clicked:
- Add a media: adds a new or existing shared multimedia element.
- Add a note: adds a new or existing shared note.
- Add a source: adds a new or existing shared source.
- Add a submitter: adds a new or existing shared submitter.
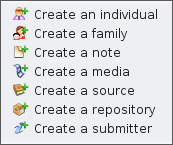
Create a global entity
Creates a global entity that will not be linked to the clicked individual. It will add an entity to your genealogy.
These are the possible sub-actions :
- Create an individual: creates a new entity individual
- Create a family: creates a new entity family
- Create a note: creates a new entity note
- Create a media: creates a new entity multimedia element
- Create a source: creates a new entity source
- Create a repository: creates a new entity repository
- Create a submitter: creates a new entity submitter
Manage SOSA / d'Aboville numbering
Allows you to generate or erase genealogy numberings, starting from the individual on whom you right clicked.
The selected individual becomes the Sosa or d'Aboville number 1 of the genealogy and a new numbering of all the ancestors and descendants will be numbered from it.
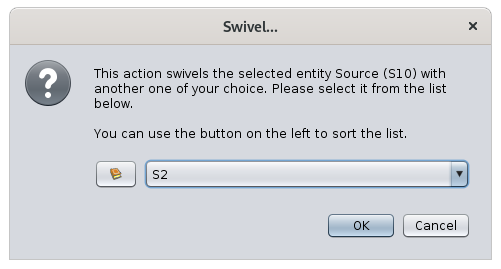
Swivel...
This action is only available for properties related to another entity (associated persons, aliases, child in family, spouse in family, linked source, linked note, etc.).
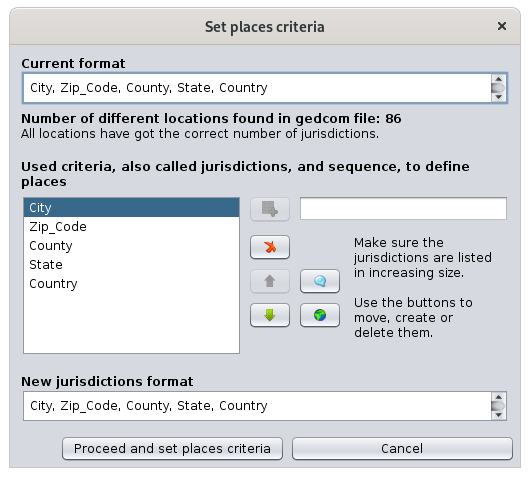
Set places criteria
Opens a window allowing to change the places criteria.
This window is the same as the one used to define the default places format in File/Properties.
This action item only appears when you click a place property in the Gedcom editor.
Encrypt the selected properties
Allows encryption of all information of the entity.
Do not loose the password used for the encryption, it will make it impossible to retrieve the information.
This action item only appears when you click an entity or a property in the Gedcom editor.
Edit/Modify
Opens the default editor on the selected entity or property. The default editor is defined in the preferences.
If the Context menu is called from a place property, Ancestris opens the Places editor for all similar places. To only edit one single place, just use one of the editors and directly edit the place fields.
Delete the selected properties...
Deletes the selected properties.
For security reason, Ancestris will ask you to confirm.
This action item only appears when you click an entity or a property in the Gedcom editor.
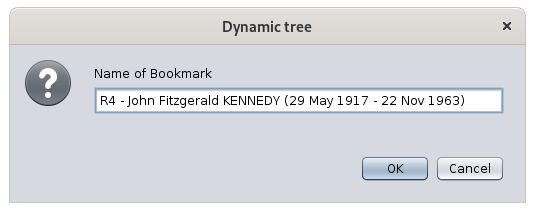
Bookmark this entity in the dynamic tree
Creates a bookmark of this entity in the dynamic tree.
You will then be able to quickly display the dynamic tree of this individual or family using the bookmark button on the dynamic tree menu bar.
Choose as preferred family for the dynamic tree
For family entity only, sets it as the preferred marriage to display in the dynamic tree view.
The action looks like this when the family is not chosen yet, and therefore can be set:
And it looks like this, with the little star on the icon, when the family has been chosen, and can therefore be unset:
Make root in the dynamic tree
Rebuilds the dynamic tree with the clicked entity as the new root.
Run a report
Launches any possible report for the selected entity or for the whole genealogy.
Swap spouses
Swaps husband and wife in a family.
This is much easier to fix a sex error in the individuals than to re-create the whole family.
Register Photo : birth | marriage | death | misc
In the act viewer, displays the photo of the certificate corresponding to the event clicked. This menu item is only enabled if the event has a photo coming from an act statement of the Registers records. The Registers Records tool must also is installed, but not necessarily open.

