Registry records
The Registry records tool helps you automatically add individuals and information into your genealogy from digitized official registry text documents. Another goal of this tools is to assist you in creating registry records for the benefit of other genealogists.
This tool can be accessed from the Tools menu. Before Ancestris version 13, this tool is an extension that is not installed by default when you install Ancestris. To install it, go to the Options Menu and select Manage extensions.
Principle
To understand the tool, let's describe the process of entering information into a genealogy file from an official text document into a genealogy file, and how it can be done using Ancestris.
Process
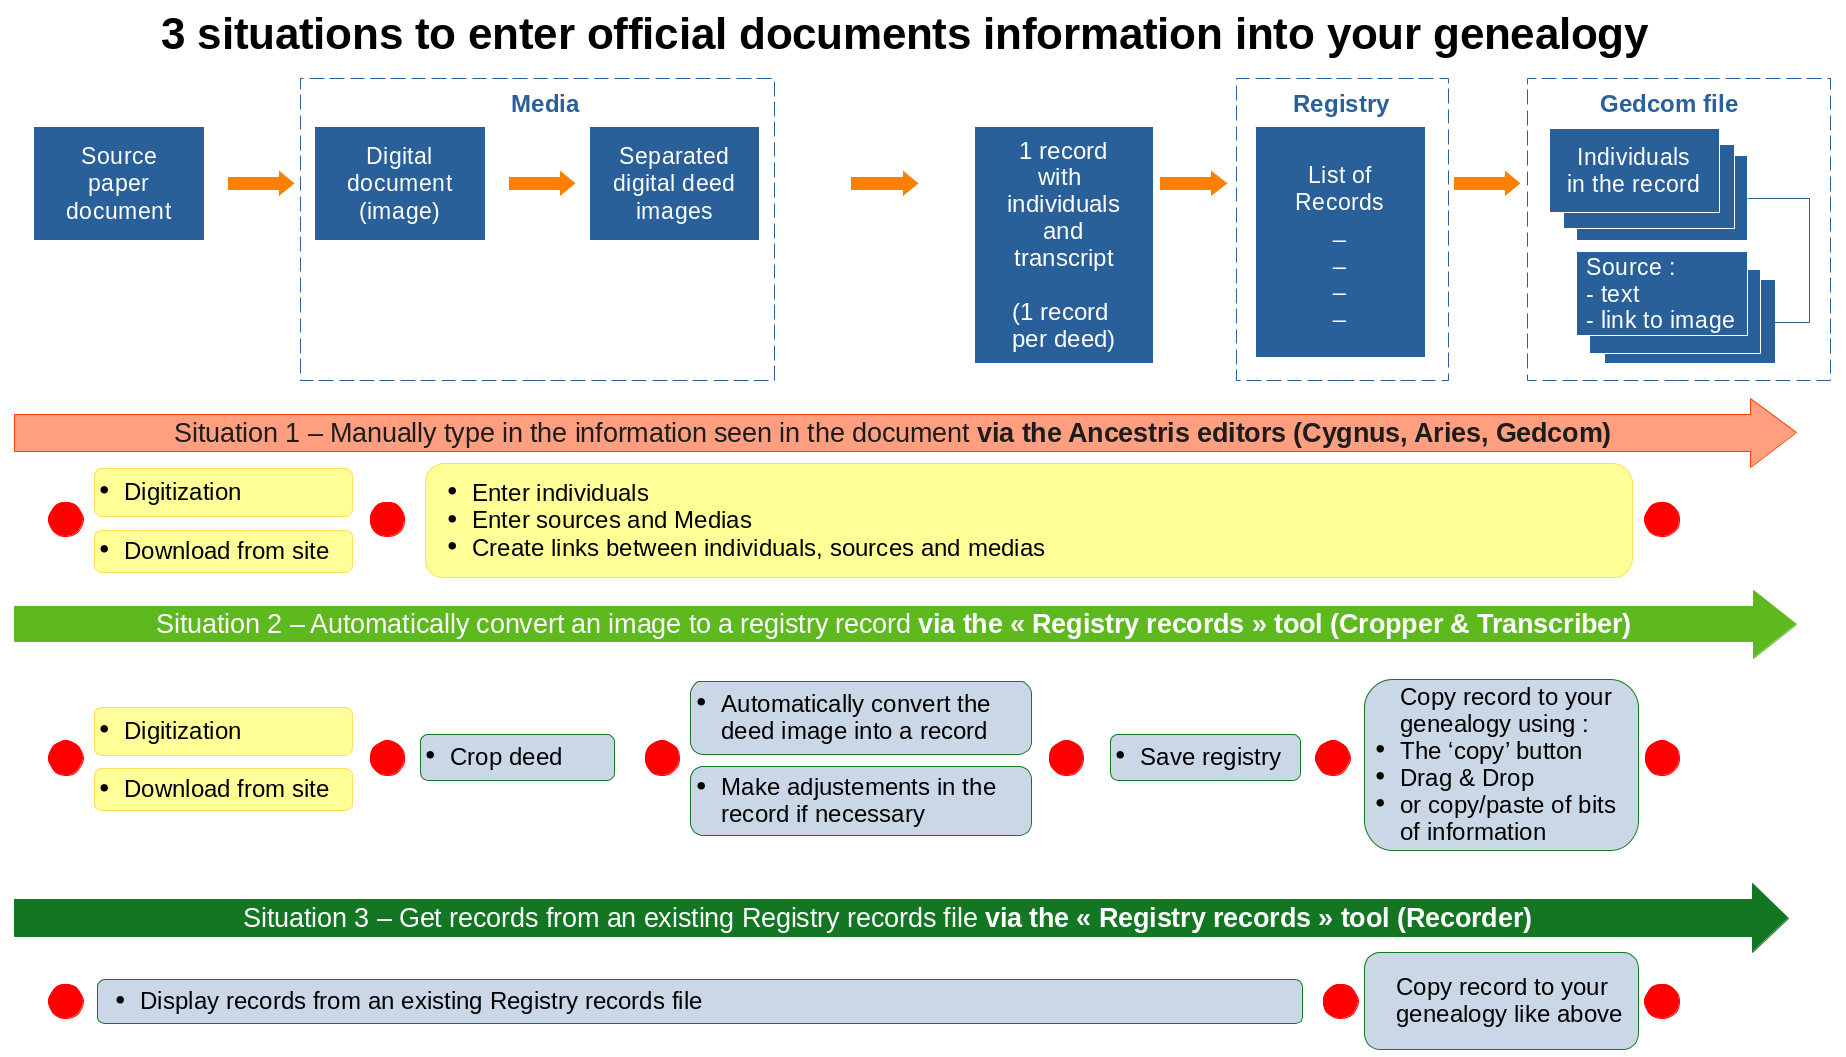
In the above image, the top row with the blue boxes shows from left to right all the possible steps to enter information in a Gedcom file starting from the source paper document.

- In the first step on the left, you have collected a source paper document. Let's say you found a birth certificate of a person you have been looking for a while during a visit to a grand-parent.
- The second step consists in digitizing the document, scanning it or taking a picture of it. In our example, you now have your birth certificate in digital format on your computer.
- The third step consists in isolating the text you are interested in from the rest of the picture in case more than one deed or certificate can be seen on the picture. For example, if your picture of the birth certificate shows the whole page of a church register with a birth certificate before and after the one you need, or if it spreads across several pages, some cropping and stitching will be necessary. You end up with one single image only showing the full text of the certificate you need.
- The fourth step consists in transcribing the text in the picture into a text in a record. This is usually done by reading it, understanding it, and entering in a form the bits of information in the appropriate fields. For the birth certificate of our example, you will enter the date and location of the certificate, the name of the newborn, the birth date if it is different from the certificate date, the parents' names, and potentially the witnesses' names.
- The fifth step consists in saving that record into a registry file so that you do not loose the work done so far. This file holds probably other records of other certificates. You may want to store all records you have found into one single file, or have one file per city, or any other split criteria. In a registry file, records are not linked to one another, just like in a church or civil register.
- The sixth step consists in properly placing all the information of the record into your genealogy file where it belongs. In the birth certificate example, one of the parent may already exists in your genealogy and you want to link the new information to this person's record rather than recreating that person's record. Also, if you want to keep the proof of the information in the genealogy file - you should, you will want to create a media to store the digital image done earlier, to document it, and to link it to the new born record. To complete our example, your newborn person is finally showing in the genealogy tree, linked to its parents, and the media image can be seen to explain and justify all that.
Of course, not all steps are performed for each document you can have.
- You can start with an already digitized document if you took a picture of it during a visit at a registry repository for instance
- You do not necessarily have to crop images if the source image is already showing the whole and only text you need
- You do not necessarily have to enter the record in a registry file and instead directly enter the information in the genealogy file.
From the general process described above, we can see 4 different real life situations. We will now give an overview of how to perform this process using Ancestris in each of these situations.
Situations
Situation 1 – Manually type in the information seen in the document via the Ancestris editors (Cygnus, Aries, Gedcom)
In the picture shown, the process performed above is represented by the orange row.
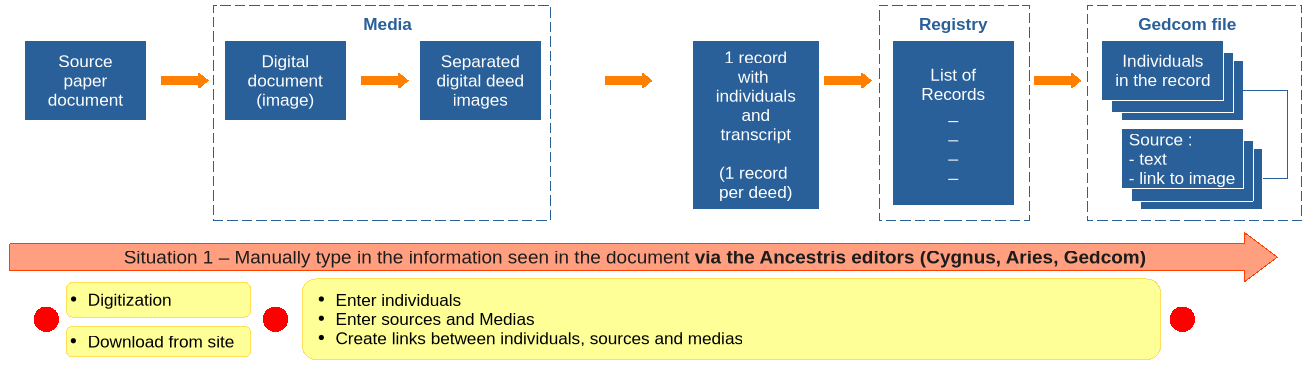
This is the most common situation nowadays. It is made of only 3 steps (represented by the red dots) and 2 sets of activities (represented by the yellow boxes).
Activities
- You have or you collect a digitalized document from a visit or directly from a web site, and you store this file in your computer somewhere. This is done outside Ancestris.
- You manually enter all the information in your genealogy tree. That is where you use Ancestris. For that, you have the choice of 3 editors: Cygnus, Aries or Gedcom. They all have their advantages. They are described in this documentation.
The Registry records tool is *not* used for that situation. The Ancestris editor views are used instead.
The benefit of this situation is that it is highly simple. On the other hand, it is highly manual, quite long and therefore error prone.
For a marriage certificate for instance, you might have to create up to 10 individual entities, 1 media entity, 1 source entity. You will have to document all their respective information. You will have to link all these entities together.
Quite tedious, isn't it? What if all this could be done automatically?
Well, that's where the Registry records tool comes into play. That is "Situation 2" described below.
Situation 2 – Automatically convert an image to a registry record via the « Registry records » tool (Cropper & Transcriber)
In the picture shown, the process performed above is represented by the light green row.
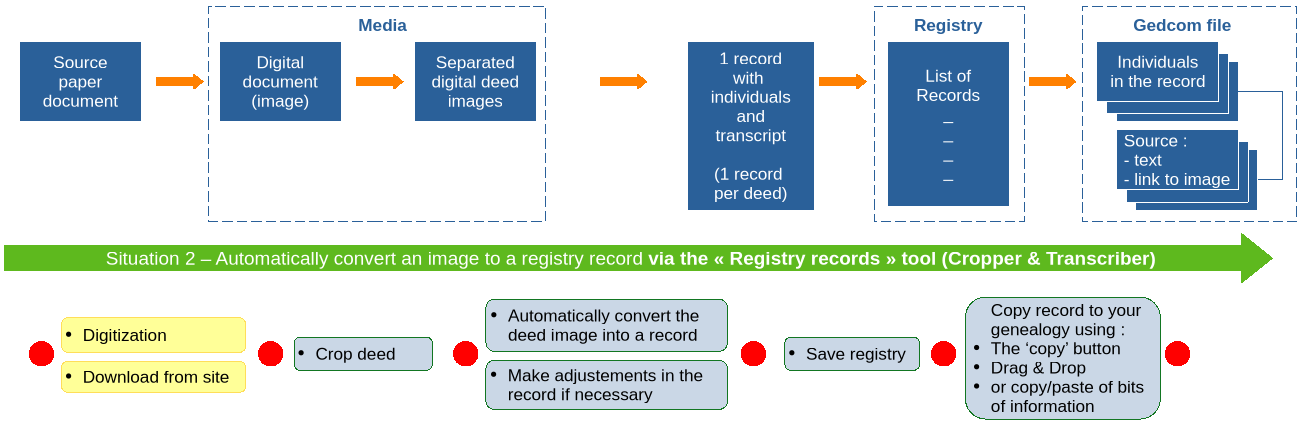
Artificial Intelligence will help automate most of the manual tasks described in "Situation 1" and this "Situation 2" might become the most common way of doing it soon. It is made of 6 steps (represented by the red dots) and 5 sets of activities (represented by the yellow and grey boxes). Yellow tasks are done outside of Ancestris. Grey tasks are done within Ancestris.
Activities
- You have or you collect a digitalized document from a visit or directly from a web site, and you store this file in your computer somewhere. This is done outside Ancestris.
- You use the "Cropper" panel of the Registry records tool to visualize the raw image and crop out one image showing the text of a deed or certificate.
- You use the "Transcriber" panel of the Registry records tool to convert the text in the image into a record displayed as a filled-in form with the relevant information in the right fields. This is where the magic happens.
- You save the record in a registry file.
- You copy the record to your genealogy tree.
- The Registry records logic will propose the most relevant possibilities to merge the record into your genealogy tree and you will select one of them
- You configure what you want to include or exclude from the merge and confirm.
- Ancestris will do the rest automatically. It will create all relevant entities, fill them in with the record information, annotate some dates and places, link all the entities together and show the result in the editors.
The Registry records tool is used for that situation.
Situation 3 – Get records from an existing Registry file via the « Registry records » tool (Recorder)
In the picture shown, the process performed above is represented by the dark green row.
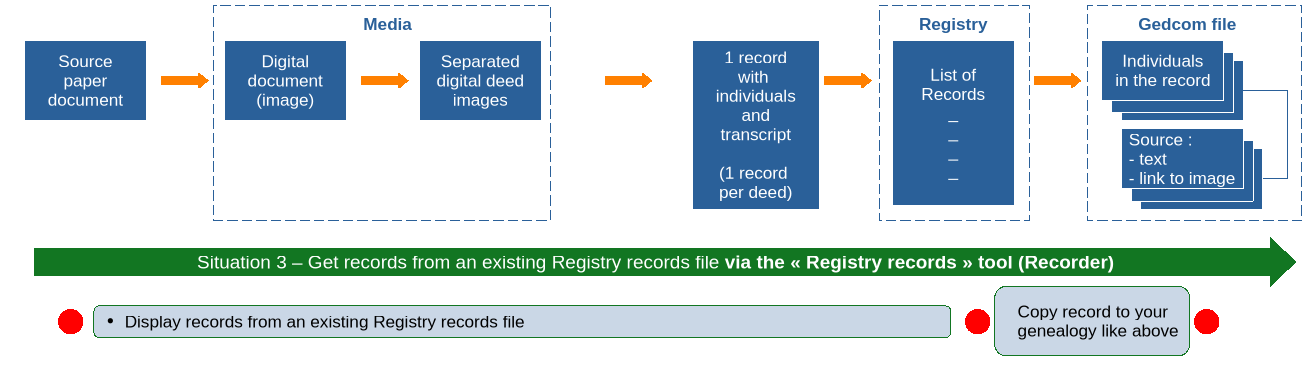
This situation has 3 steps and 2 activities. The difference with the previous two situations is that this one does not start from a digitized document, it starts from a Registry file that you might have done at a previous stage or that you received from someone else.
A registry file in Ancestris is a simple CSV file complying with a known format: NIMEGUE, EGMT, or ANCESTRIS.
Activities
- You have a registry file on your computer and you open it using the "Recorder" panel of the Registry records tool.
- You select a record you are interested in and copy it to your genealogy tree in the same way as described above in "Situation 2" activity 5.
Situation 4 – Producing Registry files for others to use
"Situation 3" suggests that rather than using a Registry file from someone else, you can be the one producing Registry files that others will use.
Use "Situation 2" in that case starting with complete official registers pages and without copying the records to your genealogy.
Only crop page images into single deed images, transcribe the text of each deed into a record, and save the records.
You can then export the file in one of the Registry formats, NIMEGUE, EGMT or ANCESTRIS.
Info: a registry inventory is the manual operation of an individual or a genealogical association to collect and enter one by one in a computer all the deeds/certificates of a parish or civil status register with a more or less complete and exhaustive transcription of the information.
The Registry tool is designed to assist you in such operation.
Description
The tool is made of 3 panels, each one for a specific activity, each one with its own toolbar of buttons.
The 3 panel have been introduced in the "Situations" section. We will give here all the details below on their features.
- The Cropper
- The Transcriber
- The Recorder
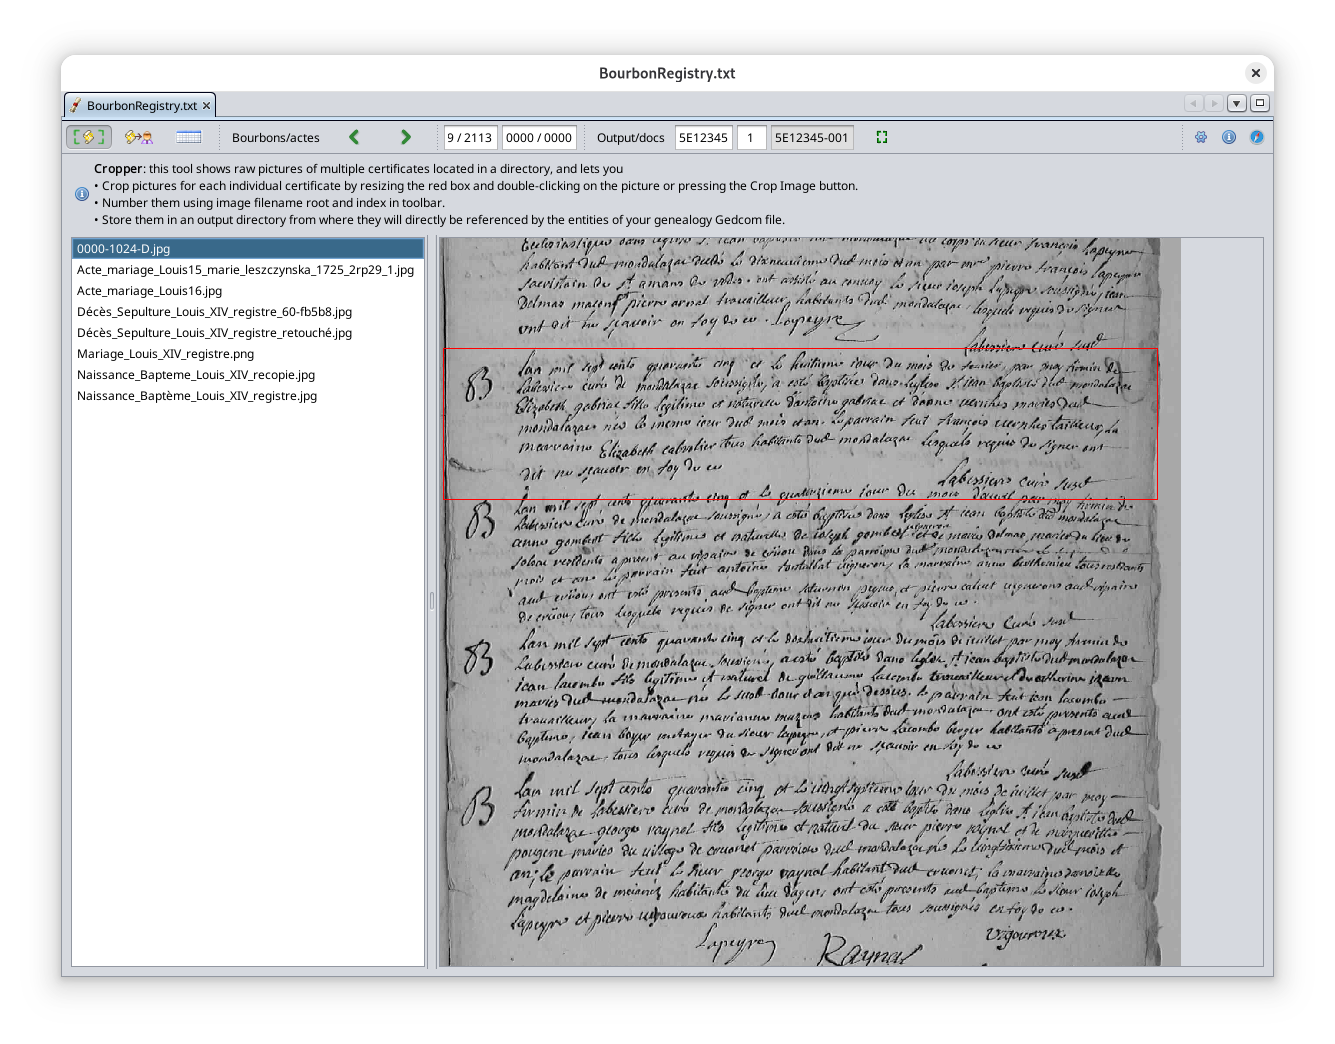
Cropper
The Cropper panel assists you in cropping images with multiple certificates so you can have images with one certificate per image.
- image
- purpose in line with info label
- which situation
- list sections (toolbar, windows)
- describe toolbar
- describe windows
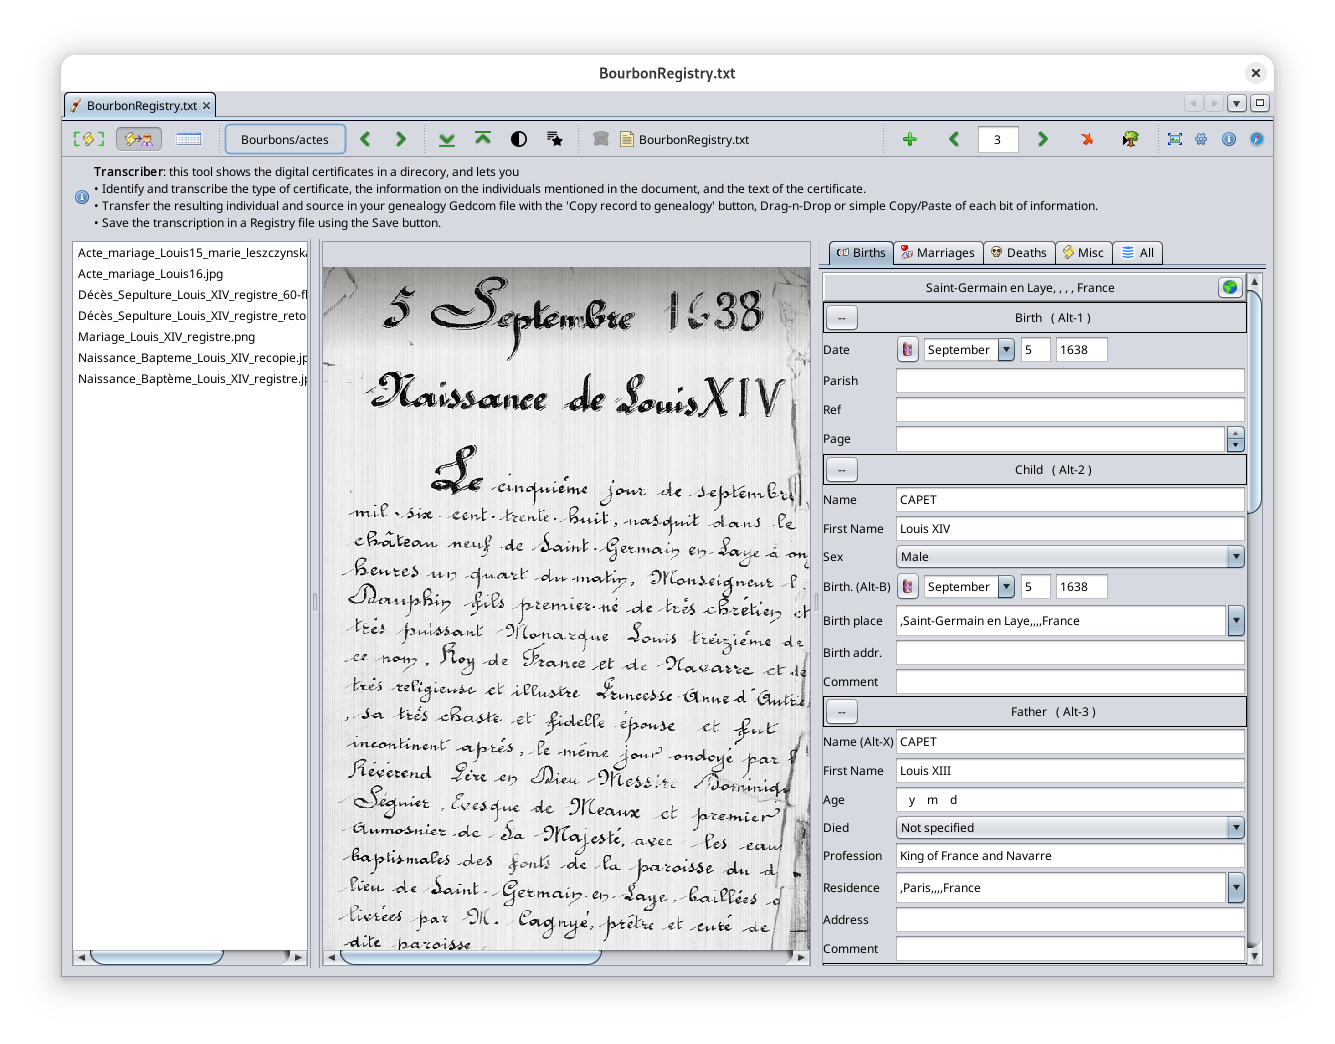
Transcriber
The Transcriber panel helps you convert a text image into a registry record.
- image
- purpose in line with info label
- which situation
- list sections (toolbar, windows)
- describe toolbar
- describe windows
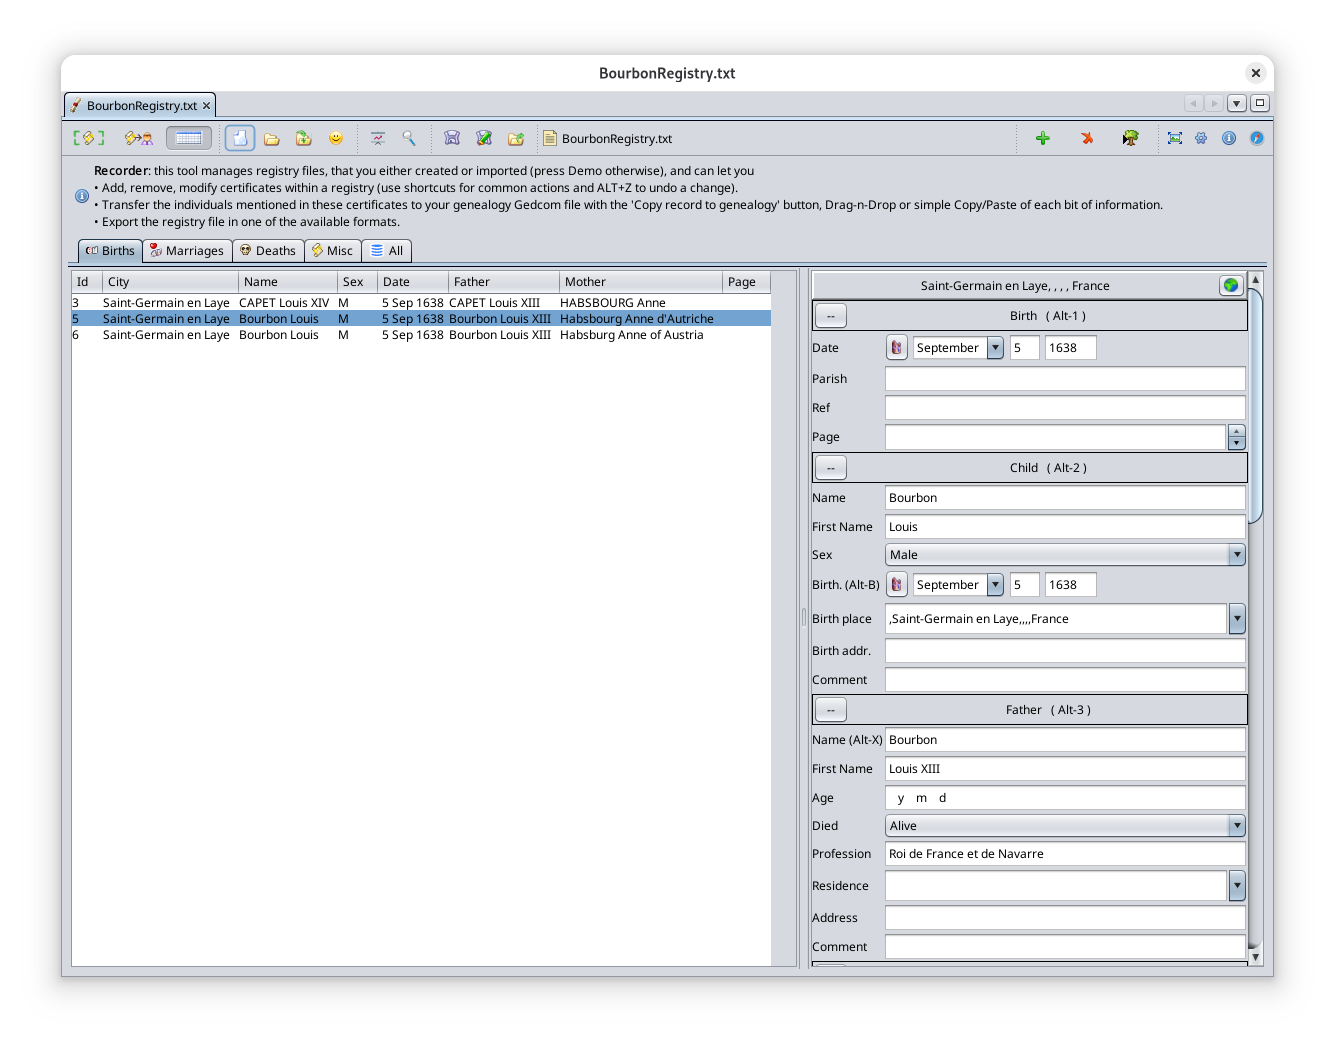
Recorder
The Recorder panel is where yo manage Registry files and Registry records.
- image
- purpose in line with info label
- which situation
- list sections (toolbar, windows)
- describe toolbar
- describe windows
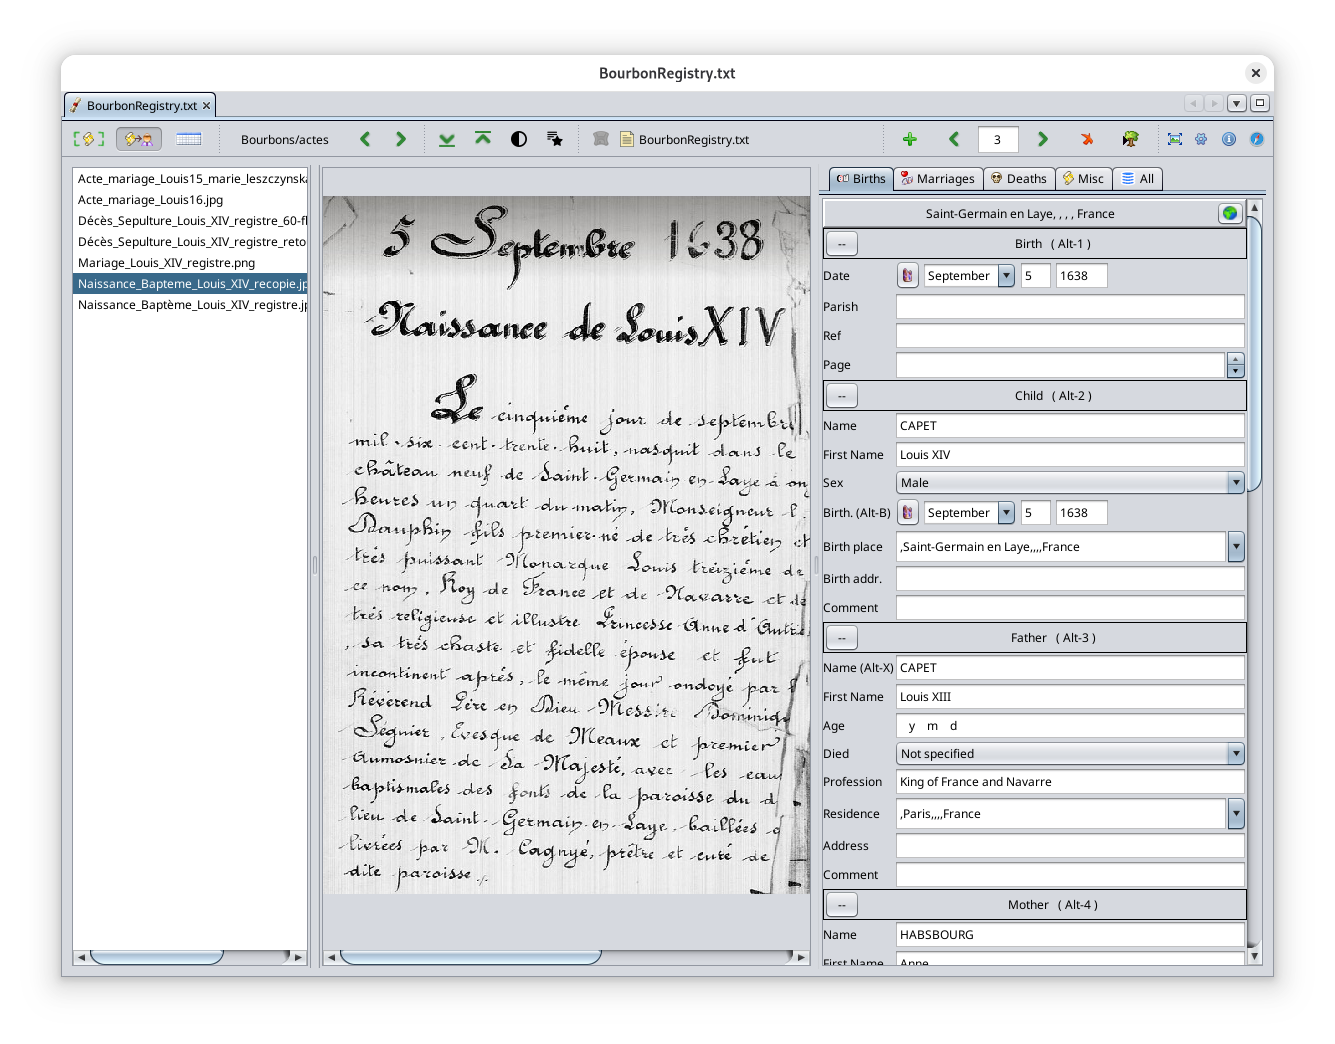
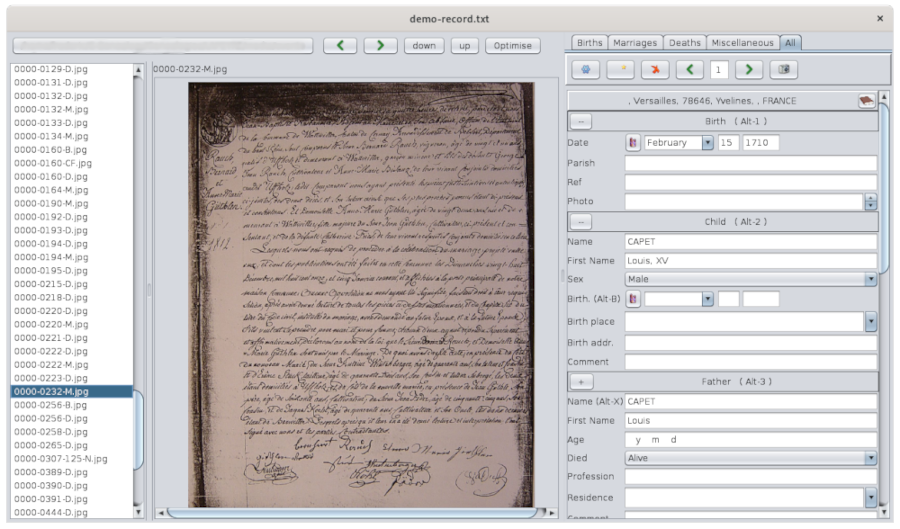
On the left hand side of the window are five tables where the records of the registry will be stored.
These are the Acts tables, or Records tables.
- the births table
- the marriages table
- the deaths table
- the table of miscellaneous records / acts such as marriage publications, marriage contracts, wills, receipts, etc.
- the summary table of all the records, which is the sum of the four previous tables
On the right-hand side is the Act Editor. It manages the registry files and edits the records for a given city.
You will notice that the Act Table and the Act Editor work together.
- When a table is selected on the left part, the Editor adapts itself to the type of act to be entered
- When an act is selected in a table, the Editor displays the corresponding data
Adjust the widths of the table columns for a better view. The separation bar between the Tables and the Editor is also adjustable.
Acts tables
The acts are classified into five tables: Births, Marriages, Deaths, Miscellaneous and All (the summary table of acts).
Each table is displayed in a tab. To see the contents of a table, click on the corresponding tab.
Each line represents one act. Each column represents a record of an act, or to simplify, an act.
The columns displayed differ according to the type of act. Here, it is the summary table of all the acts that is selected, and the Type column displays the type of the act of each row: N for birth (naissance in French), D for Death, M for marriages.
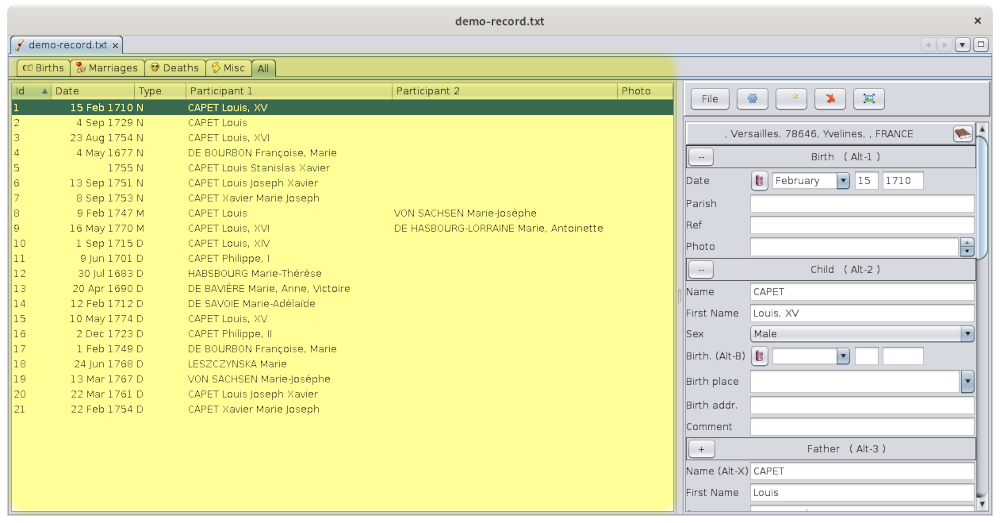
See the detail of an act
Click on a line in the table so that the details of the act are displayed in the editor on the right hand side.
In this example, a birth is selected so the editor has adapted to enter the data that is usually found on birth certificates.
Dropdown menu
Right-clicking anywhere in the left part of the window displays a drop-down menu that allows you to manipulate and renumber the acts.
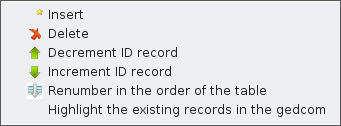
The use of the "Highlight the existing records in the Gedcom" checkbox is described below.
Link between act tables and other Ancestris windows
For highlighted acts only, there are two possibilities of synchronization with the other Ancestris windows.
- A simple click on an individual's act displays the individual in the other Ancestris views.
- A double-click on an act allows to reconstruct the tree starting from the individual of the act as root
Column Sorting
Click on the column title to sort the table alphabetically or by date according to the type of data in the column.
Columns order
To move a column, click on the column title and move the mouse sideways while holding down the button.
Act editor
The Act Editor allows you to manage the register files and to record the acts for a given city.
The act editor is composed of a title indicating the name of the city, the form to record the acts, a toolbar, whose File Menu gives access to the register file management and to tools.
The name of the city

This title indicates the name of the city of the register being recorded or read. This is an address.
All the acts entered will be saved in the same file. The name of the file will the name of the city.
Each line of the file will start with this address.
The form to record the acts
The data entry form depends on the type of act to be recorded and corresponds to the type of act selected in the acts table.
- It displays a birth form for a birth, a marriage form for a marriage, a death form for a death.
- It displays a Miscellaneous form for other acts, which allows you to enter any type of act. A drop-down menu at the beginning of the form allows you to give a name to the type of act.
Each form is divided into sections and each section has a title with a button on the left.
- The title of the section indicates the type of stakeholder the data relates to.
- The button on the left of the title at the top lets you add or remove lines to be entered
- A '--' button indicates that you can only remove lines.
- A "+" button indicates that you can add some
- Clicking on the button brings up the drop-down menu of displayable fields. You have to check them to display them.
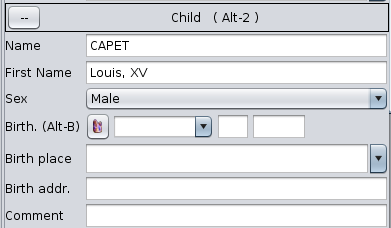
For example, here is the drop-down menu of the data that can be entered for the child of a birth certificate (these are all checked by default)

In the form, the field being edited appears with a blue background.

The form benefits from input help and keyboard shortcuts described below.
Toolbar

The toolbar includes the following actions.
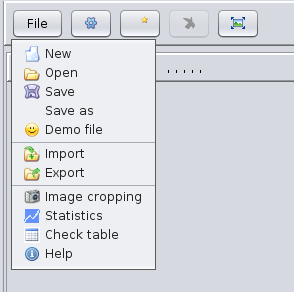
File Button
This button opens the File Menu which allows you to manage the registry files (only 1 city per file), to access a tool for cropping act pictures, and to check the data of the acts entered.
Options Button
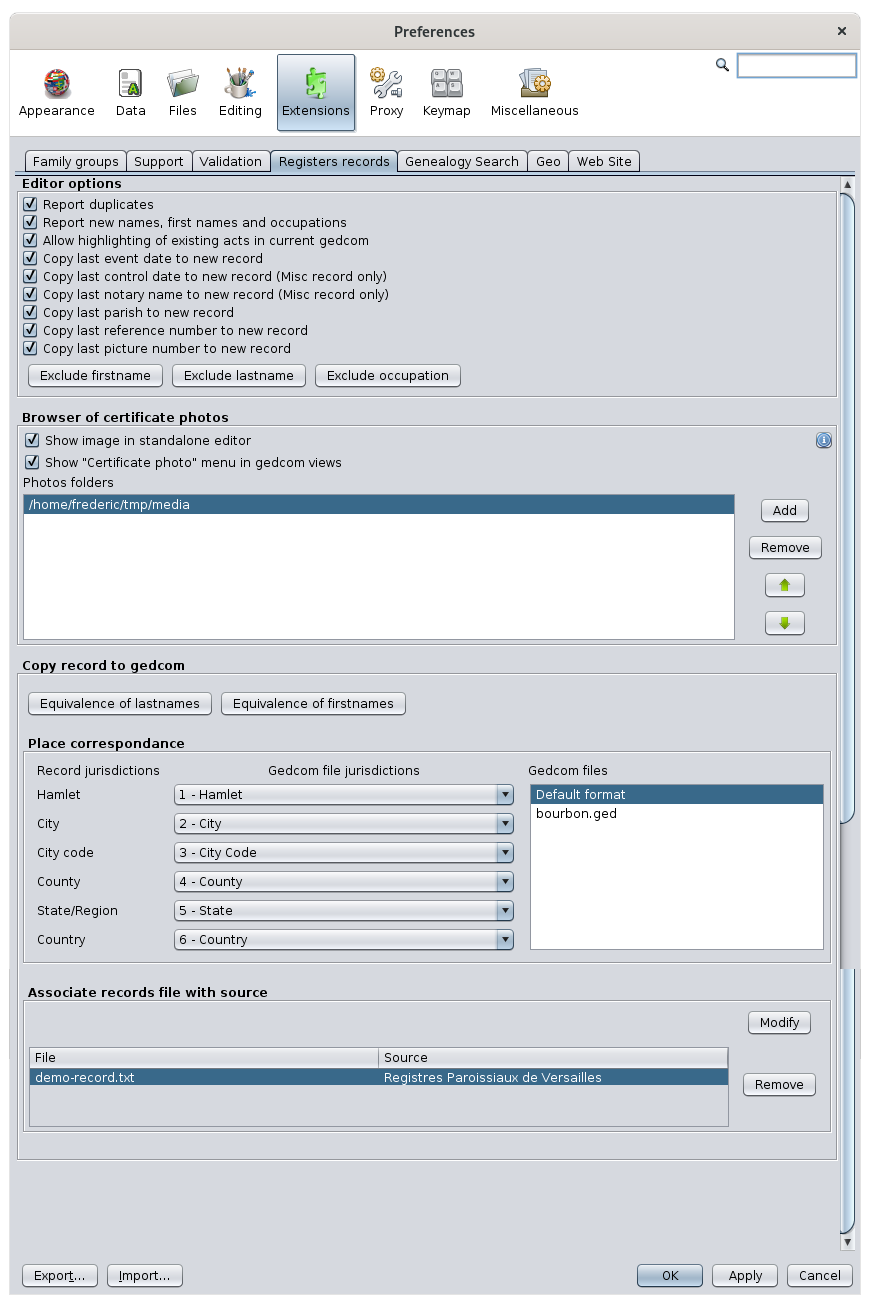
This button opens the Ancestris preferences, the Extensions pane and the Registry tab. This allows you to set your preferences for the Act editor, the browser of certificate photos, and the way to copy records to a Gedcom file.
Create Act Button
First select the tab of the act table corresponding to the type of act you are going to enter before creating it.
Delete Act button
This button deletes the act selected in the acts table.
Floating Editor Button
This button opens a floating window containing a second Act Editor that can be combined with an Act Viewer.
The size of its window is small enough to be placed next to the photos of the acts to make the mass editing.
It is attached to the Act Editor's floating window on the right hand side. The viewer displays the list of act pictures in the left column, and the act being viewed in the middle.
This floating editor contains a slightly different toolbar from the main Act Editor.

The left and right arrows allow you to move through the acts, and the Photo button allows you to show or hide the photo viewer of the acts.
This menu allows you to open or save register files. These files cannot be opened with the File menu from the Ancestris Menu bar. This menu is as follows:
New
Creates a new register file of acts for another city.
If data was being entered, a message warns you to save what you were doing.
If you confirm, the act table will be cleared and Ancestris will offer you to start creating a new record.
Open
Opens a register file of acts previously saved by Ancestris or coming from other sources.
- The different file formats are automatically recognized (Ancestris format, EGMT format or NIMEGUE format).
- If Ancestris detects lines that do not comply with a known file format then an error message is displayed indicating the list of erroneous lines.
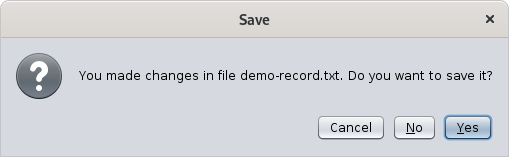
Save
Saves the data in a file in Ancestris format. If the reading has already been recorded once, the data are saved in the same file. If this is the first time the file is saved, a file name is first requested.
Save As
Requests a new file name and saves the data in this new file in Ancestris format.
Demo file
Opens a Bourbon demo file and displays its records.
Import
Adds data from another file to the data already present. This merges the imported file with the already opened file.
All the data in memory must relate to the same city. If some readings in the imported file relates to a different city, it is suggested to either ignore the readings or to replace their city by the city of the data in memory.
Export
Exports the data to a file in EGMT format or NIMEGUE format.
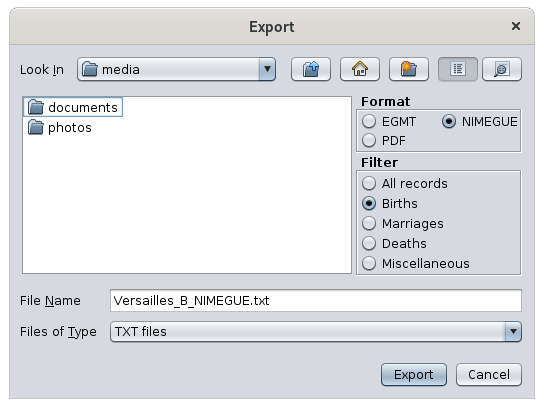
It is necessary to specify,
- the chosen format of the export file
- the type of records to be exported (Births, Marriages, Deaths, Miscellaneous or all records)
- the name of the export file
Crop photos
Allows you to crop photos of acts. Clicking on the button displays the Image cropping tool, in which it is possible to crop the act photos.
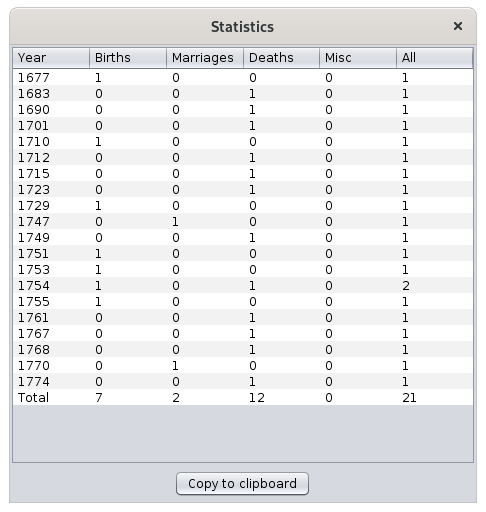
Statistics
Displays the number of readings records in the file.
Check table
Displays a table with all the data contained in the file for global verification.
There is a possibility to search for a particular act and a button to open the floating editor.

Usage
Methodology
The Registry Records tool covers several needs.
Develop your genealogy
- From photos of acts you may have found or obtained:
- the tool first allows you to enter the acts simply from the photos
- and then retrieve the data to develop your genealogy.
- From record files made by others:
- the tool allows you to retrieve the acts you are interested in to feed your genealogy.
Helping others to develop their genealogy
-
Mass entries of acts from registry or photos during a "register's inventory"
-
Then export the file for the benefit of others.
In any case, if you have photos of the acts, you can choose whether or not to automatically link the photos to the acts.
- when browsing through the acts: this allows you to switch from one act to another and the corresponding photo is displayed.
- when consulting your genealogy from an Ancestris view: the display of a source shows you the original act used during the analysis.
Suggested methodology
The rest of the page is a description of how to use the different features of the Register records tool and record acts according to a generic method that you are free to adapt.
- Start from the stock of raw digital photos of the original acts, and crop them to extract one photo per act, which you will place in folders by city, of official photos referenced by its register and its number in the register.
- These photos can indeed contain several acts, often with writings that are difficult to read. To facilitate reading in the long run, it is preferable to separate the acts.
- This step can be done with the Image cropping tool.
- Each photo can be saved with the file name, the reference of its dimension in the register and a number.
- Start with the photos cropped to capture the acts by city, with the right odds and the right photo numbers.
- This step is done with the Act viewer. When you are more familiar with the editing, you can set the input options that best suit you in the Preferences.
- To ensure the link between the act and its photo, it will be necessary to specify it beforehand to Ancestris in the Preferences and to indicate where the official photos are located.
- Each city entered will be the subject of a separate file, which you will place in a registry folder.
- For the input part, the Act editor allows a great efficiency of use thanks to keyboard shortcuts, input controls, and a function of auto-completion of the information being entered.
- Move the acts by commune and chronologically, from a register to your genealogy
- This step requires Highlighting the already existing acts in the Gedcom in Ancestris.
- Then you have to Copy by drag and drop the acts in the Dynamic Tree view. Ancestris determines the correspondence and suggests how to integrate the act
- You may also need to give Ancestris a first and last name equivalence to improve the matches
- Then you will be able to view the photos of the acts from the Ancestris views.
- There is an appendix describing the Mapping between the registry data and the Gedcom data of your genealogy.
- Export statements by municipality and send them to interested parties, if applicable.
- There are several official file formats for the counts: the NIMEGUE format and the EGMT format.
- These formats and the Ancestris format are described in the Appendix on File Formats
Image cropping tool
This window is different from the Act viewer, even though it is very similar. It is accessed through the File menu of the Act Editor, item Image cropping.
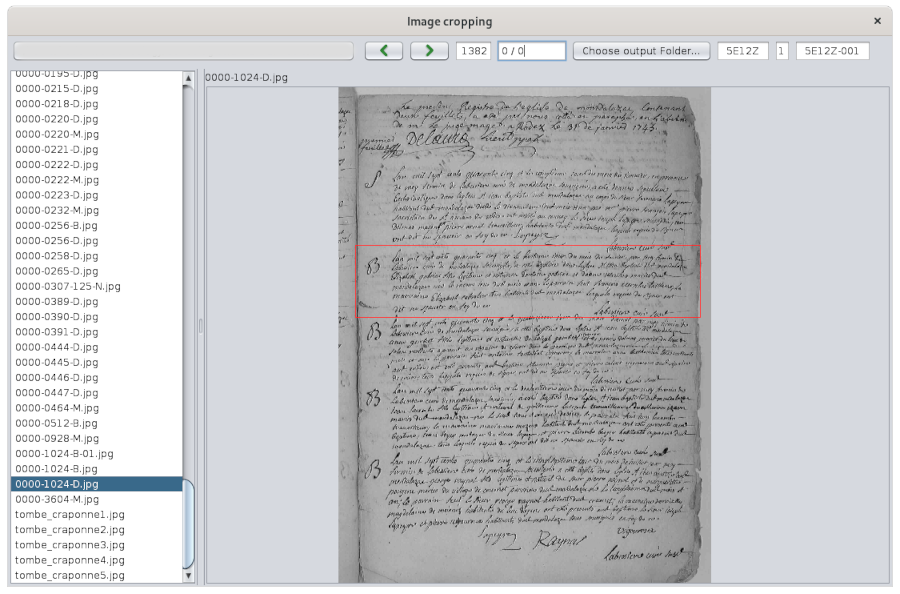
Hovering over the buttons or fields gives a tooltip to know what they do.
The principle of this tool is as follows.
- With the left button, you define an entry directory where your raw photos are stored, and with the right button you define the one where they will be saved.
- You choose the format of the names of the photos when they are saved in the two fields on the right (register number and photo number).
- You navigate through the photos with the forward and backward arrows.
- On each photo, you move the edges of the red frame to define the crop lines of the photo. It keeps a fixed position from photo to photo
- A double click on the photo performs the cut and moves to the next photo. Go back to the previous photo with the arrow if it contained other acts to be cut out.
- A right click of the mouse allows you to place / remove an extra aiming-cross, which allows you to move the photo at the time of cutting.
- This is optional. To understand how it works, wedge the photo on the top left corner: the top left part of the aiming-cross will disappear, the photo will move to the top left, and then the cut will be made according to the red frame.
- This allows to have all the photos of the same size, that of the red frame.
The act viewer
The act viewer capture the acts from their photo, and then maintain the link afterwards.
It is then possible to display the photo of an act from its act selected in the Editor.
The act viewer is accessed from the button  on the toolbar of the Act Editor.
Entering acts
To enter the acts, indicate the act directory with the button on the top left, select the act, and create the act to be entered on the right, fill in the address of the city. After the first entry, you should have something like this

The arrows are used to view the previous or next photo.
The photo can be moved and zoomed with the mouse.
Then refer to the description of the act editor and the editing features to enter the act.
View a photo from the act
To view a photo of an act .
- If you are already in the act viewer, simply select the act with the navigation arrows on the right, above the input form or open the viewer panel if it is hidden. If the act does not have a photo reference, the displayed image remains unchanged.
- If you are in the main act editor and the viewer is closed, just open it with the viewer button
The automatic correspondence between the act and the photo only works under 3 conditions.
- the act must indicate the reference of the photo in the line 'photo'. This reference can be a number or an alphanumeric text that must be uniquely located somewhere in the filename of the photo. It does not need to be the full name of the photo. If there are several photos with this reference, the last one is displayed.
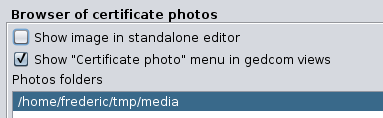
- in the Ancestris preferences, you must have checked the box 'Show image in standalone editor' and added the photo folder in the list like this.

- the folder of the photos on the disk indicated in the image above, must include a subfolder with the name of the city of the register, in or under which the photo of the act must be located.
Suggestions for storage of files containing photos of the acts
Several file organizations are possible. The viewer simply needs that there is a folder with the name of each city somewhere in the tree structure.
|
Example with subfolders by county, |
Example with subfolders by city |
|---|---|
/mydocuments/genealogy/acts
       /Yvelines
          /Versailles
             /5MI_123
                /DSC00117.jpg
                /DSC00118.jpg
             /5MI_222
                /DSC00200.jpg
                /DSC00201.jpg
             /photos_a_trier
                /DSC00251.jpg
                /DSC00252.jpg
          /Saint-Germain-en-Laye
             /5MI_333
                /DSC00300.jpg
                /DSC00301.jpg
       /Essonne
          /Palaiseau
             /5MI_108
                /SAM00400.jpg
                /SAM00401.jpg
|
/mydocuments/genealogy/atcs
       /Versailles
          /DSC00117.jpg
          /DSC00118.jpg
          /DSC00200.jpg
          /DSC00201.jpg
          /photo_a _trier
             /DSC00251.jpg
             /DSC00252.jpg
       /Saint-Germain-en-Laye
          /DSC00300.jpg
          /DSC00301.jpg
       /Palaiseau
          /SAM00400.jpg
          /SAM00401.jpg
|
Different ways to indicate the city, the reference and the photo
|
Example 1: the Photo section may contain only the number of the photo, i.e. the last digits of the name of the photo. City=Versailles Note: in this example the viewer is looking for a photo whose name ends with "117" in the folder "Versailles" in the folder "5MI_123" which is a sub-folder of "Versailles" and sub-folder of /mydocuments/genealogy/acts |
Example 2 :
Note: In this example the viewer looks for the photo whose name contains "DSC00117" in the folder "5MI_123" which is a sub-folder of "Versailles" and sub-folder of /mydocuments/genealogy/acts. |
Example 3: The Reference is optional.
Note: In this example the viewer searches for a photo whose name contains "DSC00200" in the whole folder of the commune "Versailles". |
Example 4: the photo can be in any sub-folder of the city, for example the sub-folder "photos_to_sort".
Note: In this example, the viewer first searches for the photo in the subfolder of the city of Versailles containing the name of the reference 2E_456 . If the folder corresponding to this reference does not exist, or if it does not contain the photo, it then looks for the photo in the other sub-folders of the city. |
|
Example 5: the municipality is mandatory
Note: In this example the viewer cannot find the photo because the name of the city is mandatory and here it is missing. |
Example 6
Note : In this example, the viewer looks for the photo of the act in the folder "5MI_123" which is a sub-folder of "Versailles" and sub-folder of /mydocuments/genealogy/acts. |
Example 7: the reference is optional in the SOUR:PAGE tag.
Note: In this example the viewer searches for a photo whose name contains "DSC00200" in the whole folder of the city "Versailles". |
Example 8 : the SOUR:PAGE tag can only contain the number of the photo, i.e. the last digits of the name of the photo.
Note : In this example the viewer is looking for a photo whose name ends with "117" in the "Versailles" folder. |
Editing features
Keyboard shortcuts for the Editor
All the editor commands are accessible with the mouse or with "shortcut" keys on the keyboard. The use of shortcut keys is optional. However it allows faster mass input, avoiding the need to use the mouse and keyboard alternately.
The arrow keys
- TAB to go to the next field
- SHIFT-TAB to go to the previous field
Shortcut keys to create or delete an act
- ALT-N to create a birth record
- ALT-M to create a marriage record
- ALT-D to create a death record
- ALT-V to create a miscellaneous statement
- ALT-S to delete the current reading
The Quick Move Keys
- ALT-1 Date of the event
- ALT-2 Individual or Representant No. 1
- ALT-3 Father
- ALT-4 Mother
- ALT-5 Wife or Representant #2
- ALT-6 Father
- ALT-7 Mother
- ALT-8 Witnesses
- ALT-9 General Comment
Input help keys and the cancel key
- ALT-X: copies the name of the individual in the field of the individual's father's name
- ALT-Y: copies the wife's name in the field of the wife's father's name
- ALT-B: copies the date of the event from the record in the date of birth field of the individual
- ALT-=: copies the value of the same field from the previously entered record. This shortcut is particularly useful when the witnesses are the same from one act to another, for example
- ESC: cancels the entry of a field as long as the field is being entered and returns to the original value as long as the field is being entered.
- ALT-Z: cancels the changes made previously after leaving the field. Warning: the CTRL-Z key usually used for this does not work here.
- Space: enters a space at the end of the field to reject the other terms proposed by the completion function. This space is then automatically deleted. For example, if there are compound first names beginning with the first name you are currently entering, you must type an additional space at the end of the first name to refuse the secondary first names proposed by the completion function.
Automatic checks and formatting on entry
Alert on Missing date of event and name (or first name)
Alert on Duplicate
If there is already a record with the same date, first and last name, an alert message is displayed to indicate a possible duplicate.
This function can be disabled in the control panel.
Alert on New Name
Name Case
Case of the first name
Case of the occupation
Removal of extra spaces
Automatic copy of the photo number
When a new act is created, the photo number is filled in automatically by copying the photo number from the previously created act.
This feature can be disabled in the control panel.
Tip: The photo number can be easily incremented by clicking on the buttons that appear to the right of the field, or by using the UP and DOWN arrow keys.
Completion of surnames, first names, occupations and places
As you type a name, names are suggested among those already existing in the register file. When the desired name appears, press the Tab key to interrupt the current input and move on to the next field.
This avoids having to enter all the letters of a name already known.
Exclude names
Completion with the current Gedcom
It is possible to add the names present in a Gedcom file to the list of names proposed by the completion function by activating the option Completion with the current Gedcom in the Preferences window.
When this option is activated, the assistance uses the names, first names and accupations from the current Gedcom file to complete the words as you type. This option is particularly useful when starting a register and there are still few terms available for completion among the registry themselves.
When this option is disabled, completion uses only the words present in registry already entered.
Note: It is preferable to select a Gedcom that contains data from a place and date close to the register to be entered so that completion can provide data similar to that to be entered.
Highlight existing acts in Gedcom
Once acts have been entered in register files, we will copy them into the Gedcom file. But before that, we will have to know which ones have to be copied.
- You may already have copied acts in your genealogy yourself.
- Or similar data may already be up to date in your genealogy.
It is possible to see which acts have similar data in your genealogy, i.e. in the Gedcom file currently open in the other Ancestris views.
To do so, you must highlight them using the drop-down menu in the table of acts.
You have to uncheck / recheck the box to show the new acts recently copied or used in the Gedcom file.
The acts existing in your genealogy are those in red in the table.
- An act corresponds to an event in your genealogy if the two events are of the same nature, if both have the same date, and if the two individuals compared have the same first and last name.
- The location does not need to be filled in or the same to report a match.
- In case of duplicate individuals, the first one found will be the one compared, the other will be ignored.
If the box is checked, the highlighting will automatically update if you open or close a Gedcom file in Ancestris.
In the example below, 16 acts (Id in red) are already present in the currently open Gedcom file.

Drag and Drop in the Dynamic Tree
Once the acts are highlighted, it is easier to know which ones are left to be used, and how to integrate them into your genealogy.
Register information can be copied to the dynamic tree using Drag and Drop . Thus it is not necessary to re-enter all the information of the register with an Ancestris editor to put it in your genealogy.
To copy, you must have both your Gedcom file open and your registry records, side by side.
Take the example provided of the Bourbons and place the Bourbons dynamic tree on the left, and the Demo file of the Recording tool on the right open on the 'All' tab.
We see that the acts in red are already filled in the Bourbons genealogy.
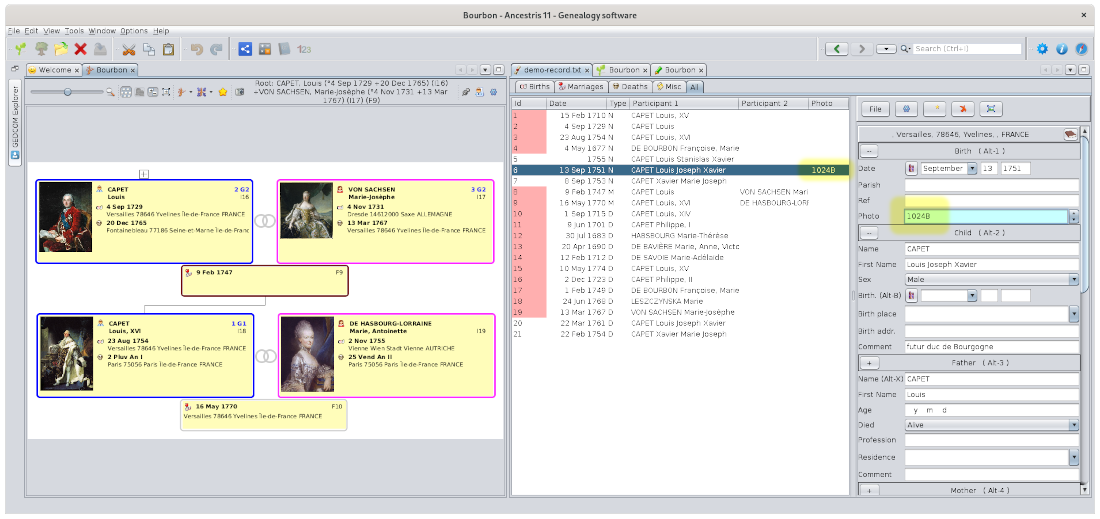
Copy a birth certificate
We will copy Louis Joseph Xavier CAPET's birth certificate of September 13, 1751, from the record of births to the marriage of his parents in the dynamic tree.
It is not already present in the Gedcom because it is not highlighted in red.
The photo of the birth certificate has been filled in in the photo above. It is highlighted in yellow. When we copy, the source will then be documented in the Gedcom file.
Proceed this way to copy the act in the Gedcom:
- click in the table on the birth certificate,
- move it with the mouse by holding down the left button onto the family box dated February 9, 1747 in the tree and release the button.

After releasing the mouse button, a validation window appears. It will intelligently merge the data in the tree. It is up to you to make some choices, but they are suggested by Ancestris.
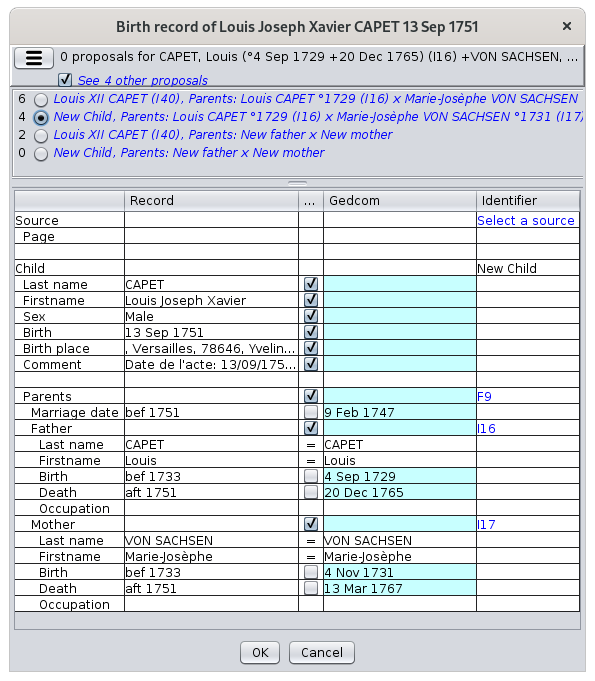 |
Choosing the merge option
Choice of data to merge
Choice of identifiers
In the example, a new individual will be created as a child of the F9 family. |
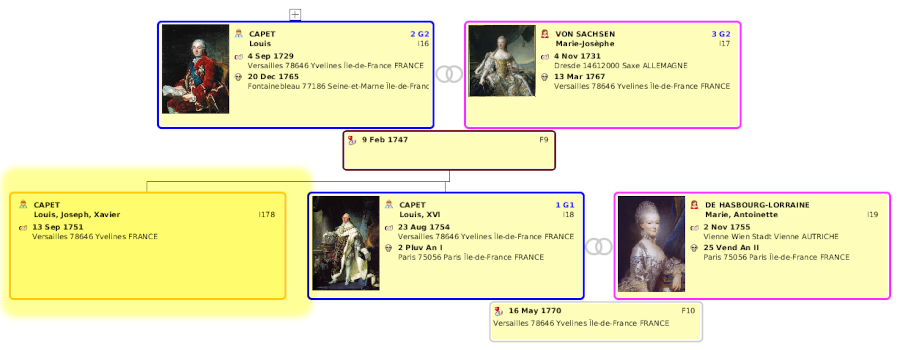
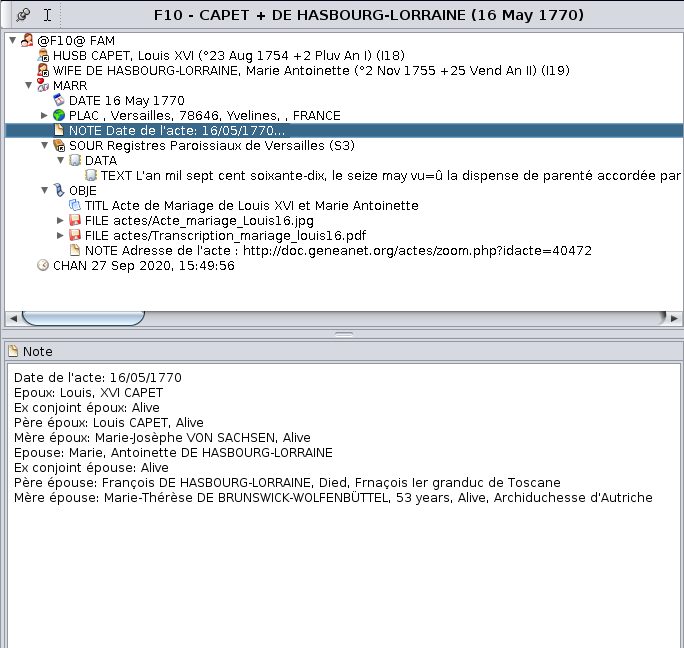
After choosing S3 as the source, and clicking on the OK button, the new individual with ID I178 is created in the tree :
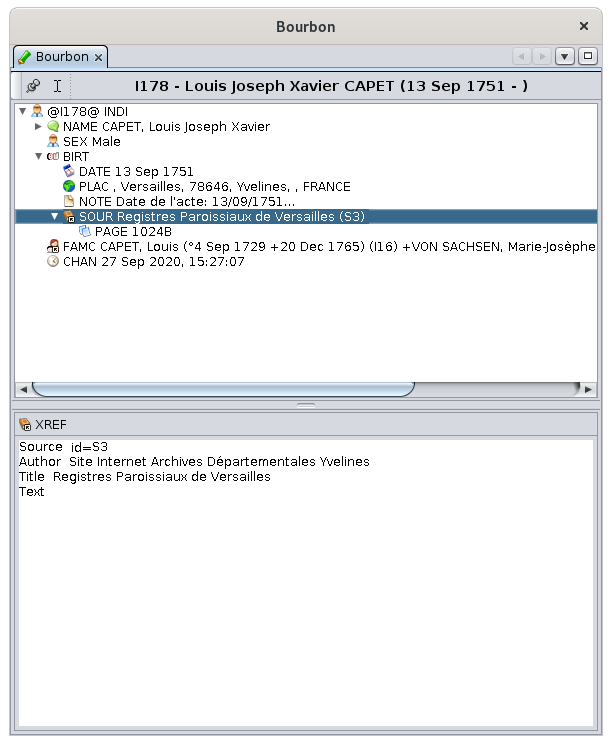
Below is the result of the data created for the new individual in the Gedcom editor.
The birth event is visible and you can see how Ancestris documented it.
The source has been added with the reference of the photo in the PAGE property. If I had documented the reference, it would also appear in the PAGE property, just before the photo number.
Depending on whether the act is deposited on an individual, a family or in the empty space of the dynamic tree, the merging rule changes.
- If the target is an individual
- The tool indicates if there is another individual with the same name and date of birth in the GEDCOM to possibly avoid creating a duplicate in the GEDCOM.
- By default, the birth record is applied to the individual
- If the target is a family
- The tool indicates if there is another individual with the same name and date of birth in the GEDCOM even in another family.
- By default, the birth record is applied to the child of the family having the same surname, first name and possibly the closest date of birth if there are homonyms. A new child is created if there is no corresponding child.
- If the target is neither an individual nor a family (bottom of the dynamic tree for instance)
- The tool indicates if there is another individual with the same name and date of birth in the GEDCOM.
- By default, a new individual is created and the birth record is applied to it
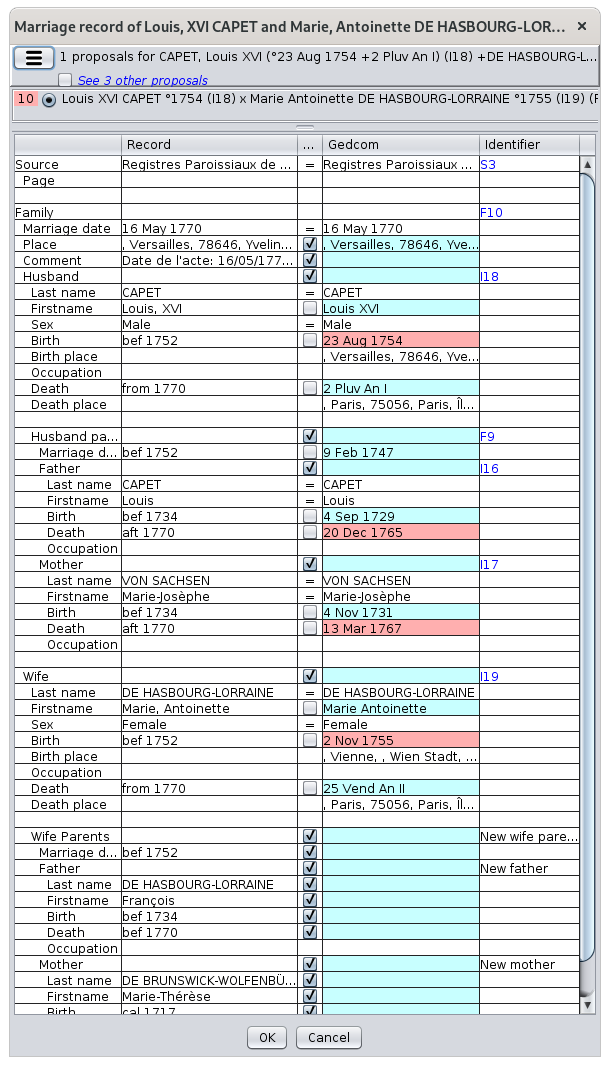
Copy a marriage certificate
Now let's try to copy a marriage certificate.
Drag and drop the May 16, 1770 marriage record from the table onto the relevant marriage in the tree.

When you release the mouse button, the window already seen above appears with other choices to be made for the merge.
If you noticed above, the act was highlighted indicating that the data were already partly filled in in the Gedcom.
 |
Choosing the merge option
Choice of data to merge
Choice of identifiers
Deduction of dates
|
After clicking the OK button, the wife's parents are added to the tree and the F10 familly is updated.

Tips for use and limitations
Add in chronological order
It is best to copy the records in chronological order. To do this it is better to use the tab "ALL" sorted by date and add the records from the oldest to the most recent, rather than adding the birth records first, then the marriages, then the deaths. This improves the search results for individuals matching the records.
Drag and drop outside of a tree entity
It is possible to drop an act anywhere in the dynamic tree window, outside of a tree entity.
In this case, the tool searches for the individual or family that best matches the act and displays a list of proposals ranked in descending order of relevance.
- Advantage: it avoids having to search the tree for the relevant individual.
- Disadvantage: the tool may not find any suggestions if an act data is incompatible with the individuals in the tree, or, on the contrary, the tool may find several dozen suggestions if the act data is too vague.
Undo a drag and drop
To undo the changes made in the tree after drag and drop, click anywhere in the tree to select the Gedcom and press the CONTROL and Z keys or press the Undo button  on the Ancestris main Toolbar. A single undo will delete all individuals created and all data that has been added by drag and drop.
Rules for calculating dates
Date deductions are made according to the following rules which are not configurable:
- Minimum age of marriage: 18 years
- Minimum age of parent: 15 years old
- Maximum age of parent: 60 years old
- Maximum age of an individual: 100 years old
- Uncertainty interval for approximate dates (EST, ABT, CALC dates): +/- 5 years
View an act from an Ancestris view
To view an act from an Ancestris view, you must already have copied the act to your Gedcom file, which we did in the paragraph on copying acts. See the corresponding section to do so.
Next, let's take the individual created above by copying the Birth act, from the Gedcom Editor, and let's call the Context Menu by right-clicking anywhere on the properties of the individual. Here is the menu that appears.
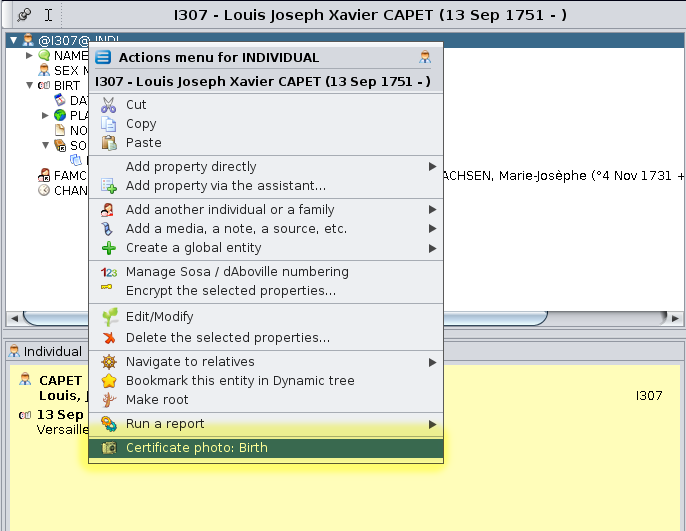
You notice the last action in the menu: "Certificate photo: Birth".
Clicking on this action displays the Act viewer, on the birth certificate of the individual we had entered and copied above.
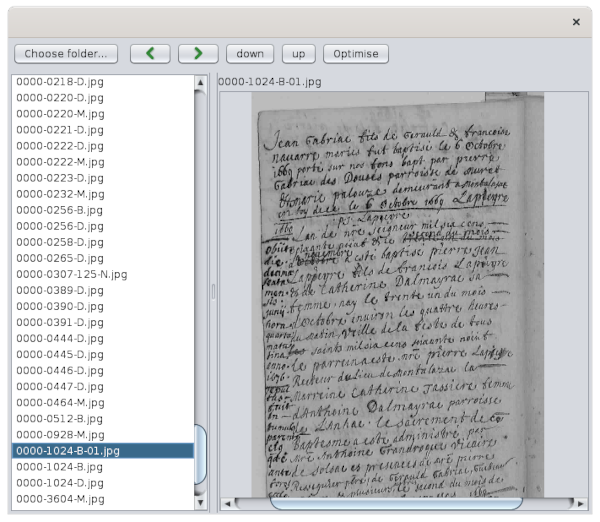
The automatic correspondence between the Ancestris view and the photo of the act only works under 3 conditions.
- The information in the Gedcom file must include the event of the act as follows
- an event of the type of the act
- a place where the name of the city is that of the act. A setting exists at this level in the Ancestris preferences of the Registry records tool. It is when dragging and dropping that Ancestris uses them to make sure that the definition of jurisdictions is well aligned with the data of the place of the acts.
- a source must be indicated with a PAGE sub-property, which must indicate the photo's dimension and reference, separated by a comma
- In the Ancestris preferences, you must have checked the box Show "Certificate photo" menu in the views and add the photos folder in the list like this
- the folder of the photos on the disk, indicated in the image above, must include a subfolder with the name of the city of the register, in or under which the photo of the act must be located.
Customization
Customization of the tool is done using the Preferences button on the toolbar of the Act Editor (which is the same as going through the Ancestris toolbar, Preferences, Extensions panel, Registry records tab).
The options are organized in 3 sections and their roles and use have been seen above.
- Editor options
- Browser of certificate photos
- Copy record to Gedcom
Tutorial
There is an educational B-A-BA on registry records in PDF format and in French.
It corresponds to version 9 of Ancestris, but the main part is still current.
It gives you detailed instructions on how to create and use the registry records tool.
You can download it here.