Preferences
This is where you set most of your usage personalization.
As soon as Ancestris is installed, you can immediately start using it.
However, if you familiarize yourself with certain settings, you can adapt Ancestris to your way of working and give your genealogy the look you want.
Preferences are accessible from several places.
Description
Selection bar
The Preferences window has a selection bar above with several categories of preferences.

Clicking on a category button brings up the preferences which can be modified under this corresponding.category.
The entry field on the right hand side is a filter which makes it easier to find a preference. Type any keyword and press the Enter key. Searching is case insensitive. The panels dealing with the keyword will be enabled and the other panels will be disabled. Hit the Esc key or the Enter key with an empty field to clear the filter.filter and re-enable all panels.
Below is a description of each category. In each category, tooltips are available to help you with the meaning of each setting.
Buttons
In its lower part, the Preferences window displays a few buttons.

Export... Button
This button copies your preferences to a file. This can be very useful when you have installed Ancestris on several computers. This will allow you to apply the same preferences on all computers without having to reconfigure each one individually.
Import... Button
This button retrieves preferences from a file. It is the reverse operation of the previous one.
OK Button
This button validates any modifications made in the Preferences window and closes it.
Apply Button
This button validates any modifications made in the Preferences window, without closing the window.
Cancel Button
This button closes the window without validating any modifications made in it.
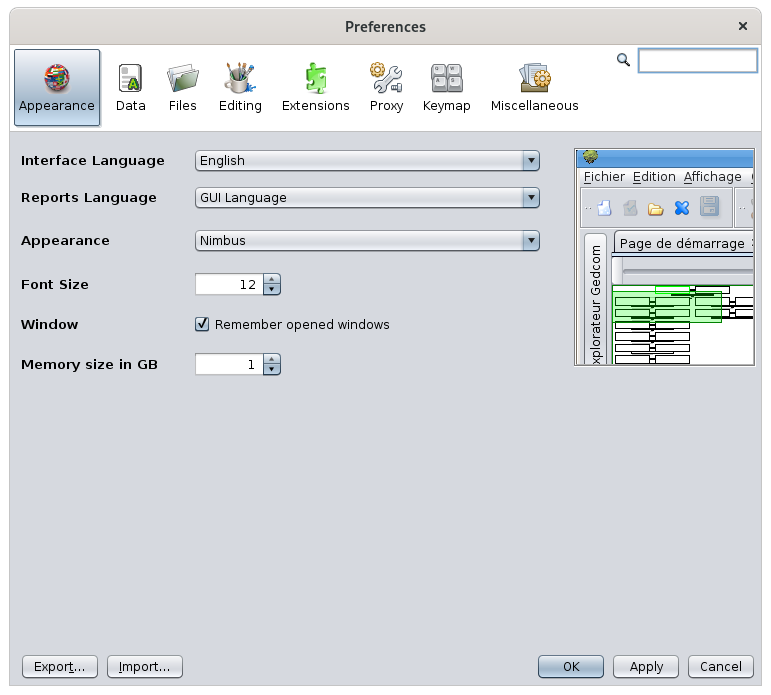
Appearance
This paneis allowsthe panel where you tocan change the general appearance of Ancestris.
Selects the display style of the windows, also called the look and feel.
For each style selected (Standard, Nimbus, Metal, ...), a sample preview is displayed on the right.right hand side.
A relaunch of Ancestris isneeds necessaryto be restarted to activate a new style.
Some of these "look and feel" are extension modules (InfoNode, JTattoo, etc.) that need to be installed to make them appear and use them. See the Extensions for more details.
Font size
Sets the size of fonts throughout the application.
Window
When the box is checked, the windows' sizes and positions will be saved when you exit Ancestris, and restored when Ancestris is reopened.
Memory size in GB
Forces the memory size to allocateallocation to Ancestris to operate.
If you have large family history files, it may be more convenient to allocate a larger number of gigabytes.
Data
This is the panel allowswhere you tocan modify the formats and contents of data elements of your genealogy. It includes two tabs.
General data

Symbols
Displays the typographical characters used to symbolize certain events (Birth, Marriage, Profession,Occupation, etc.).
Text
Defines the text width in number of characters when displaying notes, source texts, etc.
It is recommended to keep the default value of 246 characters wide.
Pictures
Sets the maximum size of images in kilobytes.
Individuals
Sets how to display names in terms of the ordeerorder of the name elements.
Dates
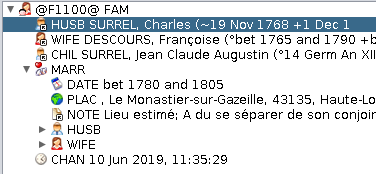
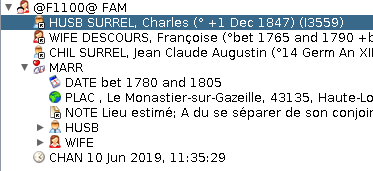
The first line sets how to display dates.
The checkbox "Use Baptism when no Birth"Birth" tellsasks Ancestris to displayapproximate anthe individual birthdate as his/herbirth date ofto baptism.the baptism date, when no birth date is available. Otherwise, birth date is left blank.
- For example for displaying the root person in the title bar of the dynamic tree.
- Or for related persons (ex: husband) in the GEDCOM editor.
Here are two examples, the first with the display of the root person in the tree, the other one with the display of the husband in the Gedcom editor.
|
Case of "Use Baptism when no Birth" set to 'no': Birth date is left blank |
Case of "Use Baptism when no Birth" set to 'yes': Birth date is approximated (~) to baptism date |
 |
|
|
|
 |

Privacy
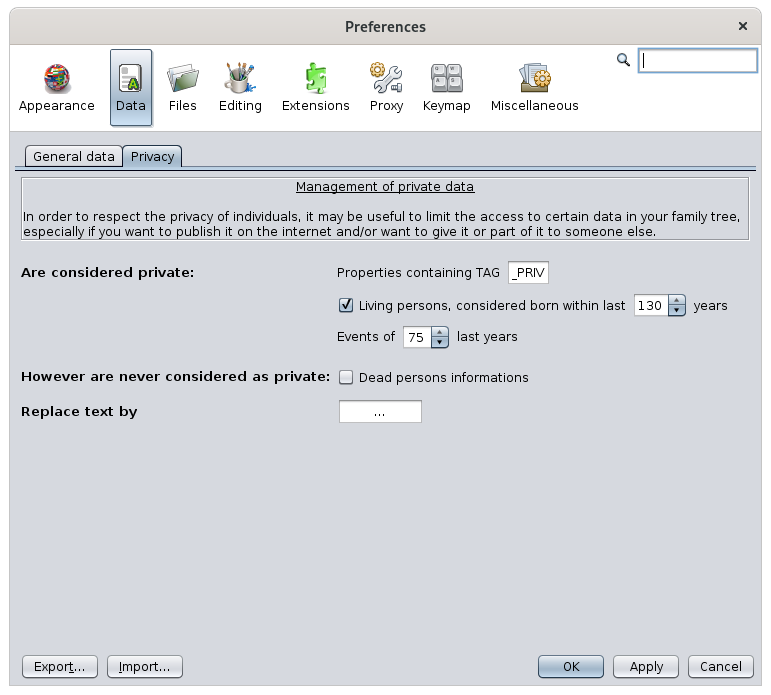
The Private tab helps you define your preferences when sharing your data with other genealogists, or for publication on the Internet.
You decide what confidential data you want to protect.
- Are considered private: any entity or property falling under the following 3 conditions
- Properties containing TAG _PRIV : all entities or properties containing the tag you specify will be considered private. '_PRIV' is the default
proposition.suggestion. - Living persons : all individuals born in the last number of years you specifiy will be considered private.
- Events of last 'n' years: all these events, but not necessarily the entities they belong to, will be considered private.
- Properties containing TAG _PRIV : all entities or properties containing the tag you specify will be considered private. '_PRIV' is the default
HoeverHowever are never considered asprivateprivate: dead person information : check this box if you are ok to display deceased person's information.
- Replace text by
letsisyouthespecify whatstring to display for private date instead of the real information. '...' is the defaultproposition.suggestion.
Files
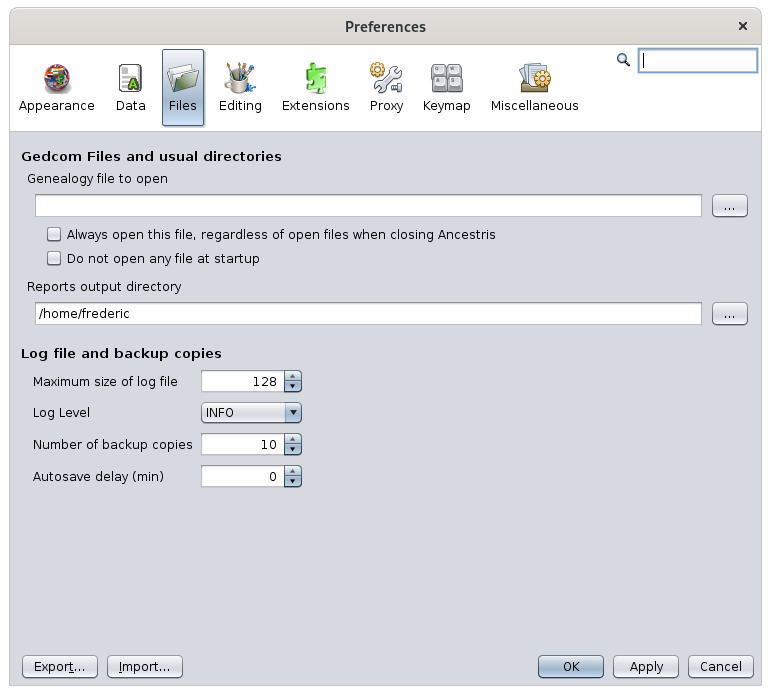
Gedcom files and usual directories
Ancestris offers the possibility to define a main genealogical file that you use most often. This file can then be opened using the Open <Default File> action in the File menu.menu. You define it in the first text field GEDCOMGenealogy file to open.
Also, by default, when Ancestris starts up, it opens the last genealogical files that was open when Ancestris last closed.
The two checkboxes modify this behavior.
- The Always open this file regardless of open files when closing Ancestris check box forces Ancestris to open the default file at start up.
- The Do not open any files at startup check box tells Ancestris not to open any files
onat startup.
The following setting is the Reports output directorydirectory. This is the directory where Ancestris will save user reports or error reports.
Log file and backup copies
Maximum size of loflog file limits the size of the log file. If the maximum size is reached, the log does starts removing the top lines.
Log Level tells Ancestris the level of detaildetails of the information to be collected by the log file. The more it is towards "SEVERE", the less it is detailed,detailed. theThe more it is towards "ALL", the more it is detailed. Be careful, the more detailed it is, the more it slows down your use since everything that happens in the software will be noted.
Number of backup copies defines the number of saved copies to keep for security reasons, in addition to the latest version. The name of each backup file is the same as the name of the main file, completed with the date and time of the recording. For example, if the number of backup copies is 3, each recording (Save action on the File menu, or <Ctrl-S>) will delete the oldest backup copy and keep four copies of the current genealogy: the most recent, plus the previous three copies with their timestamp.
Editing
This panel define your preferences when editing genealogical information or when using the editors.

Names
These options relate to the names of individuals.
Forces all lastnames in uppercase converts a surname into uppercase when validating the entry.
Defaults the same lastname to the wife assigns the child's lastname to both parents when creating them.
Tag used to read given name defines the tag to use when reading the gedcom file, to get the common first name. The default tag is NICK.
Places
This option aboutdefines places'places criteriajurisdictions ordisplay jurisdictions.preferences. It includes two items.
Add and save spaces between jurisdictions: for better visibility, a space is added after each comma separating the various place jurisdictions.
Split jurisdictions to edit in Gedcom editor: separates the places jurisdictions when editing them in the Gedcom Editor.Editor.
- Example: Box unchecked. Places are not split.

- Box checked. Places are split.
ID Numbers
This option defines settingspreferences for the ID number format of all entities.
Reuse available (deleted) numbers: forces Ancestris to reuse earlier ID numbers that have been made available when their corresponding entities hashave been deleted..
Default Entity ID length: sets the number of digits for ID numbers.
Encoding
This option deals with the encoding of the file saved on disk. It is a technical parameter that defines the character table used to save the file.
File Encoding selects the character table. It is recommended to encode with the UTF-8 table.
Editing
These options deal with the behavior of the editors.
Default editor defines the editor to use by default, in particular through the contextualcontext menu action named 'Edit/Modify'.
Automatically commit changes without asking for confirmation spares you from confirming with the OK button all changes you make. OnRegardless theof otherthis hand,setting, for security reason, the Delete action confirmation will remain.
Maximum number of cancellations is the maximum number of changes that can be undone using the Ctrl + Z key or the Undo button on the Toolbar.Toolbar.
Automatically create both parents when adding a parent adds the placehorldersplaceholders of both parents when creating an individual's parent.
Automatically detect duplicate individuals detects duplicate individuals each time you edit an individual. An individual can indeed become a duplicate when you change their date of birth, name, etc. even though this was not a duplicate initially.
When saving your changes to the person, Ancestris checks with the criteria defined in the Duplicate Merge duplicates tool if a duplicate exists.
If a duplicate is found but not merged, it will be detected each time one of the duplicate individuals is modified.
Extensions
This panel defines the preferences of certainssome ofextensions, thealso extensionscalled inmodules. theEach tabstab underneath.underneath represents a different module.

The settings for each extension are described in the Customization section of the pages of the corresponding module.module documentation page.
Proxy
This panel deals with the Internet proxy connection settings.
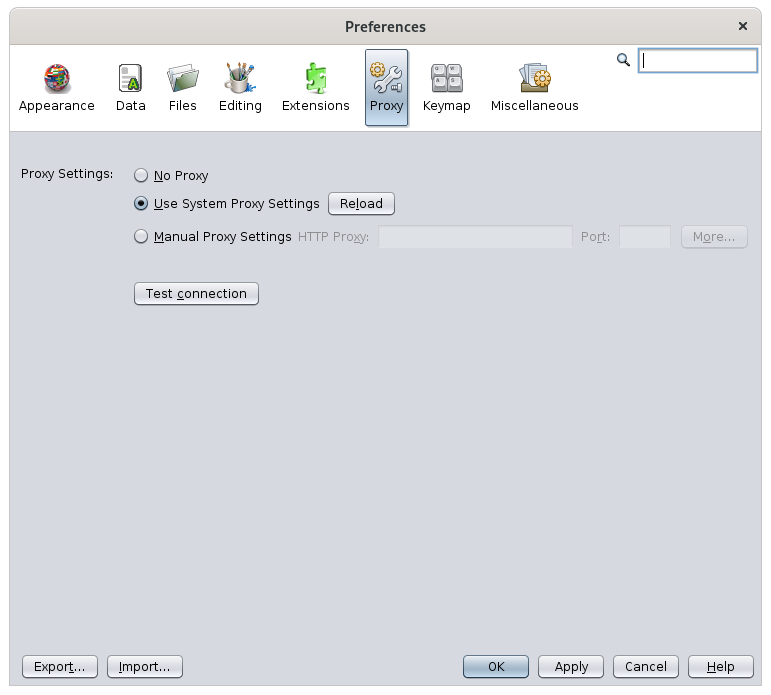
- First option: No proxy.
- Second option: Use System Proxy Settings. This is the default setting for automatic detection.
- Third option: Manual Proxy Settings. You will need to specify the proxy address.
The Test connection button allows you to check whether the connection has been correctly configured.
Keymap
This panel isdefines aboutAncestris keyboard shortcuts in Ancestris.shortcuts.
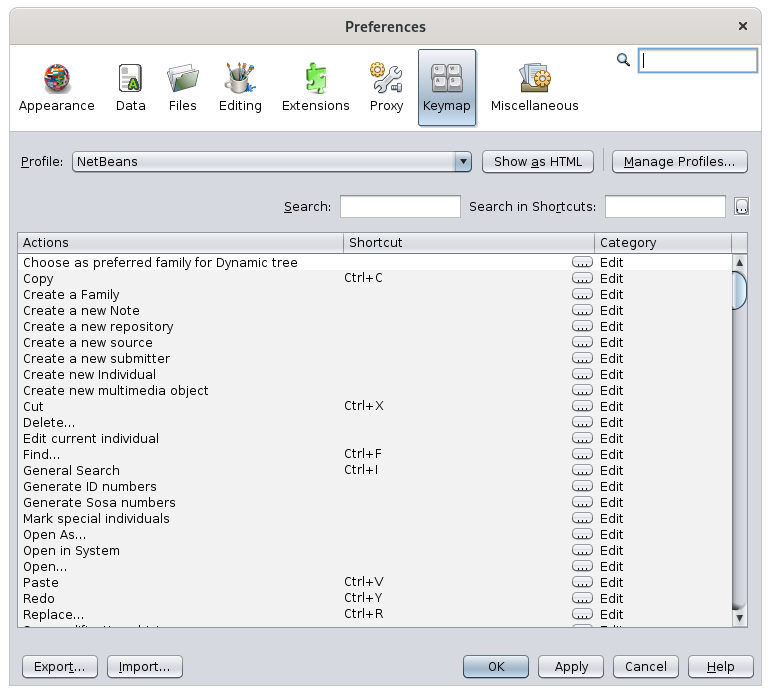
Profile selects one of the saved profiles. NetBeans'NetBeans' is the default profile.
The Show as HTML button opens your browser with the table of keyboard shortcuts. Very handy if you want to print them.
The Manage profiles button allows you to assign different shortcuts to different profiles. The window that opens to manage profiles contains several buttons.
- Duplicate creates a copy of the selected profile
- Restore Defaults restores the original content of the selected profile
- Delete deletes the selected profile
- Export copies the contents of the selected profile to an xml file
- Import creates a new profile from an xml file
- Close closes the Manage Profiles window
- Help opens help for this window (button currently unavailable)
Search allows you to filter the list of shortcuts according to their action.
Search in shortcuts filters the list of shortcuts, depending on a key used.
Shortcuts list
Each line represents the possible association between an action and a shortcut.
The Actions column lists the different actions of Ancestris.
The Shortcut column indicates the keyboard shortcut for the action when it exists
To the right of each cell, there is a button [...] which opens a contextualcontext menu containing the following actions.
- Edit allows you to add a key combination or modify an already defined one
- Add Alternative (which is available only when the cell is filled in) allows to add another shortcut to the same action
- Reset to Default resets the shortcut defined during the installation of Ancestris
- Clear removes the shortcut
La colonneThe CatégorieCategory indiquecolumn laindicates catégoriethe àcategory laquelleto appartientwhich lathe commandeassociated associée.command belongs.
Miscellaneous
This panel isdefines aboutpreferences of the Output window (or Console window). See Window Menu / Output.
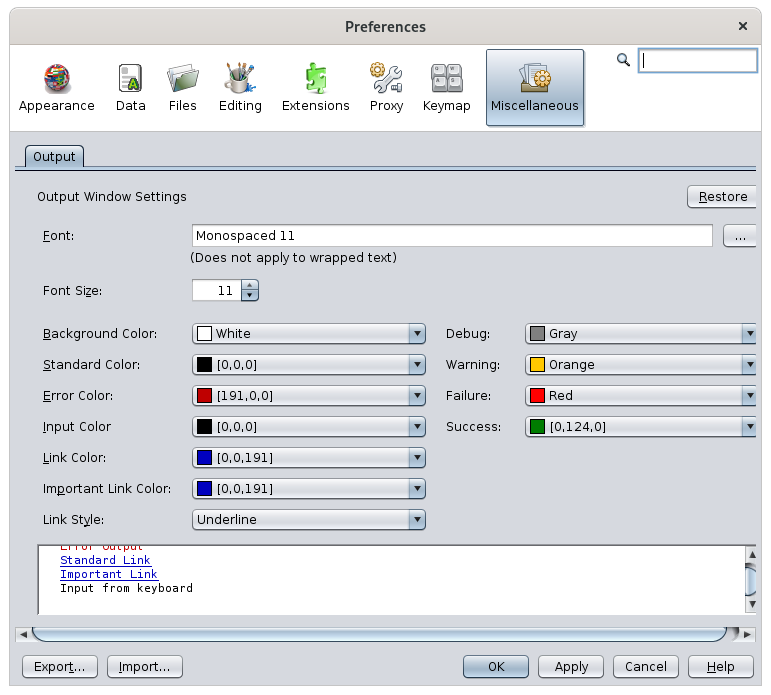
These options define the display formats of the messages sent to the user in the console (error message, warning, etc.).
Among other things, it allows you to choose the category and size of the font, as well as its color, depending on the type of message sent.
The lower part of the panel displays an overview of the choices made.
Export and Import Preferences
Remember that if you want to have the same Ancestris preferences on several computers, you must first export your configuration from the source computer and then import it fromon the destination computer.
It is also possible to make a copy of the .ancestris directory. See File configuration.configuration.
One click on the export button and you select the options you want to export.

You then indicate the file in which the selected options will be saved. This is a file in ZIP format.