Blueprints (STLM)
A blueprint is a set of parameters used to customize the display of an entity in certain views of Ancestris.
Views using blueprints
Only the following views use blueprints. For each, an example lets you see what the blueprints look like.
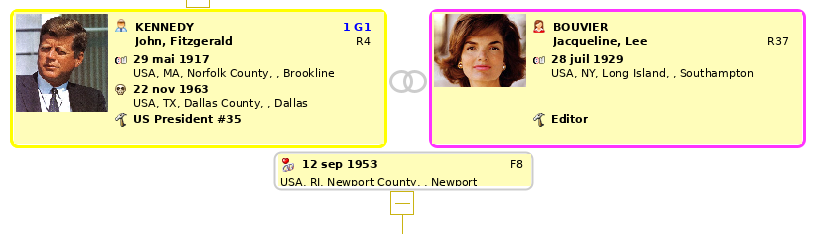
Dynamic tree
The Dynamic Tree uses blueprints for individuals and families. Blueprints are the areas displayed inside the frames.
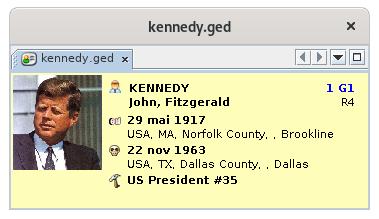
Entity card
The Entity Card uses blueprints for all categories of entities.
We can have the same individual blueprint as for the dynamic tree. Here, the individual blueprint is inside the Entity card.
Extended navigator
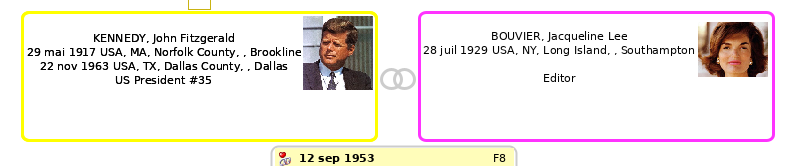
Here, the blueprints used for the individuals of the selected couple. You may notice that they are not the same. The spouse blueprint does not display the Sosa number and displays the entity number above the name.
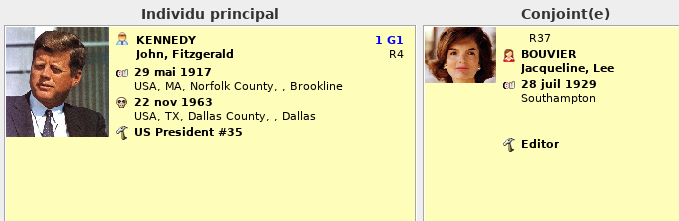
And here's a blueprint for the selected family.

Gedcom editor
The Gedcom Editor uses blueprints in its lower part for all entity categories.
As for the entity card, the Gedcom Editor uses blueprints of individuals or families, but also of other entities.
For example here is a simple blueprint of a Repository entity.
Or a simple blueprint of a Multimedia entity.
Now that you've seen what a blueprint looks like and where they're used, let's see how it works.
General principles
A blueprint is a template defining what to display of an entity, and how to display it.
A blueprint is assigned to a given entity category (individual, family, source, etc.) for a given view (Dynamic tree, Entity file, etc.).
You can define your own blueprints rather than using the ones already provided within Ancestris.
Several blueprints exist in Ancestris and are already selected by default for each of the entity categories, and in each view where blueprints apply.
Blueprints constitute a way to customize Ancestris. You are free to keep blueprints as they are or modify them to your needs.
You can define your own blueprints, i.e. both the information to display for an individual or a family (name, address, etc.) and how to display this information (color, font, alignment, layout, etc.).
If you want to make some changes regarding the blueprints, you will need to learn a little more about them. This is the subject of the following sections in this page.
Technically, a blueprint is a piece of HTML code written into a file located on your disk. Refer to the paragraph Directory containing layers for more information.
Managing blueprints
Managing blueprints consists in performing two types of activities.
- assign blueprints to entities and views
- build your own blueprints and delete them
This is done using the Blueprint window.
The Blueprint window is specific for each entity category.
This window is the same regardless of the type of entity, but the difference is that it only contains blueprints attached to the given type of entity. Also, the way to access the window starts from the corresponding entity.
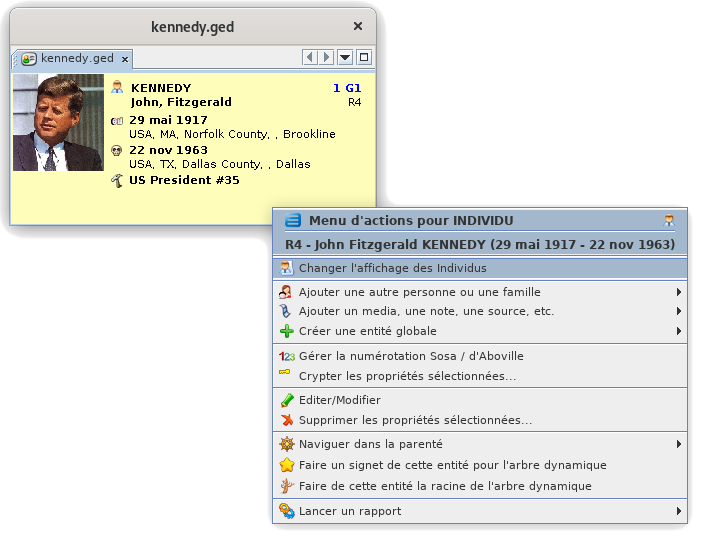
To access the Blueprint window for a given entity category, you must use the Ancestris context menu from an entity of the corresponding entity.
- Right-click on an individual in the Entity card view, then select "Change display of individuals" to open the Blueprint window for individual.
- Right-click on a family in the Entity card view, then select "Change display of families" to open the Blueprint window for families.
- Ditto for Notes, Sources, Multimedia, Repositories, etc. This can be done from the Entity card or the Gedcom Editor for the corresponding entities.
Here is how to access the Blueprint window for individuals, from the Entity card, Contextual menu by right-clicking, then choose "Change display of individuals".
The Blueprint window for Individuals appears.

Whatever the category of entity, the operations in this window are the same. We will use the example of the Blueprint window for individuals in the description that follows.
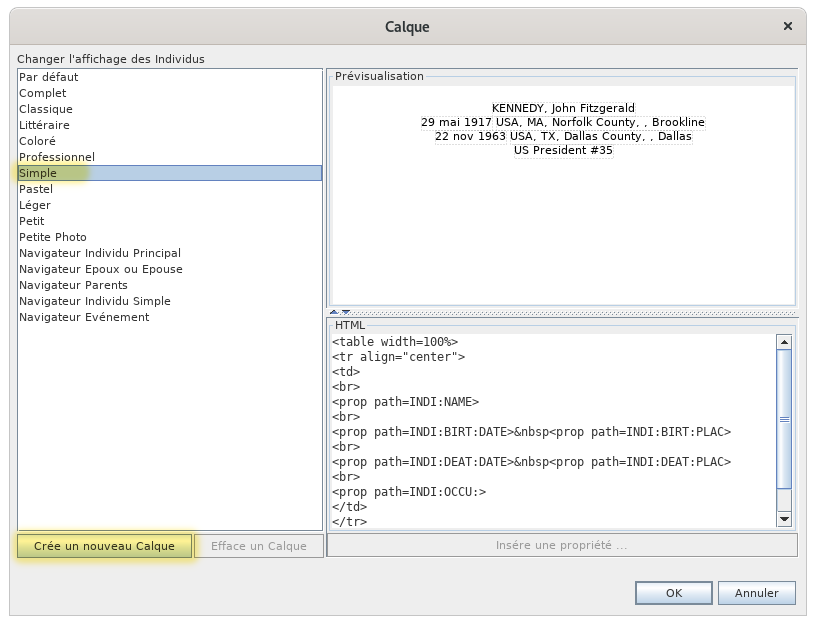
Description
The Blueprint window contains the following areas.
- The list of blueprints on the left shows the blueprintss currently available for the previously selected entity category. To work on a blueprint, select it from the list.
- The preview area at the top right shows a preview of the blueprint selected in the list.
- The HTML editor at the bottom right displays the HTML code of the layer selected in the list on the left, and where you can edit the code. The horizontal separator bar with the preview must be dragged up with the mouse to see the code.
- Meaning of the buttons:
The Blueprint window size can be changed by pulling the lower right corner.
The preview area and the Text Editor area can be adjusted by moving the separator of these two areas with the mouse or by clicking on the arrows of the separator on the left:

Usage
The Blueprint window cover the following needs:
- Discover the available blueprints. To discover the available blueprints without activating them (therefore, without closing the panel), click successively on each of them in the left-hand side list, and check the result in the preview area.
- Choose a different blueprint. To assign another blueprint to the currently selected entity category in one of the views, click a blueprint in the list, then validate by pressing the OK button.
- Modify a blueprint. For security reasons, the blueprints already available cannot be modified. To modify an existing blueprint, you must first make a copy of it. Select it in the list, click New and give it a new name. Then use the HTML editor paneel to make your changes.
-
Create a blueprint. To create a new blueprint, it is recommended to copy an existing one. See above.
-
Delete a layer. To delete a blueprint, select it in the list and click the Delete button. You are then asked to confirm the deletion which will be final. Note: for security reasons, blueprints provied with Ancestris cannot be deleted.
Case study
Suppose we have a single blueprint without a photo for the individuals in the dynamic tree, and want to insert a photo. The steps to do this are detailed below. They are the as follows:
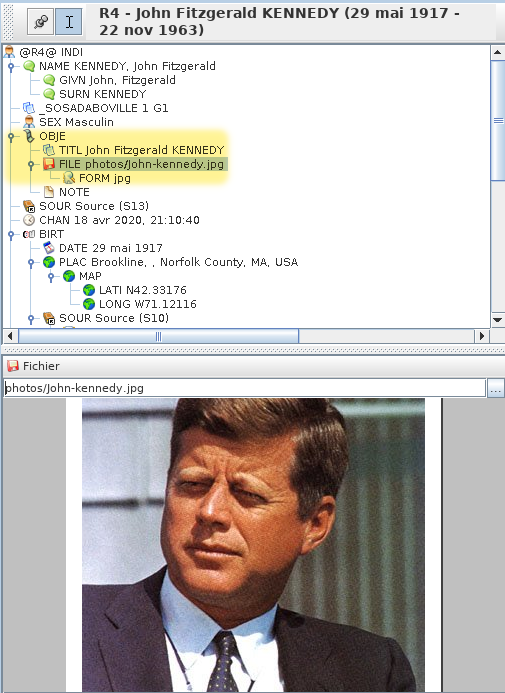
- Identify where the photo data item is inside the data of the individual. Use the Gedcom editor for that.
- Open the Blueprint window for individuals
- Create a new blueprint by copying 'simple layer' without image. Rename it 'MyBlueprint-Indi-Tree'
- Modify the blueprint to insert the photo property identified above, and adjust its size in the frame using the preview
- Save the
layerblueprint and observe the result
RepérerIdentify oùwhere sontthe lesphoto photosdata desitem individusis
L'ouverture de l'éditeurThe Gedcom vouseditor permetallows deyou repérerto oùlocate sontthe lesphoto photositems pourfor chaqueall individu.individuals. OnWe voitsee quebelow c'estthat dansit l'étiquetteis the FILE tag, attached to the OBJE tag, which itself is attached to the INDI tag. Al together, you will need to remember that photo files are at the address 'INDI:OBJE:FILE.FILE'. C'estThat's cewhat qu'onwe voulaitwanted savoir.to know.
OuvrirOpen lathe gestionBlueprint deswindow calquesfor depuis l'endroit où le calque sera appliquéindividuals
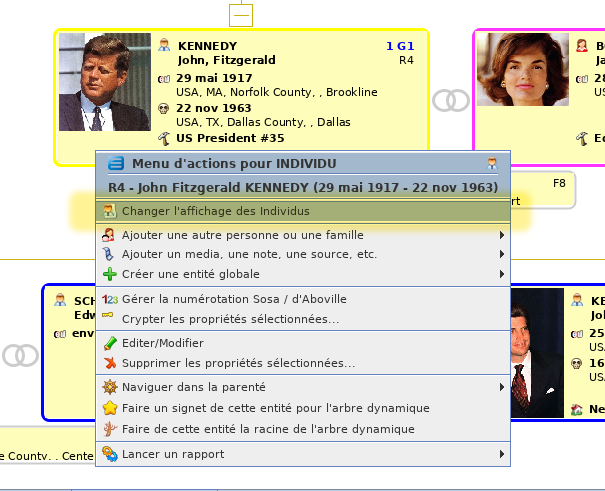
CommeAs we want to change the blueprint for Individuals in the Dynamic view, we need to first select an individual in the Dynamic view.
Then we right-click on veutthe changerindividual. leIn calquethe des individus pour l'arbre, c'est de là qu'on appelle la fenêtre de gestion de calques.
Donc depuis l'arbre, clic-droit sur un individu. Dans lecontextual menu contextuelthat quiappears, apparaît,we on choisitchoose "ChangerChange l'affichagedisplay desof individus"individuals".
CréerCreate una nouveaunew calqueblueprint
LaThe fenêtreBlueprint dewindow gestionfor voulueIndividuals apparaît.appears.
CommeAs onwe veutwant faireto unmake nouveaua calque,new onblueprint leas créean àextension partirof duthe calqueSimple blueprint, we make a copy of the "Simple" parBlueprint.
To C'estdo plusso, we select it in the list. Then in the preview, we see what this Blueprint displays for an individual : simple !text without a photo. What we want to do is to add the photo of the individual.
DoncWe onthen leclick sélectionne."New". DansAncestris l'aperçu,asks onthe voitname alorsof cethe quenew ce calque affiche pour un individu. Un texte simple sans photo. Nous, ce que l'on veut faire, c'est y rajouter la photo.blueprint:
Donc on en crée une copie car on ne peut pas modifier celui-là.
Pour cela, on clique sur "Crée un nouveau calque". Apparaît alors cette fenêtre :
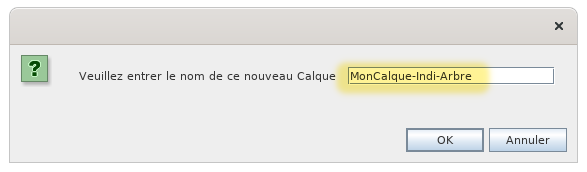
OnWe saisittype le'MyBlueprint-Indi-Tree' nomand dupress nouveauOK.
We etare then on cliquethe surprevious "OK".
Onwindow sewith retrouvea alorsnew sureditable la fenêtre de gestion précédente avec un nouveau calque modifiable.blueprint.
OnWe ahave bienthe lenew nouveaublueprint calqueselected sélectionnéin àthe gauche,list leon mêmethe aperçuleft, enthe hautsame àpreview droite,at etthe letop right, and the HTML code HTMLat enthe basbottom à droite.right.
OnWe voitsee quethat cethis calqueblueprint estis modifiable,editable, carbecause lesthe boutonsbuttons "EffaceDelete" un calque" etand "InsèreInsert une propriétéproperty..." sontare cliquables.visible and enabled.
OnWe vawill maintenantnow changerchange lethe HTML code HTMLso pourthat yit mettredisplays lathe photo.
Modifier
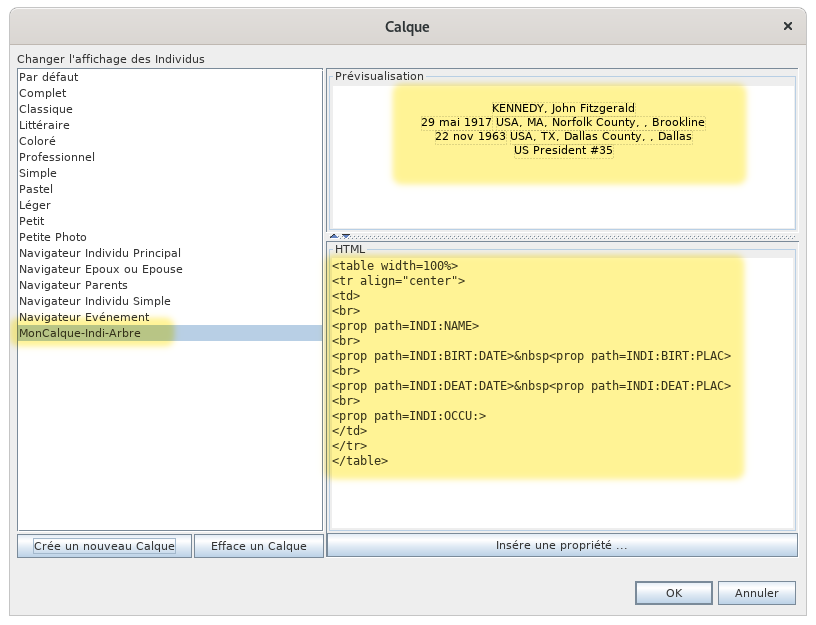
Modify calquethe blueprint
OnWe voitcan qu'ilsee ythat athere are 4 ligneslines deof propriétésproperties dansin le codethe HTML :code: lename, nom,birth, ladeath, naissance, le décès, la profession.occupation.
La baliseThe HTML <prop> ettag toutand ceeverything quiin estit àis l'intérieurAncestris estspecific. uneThis spécificitémakes Ancestris.it Celapossible permetto demanipulate manipulerthe lesgenealogical donnéesdata généalogiquesof duthe fichierGedcom Gedcom.file.
OnWe veutwant mettreto laput the photo enat dessous,the doncbottom onof souhaitethe insérerdisplay, uneso autrewe propriété,insert celleanother repéréeproperty, plusthe hautone :identified above: INDI:OBJE:FILE, aprèsafter lesthe 4 déjàalready présentes.showing properties.
OnWe place lethe curseurcursor sousunder </table>, étiquettethe quilabel marquethat lamarks finthe d'unend tableau.of a table.

DansIn cettethis fenêtre,window, onwe retrouvefind lathe ligneMultimedia ElémentElement MultimédiaOBJE line, we unfold the flap to show the content of OBJE, onand dépliewe lesee clapetthe pourline faireFile. apparaîtreWe contenucheck dethe OBJE,box. etAnd onwe voit la ligne Fichier FILE. On coche la case. Et on faitpress "OK".
OnWe voitnow maintenantsee lethat calquethe quipreview ahas changé.changed.
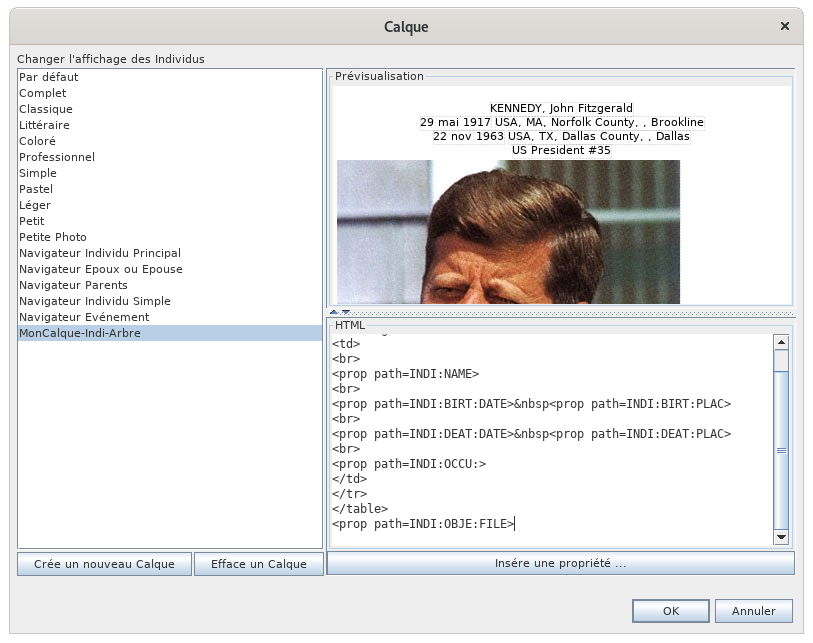
MaisBut cethat's n'estnot pasyet encorefinished, ça,because carin dansthe l'aperçu,preview onyou voitcan quesee lathat the photo estis troptoo grande.big. EtAnd peut-êtrewe vaut-ilhange mieuxour lamoind mettreand enwant hautto àposition droitethe duphoto texte.at the top right corner of the text.
CommeAs lethe textetext étaitwas structuréstructured dansinside una tableau,table, ilit fautis enin faitfact mettrenecessary l'to put the image dansin unethe casetable, duto tableauthe àright créer,of àthe droitetext. duTo texte.do Pourthis, celawe onmodify modifiethe leHTML code HTMLas commefollows: suitwe :move onthe déplaceline lathat lignewe quehave l'onjust vientinserted d'insérerin dansthe latable structure tableby enadding ajoutanta unecell celluleusing par les balisesthe <td> </td>. tags.
CommeAs onwe veutalso égalementwant limiterto lalimit taillethe desize l'of the image, onwe luiadd ajoute une spécificitéan Ancestris :specificity: onwe ajouteadd "max = 20" àat lathe fin,end, àinside l'intérieur de la balisethe <prop ...> >, tag, quiwhich veutmeans direto delimit limiter la taille de lathe photo àsize at 20% deof lathe largeuravailable disponible.width. L'aperçuThe sepreview modifiechanges enas mêmeyou tempschange que vous changez lethe code. C'estThis bienis pratiquehandy etand permetimmediately immédiatementlets deyou voirsee siif cewhat queyou vousare faitesdoing estis juste.right. UneOnce fois lethe code modifié,has l'aperçuchanged, semblethe preview looks correct, etand lathe fenêtrewindow donnelooks cecilike this
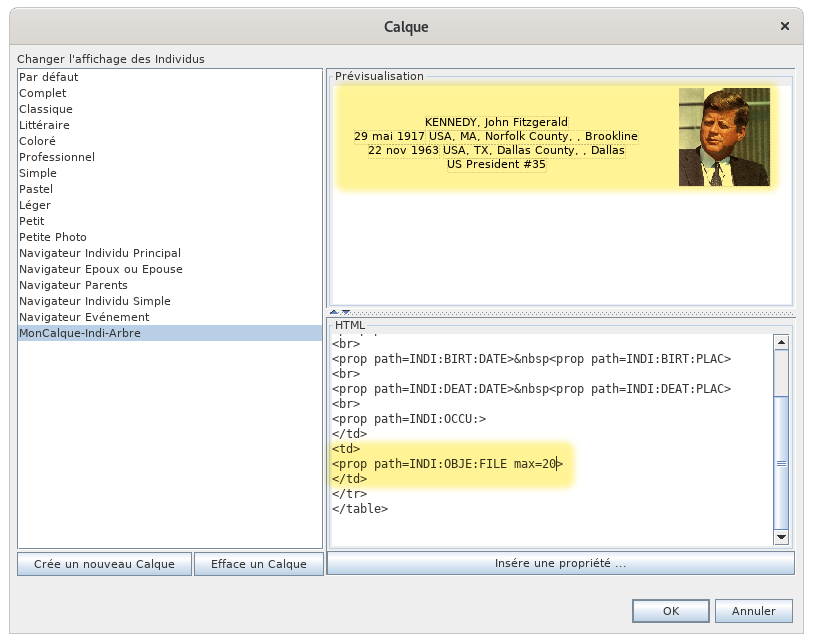
LeThe code enbelow basin enyellow jaunedoes faitits sonjob: office : lathe photo estis dansin unea cellulecell deon droitethe duright tableauof etthe limitéetable àand limited to 20% deof lathe largeur.width.
SauvegarderSave lethe calqueblueprint etand observercheck lethe résultatresult
OnWe peutcan sauvegarder.save. OnWe cliqueclick suron OK etand onwe regardelook enat mêmethe tempsdynamic l'arbretree dynamique.at Lethe calquesame setime. modifie.The layer changes.
C'estIt's bon,good, we have what we wanted!
Going further
Of course, the hardest part therefore remains knowing HTML on athe ceone qu'hand, and knowing the specificities added by Ancestris to handle genealogical data on voulait,the pour Monsieur, et pour Madame !other.
Pour
As allerfar plus loin
Bien sûr, le plus dur reste donc à connaître le langageas HTML d'unlanguage part,is etconcerned, àthere connaîtreare lesmany spécificitéssites ajoutéesto parhelp you. Please refer to them.
Regarding Ancestris pourspecificities, manipulerthe lestags donnéesadded généalogiques.
Pour ce qui est du langagethe HTML de nombreux sites existent pour vous aider.
Pour ce qui est des spécificités Ancestris, les balises ajoutées au HTML sontare
- <prop>
ouor <ifvalue> - <name>
ouor <i18n> - <media>
LesThe paragraphesfoloowing suivantssections tententdescribe dehow vousto lesmanipulate indiquer tous. them.
Balise <prop> ouor <ifvalue> tags
<prop | ifvalue path="path:to:prop" [default="path:to:other:prop"] [format="format"] [max="n"] [img="yes"] [txt="no"]>
AfficheDisplays lathe propriétéproperty deof l'entitéthe définieentity pardefined leby cheminthe (path)path. SiIf una autredefault cheminpath estis indiqué,also c'estspecified, celuiit quiis estthe utiliséone sithat lais premièreused propriétéif n'estthe pasfirst trouvé.property is not found.
Les paramètreThe format etand max sontparameters expliquésare ci-dessous.explained below.
Le paramètreThe img peutparameter êtrecan misbe àset to 'yes' ou àor 'no' pourto afficherdisplay lethe pictoproperty's deicon. laBy propriété.default, Parit défaut, c'estis 'no'.
Le paramètreThe txt peutparameter êtrecan misbe àset to 'yes' ou àor 'no' pourto afficherdisplay lathe propriétéproperty ouname non.or Parnot. défaut,Default c'estis 'yes'.
LesParameters paramètresin entresquare crochetsbrackets sontare facultatifs.optional.
Either 'prop' or 'ifvalue' can be used.
CasCase desof nomsnames (propriétéNAME NAME)property)
PourTo personnalisercustomize l'affichagethe dudisplay nom,of onthe peutname, utiliseryou lescan sous-propriétésuse duthe nom.name sub-properties.
ExempleExample : <prop path=INDI:NAME > dit :a.k.a <prop path=INDI:NAME:NICK>afficherawill ledisplay nomthe completfull suiviname duand surnom.the nick name.
ExempleExample : DUPONTJohn ditF. :Kennedy DUDUCHEa.k.a Jack
Cas
Case lieuxof places (propriétéPLAC PLAC)property)
IlIt estis possible deto forcerforce précisémentthe lelevel niveauof quejurisdictions l'onthat veutyou voirwant affichéto poursee undisplayed lieu.for a place.
LaThe syntaxesyntax deof lathe ligneline àto mettreput dansin l'éditeurthe HTML esteditor deis laof formethe suivantefollowing form
<prop path=INDI:BIRT:PLAC format="2 (7)5)">oùwhere 2 etand 75 sontare lesthe rangsjurisdication desranks juridictionsin dansthe laPlace définitioncriteria dudefinition (see File/Properties).
Example, assuming that all our places follow the following format des(as lieux.
Exemple, supposons que nos lieux soient formatés comme suit dans l'étiquettethe PLAC tag in the Gedcom file or in File/Properties):
Village,Suburb, Ville,City, Code_Insee,ZIP code, State, Code_Postal, Département, Région, PaysCountryPour savoir le rang, on compte à partir de 1, donc 2 est la Ville, et 7 est le pays.
Dans ce cas, on peut dire que
<prop path=INDI:BIRT:PLAC format="2 (7)">affichera Ville (Pays)<prop path=INDI:BIRT:PLAC format="2, 1">affichera Ville, Village<prop path=INDI:BIRT:PLAC format="2 (5)">affichera Ville (Département)
Autres cas de formatage
format="$D": affiche la date complète d'un événement- Exemple :
<prop path="INDI:BIRT" format="{$D}">affichera 10 fév 1876.
- Exemple :
format="$y": affiche l'année de la date d'un événement- Exemple :
<prop path="INDI:BIRT" format="{$y}">affichera 1876.
- Exemple :
format="$P": affiche le lieu complet d'un événement- Exemple :
<prop path="INDI:BIRT" format="{$P}">affichera Lyon, 69002, Rhône, France.
- Exemple :
format="$p": affiche la ville de l'événement- Exemple :
<prop path="INDI:BIRT" format="{$p}">affichera Lyon.
- Exemple :
format="$n": affiche le nom de l'entité liée si elle existe- Exemple :
<prop path="INDI:CHR:XREF" format="{$n}">affichera Marie STUART, la marraine du baptème.
- Exemple :
format="$N": affiche le nom complet de l'entité liée si elle existe- Exemple :
<prop path="INDI:CHR:XREF" format="{$N}">affichera STUART, Marie (° 30 mars 1909 + 16 décembre 2008) (I0298).
- Exemple :
format="$v": affiche le nom complet de l'entité liée si elle existe avec sa nature- Exemple :
<prop path="INDI:CHR:XREF" format="{$v}">affichera Marraine : STUART, Marie (° 30 mars 1909 + 16 décembre 2008) (I0298).
- Exemple :
format="$V": affiche le numéro d'entité uniquement- Exemple :
<prop path="INDI:CHR:XREF" format="{$V}">affichera I0298 si l'on reste dans l'exemple ci-dessus. - Exemple :
<prop path="INDI:BIRT:SOUR" format="{$V}">affichera S134 l'identifiant de la source de la naissance.
- Exemple :
format="text{$e}": affiche le texte "text" si la donnée existe, rien sinon.- Exemple :
<prop path="INDI:NAME:SOUR" format="{(*)$e}">affichera (*) si INDI:NAME:SOUR existe, rien sinon.
- Exemple :
max="n": limite l'affichage à n% de la largeur disponible. Valable pour une image ou pour du texte.- Exemple :
<prop path="INDI:NAME" max=10">affichera le nom complet tronqué à 10% de la largeur disponible.
- Exemple :
Balise <media>
<media [path="path:to:media"] [max="n"]>
Affiche un media de l'entité. Si un chemin est indiqué (path), le media correspondant est utilisé sinon le premier média trouvé est affiché.
Le paramètre "max" limite la taille en largeur comme ci-dessus.
Les paramètres entre crochets sont facultatifs.
Balise <name> ou <i18n>
<name|i18n [tag="tag"] [path="path:to:prop"] [entity="tag"] >
Affiche le nom de l'étiquette donnée par tag, path ou entity.
Il faut spécifier un des 3 attributs. tag est prioritaire sur path, qui est prioritaire sur entity.
Exemple :
<name tag="NAME">affichera Nom.<name path="INDI:NAME">affichera Nom.<name entity="SUBM">affichera Fournisseur d'information.
Répertoire contenant les calques
Les calques sont sauvegardés dans le Répertoire utilisateur, dans un sous-répertoire dénommé "ancestris/blueprints".
Le répertoire blueprints, contient lui-même plusieurs sous-répertoires, chacun d'eux ayant l'intitulé de l'étiquette correspondant à l'entité concernée : c'est dans chacun de ces sous-répertoires que se trouvent les différents calques.
- INDI pour les calques des entités individus
- FAM pour les calques des entités familles
- OBJE pour les calques des entités élément multimédias
- NOTE pour les calques des entités notes
- SOUR pour les calques des entités sources
- SUBM pour les calques des entités fournisseurs d'informations
- REPO pour les calques des entités dépôts
Comme ce sont des fichiers au format HTML, vous pouvez les ouvrir avec votre navigateur internet favori.
Et vous pouvez même les partager sur la communauté Ancestris ! Merci par avance.
B-A BA
Il existe un B-A-BA pédagogique sur les calques au format PDF. Vous pouvez le télécharger.