Entities table
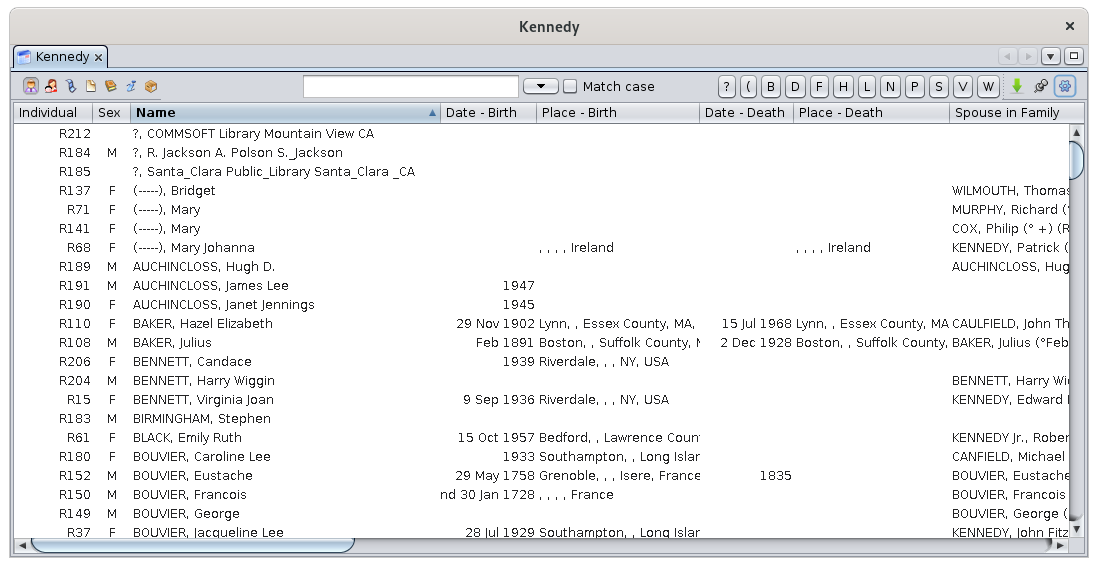
The Entities table lists all the entities of the genealogy and provides detailed information for each of them in columns.
This view is the one that best allows you to list and navigate through the entire genealogy.
You can also create, modify, and delete entities from this table using the Context menu.
Description
The entity table displays a table of entities. At the top of the table is a specific toolbar.
Data table
Rows and columns
Each row represents an entity, which belongs to the category currently selected using the selection buttons in the toolbar.
Each column represents a property associated to this category of entity (individual, family, note, source, etc.).
Sorting entities
The header of each column shows its title. It corresponds to the name of the property associated with the category of entity selected.
These column headers are also buttons to sort the table. To sort the table on a specific field, just click on its corresponding header.
A small triangle is displayed on this column header shows the sorting orientation : ascending or descending (pointing upwards : ascending direction, pointing downwards : descending direction). This direction is immediately reversed with a new click on the header.
When sorting columns, a serie of cursor buttons appear on the toolbar, between the Search window and the Export button. These buttons have letters or date labels. Clicking on a letter or a date takes you directly to the first entity whose first letter or date corresponds to the clicked cursor button.
The Table View allows you to display the Context Menu by right-clicking on any cell of the table.
Toolbar
Entity selection buttons
Located on the left hand side of the bar, these buttons materialize each entity.
Shortcuts: the <Ctrl+Left> or <Ctrl+Right> keys select the entity to the left or the entity to the right of the selected button.
Search field
At the right of the selection buttons, you can type a text in the search field to look for a name in the table.
As soon as a character is entered in the field, the number of corresponding entities is displayed at the left of the field.
To the right of the field, a check box Exact Match forces the search to distinguish upper case and lower case.
Cursor buttons
These buttons work in correlation with the entity selection buttons, and adapt to the selected column.
If the selected column is a text field, the cursor buttons are labelled with letters.
If the selected column is a date, the cursor buttons are labelled with dates.
If the search field is used, only the cursor buttons corresponding to the search results are displayed.
Export button
This export the table to a tab-separated text file that you can save on your computer.
Freeze Table View Button
This locks the current selection on the highlighted line. If another entity is selected in another Ancestris views, the highlighted line will remain.
Configure View Button
It opens a panel to set the Table display preferences. Refer to the customization section.
Usage
This table provides an efficient way to quickly select any entity in the genealogy.
Once selected, it is displayed in all Ancestris views.
From this table, you may as well create, modify or delete an entity.
Select an entity
To select an entity in the Table, first click on the selection button for that type of entity or press <Ctrl+Left> or <Ctrl+Right> to scroll through the entity categories.
Then use the table as a spreadsheet and use the search bar, sort or cursor buttons to find the entity you are looking for.
You can sort across multiple columns by holding down the control key and clicking on the column headers.
You can also, from a sorted column, type the first letter of a name or the first number of a date to go directly to the first row that begins with that letter or number.
You can also move the columns with the mouse if it makes your search easier.
Once the entity you are looking for is visible in the table, a simple click in one of the cells of the row selects the entity.
This selection will be instantly reflected in the other views of Ancestris.
A double click on the identity number will make this entity appear as the root of the Dynamic Tree.
Create an entity
To create an entity, right-click anywhere in the table to open the Context menu and choose Create a global entity and choose the category of entity you want to create.
Modify an entity
To enter or modify an entity from the entities table, first selected it. Then open the Context menu and choose Edit/Modify.
Delete an entity
To delete an entity from the entities table, first selected it. Then open the Context menu and choose Delete the selected properties.
To delete an entity, the right click must be made very precisely on the cell of the column corresponding to the ID number column of the entity to be deleted. If this right click is made on another column, the command will not delete the entity, but will simply erase the content of this cell.
Customization
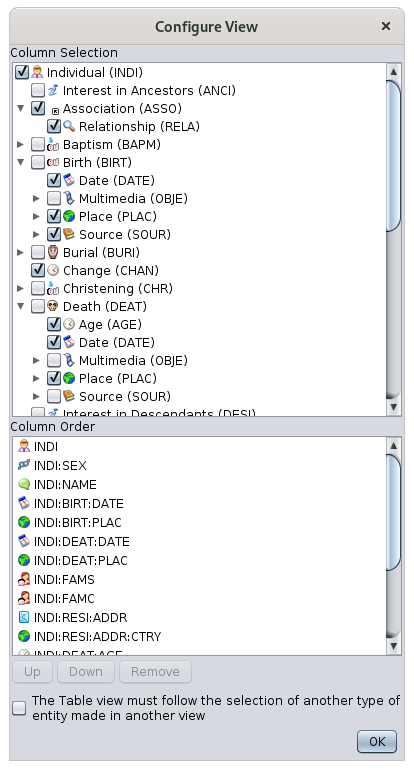
The Configure view button open the panel to customize the Entities table view.
This settings will apply to the entity category currently selected by the selection buttons.
This panel lists all the possible data element (tags) that can be displayed.
This panel has two horizontal areas displaying the tags related to the selected entity category.
Columns selection
The upper area (Columns Selection) shows, in a tree structure and in an indented presentation, the tags containing the information that can potentially be displayed.
To the left of each of them, use the checkbox to display the corresponding information or to hide it.
Column order
The column order can be changed directly with the mouse by dragging and dropping the columns one by one.
It can also be changed in this panel.
The lower area (Column Order) lists the tags currently enabled from the above section.
The order of the columns from left to right, will be the order in the list from top to bottom.
To modify the order, click an item in the list and use the Up and Down buttons.
To remove a column, click on the Remove button.
About the check box "The Table view must follow the selection of another type of entity made in another view" : when this box is checked, the selection, from another view, of an entity of a different category from the one currently selected in the entities table, will switch the table to this category.
Width of the columns
The width of the columns can be changed directly from the table itself, by moving the edge of the columns with the mouse.


