Preferences (STLM)
This is where you set most of your usage preferences.
As soon as Ancestris is installed, you can immediately start using it.
However, if you familiarize yourself with certain settings, you can adapt Ancestris to your way of working and give your genealogy the look you want.
Preferences are accessible from several places.
Description
Selection bar
The Preferences window has a selection bar above the category of preferences that you can modify.
Clicking on one of the buttons brings up the detailed content of the preferences which can be modified in the corresponding category.
The field on the right hand side is a filter which makes it easier to find a parameter. Hit the Esc key to exit the filter.
Below is a description of each category. In each category, tooltips are available to help yo with the meaning of each setting.
Buttons
In its lower part, the Preferences window has a series of buttons.
Export... Button
This button copies your preferences to a file. Very useful if you have installed Ancestris on several computers. This will allow you to apply your preferences without having to reconfigure each setting individualy.
Import... Button
This button retrieves preferences from a file. It is the reverse operation of the previous one.
OK Button
This button validates any modifications made in the Preferences window and closes it.
Apply Button
This button validates any modifications made in the Preferences window, without closing the window.
Cancel Button
This button closes the window without validating any modifications made in it.
Appearence
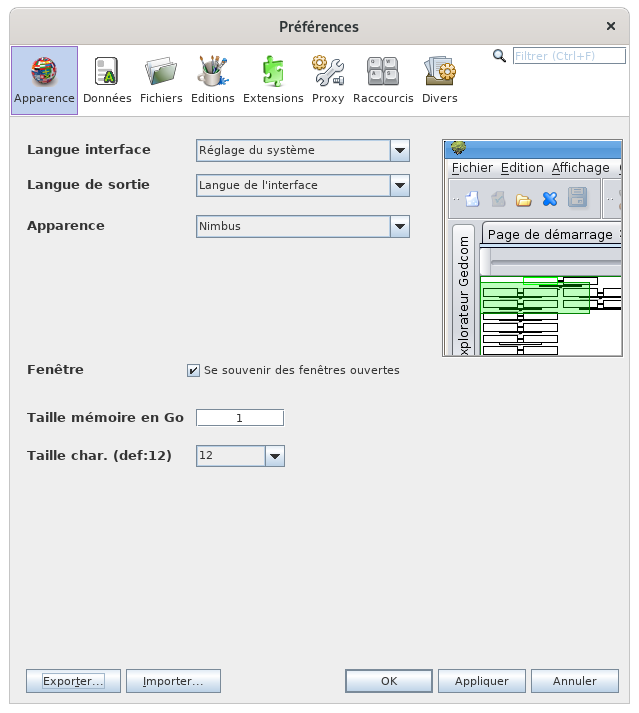
This pane allows you to change the general appearance of Ancestris.
Selects the display style of the windows, also called the look and feel.
For each style selected (Standard, Nimbus, Metal, ...), a sample is displayed on the right.
A relaunch of Ancestris is necessary to activate a new style.
Some of these "look and feel" are extension modules (InfoNode, JTattoo, etc.) that need to be installed to make them appear and use them. See the Extensions for more details.
Font size
Sets the size of fonts throughout the application.
Window
When the box is checked, the windows' sizes and positions will be saved when you exit Ancestris, and restored when Ancestris is reopened.
Memory size in GB
Forces the memory size to allocate to Ancestris to operate.
If you have large family history files, it may be more convenient to allocate a larger number of gigabytes.
Data
This panel allows you to modify the formats and contents of data elements of your genealogy. It includes two tabs.
General data
Symbols
Displays the typographical characters used to symbolize certain events (Birth, Marriage, Profession, etc.).
Text
Defines the text width in number of characters when displaying notes, source texts, etc.
It is recommended to keep the default value of 246 characters wide.
Pictures
Sets the maximum size of images in kilobytes.
Individuals
Sets how to display names in terms of the ordeer of the name elements.
Dates
The first line sets how to display dates.
The checkbox "Use Baptism when no Birth" tells Ancestris to display an individual birthdate as his/her date of baptism. Otherwise, birth date is left blank.
- For example for displaying the root person in the title bar of the dynamic tree.
- Or for related persons (ex: husband) in the GEDCOM editor.
Here are two examples, the first with the display of the root in the tree, the other with the display of the husband in the Gedcom editor.
| Case of "Use Baptism when no Birth" set to 'no' |
Case of "Use Baptism when no Birth" set to 'yes' |
 |
|
|
|
 |
Privacy
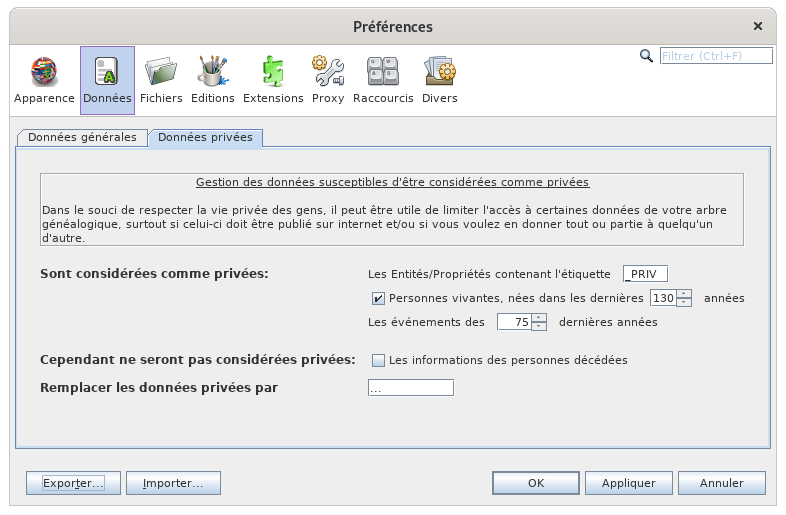
The Private tab helps you define your preferences when sharing your data with other genealogists, or for publication on the Internet.
You decide what confidential data you want to protect.
- Are considered private: any entity or property falling under the following 3 conditions
- Properties containing TAG _PRIV : all entities or properties containing the tag you specify will be considered private. '_PRIV' is the default proposition.
- Living persons : all individuals born in the last number of years you specifiy will be considered private.
- Events of last 'n' years: all these events, but not necessarily the entities they belong to, will be considered private.
- Hoever are never considered as private dead person information : check this box if you are ok to display deceased person's information.
- Replace text by lets you specify what to display instead of the real information.'...' is the default proposition.
Files
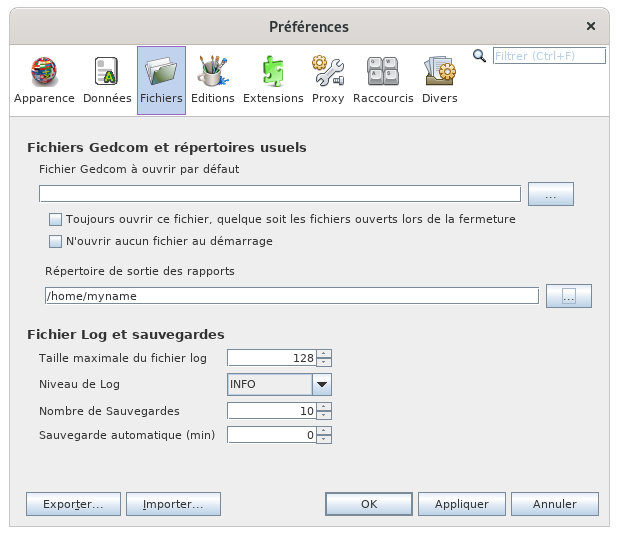
Gedcom files and usual directories
Ancestris offers the possibility to define a main genealogical file that you use most often. This file can then be opened using the Open <Default File> action in the File menu. You define it in the first text field GEDCOM file to open.
Also, by default, when Ancestris starts up, it opens the last genealogical files that was open when Ancestris last closed.
The two checkboxes modify this behavior.
- The Always open this file regardless of open files when closing Ancestris check box forces Ancestris to open the default file at start up.
- The Do not open any files at startup check box tells Ancestris not to open any files on startup.
The following setting is the Reports output directory is the directory where Ancestris will save user reports or error reports.
Log file and backup copies
Maximum size of lof file limits the size of the log file. If the maximum size is reached, the log does starts removing the top lines.
Log Level tells Ancestris the level of detail of the information to be collected by the log file. The more it is towards "SEVERE", the less it is detailed, the more it is towards "ALL", the more it is detailed. Be careful, the more detailed it is, the more it slows down your use since everything that happens in the software will be noted.
Number of backup copies defines the number of saved copies to keep for security reasons, in addition to the latest version. The name of each backup file is the same as the name of the main file, completed with the date and time of the recording. For example, if the number of backup copies is 3, each recording (Save action on the File menu, or <Ctrl-S>) will delete the oldest backup copy and keep four copies of the current genealogy: the most recent, plus the previous three copies with their timestamp.
Editing
This panel define your preferences when editing genealogical information or when using the editors.
Names
These options relate to the names of individuals.
Forces all lastnames in uppercase converts a surname into uppercase when validating the entry.
Defaults the same lastname to the wife assigns the child's lastname to both parents when creating them.
Tag used to read given name defines the tag to use when reading the gedcom file, to get the common first name. The default tag is NICK.
Places
This option about places' criteria or jurisdictions. It includes two items.
Add and save spaces between jurisdictions: for better visibility, a space is added after each comma separating the various place jurisdictions.
Split jurisdictions to edit in Gedcom editor: separates the places jurisdictions when editing them in the Gedcom Editor.
- Example: Box unchecked.
ID Numbers
This option defines settings for the ID number of all entities.
Reuse available (deleted) numbers: forces Ancestris to reuse earlier ID numbers that have been made available when their corresponding entities has been deleted..
Default Entity ID length: sets the number of digits for ID numbers.
Encoding
This option deals with the encoding of the file saved on disk. It is a technical parameter that defines the character table used to save the file.
File Encoding selects the character table. It is recommended to encode with the UTF-8 table.
Editing
Ces options concernent le comportement des éditeurs.
Éditeur par défaut indique le nom de l'éditeur à utiliser lors de l'action du menu contextuel Éditer.
Appliquer les modifications sans confirmation vous dispense de cliquer sur OK pour valider une modification dans les éditeurs. L'action de Supprimer reste toutefois soumise à confirmation de votre part.
Nombre maximal d'annulations est le nombre de modifications qu'il est possible d'annuler via la touche Ctrl+Z ou le bouton Annuler de la Barre d'outils.
Créer automatiquement les deux conjoints lors de la création d'une liaison parent-enfant ajoute systématiquement les deux emplacements des parents au moment de créer l'ascendance d'un individu.
Détecter automatiquement les doublons d'individus détecte les doublons d'individus à chaque fois que vous modifiez un individu. Un individu peut en effet devenir un doublon au moment où vous changez sa date de naissance, son nom, etc. sans qu'il l'ait été au moment de sa création.
Lors de la sauvegarde de vos modifications sur la personne, Ancestris vérifie avec les critères définis dans l'outil Fusion de doublon si un doublon existe.
Si un doublon est trouvé mais non fusionné, il sera détecté à chaque modification de l'un des individus.
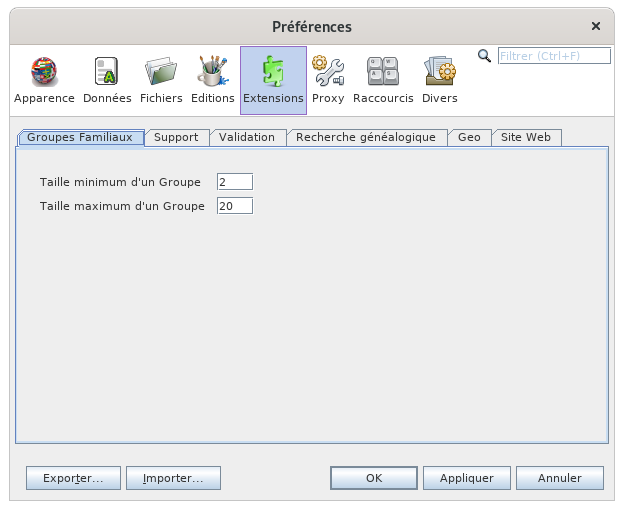
Volet Extensions
Ce volet vous permet de définir les préférences des outils correspondants aux onglets ci-dessous.
Les options de personnalisation de chaque onglet sont décrites dans la page des outils correspondants, dans la section personnalisation.
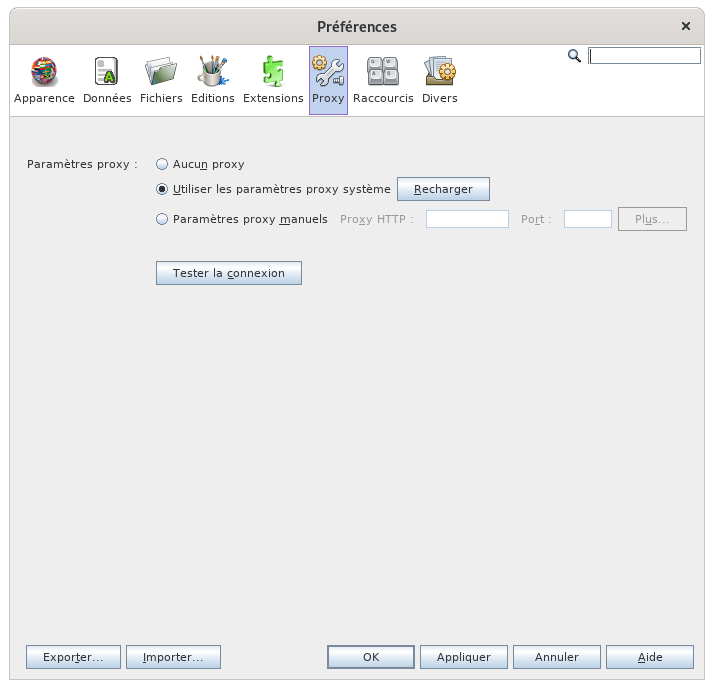
Volet Proxy
Ce volet concerne votre mode de connexion Internet, si elle se fait via un serveur intermédiaire ou non.
- Première option : Aucun proxy
- Deuxième option : Utiliser les paramètres proxy système, accompagnée d'un bouton Recharger. C'est le réglage par défaut de détection automatique.
- Troisième option : Paramètres proxy manuels. Lorsque cette troisième option est sélectionnée, Ancestris vous demande des informations complémentaires.
Le bouton Tester la connexion permet de vérifier si la connexion a été correctement configurée.
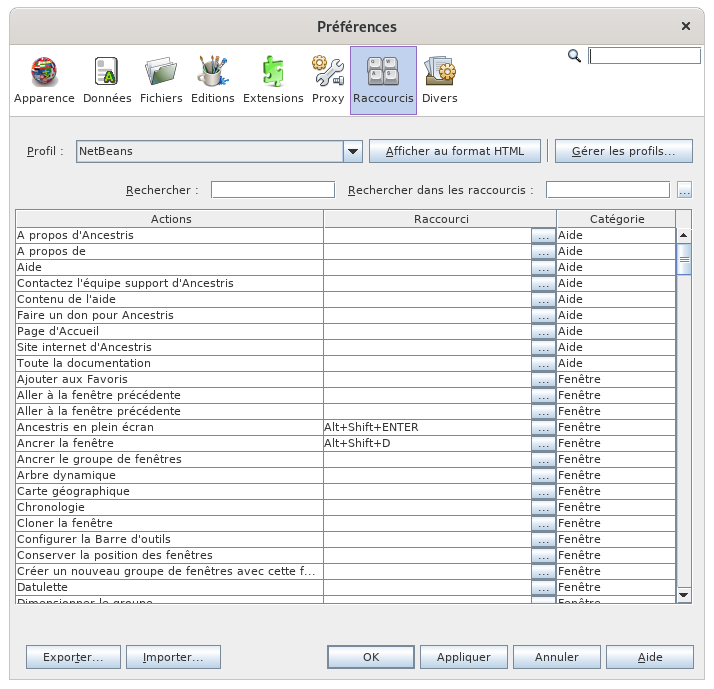
Volet Raccourcis
Ce volet concerne les raccourcis clavier dans Ancestris.
Profil sélectionne l'un des profils enregistrés. NetBeans est le profil par défaut.
Le bouton Afficher au format HTML ouvre votre navigateur avec le tableau des raccourcis clavier. Bien pratique si vous souhaitez les imprimer.
Le bouton Gérer les profils permet d'affecter des raccourcis différents à des profils différents. La fenêtre qui s'ouvre pour gérer les profils contient plusieurs boutons.
- Dupliquer crée une copie du profil sélectionné
- Restaurer les valeurs par défaut rétablit le contenu originel du profil sélectionné
- Supprimer supprime le profil sélectionné
- Exporter copie le contenu du profil sélectionné dans un fichier xml
- Importer crée un nouveau profil à partir d'un fichier xml
- Fermer ferme la fenêtre Gérer les profils
- Aide ouvre l'aide relative à cette fenêtre (bouton actuellement indisponible)
Rechercher permet de filtrer la liste des raccourcis en fonction de leur action.
Rechercher dans les raccourcis permet de filtrer la liste des raccourcis. en fonction d'une touche utilisée.
Liste des raccourcis
Chaque ligne représente l'association éventuelle entre une action et un raccourci.
La colonne Actions liste les différentes action d'Ancestris.
La colonne Raccourci indique le raccourci clavier de l'action lorsqu'il existe
À droite de chaque cellule, figure un bouton [...] qui permet l'ouverture d'un menu contextuel contenant les actions suivantes.
- Modifier permet d'ajouter une combinaison de touches ou d'en modifier une déjà définie
- Ajouter une alternative (qui est présente seulement quand la cellule est renseignée) permet d'ajouter un autre raccourci à la même action
- Réinitialiser les valeurs par défaut remet le raccourci défini lors de l'installation d'Ancestris
- Effacer supprime le raccourci
La colonne Catégorie indique la catégorie à laquelle appartient la commande associée.
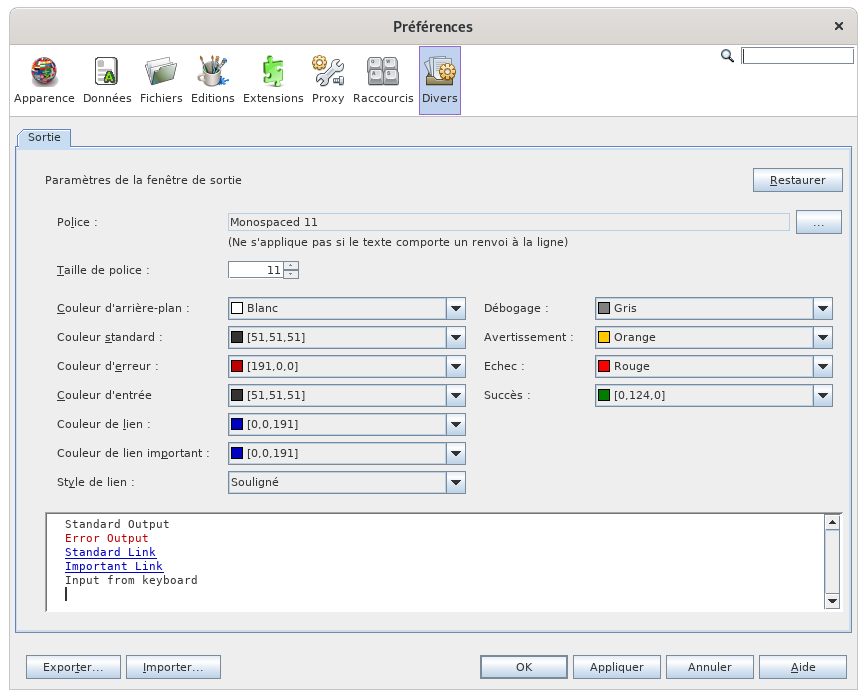
Volet Divers
Ce volet concerne la fenêtre Sortie. Voir Menu Fenêtre/Sortie.
Ces options définissent les formats d'affichage des messages envoyés à l'utilisateur par le logiciel (message d'erreur, avertissement, etc.).
Il permet entre autres choses de choisir la catégorie et la taille de la police de caractères, ainsi que sa couleur, selon le type de message envoyé.
La partie inférieure du panneau affiche un aperçu des choix retenus.
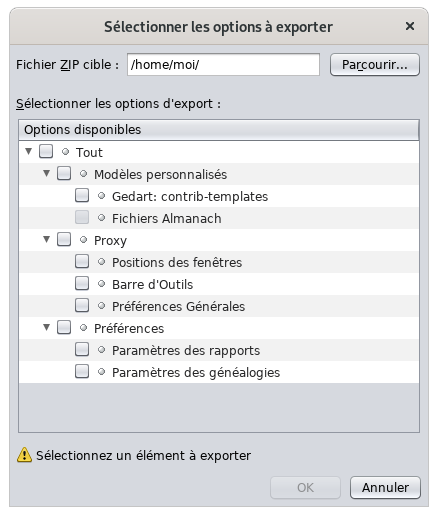
Exporter et Importer vos Préférences
N'oubliez pas que si vous voulez avoir les mêmes préférences Ancestris sur plusieurs ordinateurs, il faut que vous pensiez à faire un export de votre configuration puis un import.
Il est également possible de faire une copie du répertoire .ancestris.
Un clic sur le bouton exporter et vous sélectionnez les options que vous souhaitez exporter.
Vous indiquez ensuite le fichier dans lequel seront sauvegardées les options sélectionnées. Il s'agit d'un fichier au format ZIP.

