Maak een nieuwe stamboom
Create your genealogy
You will see how simple it is to create a genealogy from scratch with Ancestris. You will create a first individual, the parents and close family like children and brothers and sisters, thus having your first genealogical tree with one or two generations.
Creating a genealogy usually starts with creating the first person and specifying information like the birth date and place for instance. Then other persons are added, such as the parents, brothers and sisters, cousins and grandparenst. A new person is always linked to a person already in the tree, these are the relationships. For eaxmple parent - child, or partner1 - partner2. In this way you will continue to expand the tree.
Well, with Ancestris, you can exactly do the same!
Create the first individual
During the guided tour, we used the Bourbon genealogy, Bourbon file. This is an example of a genealogy supplied with Ancestris.
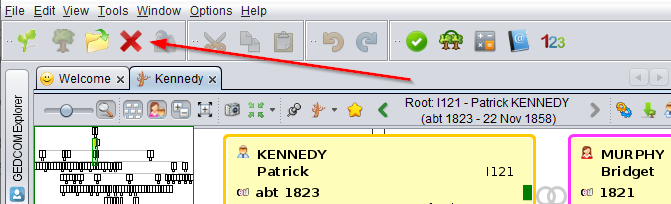
If this tree is still open, we first have to close it. To close Bourbon, just click on the red cross on the toolbar at the top of the window.
And now, let's create your own genealogy. If the Welcome page is still visible, click the button Create a genealogy or click  at the left on the toolbar.
The following window appears.

Fill it in and click OK. The next window appears:
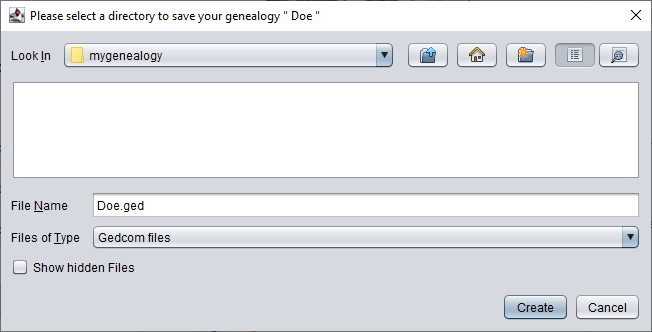
Ancestris will then ask you for the location and file name to save your genealogy information.
As you can see, the information is directly saved as a Gedcom file. Gedcom files have the extension ".ged". The filename Ancestris chooses, is the lastname of the person that was just filled in.
Press Create to save. That's it.
Ancestris will now show a genealogy tree in the dynamic tree view on the left side of the window. This tree is made up of one person only: you.
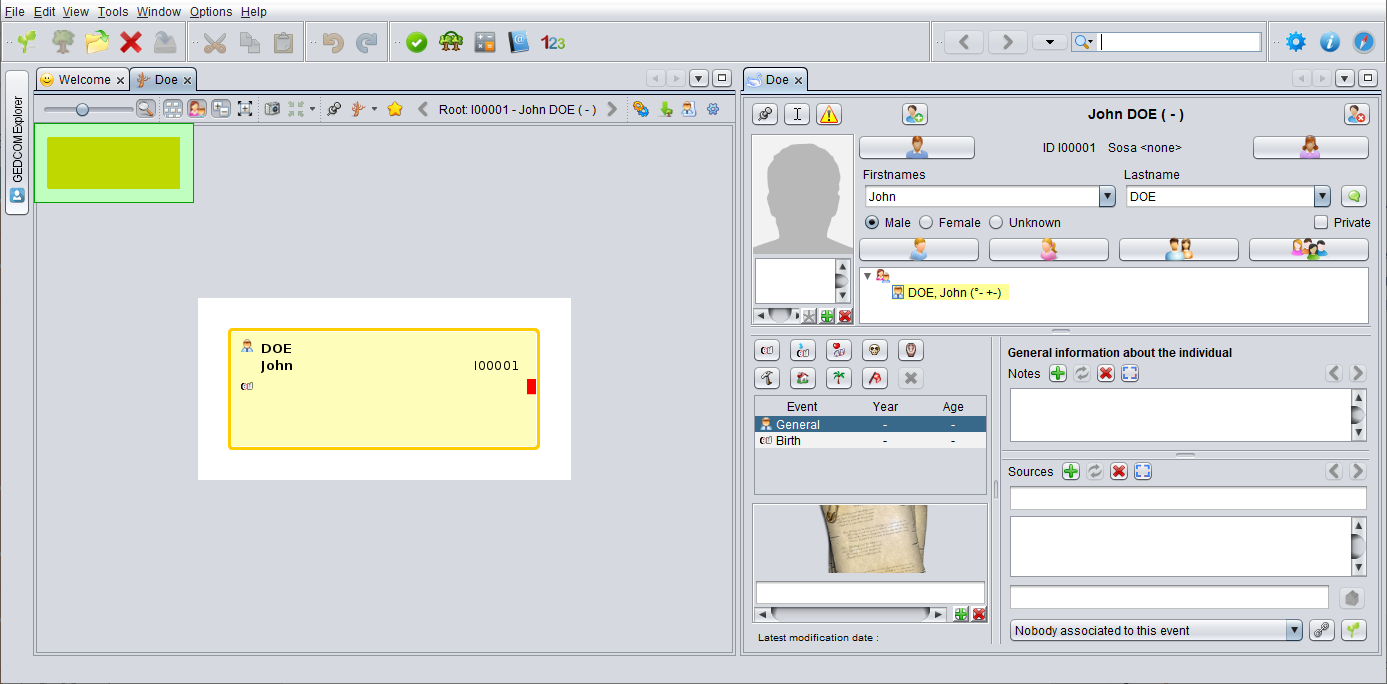
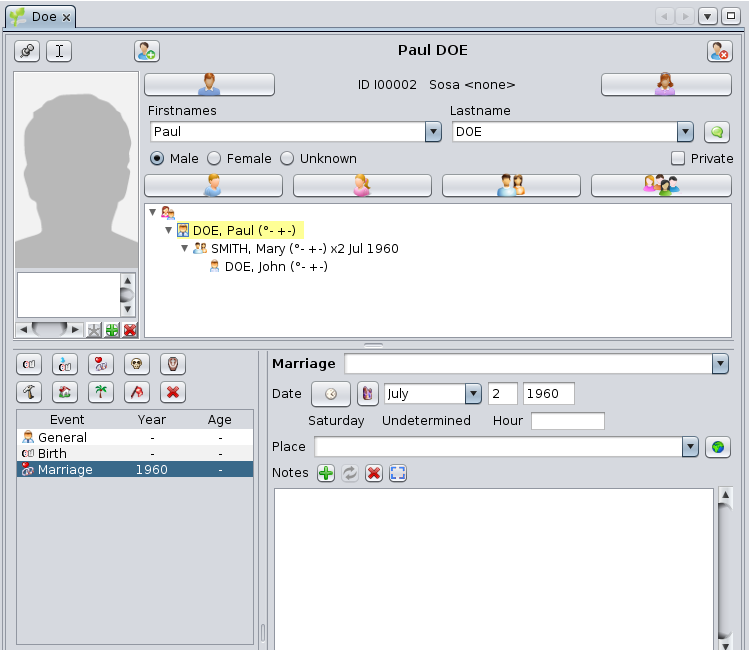
On the right hand side, the Cygnus editor is also opened. The Cygnus editor shows the detailed information of the person currently selected in the dynamic tree view on the left. (Maybe on your screen the last name is written as "DOE". So in all capitals. The xplanation of this you will find near the end of this page.
Short summary of Cygnus fields and buttons:
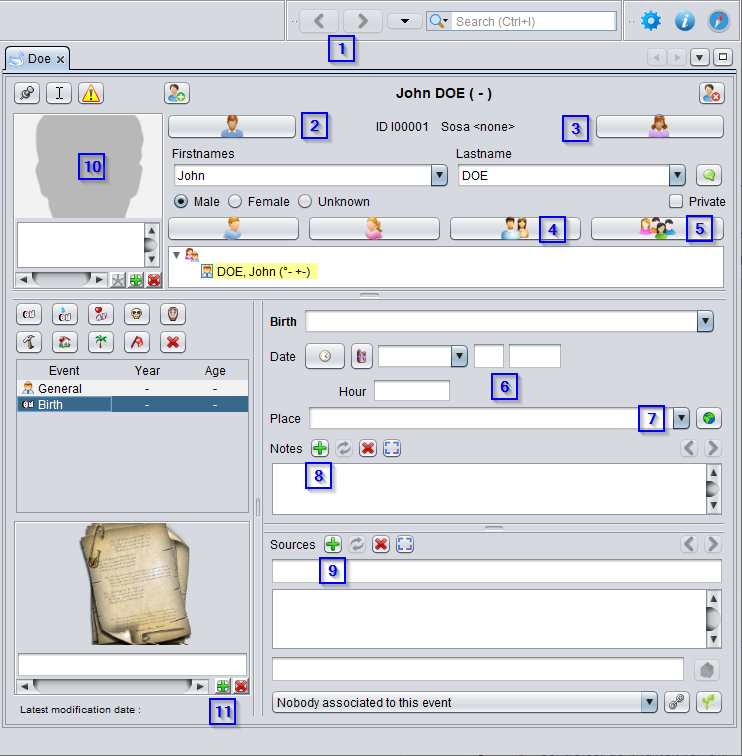
Click here for an explanation of the numbers
Explanation of the numbering:
- Buttons that scroll forward or backward through previous content in this editor. (previous persons)
- Button
withtowhichcreate thefather can be created.father. - Button to create the mother.
- Button to create the partner.
- Button with which the children can be created.
- Birth data can be entered in these fields. For example the date and possibly time.
- Place of birth field. This field can be expanded to search in existing places. The green globe can also be used to transfer data from a map.
- Any notes can be created via the green plus.
- Sources can be added via the green plus. Including any associated data.
- A photo or photos can be added here.
- Scans of deeds and the like can be added with the green plus. Including all associated data.
UsingWe will not go into much detail here about how to enter things exactly, because you will find that on the "Cygnus editor,Editor" page.
If you want to know the meaning of a button, hold the mouse over the button and more information will appear in a popup. That goes for any button on any screen.
With this Cygnus editor you can now complete the missing information,data, e.g.such youras birththe date and time of birth (field 6), your place forof instance.birth (field 7). But you can also add a photo (10). To add more names:
Add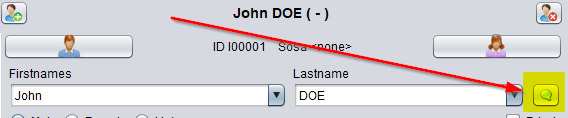
Klik photographop ofde yourselfgroene byknop clicking"Details naam", zoals hierboven aangegeven, dan opent het Details naam scherm::
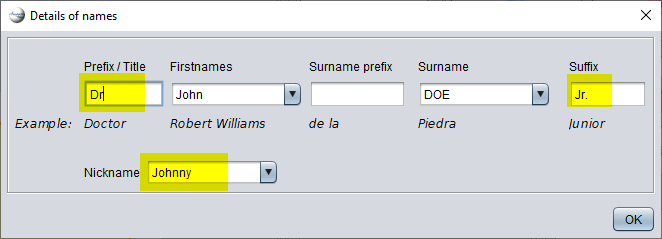
Here you can enter more names, titles and the like.
Save changes in the respectiveCygnus area.editor:
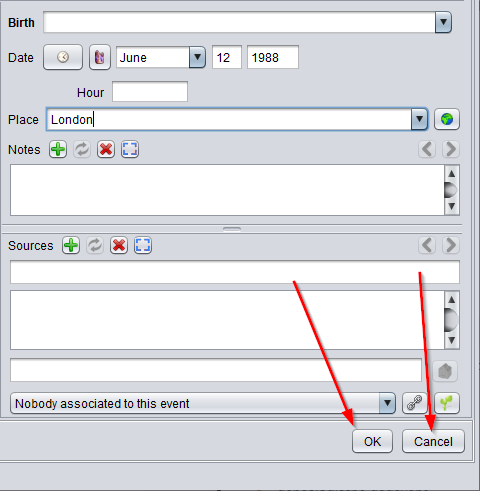
AddAs soon as you have entered something, for example the date of birth, or more names or other namesdata, iftwo necessary.
When finished, in order to save the changes made, click on the OK button thatbuttons will appear at the bottom rightright. corner,OK as soon as you change your data insaves the editor.
AdoptCancel bestcancels practices
If you keep on adding people, very soon you will reach hundreds of records: individuals, families, etc.
We recommend you to immediately adopt a consistent and harmonised way to write the frequently used information, such as:
surnames (1st letter uppercase or not)occupation descriptionswitnesses (usehusband's uncle rather than Peter's uncle) to avoid repeating namesplace names (old spelling or new spelling ?)etc.
Also, if you have your birth certificate at hand, document it now as a source, and as comprehensively as possible. Ancestris is very good at keeping all detailed information.them.
Create your parents
Creating parent can be done either from the dynamic tree view or from the Cygnus editor.
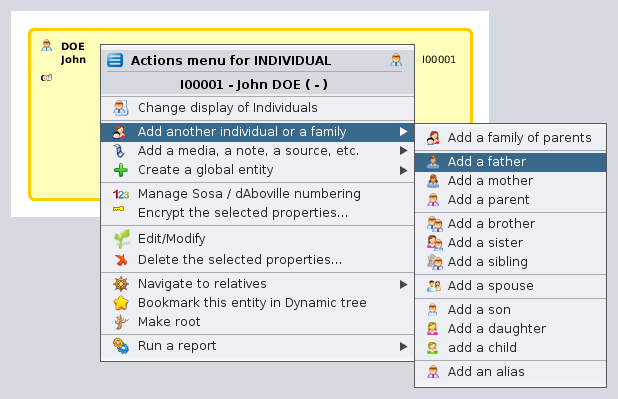
FromIn the tree,pedigree rightoverview on the left side of the screen, right-click on the desired individual.person, in this case "John Doe". (For Mac users with 1 mouse button use cntr click) A popup menu will appear:
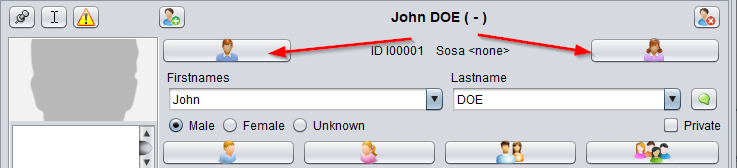
In the Cygnus editor (as seen below) we use the buttonsbig button for new parents."Father". This method is a faster method.faster. The "Father"Father" button is atlocated in the top left onof the Cygnus editor.editor screen. (The "Mother" button is on the right)
After clicking the appropriate button, the "Add a father" screen will appear:
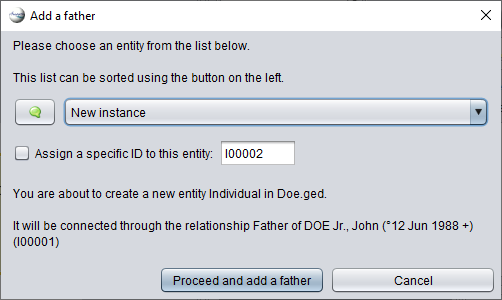
You click on "Proceed and add a father". Then your tree will look like this:
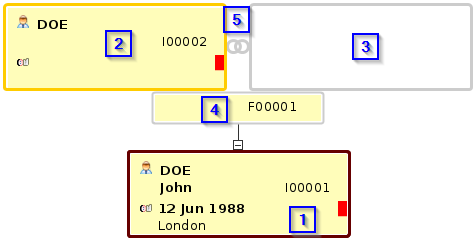
In eitherboth case,cases, you get two more boxes onin the tree, above your own: These are your parents. Your father (2) is created,created (yellow), but for your mother (3) only a placeholder is visible for your mother.visible. The entity corresponding to her is not yet created.
Explanation of the numbers:
- Field of your own. With first name and last name, because they were known. On the right is the internal number assigned to your person, here "I00001" (The I of Individual). The red square on the right means that important information about you is still missing. The small icon on the left under your name means: "Born", which may contain your birth data.
- Your father's field. Only the surname is known here, so the first name is missing. Your father gets number "I00002".
- Your mother's field. All data is still missing.
- Field in which the FAMS (=relationship) data will appear. For now only the relationship number "F00001" (The F comes from Family).
- This is the relationship symbol (2 rings) it stands between both partners of the relationship. The symbol changes when they are divorced.
Ancestris default settingssetting createcreates only one parent at a time. It could be interesting to try and create both. To do so, go to preferences, using the main menu "Options / PreferencesPreferences" /Choose the Editing tab, or click on  at the top right of the main window.
In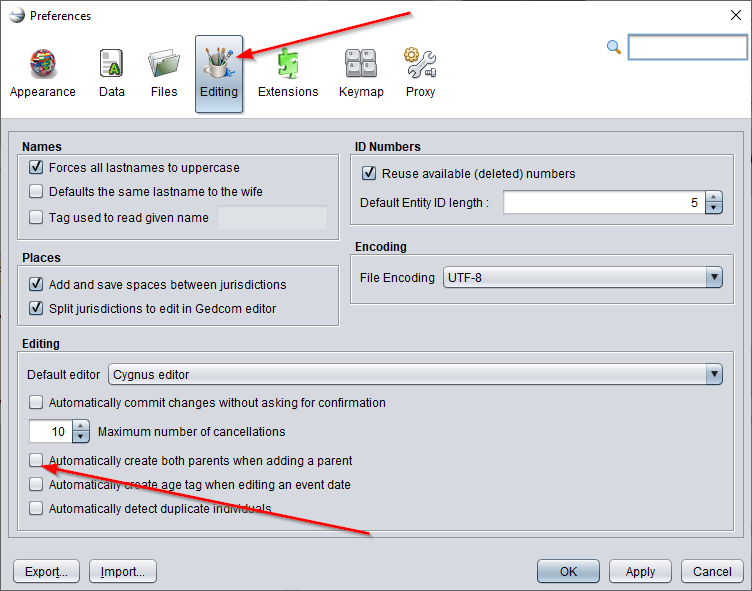
On the preferences,Preferences screen, select the Editing"Edit" panel,tab, and check the option "Automatically create both spousesparents when adding a parent.
parent". Then click OK (at the bottom) to save this change.
On the father's box,field, the family name is automatically derived from the individual from which the father was created.
Now enter your father's details in the Cygnus editor (name (Peter), date and place of birth, etc.). Click the OK button when you are done to save the data.
To create the mother, right click on the field of "William" and choose "Add a partner" from the popup menu. Either you select the field of "John" and click on the corresponding "Mother" button in the Cygnus editor, or you right-click in your own field "John", and then choose in the popup menu: "Add a mother". You fill in her details and click OK.

On the Cygnus editor, enter your father's information (name, date and place of birth, etc.). Click the OK button once done, to save the data.
To create the mother, whether right click on the individual and choose Add a spouse or click the corresponding button on the Cygnus editor, or right click your own box and choose Add a mother.
Create your close relatives
Next you can create your brothers and sisters, your wife and children, etc. in the same manner.
If you make a mistake, it is always possible to correct the information directly or simply undo the creation of the new individual by clicking on Undo button on the toolbar and start over.
Once you have created all the individuals of your close family, just click on your box to return to yourself.
Add information about your family
Let's suppose you want to enter your parents wedding date.
Click on the family box, the one between yours and your parents's. It is box number F00001 on the Dynamic tree view below.
In Cygnus, you will see your father's information, and Cygnus will select the nuclear family he constitutes with your mother.
From there, click on the "Marriage" button on the Cygnus editor. The marriage event is created. Indicate the type of marriage (for example : Religious), enter the date and place, if known.
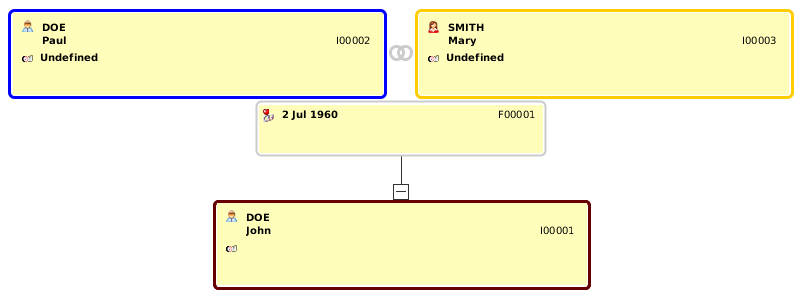
Click OK and that's it. Here is the result:
This is the current tree:
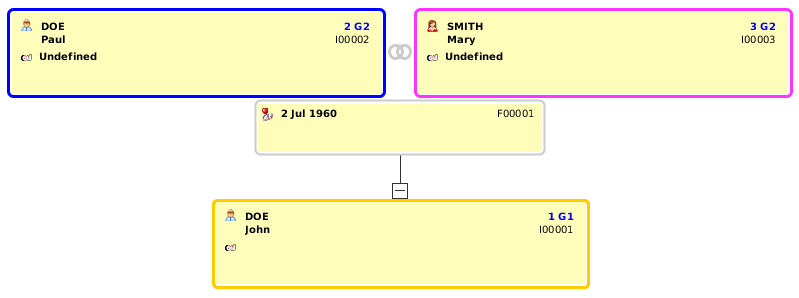
Let's now generate the Sosa numbering for this 3 people family.
Right click on the box representing yourself and choose "Manage Sosa / d'Aboville numbering". A window will open. Just click OK and the Sosa numbering will be created like the following: number 1 for yourself, 2 for your father and 3 for your mother. G1 and G2 codes are the generation numbers.
You should now have something similar to the view below, where the Sosa numbering is visible on every box at the top right corner, above the identification numbers.
This first tree is now finished. Save it on disk by clicking  on the toolbar.
You can now close your genealogy file by clicking the red cross on the toolbar.
If you hadn't saved your data before, a window would have poped-up, asking you to save the file.
We will then see the Welcome page again, since it is now the only one opened.
From there, your genealogy will show on the "My Ancestris" tab of the Welcome panel, and at the top left on the section "Last opened genealogies".
From then on, you will probably adopt the habit of opening your genealogy from the Welcome panel.
You are now ready to take advantage of all the other features of Ancestris. The other chapters of this book will help you do so.
We wish you all the best.
Adopt best practices
If you keep on adding people, very soon you will reach hundreds of records: individuals, families, etc.
We recommend you to immediately adopt a consistent and harmonised way to write the frequently used information, such as:
- surnames (1st letter uppercase or not)
- occupation descriptions
- witnesses (use husband's uncle rather than Peter's uncle) to avoid repeating names
- place names (old spelling or new spelling ?)
- etc.
Also, if you have your birth certificate at hand, document it now as a source, and as comprehensively as possible. Ancestris is very good at keeping all detailed information.