Registry records
The Registry records tool helps you automatically add individuals and information into your genealogy from digitized official registry text documents. Another goal of this tools is to assist you in creating registry records for the benefit of other genealogists.
This tool can be accessed from the Tools menu or from the Cygnus editor via the button  in the source section.
To get all the functionalities described in this page, you will need at least Ancestris 13 because the tool has been completely revisited.
Principle
To understand the tool, let's describe the process of entering information from an official text document into a genealogy file, and how it can be done using Ancestris.
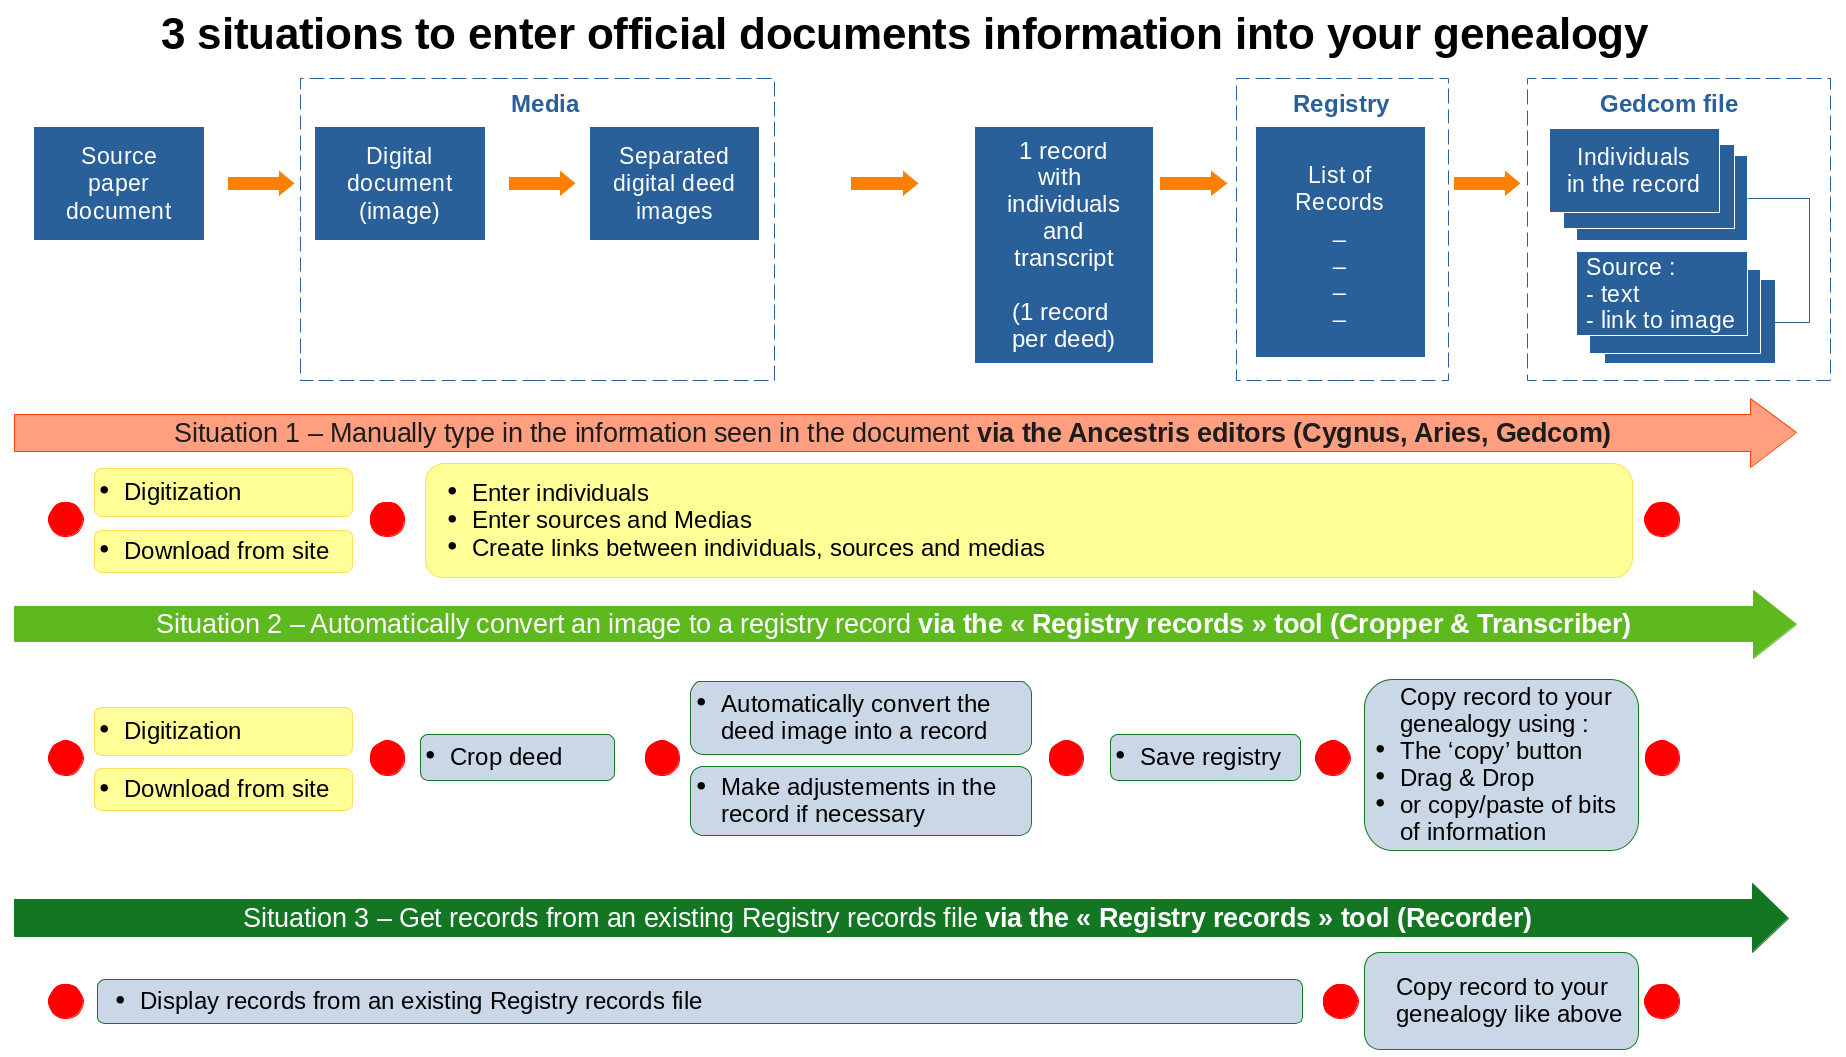
Process
In the above image, the top row with the blue boxes shows from left to right all the possible steps we see to enter information in a Gedcom file starting from the source paper document.

- In the first step on the left, you have collected a source paper document. Let's say you found a birth certificate of a person you have been looking for a while during a visit to a grand-parent.
- The second step consists in digitizing the document, scanning it or taking a picture of it. In our example, you now have your birth certificate in digital format on your computer.
- The third step consists in isolating the text you are interested in from the rest of the picture in case more than one deed or certificate can be seen on the picture. For example, if your picture of the birth certificate shows the whole page of a church register with a birth certificate before and after the one you need, or if it spreads across several pages, some cropping and stitching will be necessary. You end up with one single image only showing the full text of the certificate you need.
- The fourth step consists in transcribing the text in the picture into a text in a record. This is usually done by reading it, understanding it, and entering in a form the bits of information in the appropriate fields. For the birth certificate of our example, you will enter the date and location of the certificate, the name of the newborn, the birth date if it is different from the certificate date, the parents' names, and potentially the witnesses' names.
- The fifth step consists in saving that record into a registry file so that you do not loose the work done so far. This file holds probably other records of other certificates. You may want to store all records you have found into one single file, or have one file per city, or any other split criteria. In a registry file, records are not linked to one another, just like in a church or civil register.
- The sixth step consists in properly placing all the information of the record into your genealogy file where it belongs. In the birth certificate example, one of the parent may already exists in your genealogy and you want to link the new information to this person's record rather than recreating that person's record. Also, if you want to keep the proof of the information in the genealogy file - you should, you will want to create a media to store the digital image done earlier, to document it, and to link it to the new born record. To complete our example, your newborn person is finally showing in the genealogy tree, linked to its parents, and the media image can be seen to explain and justify all that.
Of course, not all steps are performed for each document you can have.
- You can start with an already digitized document if you took a picture of it during a visit at a registry repository for instance
- You do not necessarily have to crop images if the source image is already showing the whole and only text you need
- You do not necessarily have to enter the record in a registry file and instead directly enter the information in the genealogy file.
From the general process described above, we can see 4 different real life situations. We will now give an overview of how to perform this process using Ancestris in each of these situations.
Situations
Situation 1 – Manually type in the information seen in the document via the Ancestris editors (Cygnus, Aries, Gedcom)
In the picture shown, the process performed above is represented by the orange row.
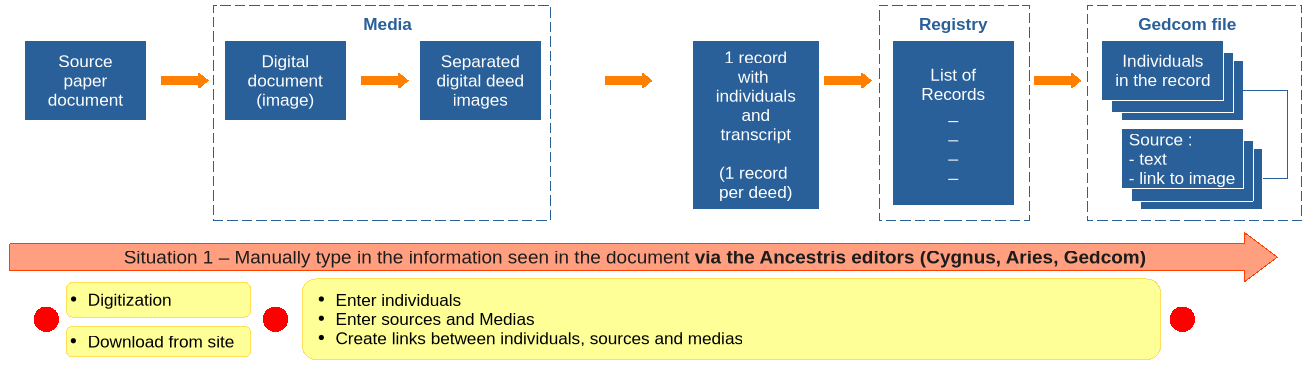
This is the most common situation nowadays. It is made of only 3 steps (represented by the red dots) and 2 sets of activities (represented by the yellow boxes).
Activities
- You have or you collect a digitalized document from a visit or directly from a web site, and you store this file in your computer somewhere. This is done outside of this tool.
- You manually enter all the information in your genealogy tree. That is where you use Ancestris. For that, you have the choice of 3 editors: Cygnus, Aries or Gedcom. They all have their advantages. They are described in this documentation.
The Registry records tool is not directly used for that situation. The Ancestris editor views are used instead.
The benefit of this situation is that it is highly simple. On the other hand, it is highly manual, quite long and therefore error prone.
For a marriage certificate for instance, you might have to create up to 10 individual entities, 1 media entity, 1 source entity. You will have to document all their respective information. You will have to link all these entities together.
Quite tedious, isn't it? What if all this could be done automatically?
Well, that's where the Registry records tool comes into play. That is "Situation 2" described below.
To make it easier for you, it is possible to switch to the automatic mode (Situation 2) from the Cygnus editor (Situation 1).
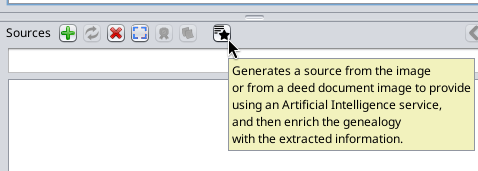
Just click the "Extract information" button in the Source section of the Cygnus editor. You will be asked for a file if the Source does not have any and you will be taken to the middle of Situation 2 described next.
Situation 2 – Automatically convert an image to a registry record via the « Registry records » tool (Cropper & Transcriber)
In the picture shown, the process performed above is represented by the light green row.
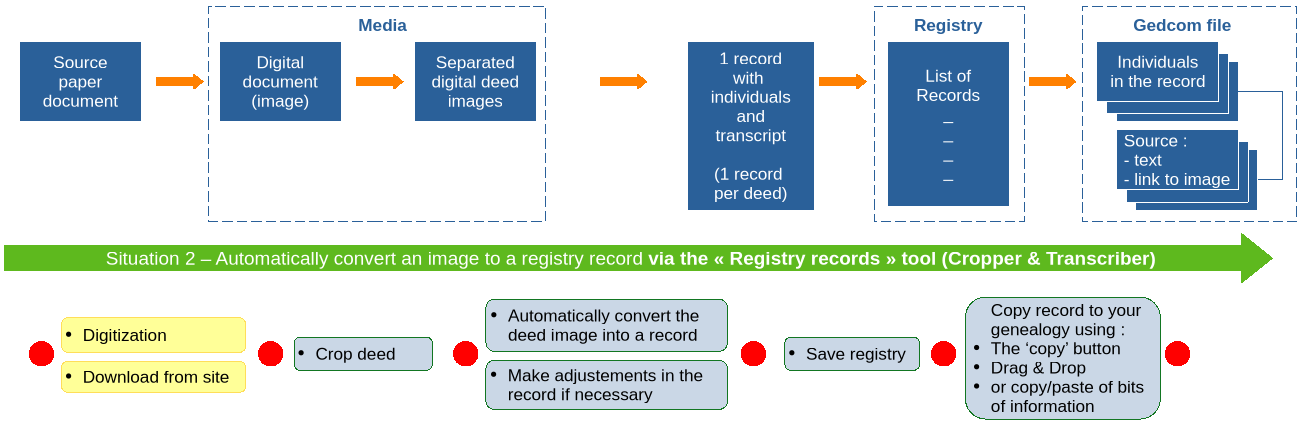
Artificial Intelligence helps automate most of the manual tasks described in "Situation 1" and this "Situation 2" might become the most common way of doing it soon. It is made of 6 steps (represented by the red dots) and 5 sets of activities (represented by the yellow and grey boxes). Yellow tasks are done outside of Ancestris. Grey tasks are done within Ancestris.
Activities
- You have or you collect a digitalized document from a visit or directly from a web site, and you store this file in your computer somewhere. This is done outside of Ancestris.
- You use the "Cropper" panel of the Registry records tool to visualize the raw image and crop out one image showing the text of a deed or certificate.
- You use the "Transcriber" panel of the Registry records tool to convert the text in the image into a record displayed as a filled-in form with the relevant information in the right fields. This is where the magic happens. See use case here if you are impatient.
- You save the record in a registry file.
- You copy the record to your genealogy tree.
- The Registry records logic will propose the most relevant possibilities to merge the record into your genealogy tree and you will select one of them
- You configure what you want to include or exclude from the merge and confirm.
- Ancestris will do the rest automatically. It will create all relevant entities, fill them in with the record information, annotate some dates and places, link all the entities together and show the result in the editors.
The Registry records tool is used for that situation.
Situation 3 – Get records from an existing Registry file via the « Registry records » tool (Recorder)
In the picture shown, the process performed above is represented by the dark green row.
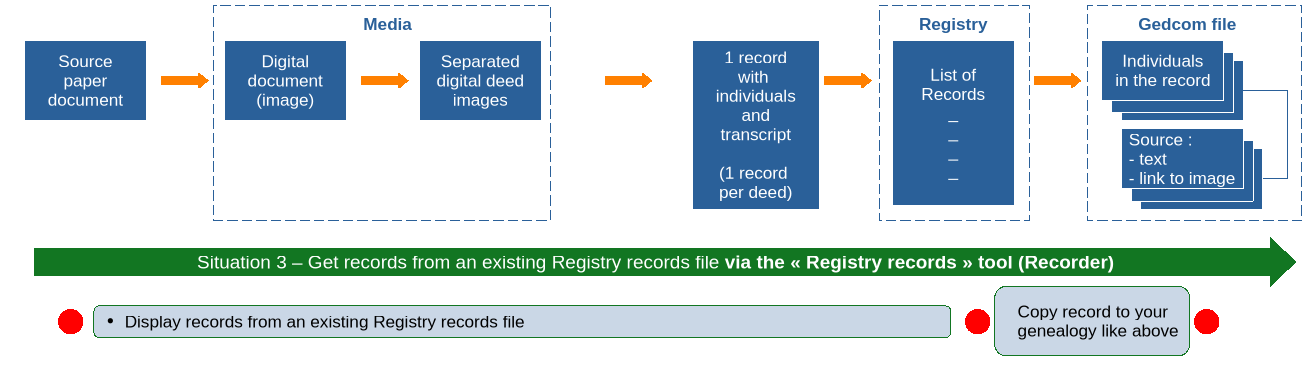
This situation has 3 steps and 2 activities. The difference with the previous two situations is that this one does not start from a digitized document. It starts from a Registry file that you might have done at a previous stage or that you received from someone else.
A registry file in Ancestris is a simple CSV file complying with a known format: NIMEGUE, EGMT, or ANCESTRIS.
Activities
- You have a registry file on your computer and you open it using the "Recorder" panel of the Registry records tool.
- You select a record you are interested in and copy it to your genealogy tree in the same way as described above in "Situation 2" activity 5.
Situation 4 – Producing Registry files for others to use
"Situation 3" suggests that rather than using a Registry file from someone else, you can be the one producing Registry files that others will use.
Use "Situation 2" in that case starting with complete official registry pages and without copying the records to your genealogy.
Only crop page images into single deed images, transcribe the text of each image into a record, and save the records.
You can then export the file in one of the Registry formats, NIMEGUE, EGMT or ANCESTRIS.
Info: a registry inventory is the manual operation of an individual or a genealogical association to collect and enter one by one in a computer all the deeds/certificates of a parish or civil status register with a more or less complete and exhaustive transcription of the information.
The Registry tool is designed to assist you in such operation.
Description
The Registry records tool is actually made of 3 tools, each one in a specific panel, for a specific work situation and activities, each one with its own toolbar of buttons.
-
 The Cropper
 -
 The Transcriber
  The Recorder


These tools have been introduced in the "Situations" section above. We will give all the details below about their features.
Cropper

The Cropper assists you in cropping images showing multiple certificates to produce images with only one certificate per image.
This tool shows raw pictures of multiple certificates located in a directory, and lets you
- Crop pictures for each individual certificate by resizing the red box and double-clicking on the picture or pressing the Crop Image button.
- Number them using image filename root and index in toolbar.
- Store them in an output directory from where they will directly be referenced by the entities of your genealogy Gedcom file.
The Cropper is used in "Situation 2" above.
Here is what the panel looks like.
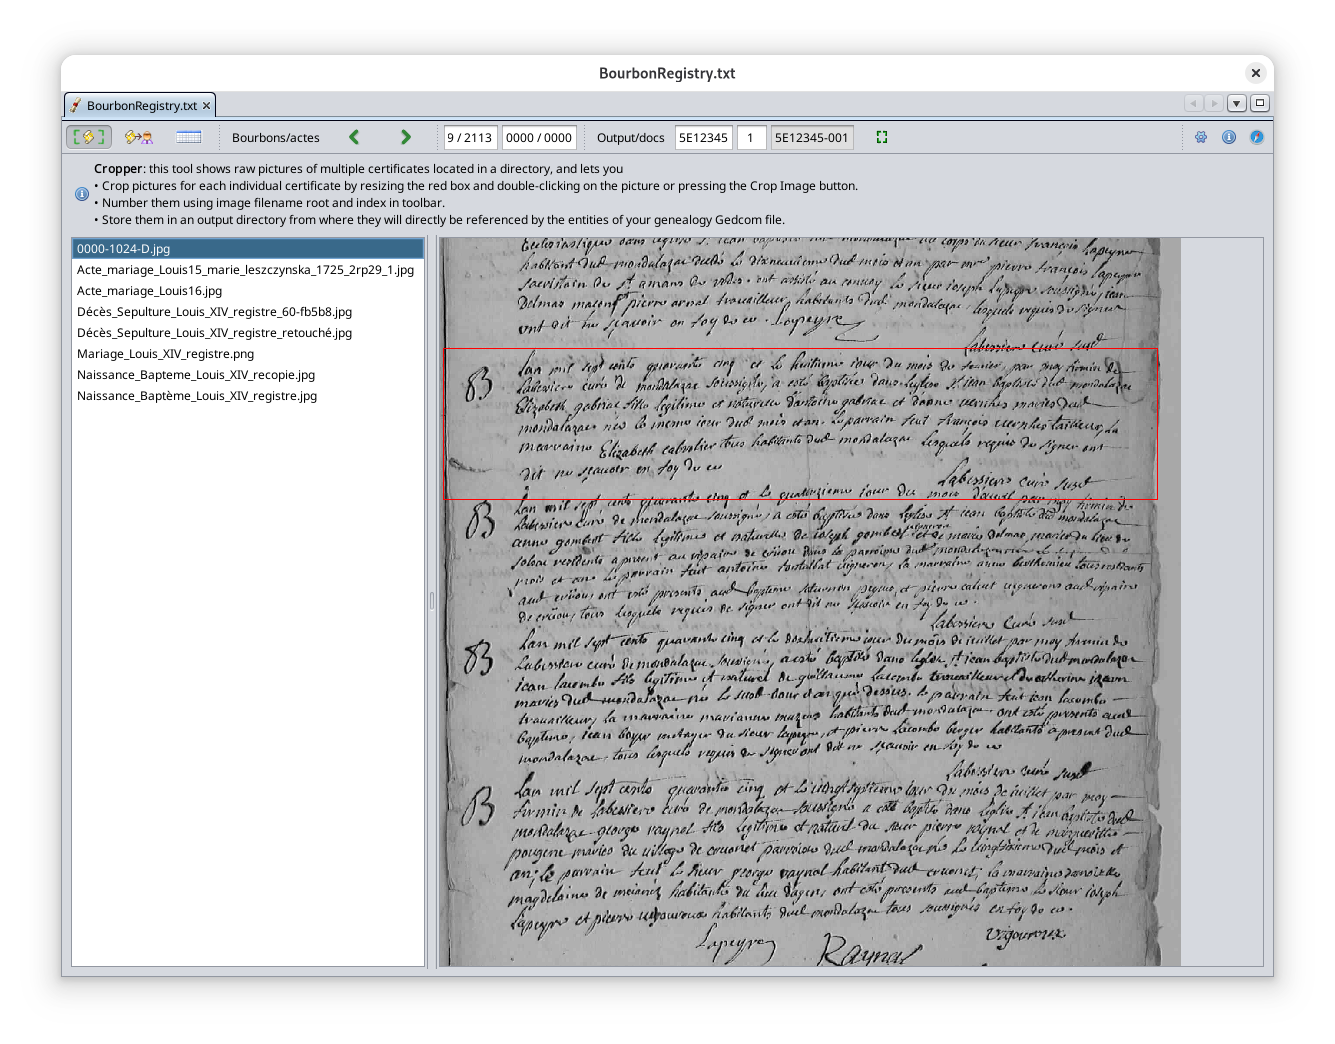
The panel shows
Toolbar

Cropper button
Transcriber button
Recorder button
Input directory button 

Previous image button 

Next image button 

Mouse coordinates field 

This field displays the coordinates of the mouse on the picture. The main purpose of showing the mouse coordinates is to position and size the red rectangle on the picture. When moving the four sides of the rectangle, you can set its position and size.
Reticle coordinates field 

This field displays the reticle coordinates on the picture in case you want to remember exactly where you put the reticle for some pictures. You can show or hide the vertical and horizontal line of the reticle on the picture by right-clicking on the picture.
The reticle is used to define the top left corner of the image to consider. This is useful if you want to keep only the part of the picture that has the red rectangle size and shape, but starting from the reticle position.
- If the reticle is not visible, both the position and the size of the red rectangle will matter and the image will be cut along the red rectangle line.
- If the reticle is visible, only the size of the red rectangle will matter and the image will be cut from the reticle point according to a rectangle equal to the red rectangle in size. It is as if the top left corner of the red rectangle was at the reticle position.
What problem does it solve? If you have several pictures where you are only interested in keeping the right hand side of the image (e.g. right page of register showing two pages), and if the right hand side of the image does not always start at the same position in the picture, you just have to position the reticle from one image to the next, and not to adjust the four sides of the red rectangle.
Output directory button 

Image filename root field 

This field defines a root name - or prefix - for each cropped file. It can be a document reference in the repository or a page number of a register or any other prefix you would like to name your media file with.
Image file name index field 

This field defines the index of the next cropped image. If can be the certificate number in a register or any index you would like to define for your media files.
Resulting file name field 

This field shows the full image file name resulting from the concatenation of the root part and the index part.
Crop button 

Before pressing the Crop button, move the edges of the rectangle where the image should be cut. You cannot move the corners, only the edges. You can use the Reticle described above to redefine the top-left corner of the image to be considered.
The red rectangle remains at the same position when you change images in the list.
Double-clicking on the picture also crops the picture.
Configure view button 

Information button 

Online Help button 

Transcriber
The Transcriber helps you convert a text image into a registry record.
This tool shows the digital certificates in a directory, and lets you
- Identify and transcribe the type of certificate, the information on the individuals mentioned in the document, and the text of the certificate.
- Transfer the resulting individual and source in your genealogy Gedcom file with the 'Copy record to genealogy' button, Drag-n-Drop or simple Copy/Paste of each bit of information.
- Save the transcription in a Registry file using the Save button.
The Transcriber is used in "Situation 2" above.
Here is what the panel looks like.
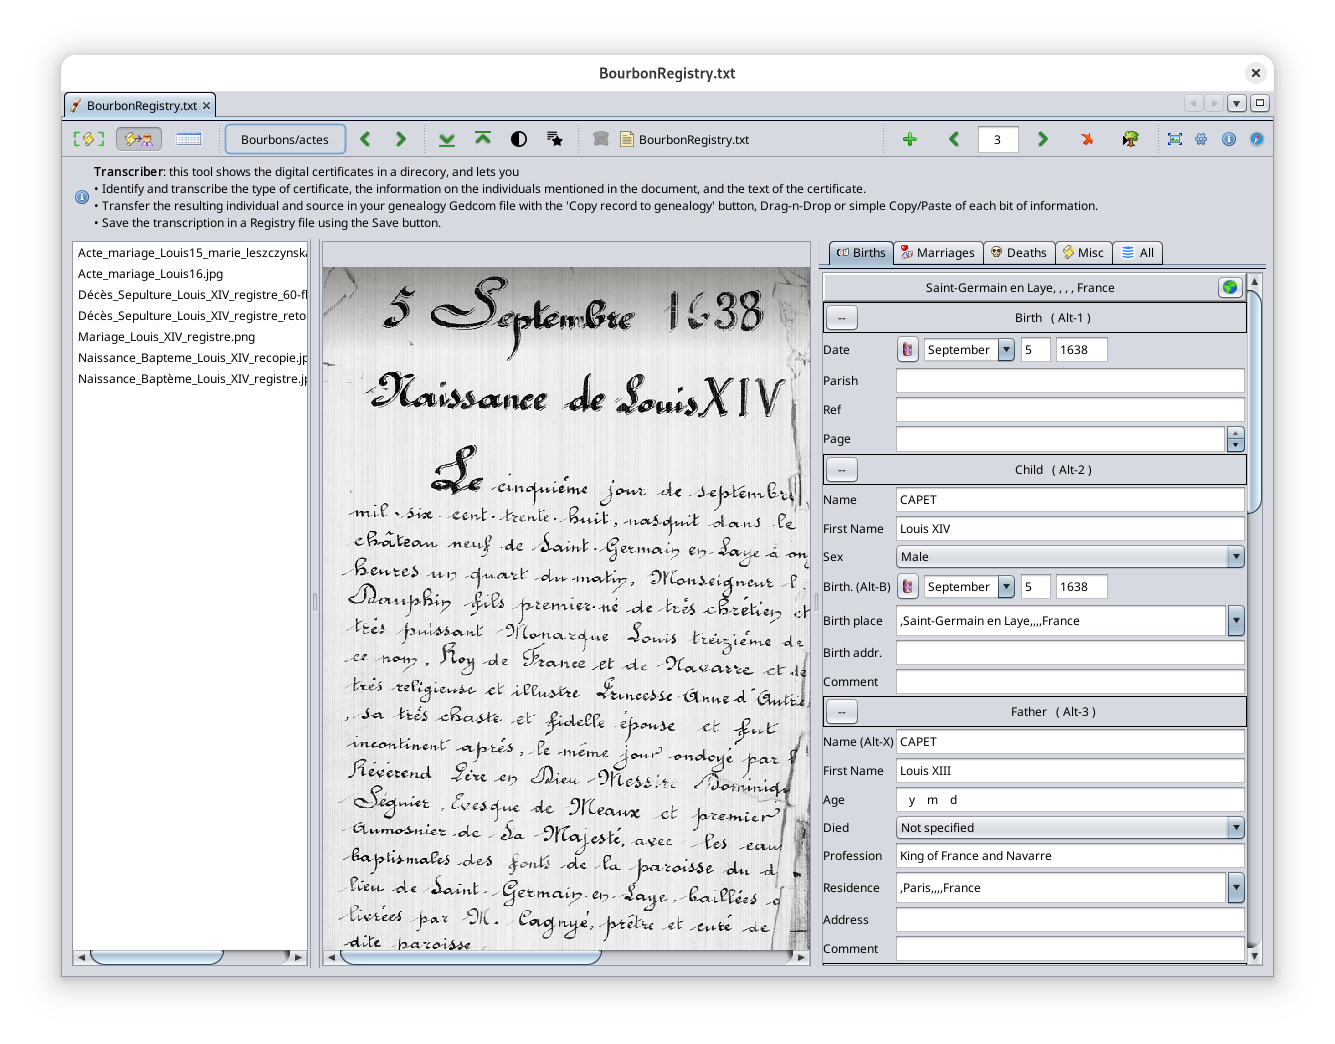
The panel shows
Toolbar

Cropper button
Transcriber button
Recorder button
Folder button 

Previous image button
Next image button
Top button 

Bottom button 

Contrast button 

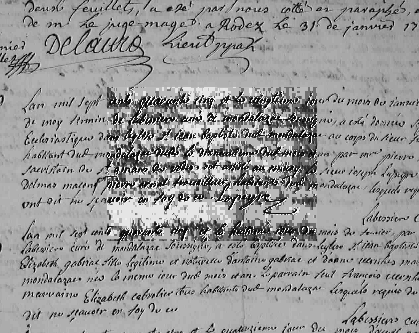
Automatic transcription button 

Here are some details to help you understand what is 'under the hood' and chose the transcription mode that best suits your needs.
When clicking this button, Ancestris performs an Optical Character Recognition operation (OCR) on the image to get the text, and then a 'Document Understanding' operation to extract the record information from the text.
These operations are performed by calling an internet service using an Artificial Intelligence Large Language Model (LLM).
Ancestris currently uses Mistral AI models. Ancestris calls the corresponding APIs (internet service endpoint). Using Mistral AI proves to be highly efficient at understanding all documents, typed and handwritten.
We recommend you define your own Mistral AI API key in the settings (see image below) because the API key we provide within Ancestris has a limited usage quota. For an occasional and non-commercial use, the service can be free. A paid subscription is also possible for better performance and extended quota.
At this stage, with the way Ancestris uses the LLM service, the speed and the accuracy of the results differ depending on whether the document is typed or handwritten. This is why we have defined two transcription modes in order to use either the same model or two different models for the OCR operation and for the Document Understanding operation. Please note that this trade-off could just be due to our "improper" use of the models and not the internal properties of the models themselves.
Our recommendation is therefore the following.
- Use the 1-step mode for handwritten documents because it is more accurate. The downside is a generally longer response time to get the result. In this mode, the button shows 1 star.
- Use the 2-step mode for typed documents because it is faster and accurate enough. The downside is that is does not perform as well on handwritten documents. In this mode, the button shows 2 stars.
You set the API key and the transcription mode via the settings button in this shown section of the options panel.

- With the 2-step mode, Ancestris will show you the text after the OCR operation in a popup window in order to give you the opportunity to fix the text if the transcript is incorrect.
- With the 1-step mode, you will make any fix directly in the record fields of the record editor.
Save registry button 
Registry filename icon and name 

Create record button 

Previous record button
Current record index 

This field shows which record index is displayed in the editor.
Next record button
Delete record button 

Copy record to Gedcom button 
Standalone editor button 
Configure view button
Information button
Online Help button
Recorder
The Recorder is where you manage Registry files and Registry records.
This tool manages registry files, that you either created or imported, and can let you
- Add, remove, modify certificates within a registry (use shortcuts for common actions and ALT+Z to undo a change).
- Transfer the individuals mentioned in these certificates to your genealogy Gedcom file with the 'Copy record to genealogy' button, Drag-n-Drop or simple Copy/Paste of each bit of information.
- Export the registry file in one of the available formats.
The Recorder is used in particular in "Situation 3" above, and is actually used in any situation.
Here is what the panel looks like.
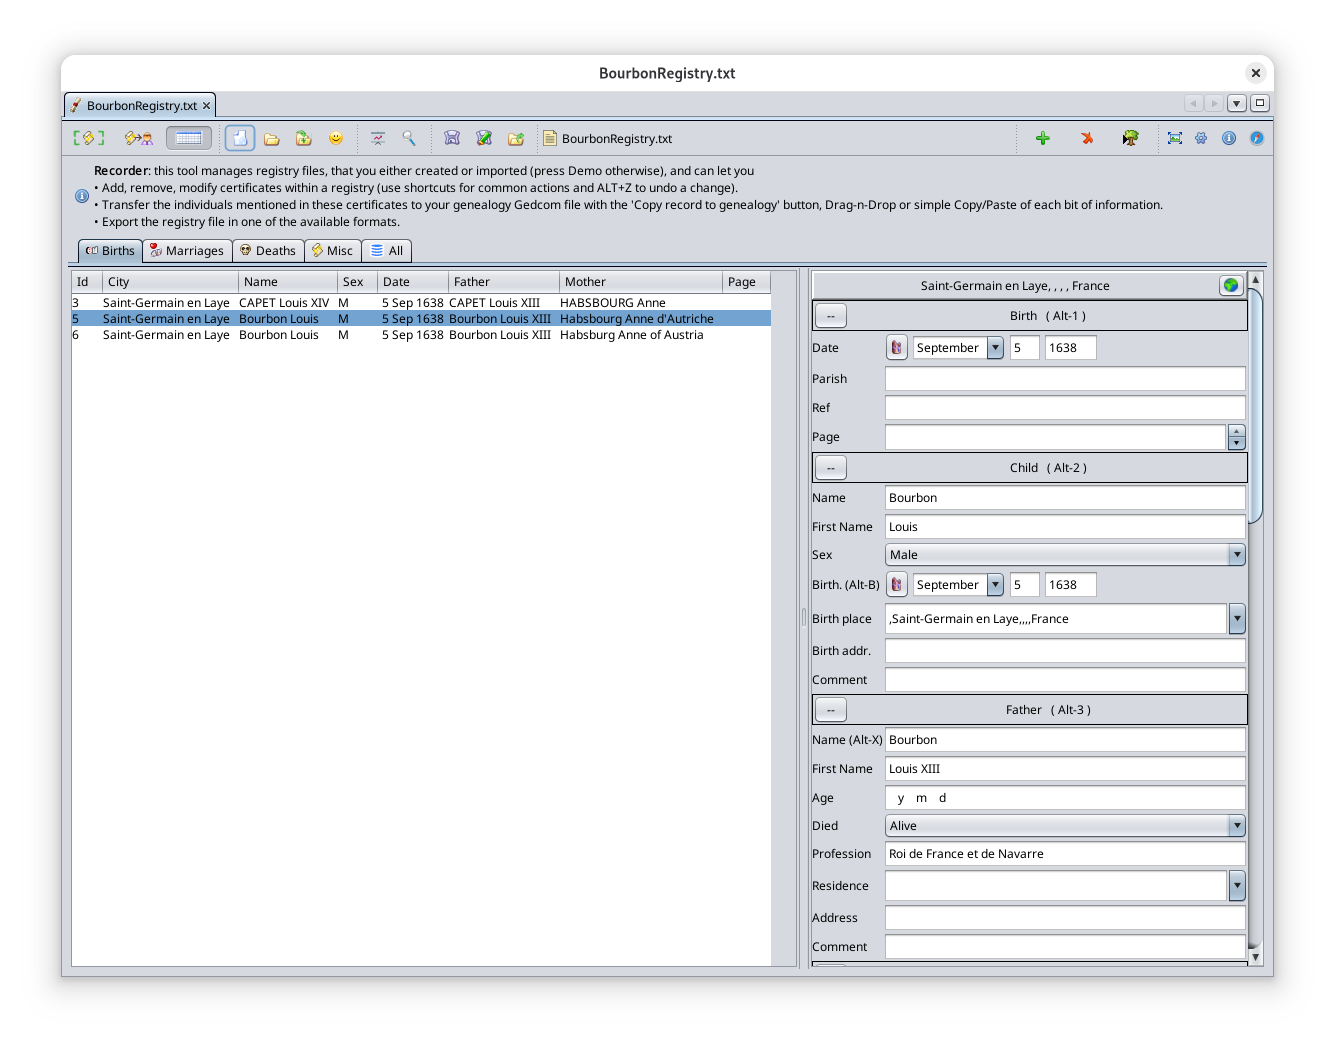
The panel shows
Toolbar

Cropper button
Transcriber button
Recorder button
New Registry file button 

If data was being entered, a message warns you to save what you were doing.
If you confirm, the Record editor will be cleared and Ancestris will offer you to start filling in a new record.
Open Registry file button 

The different file formats are automatically recognized (NIMEGUE, EGMT, ANCESTRIS). If Ancestris detects lines that do not comply with a known file format then an error message is displayed indicating the list of erroneous lines.
Add Registry file button 

Demo Registry file button 

Registry statistics button 

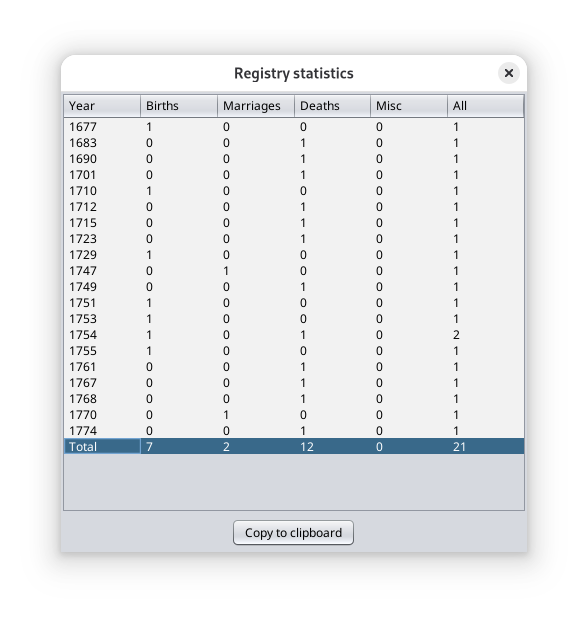
Search record button 

This button displays a table with all the data contained in the Registry file for global verification and it helps you find a specific record in the registry file with the button  .
.
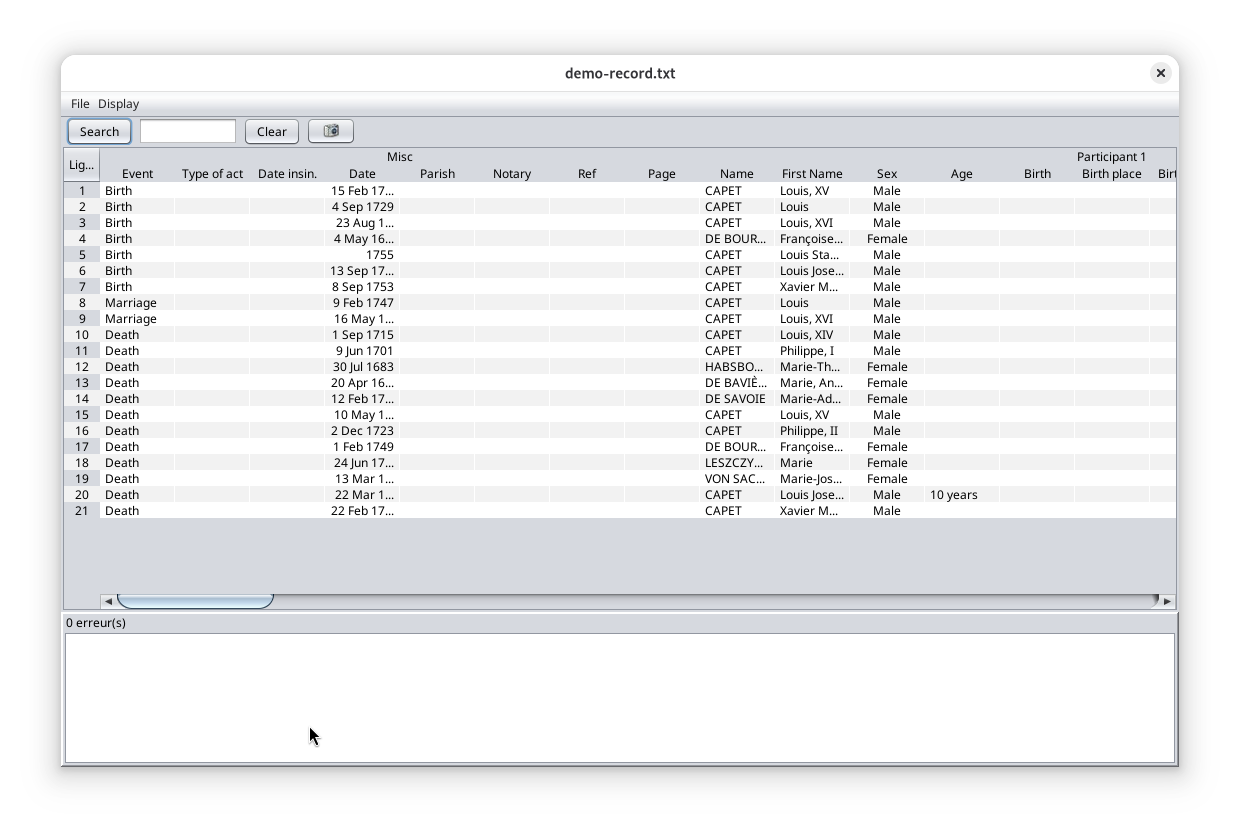
Save registry button
Save as registry button 

Export registry button 

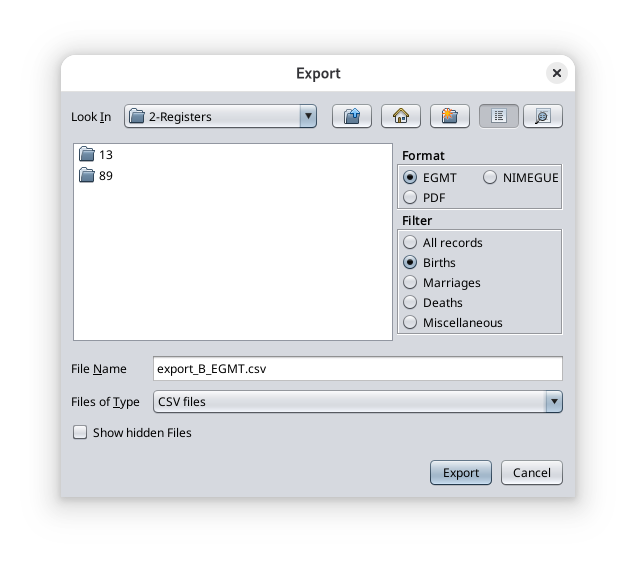 In this window, you can specify
- the chosen format of the export file (EGMT, NIMEGUE, or PDF)
- the type of records to be exported (Births, Marriages, Deaths, Miscellaneous or all records)
- the name of the export file
Registry filename icon and name
Create record button
Delete record button
Copy record to Gedcom button
Standalone editor button
Configure view button
Information button
Online Help button
Record tables
The tabbed pane on the left hand side shows five tables where the records of the registry are stored. These are the 5 record tables.
 The births table
 The marriages table
 The deaths table
 The table of miscellaneous records such as marriage publications and contracts, wills, burial, naturalization.
 The summary table of all the records, which is the addition of the four previous tables


Each table is displayed in a tab. To see the contents of a table, click on the corresponding tab.
Each line represents one record. A record can correspond to a deed, an act, a certificate, etc.
Click on the column title to sort the table alphabetically or by date according to the type of data in the column.
To move a column, click on the column title and move the mouse sideways while holding down the button.
Adjust the column widths for a better visualisation of the information.
Right-clicking anywhere in the left part of the window displays the following popup menu. It is used to trigger actions that will be applied to the selected record line.
Popup context menu
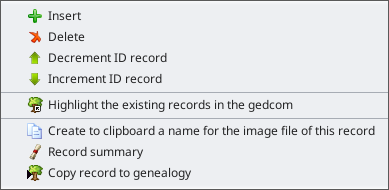
- The Insert action inserts a record before the one selected.
- The Delete action deletes the selected record. A confirmation will be asked.
- The
 Decrement ID record action reduces the record index number by 1 and sorts records accordingly.
 - The
 Increment ID record action increases the record index number by 1 and sorts records accordingly.
 - The
 Highlight the existing records in the gedcom action displays the index column in red backgrounds for the records that correspond to an existing source in the genealogy file. A highlighted record has a corresponding individual in the genealogy.
- A simple click on this record displays the individual in the Ancestris views.
- A double-click on this record rebuilds and displays the Dynamic tree with the corresponding individual as tree root.
- The
 Create to clipboard a name for the image file of this record action displays a popup window showing a file name with a jpg extension. It indicates that this name string is in the clipboard. You just have to use it to save the image file with that name.
 - The
 Record summary action displays a popup window with a proposed text summary of the record.
 - The Copy record to genealogy action does the same as the Copy button in the toolbar described above. It displays the Merge assistant window to help you merge the record in to your genealogy tree.


Record editor
On the right-hand side is the record editor. You can edit the records content.
You will notice that the Record tables and the Record editor work together.
- When a table is selected on the tabbed, the editor adapts itself to the type of record to be entered.
- When a record is selected in a table, the Editor displays the corresponding record content.
The separation bar between the Tables and the Editor is also adjustable.
At the top of the editor is displayed the location where the deed or certificate was issued.

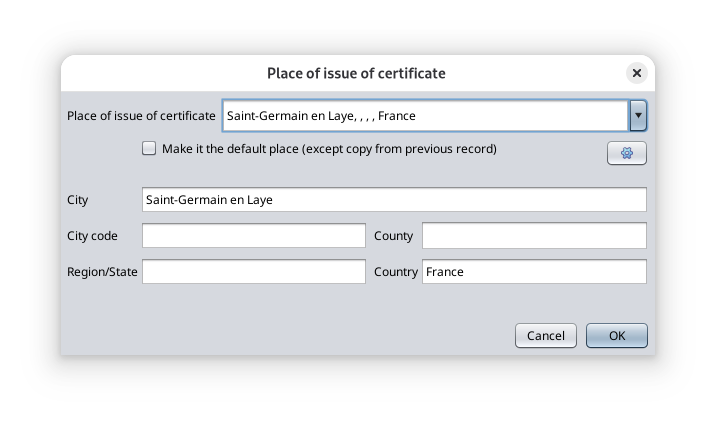
Below the place of issue are displayed all the fields of the record that you can change.
A miscellaneous type record can be of any event type except Birth, Marriages and Death which have already their specific entry form. For a Miscellaneous record then, use the first drop-down list of the form to specify the event type of the record.
Each editing form is divided into sections and each section has a title with a button on the left.
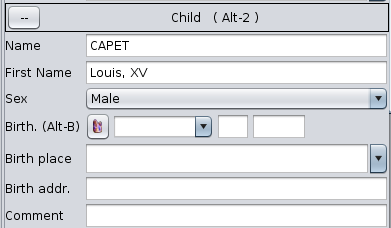
- The title of the section indicates the type of stakeholder the data relates to.
- The button on the left of the title at the top lets you add or remove lines to be entered
- A '--' button indicates that you can only remove lines.
- A "+" button indicates that you can add some lines.
- Clicking on the button brings up the drop-down menu of displayable fields. You have to check them to display them.
For example, here is the drop-down menu of the data that can be entered for the child of a birth certificate (these are all checked by default)

In the form, the field being edited appears with a blue background.

The form benefits from input help and keyboard shortcuts described below.
Standalone Record editor
The standalone button  in the toolbar opens up a floating window with the Record editor.
This is useful if the image your are trying to decipher is showing in an application external to Ancestris. For instance, your web browser could be open on one of the online repository of archived digitized documents.
Usage
The section at the top of this page describes the main 'Situations' in which you can use the Registry record tools.
Here we illustrate these situations with the following use cases.
- Automatically transcribing a document using the Artificial Intelligence service. Used in Situations 2 and 4.
- Copying a record to your genealogy. We will use a birth certificate example and a marriage example. Used in Situations 2, 3, 4.
- Understanding the both-way-link between the Registry records and the Gedcom file.
- Efficiently editing many records using the editor: shortcuts, automatic checks, auto-completion. Particularly useful for Situation 3.
- Suggestions on how to organise a large number of images using Reference and Page values for the folder structure and the file name convention. Particularly useful for Situation 3.
Automatically transcribing a document using Artificial Intelligence
This use case is particularly easy.
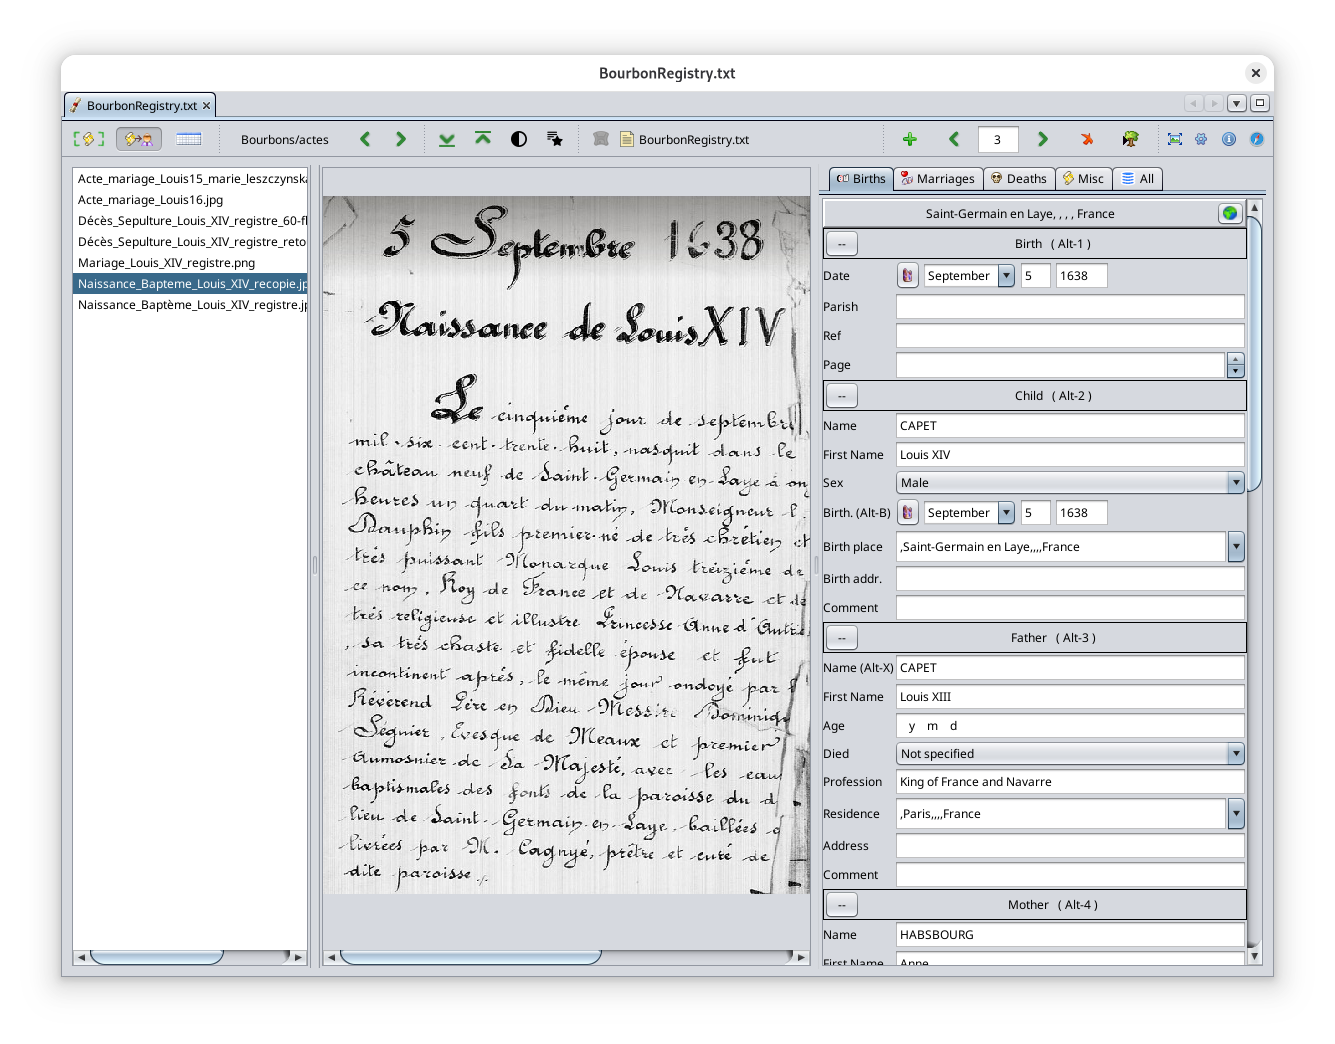
Select the Transcriber tool  and select an image to convert into a record. Here, we take a copy of the birth certificate of Louis XIV.
Here we start with an empty registry file to better show you what will happen.
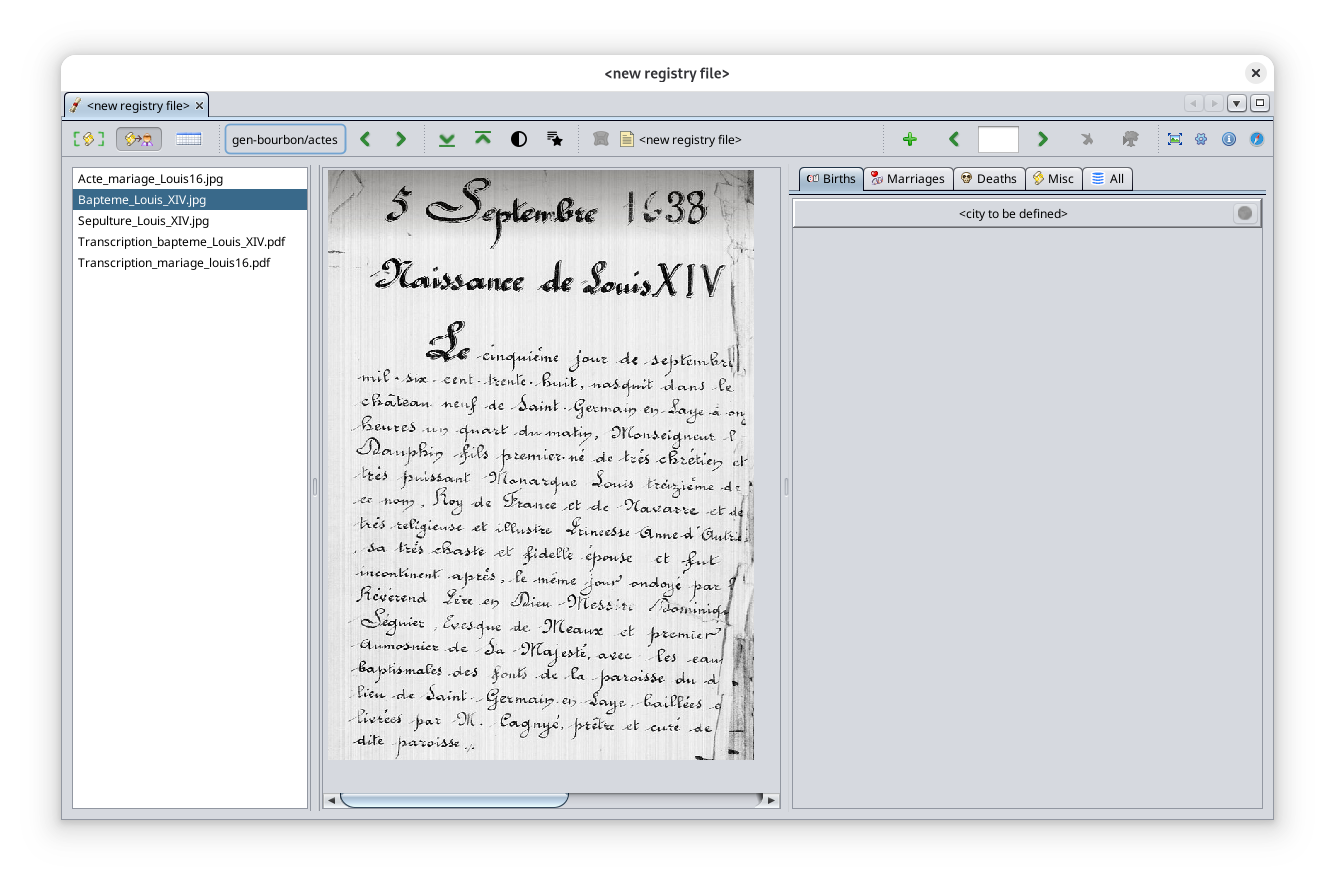
Click on the Extract Information button which appears, i.e. in 1 step  , or in 2 steps
  . For handwritten documents, we recommend you use the 1-step transcription mode. For the document displayed, the handwriting is particularly well written and the 2-step transcription mode is performing well as well. We will show both modes below. Go to the settings if you need to change the transcription mode.
One-step transcription mode
On pressing the button , the following "wait popup" shows up.
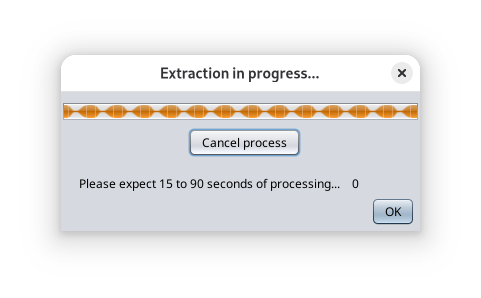
From experience, the waiting time depends on various factors and can range from a few seconds to a minute or two. Factors include the length of the document, the existence of the relevant information in the document, the availability of the Internet service, the type of subscription of the service.
When completed, the following window appears.
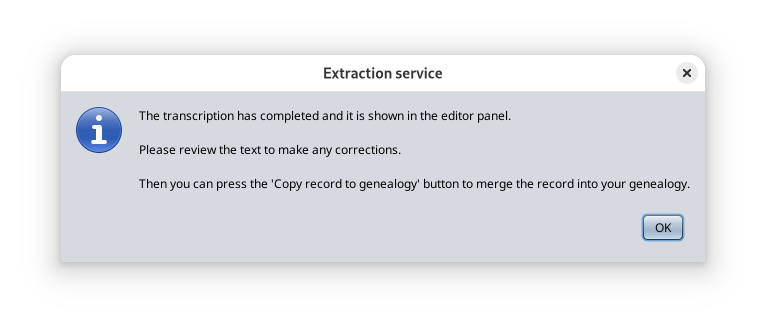 In case an error occurs, an error message appears explaining what the problem could be.
- The most common problem is that you exceeded the quota with the Ancestris free account to the service, so you might need to create your own API key. See here.
- There might just be a malfunction in which case repeat the operation.
- If it still does not work, try the other Transcription mode (1- or 2- steps).
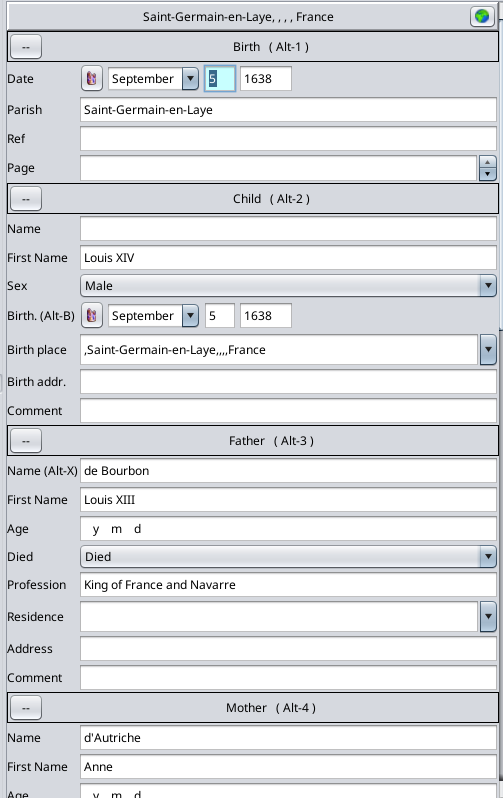
In our case here, it worked and as it says, the record has been created and is showing in the editor.
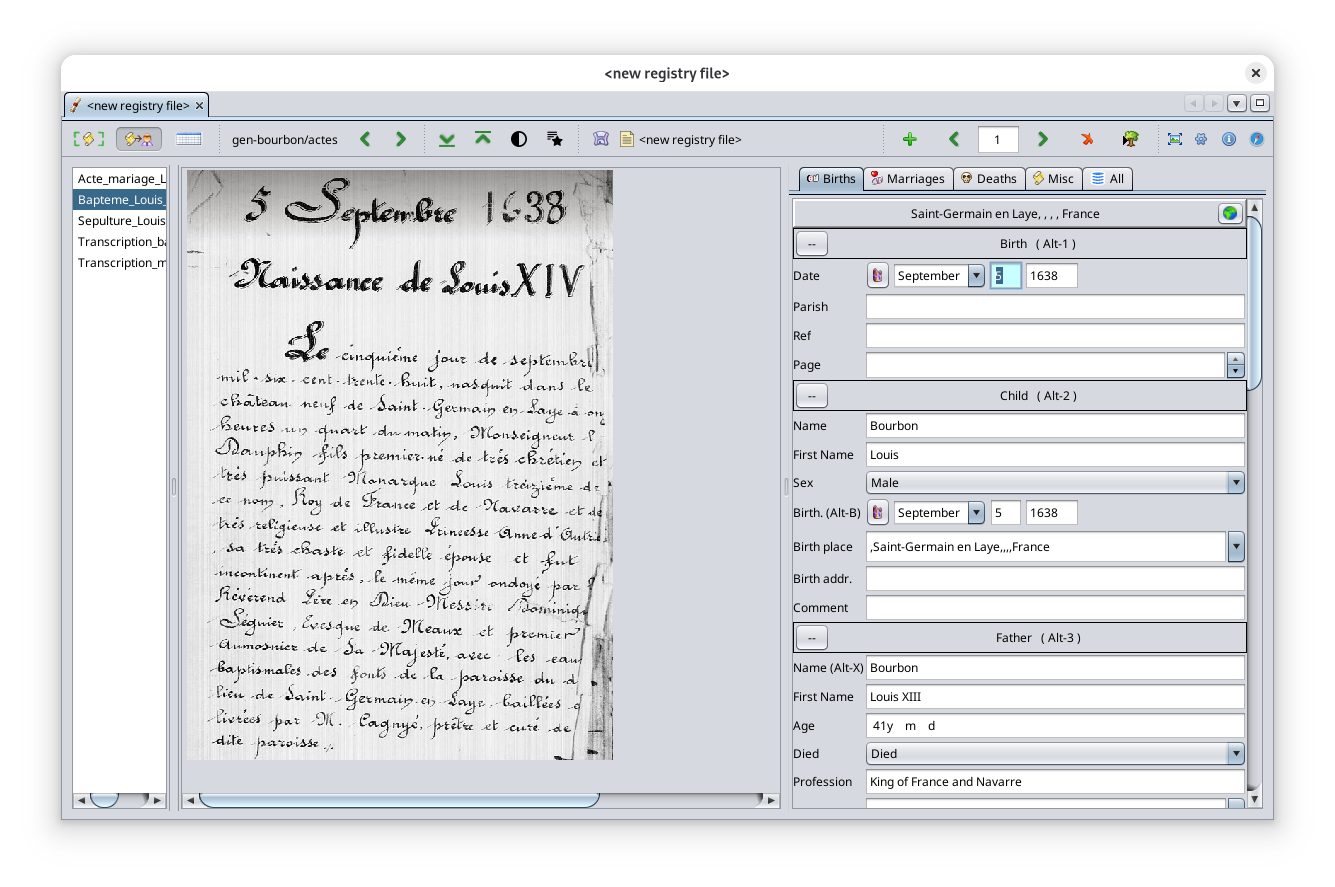 Let's review all the fields to check if everything was well understood.
As we can see quickly, the name Louis XIV did not appear per se in the original image so the artificial intelligence service assumed the last name was Bourbon. We will need to make some adjustments. Let's do it.
Here is the full record.
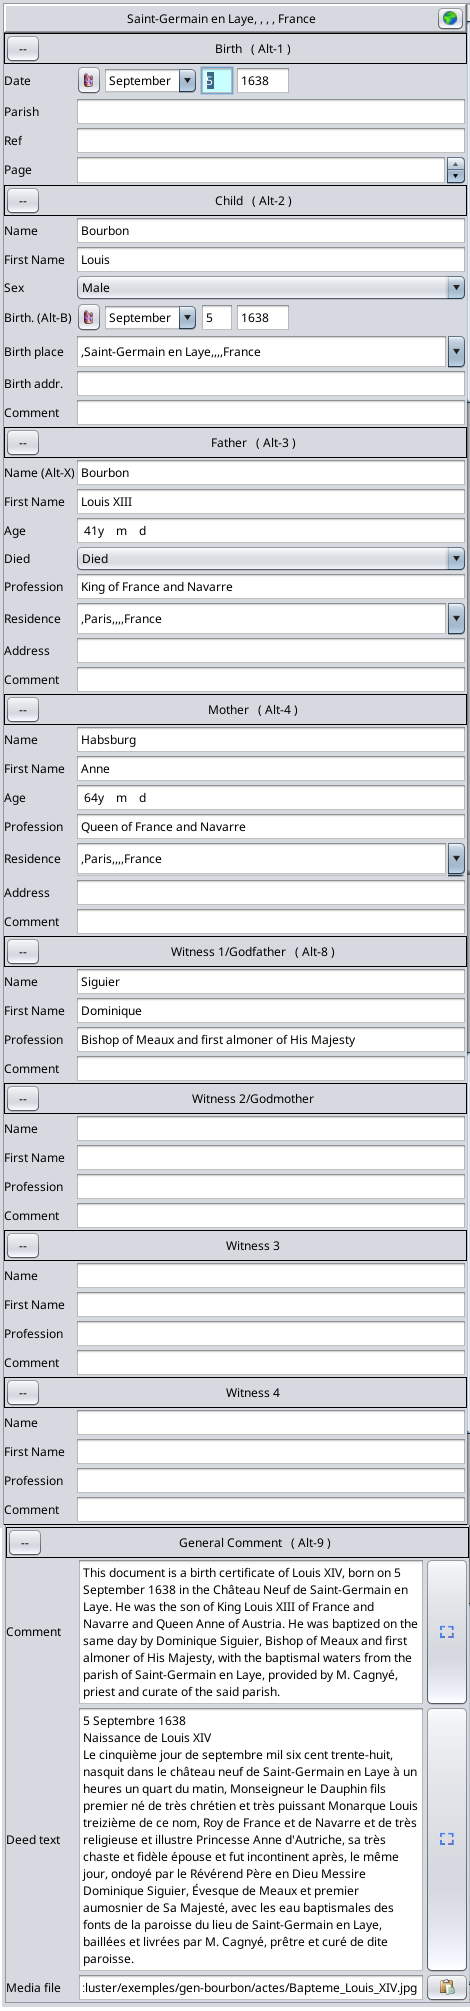
Let's review.
- The location city and country where the document was issued is properly understood and the format used is the one of the record place. It is not necessarily the same as the currently open Gedcom file but this is fine: it will be properly transformed if copied to the Gedcom file.
- It correctly detected this is a birth certificate.
- The date is correct
- The child information is correct except for two elements
- the last name that we need to edit and change to 'CAPET',
- the first name where we need to add 'XIV'.
- The birth place city and country are correct and the format used is the one of the Gedcom file currently open.
- The father information is correct except for a few things.
- the last name that we change to 'CAPET'
- the life status that we should change to 'Alive' because we just know it from public knowledge (Louis XIII died in 1643). Otherwise we set it to 'not specified'.
- the age which should be 37 because we know it (Louis XIII was born in 1601). Not sure where the 41 comes from. Usually, the calculation is correct when the father's birth date is in the document. Ancestris tends to tell the AI model not to put information not specified in the document but sometimes the AI model does provide it anyway. Here, we will remove the age and leave it blank.
- The mother information is correct except for
- The last name that we should change to 'Austria'.
- The age that we will remove.
- The witness information is correct
- The summary is correct, and written in English because the Ancestris user interface is in English
- The deed transcript is all correct and written in the language of the document, French in this case.
- The media file name is correct. Nothing to do with artificial intelligence for this one.
Here we had to make a few fixes. It is common to have correct results all across. The performance of the AI model is quite impressive. All that in a few seconds.
We now save the record to keep our changes by pressing the Save button  .
.
Because the Registry file was a newly created one, Ancestris will ask you for a name and a location to save the file. This is a simple CSV format text file.
That's it !
To copy the record to the Genealogy, the easiest is to just click the Copy record to genealogy button. We will see that in the next section below.
Two-step transcription mode
Just as a comparison, the same process using the 2-step transcription mode looks like this.
A couple of seconds after pressing the 2-step button , the text appears. This is faster.
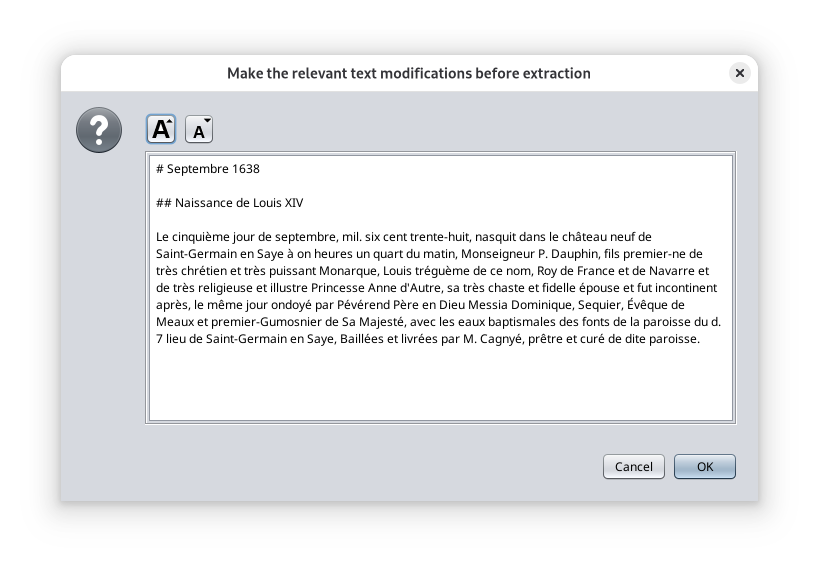
As you can see, the text transcription is not as good as the one step process. It is because the text is handwritten. We have to make a few corrections. Here is the text once we made the corrections.
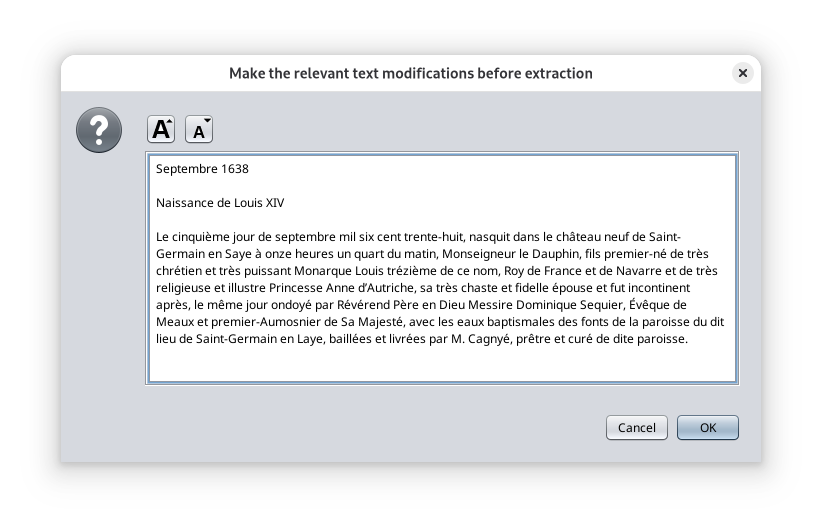
Then we press OK and we get a slightly better result than the 1-step process. Indeed, this time the first name of the newborn is complete and the last names of the parents are correct. The last name of the new newborn is missing so we will still need to fix this one.
The result of the Artificial Intelligence models keeps improving frequently so these results are only a description of what they are today in July 2025 based on the way we interrogate them.
Copying a record to the genealogy
Registry records can be copied to the genealogy using the Copy record to genealogy button or using Drag and Drop.
- Use the Copy record to genealogy button to let Ancestris show all possible genealogy entities on which to attach the individual of the record.
- Use Drag and Drop if you want to explicitly tell Ancestris on which genealogy entity you want to attach the individual of the record.
You can also copy/paste some of the record fields text to your genealogy if you want to only consider bits of information.
To copy a record to your genealogy, you must have both your Gedcom file open and the registry records open and selected on the given record.
To copy using Drag and Drop, these two windows must be side by side.
Before you perform any copy, please check your Source type preference in the Settings. See details here.
Copy a record using the 'Copy record to genealogy' button
Let's continue the example of the previous section.
Press the Copy record to genealogy button  .
.
The following window appears. This is the 'Merge window'.
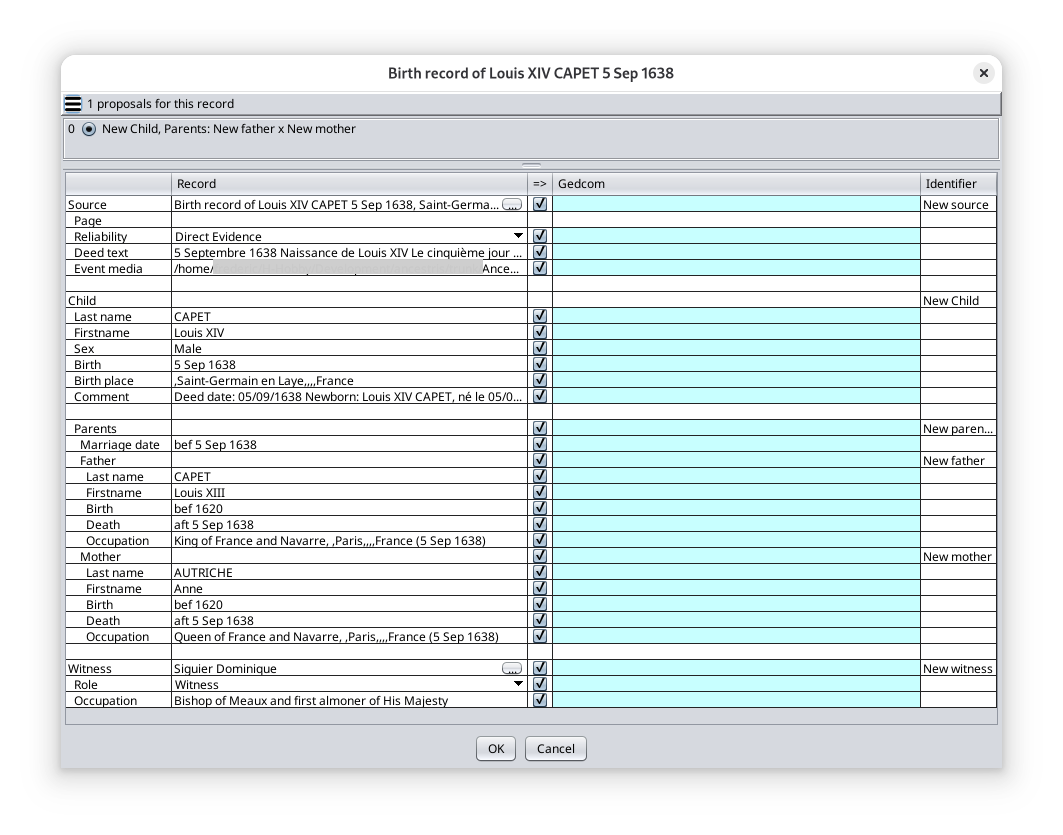
The Merge window shows the record that was just created and adjusted on the left hand side, and the proposed entities of the genealogy on the right hand side.
The proposed entities are all empty and new because the genealogy file is new as well in this example. We will see next that if we try to copy a second time after a successful first copy, this will show the existing entities.
Here, we just press OK because we want to copy everything: the source, the individual, the parents, the witness.
This next image shows what we get in the Cygnus editor.
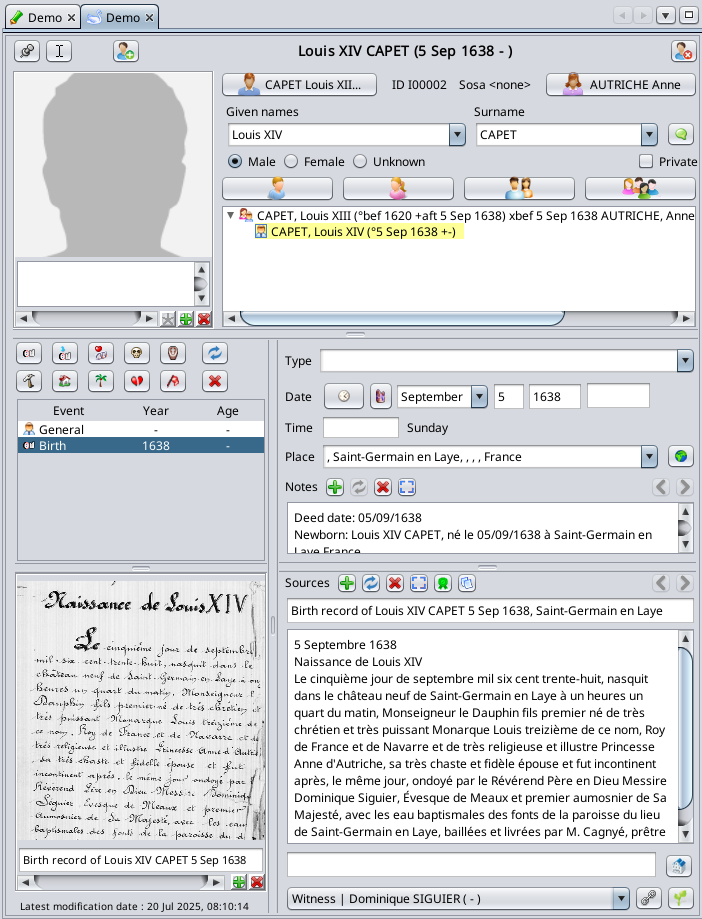
The result is pretty good.
- Cygnus shows all the information where it needs to be.
- Ancestris has added a note to the event
- Ancestris has added a source with a title to the source image
- The source text has been copied into the source field, as the user preference here is to have one source per document (Cygnus displays the source text if it is located in the SOUR:TEXT entity. It does not display the source text if it is located in INDI or FAM then SOUR:DATA:TEXT)
- The witness is also showing.
Please note the copy of the Witnesses information only works from Gedcom version 7.
This concludes the copy of a record. In a couple of minutes, you have merged and documented inside your genealogy all the relevant information contained in an image.
This involved the creation of 7 entities: 4 individuals, 1 family, 1 source, 1 media.
To provide more details, we said that the Merge window looks different if the entities in the Gedcom file already exist. Let's check.
If you press the Copy record to genealogy button one more time, the Merge window looks like this.
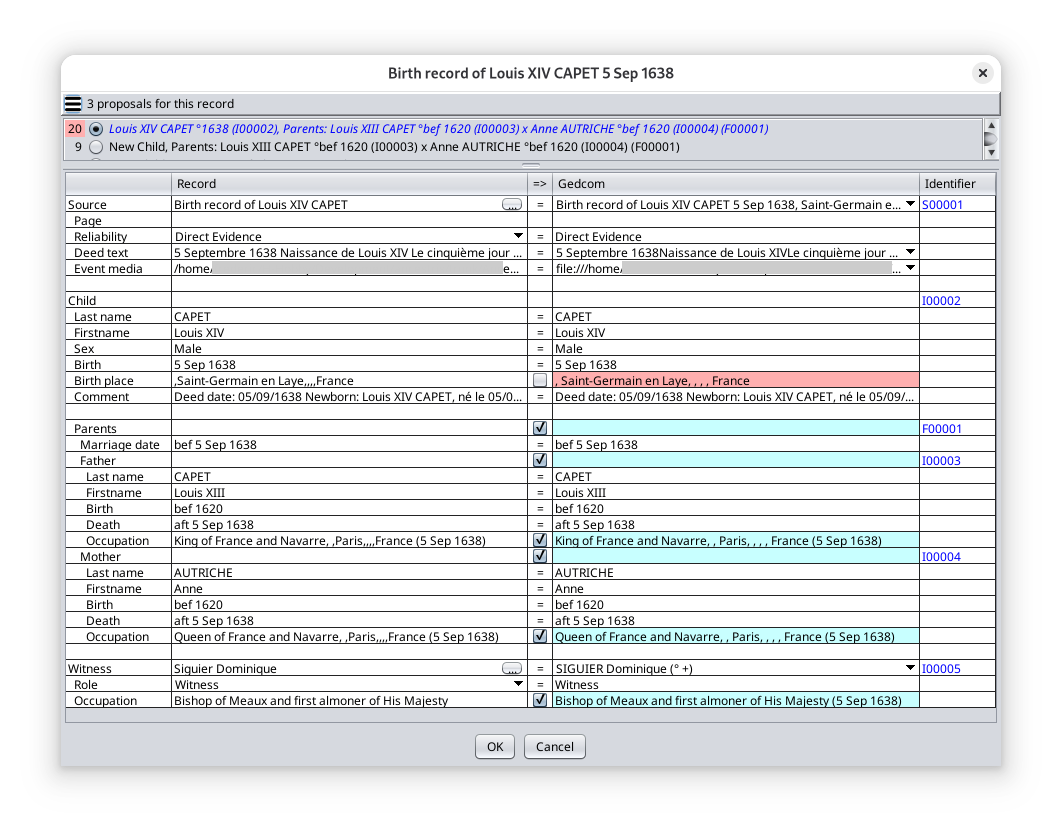
We can see that this time, Ancestris has found corresponding entities for all the elements: the source, main individuals, parents, family and witness.
Some general principles about this window.
- In blue are displayed the fields that match. In red those that do not match. In this example, the place is in red because the spaces between the comas have been added during the previous copy in order to respect the PLACE format of the genealogy.
- You can change the entities by selecting the proposal on top, or pressing the "..." button for the source in the first line of the Record column
- You can exclude a line you do not want to copy by unselecting the checkboxes in the middle column.
- You can change the attachment within the entities by unfolding the lists in the Gedcom column.
- Hover the mouse on the cells will display an explanation tip.
Copy a birth certificate using Drag-and-Drop
Let's take the example provided by the Bourbon demo
- open the Bourbon genealogy and place the Bourbon dynamic tree on the left
- open the Bourbon Demo registry file in the Registry records 'Recorder' tool and place it on the right
- open on the 'All' tab.
Once the records highlighting mode is on, it is easier to know which ones are left to be copied. However this is not necessary to set it on to copy records to your genealogy.
We see that the records in red have already been merged into the Bourbon genealogy.
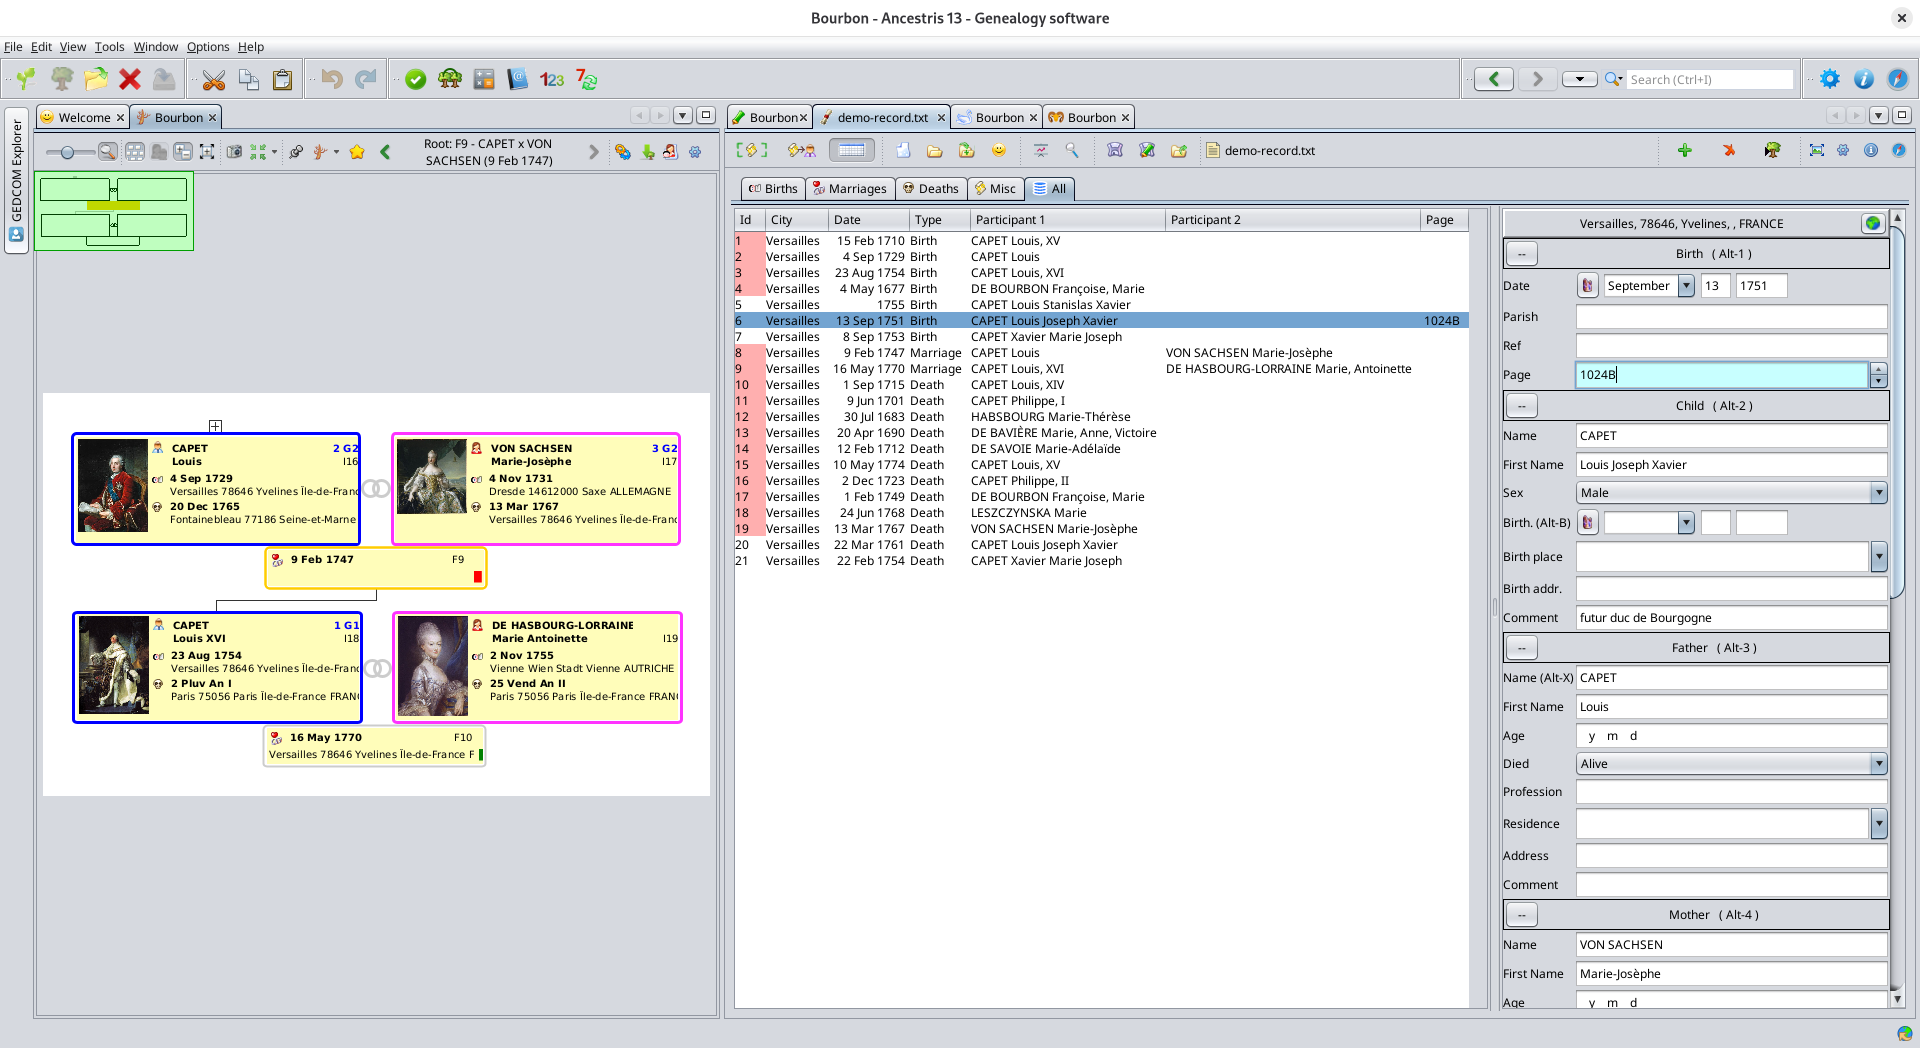
We will copy Louis Joseph Xavier CAPET's birth certificate of September 13, 1751, from the record of births to the marriage of his parents in the dynamic tree via Drag-n-Drop.
It is not already present in the Gedcom because it is not highlighted in red.
The page of the birth certificate has been included in the page field above. It is the '1024B' in blue in the Records table and in blue in the Record editor. When we copy, the source will then be documented in the Gedcom file using that page number.
Proceed this way to copy the record to the Gedcom:
- click in the table on the birth certificate,
- move it with the mouse by holding down the left button onto the family box dated February 9, 1747 in the tree and release the button.

After releasing the mouse button, a validation window appears. It will intelligently merge the data in the tree. It is up to you to make some choices, but they are suggested by Ancestris.
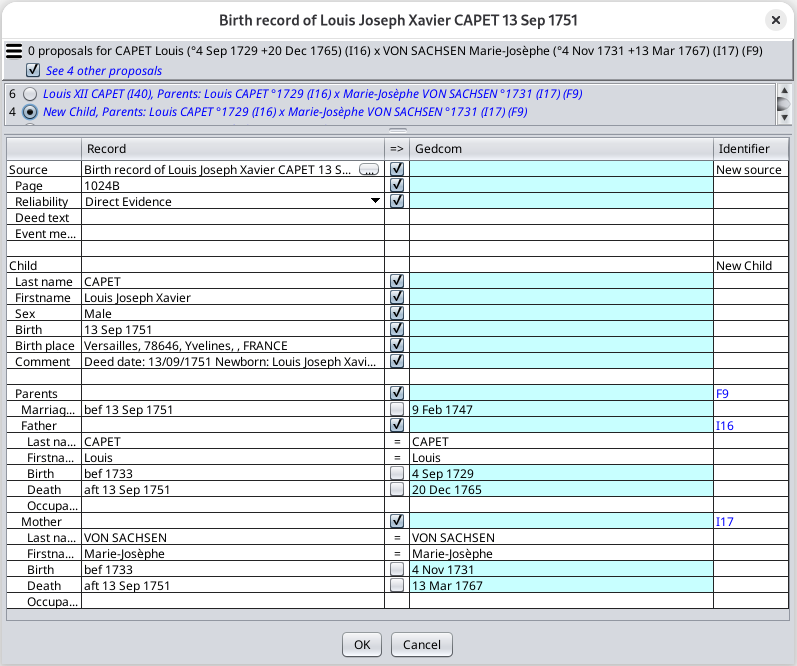 |
Choosing the merge option
Choice of data to merge
Choice of identifiers
In the example, a new individual will be created as a child of the F9 family.
|
After choosing S3 as the source, and clicking on the OK button, the new individual with ID I178 is created in the tree :
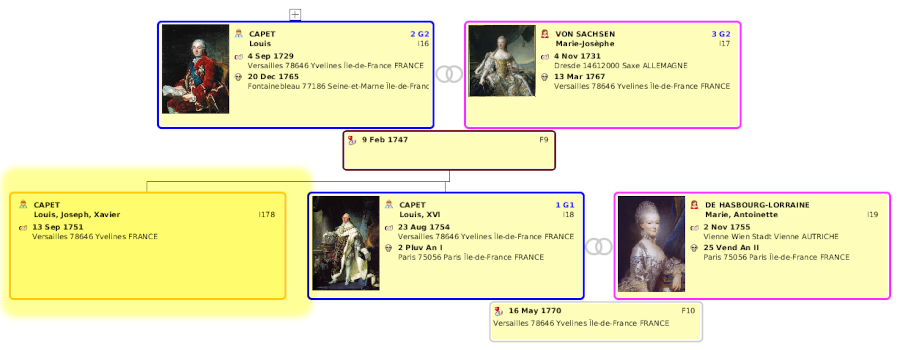
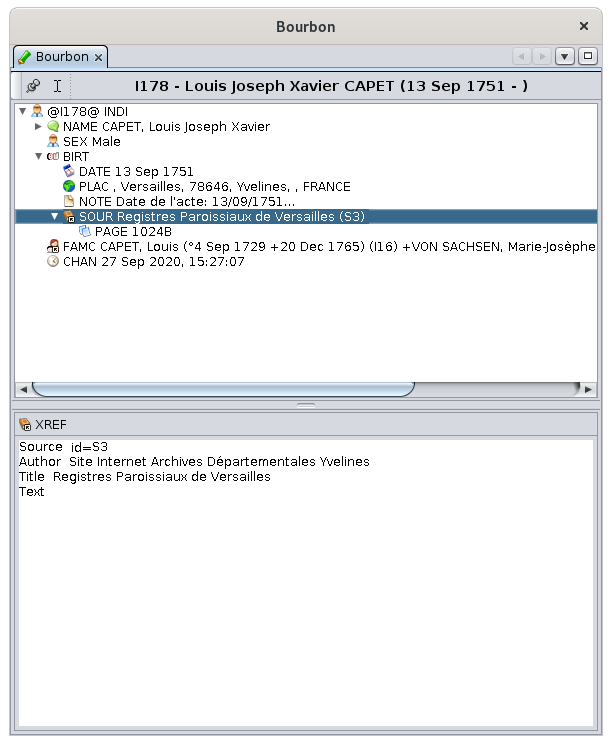
Below is the result of the data created for the new individual in the Gedcom editor.
The birth event is visible and you can see how Ancestris documented it.
The source has been added with the reference of the image in the PAGE property with value 1024B. If I had documented the reference, it would also appear in the PAGE property, just before the page number. See more about this PAGE value for the correspondance between the Gedcom information and the Record image file.
Depending on whether the record is dropped on an individual, a family or in the empty space of the dynamic tree, the merging rule changes.
- If the target is an individual
- The tool indicates if there is another individual with the same name and date of birth in the genealogy to possibly avoid creating a duplicate entity in the genealogy.
- By default, the birth record is applied to the individual
- If the target is a family
- The tool indicates if there is another individual with the same name and date of birth in the genealogy even in another family.
- By default, the birth record is applied to the child of the family having the same surname, first name and possibly the closest date of birth if there are homonyms. A new child is created if there is no corresponding child.
- If the target is neither an individual nor a family (bottom of the dynamic tree for instance)
- The tool indicates if there is another individual with the same name and date of birth in the genealogy.
- By default, a new individual is created and the birth record is applied to it
The Copy record to genealogy button has the same effect as this third case.
Copy a marriage certificate using Drag-and-Drop
Now let's try to copy a marriage certificate.
Drag and drop the May 16, 1770 marriage record from the table onto the relevant marriage in the tree.

When you release the mouse button, the window already seen above appears with other choices to be made for the merge.
As you have noticed above, the chosen record was highlighted, indicating that the data was already partly included in the Gedcom.
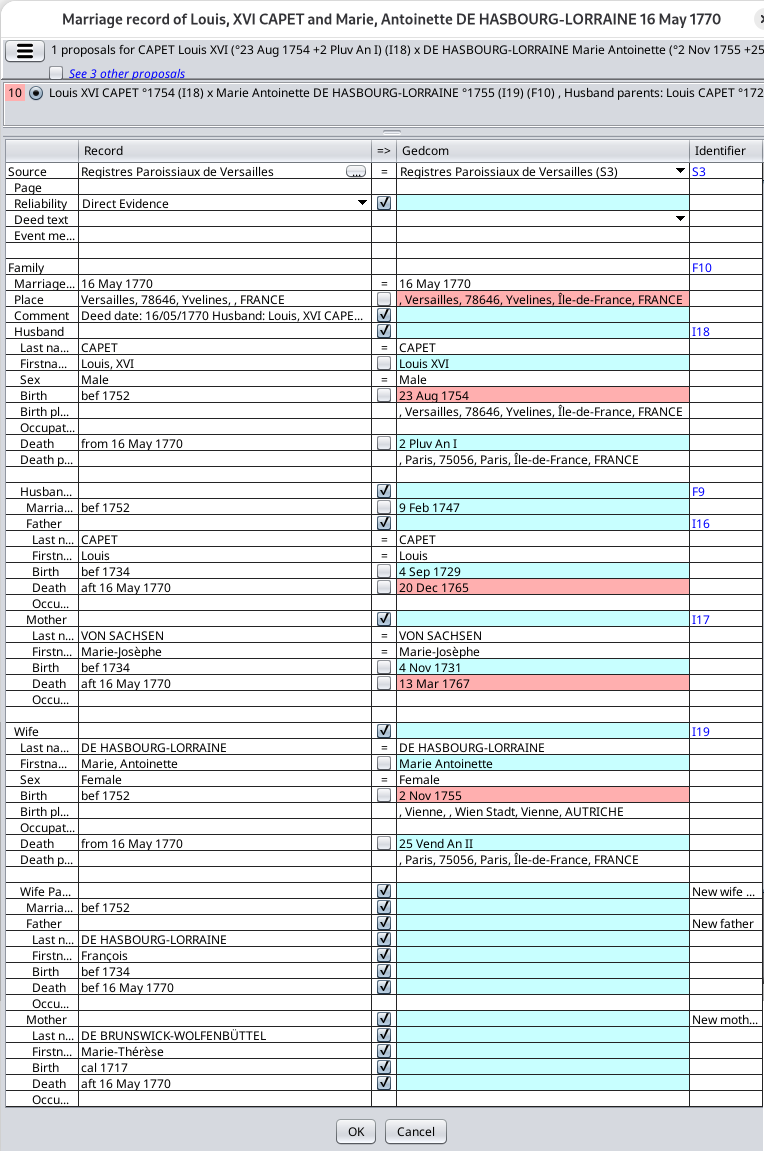 |
Choosing the merge option
Choice of data to merge
Choice of identifiers
Deduction of dates
|
After clicking the OK button, the wife's parents are added to the tree and the F10 familly is updated.
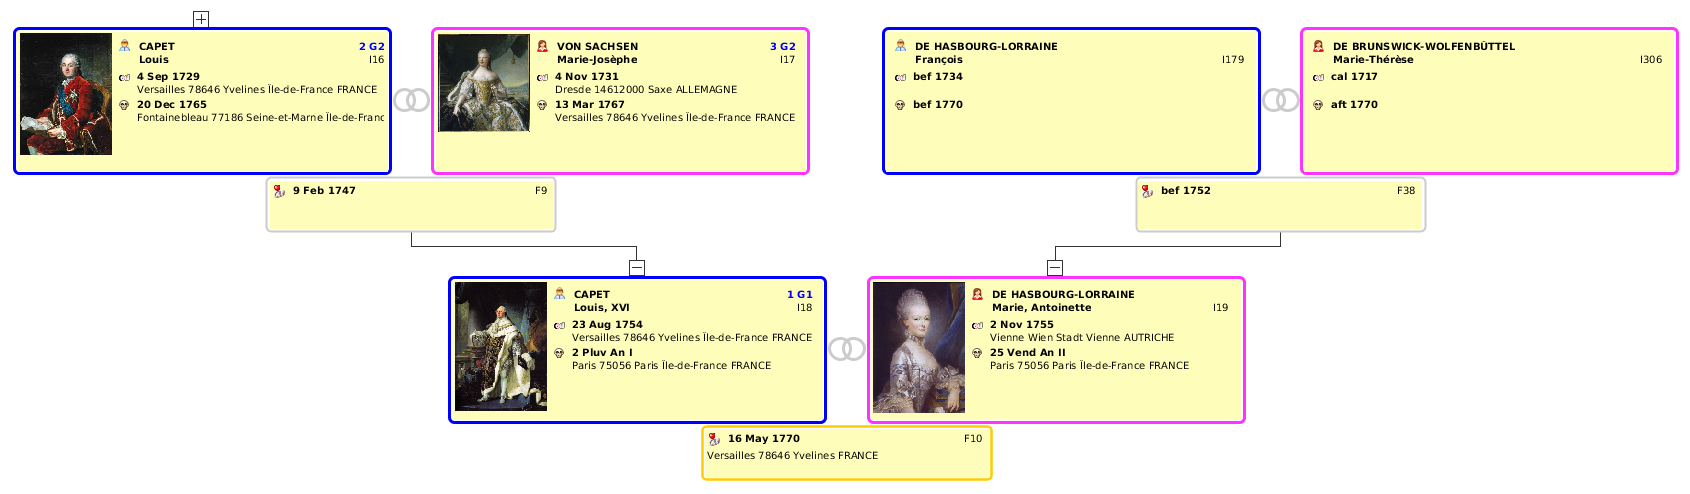
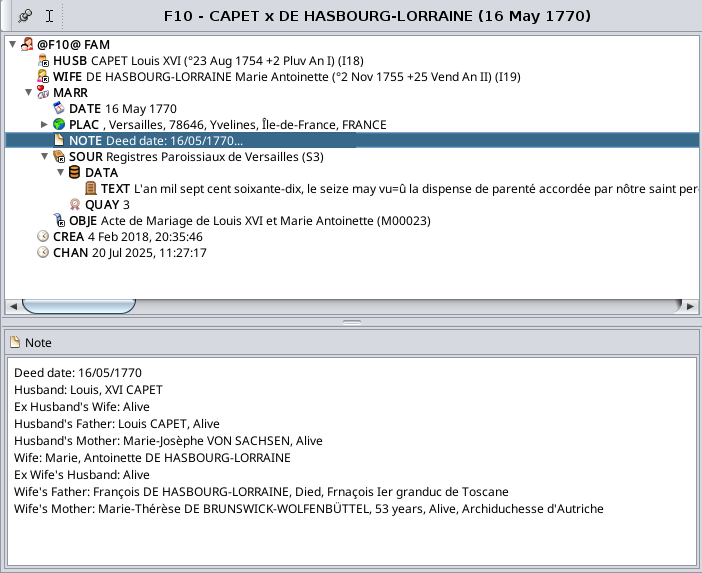
Tips for use and limitations
Check your Source type preference in the settings before copying Records to your genealogy
In Ancestris, some users may prefer to have one Source entity for several documents related to various individuals. Other may prefer to have one Source entity per document.
In the first case (1 source entity for several documents), the text of the document will be attached to the individual event as a ‘source citation’ (the source text will be in INDI or FAM and then SOUR:DATA:TEXT) and will not be visible in Cygnus.
In the second case (1 source entity for 1 document), the text of the document will be attached to the ‘source entity’ linked to the individual event (the source text will be in SOUR:TEXT and will be visible in Cygnus)
Before copying a record to your genealogy, make sure the type of attachment is the one you prefer. This setting is defined here in the configuration window.
To quickly check while you are in the process of merging a record, click on the "..." button on the Source line. It displays the Choose Source window.
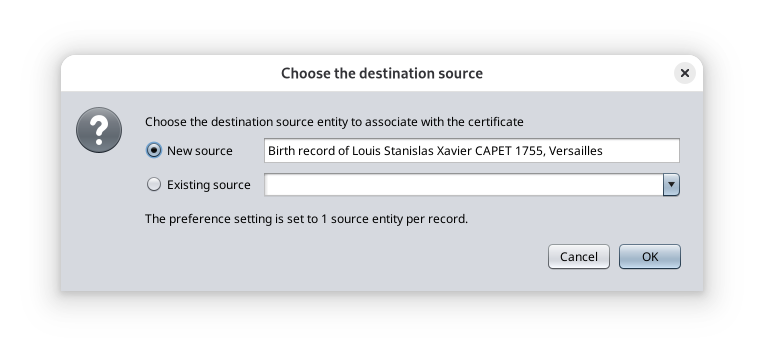
In this window, you can see the option set is to have 1 source entity per record. It means in this example that the text of the source will be attached to the Source entity, not to the Source citation, which is inside the Individual Entity.
Add records to the Gedcom file in chronological order
It is best to copy the records in chronological order. To do this it is better to use the tab "ALL" sorted by date and add the records from the oldest to the most recent, rather than adding the birth records first, then the marriages, then the deaths. This improves the search results for individuals matching the records.
Use the Copy record to genealogy button or Drag and drop outside of a tree entity
It is possible to drop a record anywhere in the dynamic tree window, outside of a tree entity.
In this case, the tool searches for the individual or family that best matches the record and displays a list of proposals ranked in descending order of relevance.
- Advantage: it avoids having to search the tree for the relevant individual.
- Disadvantage: the tool may not find any suggestions if record data is incompatible with the individuals in the tree, or, on the contrary, the tool may find several dozen suggestions if record data is too vague.
Undo a Copy or a Drag and Drop
To undo the changes made in the tree after drag and drop, click anywhere in the tree to select the Gedcom and press the CONTROL and Z keys or press the Undo button  on the Ancestris main Toolbar. A single undo will delete all individuals created and all data that has been added by drag and drop.
Rules for calculated dates
Date deductions are made according to the following rules which are not configurable:
- Minimum age of marriage: 18 years
- Minimum age of parent: 15 years old
- Maximum age of parent: 60 years old
- Maximum age of an individual: 100 years old
- Uncertainty interval for approximate dates (EST, ABT, CALC dates): +/- 5 years
Both-way-link between the Registry records and the Gedcom file
Highlighting records of the Records table that already exist in the Gedcom file
Once records have been entered in register files, we will copy them into the Gedcom file. But before that, we might have to know which ones have already been copied.
- You may already have copied acts in your genealogy yourself.
- Or similar data may already be up to date in your genealogy.
It is possible to see which records have similar data in your genealogy, i.e. in the Gedcom file currently open in the other Ancestris views.
To do so, you must highlight them using the record context menu of the Records table.
You have to uncheck / recheck the box to show the new records recently copied or used in the Gedcom file.
The records already existing in your genealogy are those in red in the table.
- A record corresponds to an event in your genealogy if the two events are of the same nature, if both have the same date, and if the two individuals compared have the same first and last name.
- The location does not need to be filled in and the same to match.
- In case of duplicate individuals, the first one found will be the one compared, the other one will be ignored.
If the checkbox is selected, the highlighting will automatically be updated if you open or close a Gedcom file in Ancestris.
In the example below, 16 records have their Id field in red background and are therefore already present in the currently open Gedcom file.

View a Record from an Ancestris view 

To view all the Registry records of a selected entity from an Ancestris view, you must already have copied the Record information to your Gedcom file. You must also make sure that the 'Show Certificate photo" checkbox is selected in the settings.
Next, you will right-click on the entity to display the context menu.
As an example, let's say you copied Louis XIV record to the genealogy tree. Let's call the Context Menu by right-clicking anywhere on the properties of the individual. The following context menu appears.
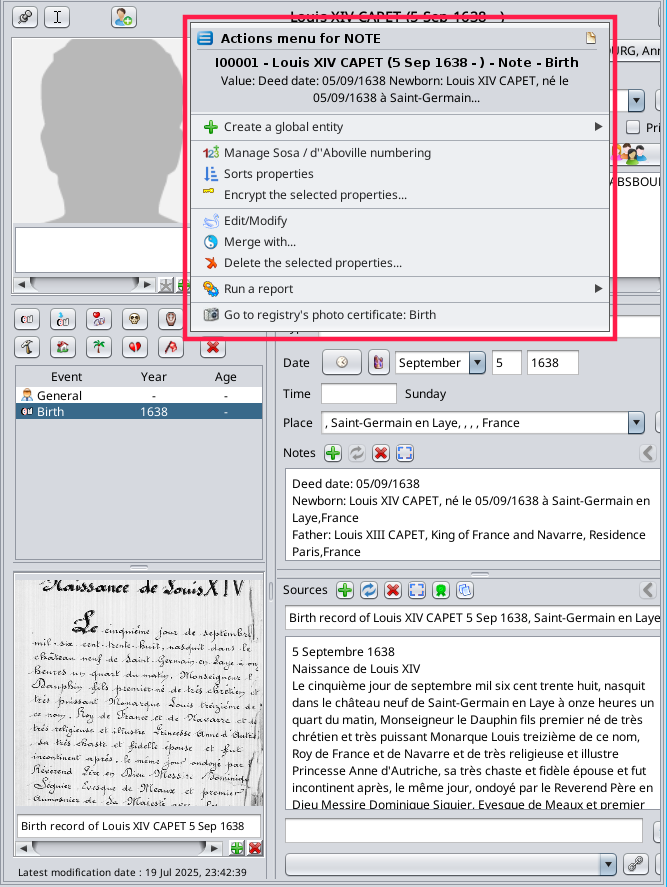
You notice the menu item at the bottom of the list: "Go to registry's photo certificate: Birth".
Clicking on this action displays a window showing the image files list and the image of the source. It looks like the following image.
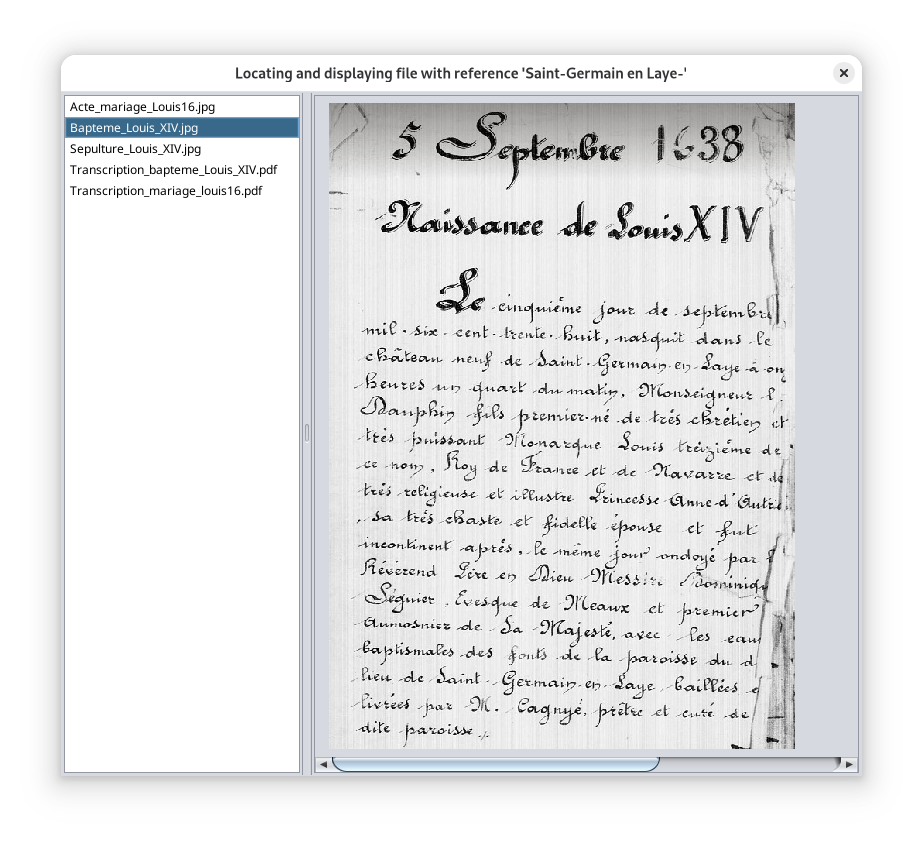
The automatic correspondence between the Ancestris view and the photo of the record only works under 3 conditions.
- In the Ancestris preferences, you must have checked the box Show "Certificate photo" menu in the views and add the photos folder in the list like this. See here.
- The information in the Gedcom file must include the event of the certificate as follows
- an event of the type of the record
- a place where the name of the city is that of the record.
- a source must be indicated with a media including a valid file, or alternatively a PAGE sub-property, which must indicate the filename reference via a reference and a page, separated by a comma. See here.
- The filepath of the media file must exist, or alternatively, the folder of the photos on the disk, indicated in the image above, must include a subfolder with the name of the city of the register, in or under which the photo of the record must be located. See here.
Efficiently editing many records using the editor
Keyboard shortcuts for the Editor
All the editor commands are accessible with the mouse or with "shortcut" keys on the keyboard. The use of shortcut keys is optional. However it allows faster mass input, avoiding the need to use the mouse and keyboard alternately.
The arrow keys
- TAB to go to the next field
- SHIFT-TAB to go to the previous field
Shortcut keys to create or delete a record
- ALT-N to create a birth record
- ALT-M to create a marriage record
- ALT-D to create a death record
- ALT-V to create a miscellaneous statement
- ALT-S to delete the current reading
The Quick Move Keys
- ALT-1 Date of the event
- ALT-2 Individual or Representant No. 1
- ALT-3 Father
- ALT-4 Mother
- ALT-5 Wife or Representant #2
- ALT-6 Father
- ALT-7 Mother
- ALT-8 Witnesses
- ALT-9 General Comment
Input help keys and the cancel key
- ALT-X: copies the name of the individual in the field of the individual's father's name
- ALT-Y: copies the wife's name in the field of the wife's father's name
- ALT-B: copies the date of the event from the record in the date of birth field of the individual
- ALT-=: copies the value of the same field from the previously entered record. This shortcut is particularly useful when the witnesses are the same from one record to another, for example
- ESC: cancels the entry of a field as long as the field is being entered and returns to the original value as long as the field is being entered.
- ALT-Z: cancels the changes made previously after leaving the field. Warning: the CTRL-Z key usually used for this does not work here.
- Space: enters a space at the end of the field to reject the other terms proposed by the completion function. This space is then automatically deleted. For example, if there are compound first names beginning with the first name you are currently entering, you must type an additional space at the end of the first name to refuse the secondary first names proposed by the completion function.
Automatic checks and formatting on entry
Alert on Missing date of event and name or first name
Alert on Duplicate
If there is already a record with the same date, first and last name, an alert message is displayed to indicate a possible duplicate.
This function can be disabled in the settings.
Alert on New Name
Name Case
Case of the first name
Case of the occupation
Removal of extra spaces
Automatic copy of the page number
When a new record is created, the page number is filled in automatically by copying the page number from the previously created record.
This feature can be disabled in the settings.
Tip: The page number can be easily incremented by clicking on the buttons that appear to the right of the field, or by using the UP and DOWN arrow keys.
Completion of surnames, first names, occupations and places
As you type a name, names are suggested among those already existing in the register file. When the desired name appears, press the Tab key to interrupt the current input and move on to the next field.
This avoids having to enter all the letters of a name already known.
Exclude names
Auto-Completion with the current Gedcom
It is possible to add the names present in a Gedcom file to the list of names proposed by the completion function by activating the option Link current genealogy for fields auto-completion and highlighting of existing records in the Preferences window.
When this option is activated, the assistance uses the names, first names and occupations from the current Gedcom file to complete the words as you type. This option is particularly useful when starting a register and there are still few terms available for completion among the registry themselves.
When this option is disabled, completion uses only the words present in registry already entered.
Note: It is preferable to select a Gedcom that contains data from a place and date close to the register to be entered so that completion can provide data similar to that to be entered.
Suggested folder structure and naming convention with many images to store
The Record includes a File path value that points to the image file for easy access. For image search purposes, Ancestris will therefore use that file path value.
If that value is empty, and in case many image files are stored on your computer, it is worthwhile to provide an optimized folder structure for search purposes, both for yourself and for Ancestris.
In the Registry records tool, there is the ability to find a record image from the general search field of Ancestris and from the Ancestris context menu. To speed up the search, a partitioning folder structure should be used so that Ancestris does not perform a full scan of all the image files.
With many image files, we therefore suggest you use the following folder structure and naming convention for the image file names.
Folder structure
Several file organizations are possible. The Transcriber makes use of a folder structure matching the name of each city somewhere in the tree structure.
|
Example with subfolders by county, |
Example with subfolders by city |
|---|---|
/mydocuments/genealogy/acts
/Yvelines
/Versailles
/5MI_123
/DSC00117.jpg
/DSC00118.jpg
/5MI_222
/DSC00200.jpg
/DSC00201.jpg
/photos_a_trier
/DSC00251.jpg
/DSC00252.jpg
/Saint-Germain-en-Laye
/5MI_333
/DSC00300.jpg
/DSC00301.jpg
/Essonne
/Palaiseau
/5MI_108
/SAM00400.jpg
/SAM00401.jpg
|
/mydocuments/genealogy/atcs
/Versailles
/DSC00117.jpg
/DSC00118.jpg
/DSC00200.jpg
/DSC00201.jpg
/photo_a _trier
/DSC00251.jpg
/DSC00252.jpg
/Saint-Germain-en-Laye
/DSC00300.jpg
/DSC00301.jpg
/Palaiseau
/SAM00400.jpg
/SAM00401.jpg
|
Image file naming convention indicating the city, the reference and the page
What follows is only used in the case where the file path value of the image file of the document in the record is empty.
The Reference value is the official reference code of the source register (book, church register, registry inventory, etc.) as it is stored in the repository.
The Page value can either refer to
- The page of the document in that register 'book', in which case the image file name should be modified so that then name ending matches the page number
- The last digits of the image file name of the picture that was taken of the document page.
The following examples show how Ancestris will look for image files
- Starting from the record values of City, Reference and Page: examples 1 to 5 (general Ancestris search)
- Starting from the individual event in the genealogy tree: examples 6 to 8 (Ancestris context menu action)
|
Example 1: RECORD values
Here the Transcriber will be looking for an image file:
|
Example 2 :
Here the Transcriber will be looking for an image file:
|
Example 3:
Here the Transcriber will be looking for an image file:
|
Example 4:
Here the Transcriber will be looking for an image file:
If the folder 2E_456 does not exist, or if it does not contain the photo, it will look for the image file in the other sub-folders of the city folder. |
|
Example 5: the municipality is mandatory
Here the Transcriber will not find the image file because the name of the city is mandatory and not provided. |
Example 6
|
Example 7: the reference is optional in the SOUR:PAGE tag.
Same as example 3. |
Example 8 : the SOUR:PAGE tag can only contain the number of the photo, i.e. the last digits of the name of the photo.
The Transcriber will be looking for all file ending with '117' in the sub-folders of the city. |
Customization
Customize the tool via the Configure View button. This is equivalent to going through the Ancestris toolbar, Preferences, Extensions panel, Registry records tab.
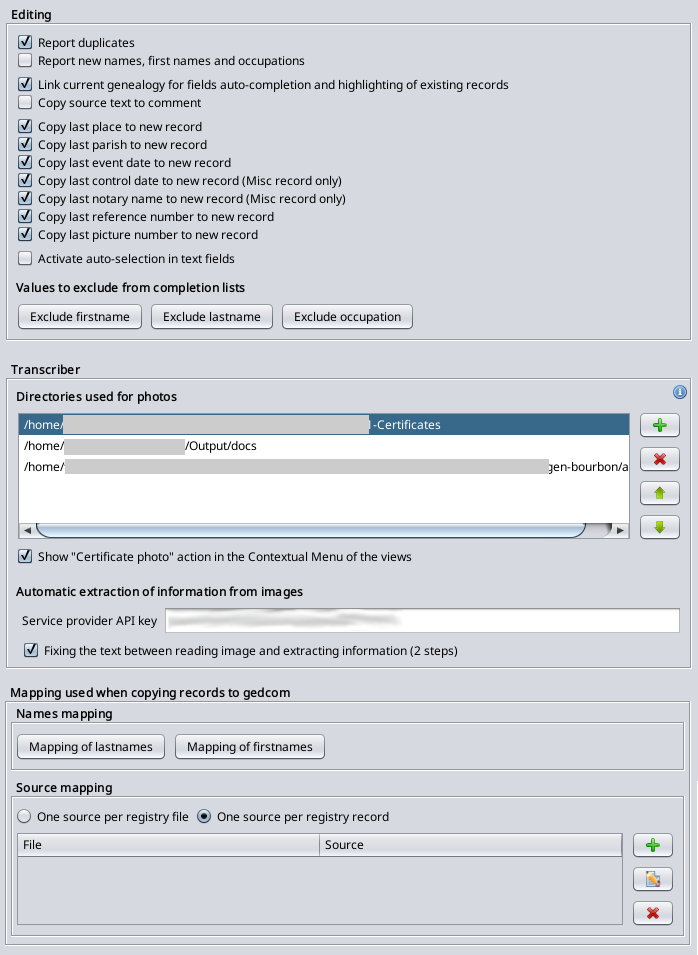
The options panel is organized in 3 sections.
- Editing settings
- Transcriber settings
- Copy record to Gedcom settings
Editing settings
- The first two report settings trigger alerts during the edition of a record
- Link current genealogy for fields auto-completion and highlighting of existing records gives two possibilities
- in the Record editor, it adds the values of the current Gedcom file. See here.
- in the Records tables, it enables the context menu action to show or hide the records that are linked to the genealogy. Changing this setting in itself does not show it. Once you trigger this setting, you still need to activate it via the context menu on a record. See here.
- Copy source text to comment is used for the context menu that summarizes the content of the record. This indicates whether to add or not the content of the source text to the summary of the record. Please note this summary is also used when merging the record to the genealogy.
- "Copy..." settings ares an efficient way to fill in the next record created with information coming from the previous record.
- Activate auto-selection is a way to speed up the auto-completion of some of the fields. Because it forces strings to belong to predefined lists, this setting can be unchecked to have more freedom to modify an auto-completed string.
- 3 buttons let you exclude surnames, first names and occupations from the completion lists.
Transcriber settings
This section shows a list of directories where images are to be found.
The "Show certificate" option adds an action item in the Ancestris context menu (right-click on entities). If the entity has a Source element linked to a Registry record, an action will be shown in the context menu to get you to the corresponding record.
This section also includes the settings for the "information extraction service" based on an Artificial Intelligence.
- The first field is where you enter the API key for Mistral AI. You get this key for free from the Mistral AI web site.
- The check box indicates whether you want to perform the transcription in 1 step (better for handwritten documents, but slower), or in 2 steps (faster but not as accurate for handwritten documents).
Copy record to Gedcom settings
This section helps you define how to merge records into your genealogy.
- Mappings for last names and first names provides equivalence when looking for similar individuals
- Source mapping indicates whether a Source should hold multiple records or a single one
- Multiple records is usually the case if you have defined a source entity in Ancestris as being a Registry book or a Church register for a given city. In this case you select "one source per registry file".
- Single record is usually the case if you have defined a source entity in Ancestris as being a single Document for a given individual. In this case you select "one source per registry record".

- The list underneath is used if a Source entity in Ancestris corresponds to a Registry file. In this case, the mapping is saved for faster search. This list helps you manage this mapping (add or remove correspondances).

Tutorial
There is an educational B-A-BA on registry records in PDF format and in French.
It corresponds to version 9 of Ancestris. Following version 13 redesign, only some sections are still useful. You can download it here.