Discover Ancestris
Guided tour. Start a new genealogy or migrate an existing one from another software.
- Guided Tour
- Getting started: create or migrate
- Create your genealogy
- Migrate your genealogy to Ancestris
Guided Tour
Welcome to Ancestris !
Ancestris offers a guided tour, allowing you to discover this software in an interactive way, using the Bourbons genealogy as an example.
You can start this tour from the Welcome page.

Enjoy the visit !
A YouTube video called "Why you might want to use Ancestris to build your family tree" might give you some additional information about Ancestris.

Getting started: create or migrate
Create your genealogy
If you feel like starting your own genealogy, or convert your paper genealogy to a computer as it has become too difficult to manage by hand, a wizard will guide you to create a new genealogy file step by step, including your first individuals.
Migrate your genealogy to Ancestris
If you already use another genealogy software and aim to move it to Ancestris, it is as simple as opening a Gedcom file exported by this other software. Ancestris will keep all the exported data, analyse it, and display it automatically. If the data is clean, you will not have to do anything more.
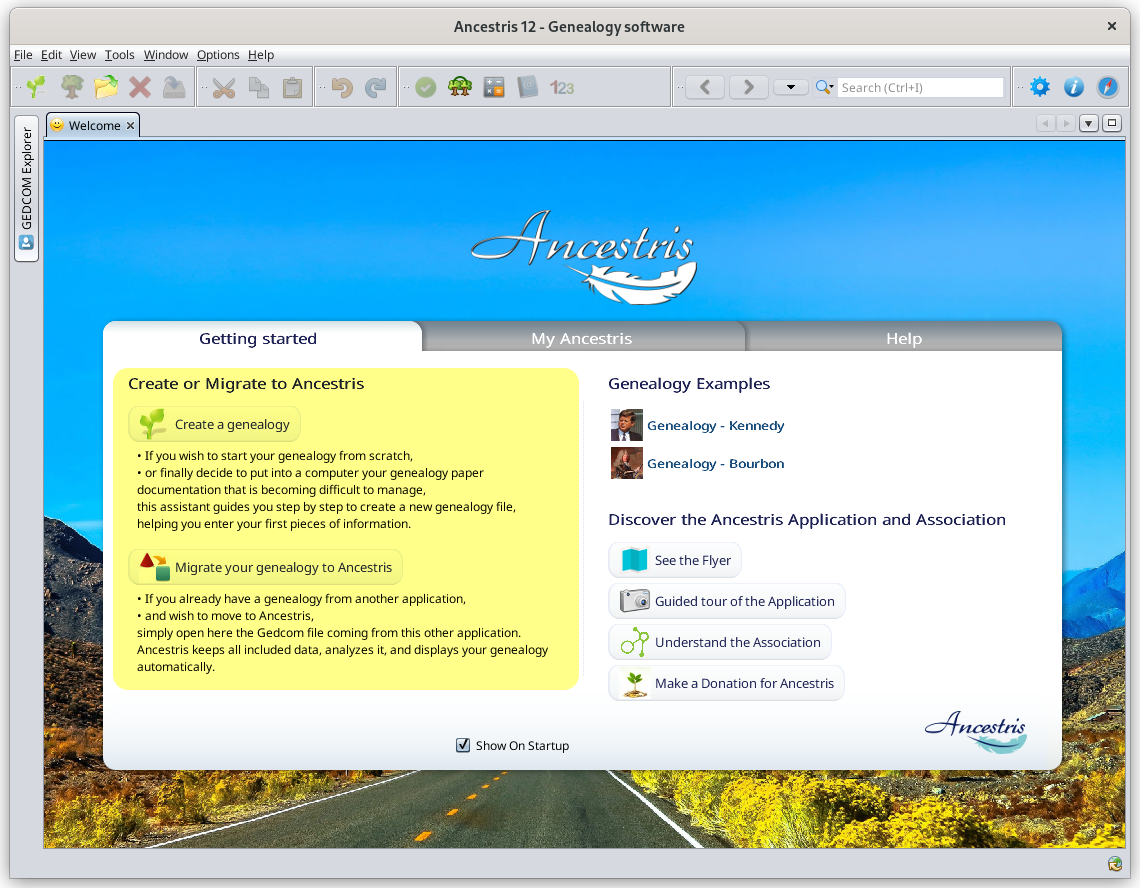
Both situations can be handled from the Welcome page, like the one shown below. They can also be done from the File menu, or using the buttons on the Toolbar.
Create your genealogy
You will see how simple it is to create a genealogy from scratch with Ancestris. You will create a first individual, the parents and close family, thus having your first genealogical tree with one or two generations.
Creating a genealogy usually starts by drawing a first person and specifying information like the birth date and place for instance. Then drawing other persons, the parents, and linking them to the first individual. Then the grandparents, and so on. Well, with Ancestris, you can exactly do the same!
Create the first individual
During the guided tour, we used the Bourbon genealogy, Bourbon file. This is an example of a genealogy supplied with Ancestris.
Let's close it and create a new one. To close Bourbon, just click on the red cross on the toolbar when any of the Bourbon windows is activated. And now, let's create your own genealogy.
From the Welcome page, click the button Create a genealogy or click  on the toolbar.
The following window appears. Fill it in and click OK.

Ancestris will then ask you for the location and file name to save your genealogy information.

As you can see, the information is directly saved as a Gedcom file. Gedcom files have the extension ".ged".
Press Create to save. That's it.
Ancestris will now show a genealogy tree in the dynamic tree view. This tree is made up of one person only: you.
On the right hand side, the Cygnus editor is also opened. It shows the individual information details of the person currently selected in the tree.
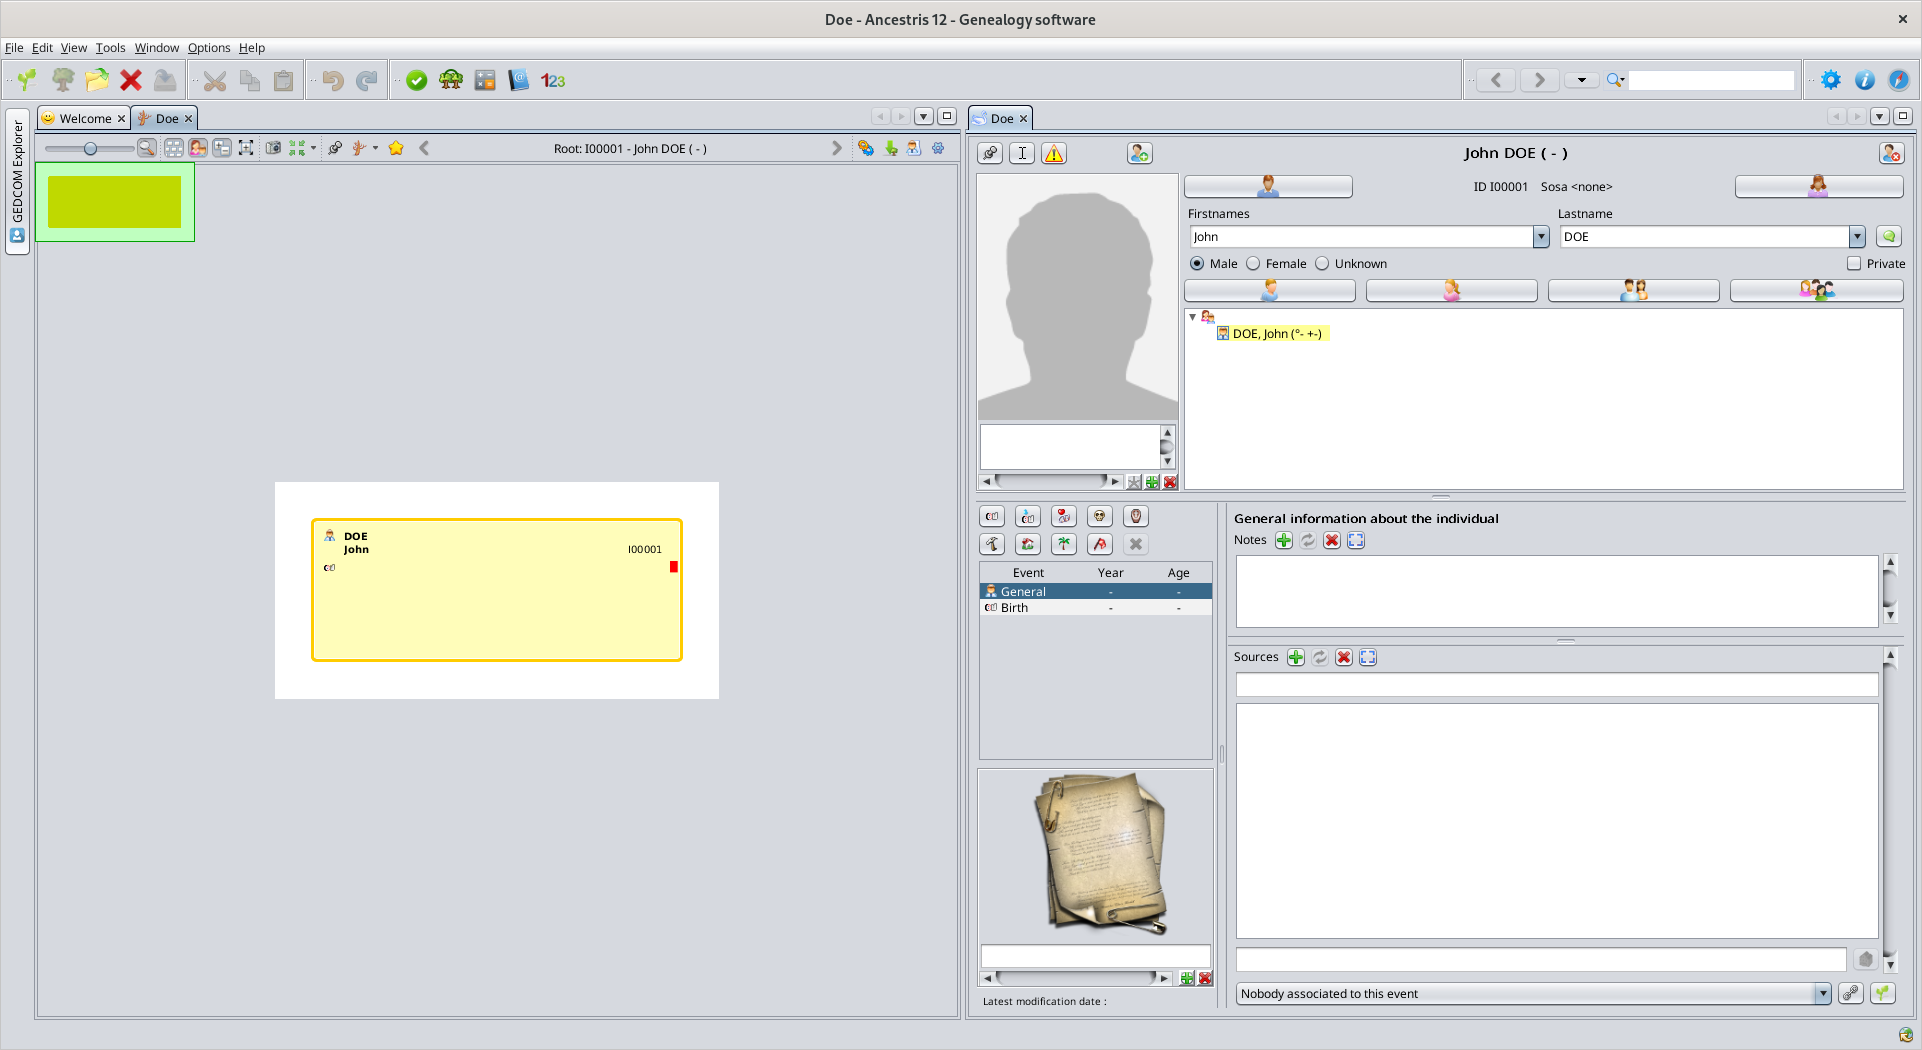
Using the Cygnus editor, you can now complete the missing information, e.g. your birth date and place for instance.
Add a photograph of yourself by clicking in the respective area.
Add other names if necessary.
When finished, in order to save the changes made, click on the OK button that will appear at the bottom right corner, as soon as you change your data in the editor.
Adopt best practices
If you keep on adding people, very soon you will reach hundreds of records: individuals, families, etc.
We recommend you to immediately adopt a consistent and harmonised way to write the frequently used information, such as:
- surnames (1st letter uppercase or not)
- occupation descriptions
- witnesses (use husband's uncle rather than Peter's uncle) to avoid repeating names
- place names (old spelling or new spelling ?)
- etc.
Also, if you have your birth certificate at hand, document it now as a source, and as comprehensively as possible. Ancestris is very good at keeping all detailed information.
Create your parents
Creating parent can be done either from the dynamic tree view or from the Cygnus editor.
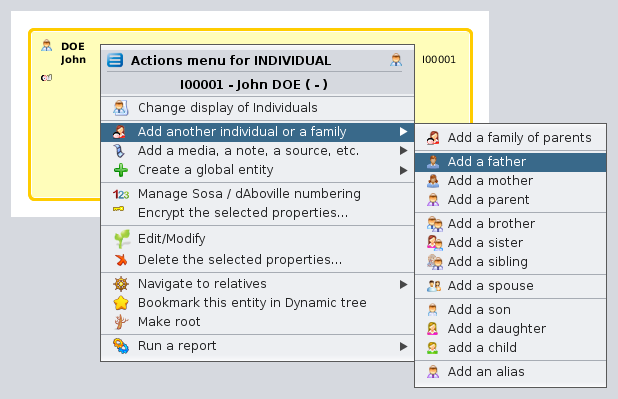
From the tree, right click the desired individual.
From Cygnus, we use the buttons for new parents. This is a faster method. The "Father" button is at the top left on the Cygnus editor.

In either case, you get two more boxes on the tree, above your own: your parents. Your father is created, but only a placeholder is visible for your mother. The entity corresponding to her is not yet created.
Ancestris default settings create only one parent at a time. It could be interesting to try and create both. To do so, go to preferences, using the main menu Options / Preferences / Editing, or click on  at the top right of the main window.
In the preferences, select the Editing panel, and check the option Automatically create both spouses when adding a parent.
On the father's box, the family name is automatically derived from the individual from which the father was created.
On the Cygnus editor, enter your father's information (name, date and place of birth, etc.). Click the OK button once done, to save the data.
To create the mother, whether right click on the individual and choose Add a spouse or click the corresponding button on the Cygnus editor, or right click your own box and choose Add a mother.
Create your close relatives
Next you can create your brothers and sisters, your wife and children, etc. in the same manner.
If you make a mistake, it is always possible to correct the information directly or simply undo the creation of the new individual by clicking on Undo button on the toolbar and start over.
Once you have created all the individuals of your close family, just click on your box to return to yourself.
Add information about your family
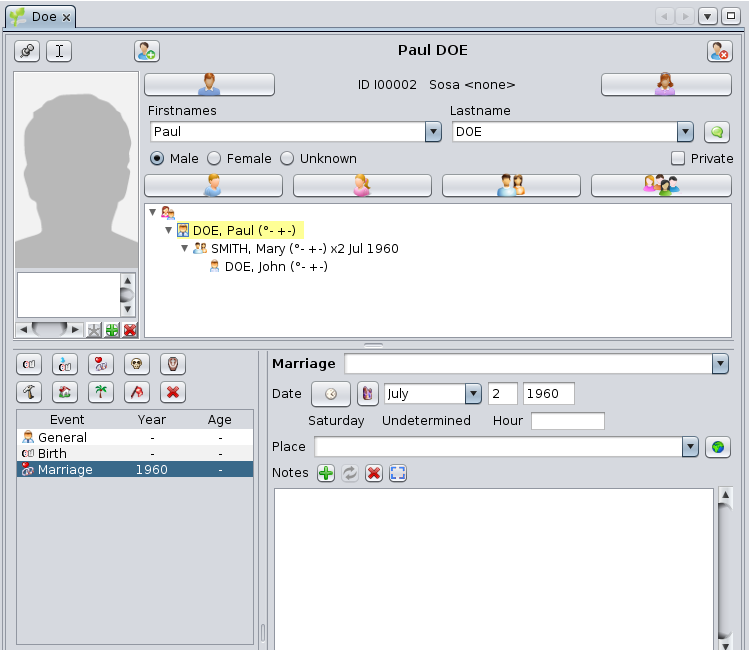
Let's suppose you want to enter your parents wedding date.
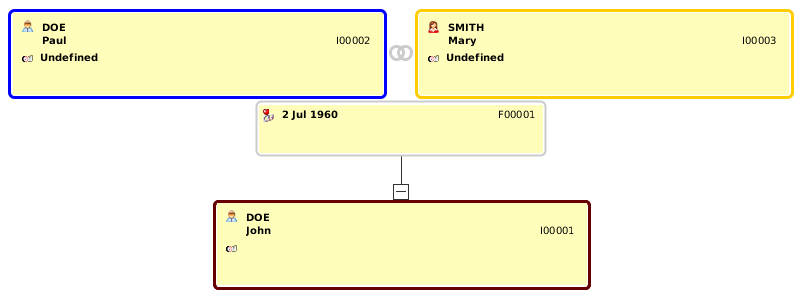
Click on the family box, the one between yours and your parents's. It is box number F00001 on the Dynamic tree view below.
In Cygnus, you will see your father's information, and Cygnus will select the nuclear family he constitutes with your mother.
From there, click on the "Marriage" button on the Cygnus editor. The marriage event is created. Indicate the type of marriage (for example : Religious), enter the date and place, if known.
Click OK and that's it. Here is the result:
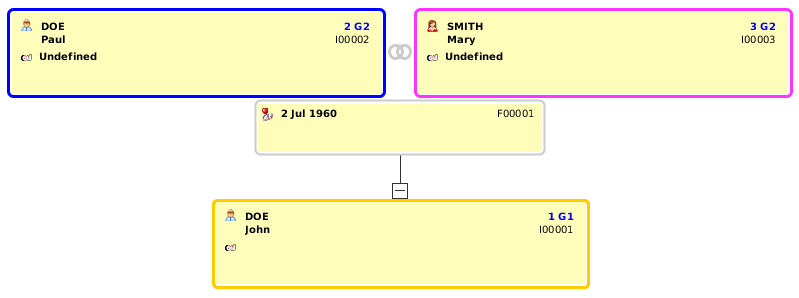
This is the current tree:
Let's now generate the Sosa numbering for this 3 people family.
Right click on the box representing yourself and choose "Manage Sosa / d'Aboville numbering". A window will open. Just click OK and the Sosa numbering will be created like the following: number 1 for yourself, 2 for your father and 3 for your mother. G1 and G2 codes are the generation numbers.
You should now have something similar to the view below, where the Sosa numbering is visible on every box at the top right corner, above the identification numbers.
This first tree is now finished. Save it on disk by clicking  on the toolbar.
You can now close your genealogy file by clicking the red cross on the toolbar.
If you hadn't saved your data before, a window would have poped-up, asking you to save the file.
We will then see the Welcome page again, since it is now the only one opened.
From there, your genealogy will show on the "My Ancestris" tab of the Welcome panel, and at the top left on the section "Last opened genealogies".
From then on, you will probably adopt the habit of opening your genealogy from the Welcome panel.
You are now ready to take advantage of all the other features of Ancestris. The other chapters of this book will help you do so.
We wish you all the best.
Migrate your genealogy to Ancestris
Migrating to Ancestris simply consists in opening a Gedcom file created by another software.
The expressions « Migrate to Ancestris » and « Import a genealogy file to Ancestris » means exactly the same thing.
There is a slight difference which is not relevant here: a migration assumes that this import is done only once for a user. Importing is an operation that a user would repeat several times.
A migration implies two issues:
- Forego the software you are currently using and learn another one
- Recover all your data during the transition process.
The first issue can be overcome easily. It is just a matter of getting used to Ancestris and its interface : 'What is the name of that action?', 'Where is that thing again ?', 'How do we do that?', and so on. After a few hours using it, you'll get used to it and that is it!
On the other hand, recovering all your data at the same place could be much harder to manage depending on your current software.
Ancestris is here to make it easy for you.
What you should know before importing
Ancestris is able to read any file in Gedcom format. This format is an international standard for information exchange between genealogy software.
So transferring your data could be very easy if your current software did its job perfectly.
However, many programs do not scrupulously comply with this Gedcom standard: they make specific choices with the way they organize their data, which makes it later difficult to convert it to the Gedcom format. This can result in data loss during exchanges between genealogists.
That is why Ancestris chose to be 100 % compliant with the Gedcom standard!
You might face two different situations when migrating:
Generally, your current software will be able to export most of your data in the Gedcom format. However, genealogy software may generate 3 types of anomalies:
-
they may use official tags at the wrong locations in the Gedcom language structure
-
they may use tags for something else than the norm defines it for
- they may create new tags, not defining them as user defined, missing "_" at the start of the tag name
Ancestris will read all this data without any problem and you will then have to check if everything is there and in their expected places.
- In the worse case scenario, your current software will not be able to export some important data or even worse will not respect enough the Gedcom format which will generate reading errors later, preventing the file to be loaded. This is quite rare, but in this case, Ancestris will not be able to read the file, and you will have to fix the gedcom file manually. Then, you would potentially have to re-enter some of your data in Ancestris.
Most of the software we know fall into the first category. And because we know how these software organize their information, we have built import mechanisms which put the data back to where the Gedcom standard expects it. Ancestris will recover all data read. You can later see 100% of this data. None of your original data is lost.
As a result, the migration to Ancestris takes three steps:
- The export step. From your current software, export ALL your data in Gedcom format. This means the software has to convert the original data to the Gedcom standard, creating a file with the extension .ged. Any good genealogy software should be able to do this, with the variations mentioned above.
- The import step. From Ancestris, open the resulting Gedcom file (Menu/File/Open). Ancestris will automatically detect what software created the file and apply some necessary corrections if it knows this software.
- The check step. From Ancestris, control the result. Ancestris cannot correct all anomalies, but will most certainly eliminate most of them. You will have to check if some anomalies remain, where the data has been placed and potentially make some fixes manually. If some data is missing from the original file, you will have to make sure you have not omitted some export settings. Otherwise, you will have no choice but to re-enter any missing information once the genealogy is loaded in Ancestris.
Importing your genealogy into Ancestris
During the guided tour, you have seen the Bourbon genealogy. Let's close it and import your genealogy now.
To close bourbon.ged, click on the red cross on the toolbar when any Bourbon window is active.
In this import process, we assume here that you have already performed step 1, the export step : that is to export a Gedcom file from your existing software.
Start migrating from the Ancestris Welcome page, click on Migrate your genealogy to Ancestris or, from the menu bar, File, click Open a genealogy.
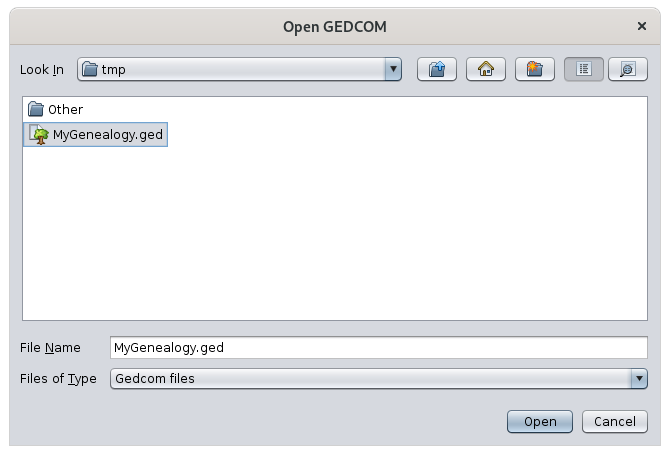
Ancestris asks you for the name of the Gedcom file to import. Choose it and click Open.
A first message tells you that Ancestris has detected a Gedcom file from another software.

In the message above, Ancestris recognise the software to open as coming from RootsMagic. Ancestris can recognise the following software, listed in alphabetical order.
- Ahnenblatt
- Ancestrologie
- Family Tree Maker (FTM)
- Genbox
- Geneanet
- Généatique
- Gramps
- Hérédis
- Legacy
- Mac Family Tree
- MyHeritage
- RootsMagic
- RootsTrust
In case it is not recognized, you can still proceed as a generic import.
In this message, Ancestris explains you what is going to happen. Click Convert in order to fix known issues.
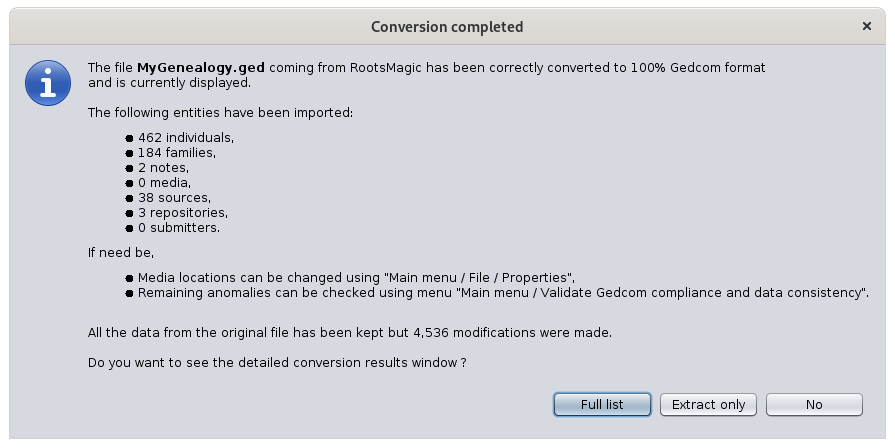
Now, the exported file is processed following the steps below. Ancestris tells you that your file has been transformed and renamed to preserve the original copy. The transformed file will then be opened in Ancestris. The original file is preserved.

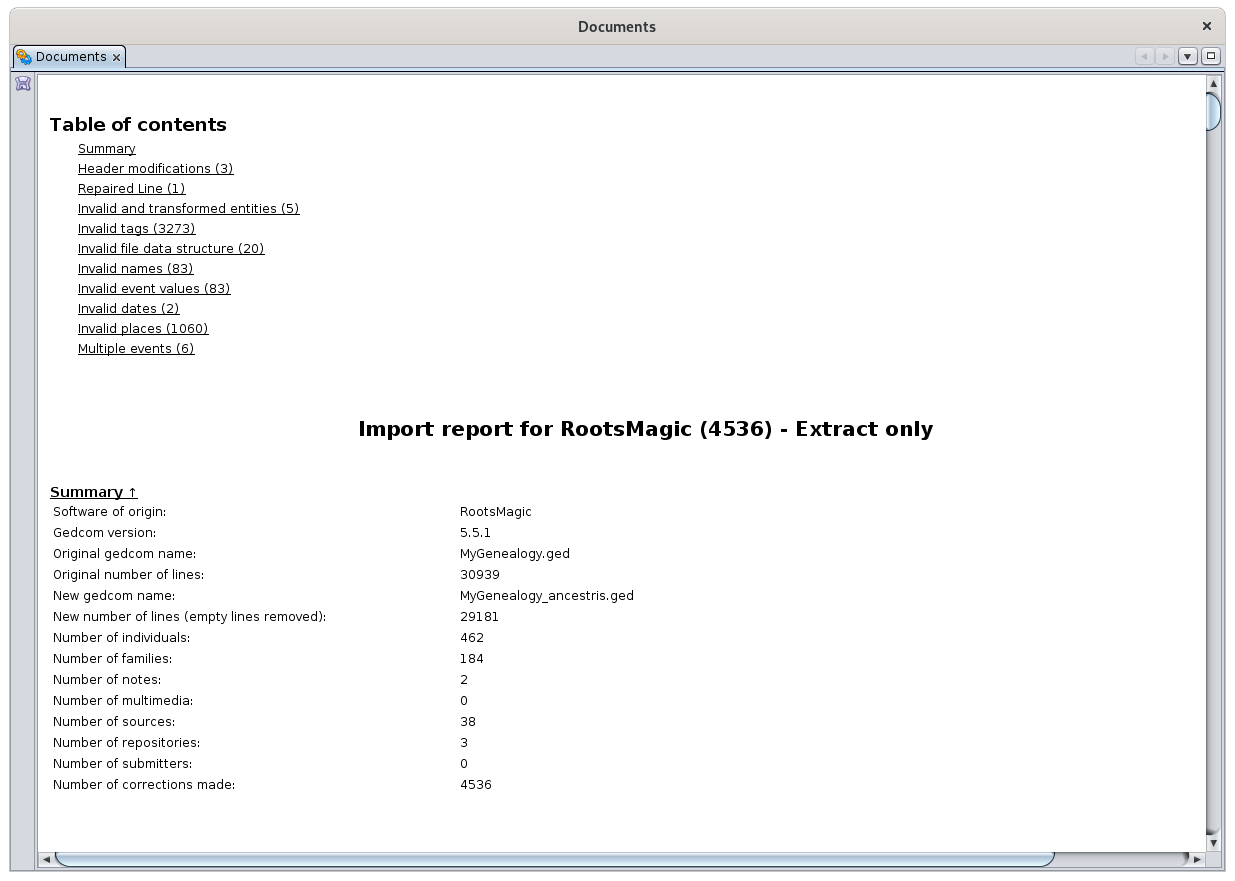
When completed, Ancestris displays the message below with the result of the conversion. It also allows you to see the changes made. Click 'Full list' to see all changes made. Because it can be unnecessary and long, Ancestris offers to only show you an extract of the changes made. This is more efficient because it displays all types of correction encountered. Otherwise, click 'No' to close this message box.
Here is an example of the displayed extract where numerous corrections have been made.
When the import report is displayed, Ancestris also display the Gedcom editor because it is easier to see the correction in the real data. Just click on the id of the entity in the Import Report and Ancestris will display it in the Gedcom editor.
At the bottom of this page we have listed specific software issues identified by Ancestris users during migration that we have not been able to automatically fix. Check your software's paragraph for more details if it exists.
Controlling the migrated data
Once Ancestris opens the converted file, let us perform some checks, including those reported at the bottom of the previous message, namely:
- Has all my original data been transferred to the new file?
- Were the multimedia files stored correctly?
- Are there any data or format anomalies detected by Ancestris that I need to correct?
Checking the data
There are two ways of losing data during the import:
- Either the data was not transferred to the Gedcom file produced by your existing software,
- Or the data has been transferred, but it is not in the expected location in the Ancestris file.
Only you can perform these two checks visually.
The first control is to open your exported Gedcom file before conversion by Ancestris, with a text editor. Explore some entities and see if everything is there by visually checking with your original software.
The second control is to look at your new Ancestris file using the Gedcom editor. Take a look at entities likely to have very well known information, and see how it is organised and displayed. Since the same types of information were placed in the same places, this will give you an idea of the conversions made. Use the Output window result to help you with this as well (menu Windows/Output).
Checking multimedia files
File names of the multimedia files used by your genealogy are referenced in 'FILE' lines of the Gedcom file.
If the links are broken due to a change of directory or if the export has modified the root of the directory, the media may no longer appear in Ancestris. A quick test is to see if your photo is displayed, in case you had one before.
If media files are not visible any more but still present on your disk, Ancestris will be able to link them back. To do this, go to the tool File/Manage media files to reattach the files to the Gedcom with the proper links.
Checking anomalies
Even after convertion, some data might still not respect the Gedcom standard. It can be the case when data is invalid, wrongly placed or missing. Of course, Ancestris cannot invent data that was not there.
Since Ancestris does not delete anything from the original file, but does not complete missing data either, compliance with the Gedcom standard may remain imperfect.
More, the genealogical data itself may contain inconsistencies.
This check can be performed using the Menu / Tools / Validate Gedcom compliance and data consistency. Please refer to the validation tool for more information.
Each anomaly is listed and can be corrected. It is best to do it with the Gedcom editor, because it is the most transparent editor on the information contained in the Gedcom file. Please refer to the Gedcom editor for more information.
Modifying or adding information
Once imported and the checks carried out, your genealogy is ready to be enriched. You can add other individuals or modify or add information.
To do this, choose an individual without parents from your family tree by clicking on it, and see how to create parents and siblings for him by referring to the previous page Create your genealogy for instance.
Issues identified by other users after importing
For all software recognized by Ancestris, we already performed most appropriate conversions, and you should not encounter any issues, unless there have been changes since our work.
For others unknown issues, we welcome your opinion. We will write them down below for the benefit of all users, while waiting to be able to make the corresponding conversion developments if possible.
We can only fix problems if they are reported by users. Participate in enhancing Ancestris by reporting issues to us on the discussion list.
Migrating from Genealogie.com
The files generated by the site genealogie.com do not have information relative to the submitter/researcher. Such indication is mandatory to comply with the standard.
Ancestris solution: create the information after the import process from the menu File/Properties and update the author.
Migrating from LifeLines
With the default settings, LifeLines does not export information relative to the submitter/researcher. Such indication is mandatory to comply with the standard.
Ancestris solution: create the information after the import process from the menu File/Properties and update the author.
Migrating from Family Tree Builder
Family Tree Builder (FTB) generates several proprietary tags that clog the file, rendering it less clear.
Ancestris solution: remove the useless tags from the Menu / Edit / Delete.