Develop your genealogy
How to use Ancestris in various genealogy situations : know your genealogy status, search for official documents, enter them in Ancestris. Analyse your genealogy, organize it, share it.
- Setting a goal
- Building a progress indicator
- Prepare your genealogical research
- Organize your media
- Document your sources
- Enter a deed
- Documenting a register
- Enter specific events
Setting a goal
You will soon realize that the genealogist's work is exponential and can go in all directions.
So you will have to set yourself limits if you want to do a quality work.
The following points are only examples of choices to be made to delimit a research perimeter that can be achieved in a lifetime.
Whose genealogy?
Define whose genealogy will be developed:
- Yours
- Your wife's
- Your family's, starting with your children or grand children
- That of a close relative
- A friend's.
Over how many generations?
Define the number of generations to be identified:
- All the way back to the great-grandparents
- Back to Independence day, the French revolution, the first English settlers, back to William Shakespeare birth, etc.
- Back to the Middle Age or William the Conqueror
Which branches?
Define branches to be identified:
- All
- Paternal lineage only
- Maternal lineage
- Specific ones
What descendants?
Define from which ancestors you wish to identify descendants and cousins :
- From the highest ancestor found
- From Great-grandparents
- From all ancestors found
What level of detail?
Define the level of detail to be obtained for each individual
- According to its generation
- Systematically have the sources of all acts
- Only Birth, Marriage, Death
- The maximum number of events
Building a progress indicator
You will need to measure the progress of your research.
What gets measured gets done!
You can measure your progress as a percentage coverage of the number of individuals identified over the number of individuals to be found.
If you add the fact that for an individual, you have set a level of depth of information to be found, you may prefer the percentage coverage of data found.
If your goal is to go back as far as possible on the paternal line, your indicator could be the oldest year of ascent for instance.
Ancestris has a report that allows you to view the level of search completeness by generation and easily see the "holes" in your quest to orientate your investigations.
Prepare your genealogical research
You will then have to prepare your genealogical research and build some sort of action plan.
Ancestris allows you to prepare a list of searches to be carried out, sorted by categories and by storage locations.
Search for event dates
The way to conduct genealogical research benefits from the development of genealogy.
- The development of surveys carried out by associations
- The important place taken by collaborative online uploads
- The digitization and online posting of civil and parish registers
Some genealogists in fact carry out their research by entering the dates of events (births, deaths, marriages ...), no longer from the original acts, but from either associative records or trees found on the Internet.
However, it is necessary to systematically verify all these dates by checking the original acts or their transcription, whether they are paper archives or digitized archives.
Now Ancestris is a powerful and efficient tool to facilitate the management of these searches or verifications.
Whenever you collect a dated event, after entering the event, we recommend that you first indicate the origin of this information, its source (genealogical association of such and such, tree found on this web site, etc.).
Then, we suggest that you add a property to this event to remind you to find the original document or piece of evidence of the deed concerned, or other tasks to be performed.
To do this, you can define a personalized property (example: "_TODO"), which value will be the task to be performed (example: "find the deed.").
The easiest way to do this is to use the Ancestris Gedcom editor. On the first line of properties, right-click to display the Context menu and choose the Gedcom Properties List. When the Add Property panel appears, activate the New Label radio button, and, in the box just below, enter a custom label starting with “_” (with, for example, a department name: “ _TODO ”), enter the value“ find the deed ”then validate by pressing <OK>.
Creation of a research sheet
At any time, Ancestris allows you quite easily to build a research sheet summarizing all the sources to check or actions to perform.
To do this, use the To Do List report, via the Tools / Lists and reports menu. When the view is displayed, left column, click on To Do List, then, at the top right, activate the Options tab.
In the Options panel, fill in the box defining the tasks to be searched for by your tag (for example "_TODO"), validate by clicking next to it.
Launch the report. Ancestris offers PDF as an output format by default. If you have few acts, you can choose PDF. Disadvantage: the resulting list is not ranked which might make it unpractical over several pages. To easily obtain a list classified by city for example, change the file type to “CSV” format instead of “PDF”.
Then open the "* .csv" file in a spreadsheet tool.
Delete the first header line “Complete list of to-do items” which is unnecessary.
All you have to do then is sort your table on the desired columns.
Your worksheet is sorted by city with the acts to be searched.
You can then create an additional column called "notes" to write down any issue.
With your sorted worksheet, you can now go to the website of the geographic archives repository and look for your deeds city by city.
Search for notarial deeds
To search for notarial deeds, the process is the same.
Whenever the date of a marriage contract is indicated in the text of a marriage, on a deed statement or on the Internet, enter it in your Ancestris genealogy, under tag "MARC", with the date and place, with the name of the notary under tag "AGNC".
Create a personalized label, for example “_NOTARIAL123”.
Configure the report seen above by changing the name of the tag sought by "_NOTAIRES123".
Run your report as in the example above.
With your beautiful notaries worksheet, you can go to check the elements at the local repository.
Eventually, if the notary register numbers are on the Internet, look them up from home and add them in an additional column on your work sheet.
By proceeding this way, with a minimum of preparation, you will have prepared your control work efficiently, whether from home or going physically to the corresponding repository offices, especially if you do not perform research every day and you do not want to end up with too many documents to verify at the same time.
Organize your media
The organization of your media on your PC - folders and file names - is decided as early as possible in your genealogy work, because you will quickly end up with many documents and it is advisable to start from the beginning with a convention of classification, under penalty of having to reorganize everything along the way, or worse, no longer find your way around.
Please take a look at this best practice for organising your media in general.
One of our users, Thierry N, told us about a very rigorous way of organizing the media.
About the folders structure
- Announcements: includes announcements, invitations, other similar documents
- Cadastre: official registers of real estate & land
- Census
- Contracts: all types of contracts (CM: marriage contract
- Deed: all BMD deeds grouped together and distinguished using the file name. See below.
- Deed_Notary
- Graves: geo-tagged photographs, copy of burial or cemetery register
- Military Records
- Naturalizations
- OJ: official journal (decrees or orders relating to an individual, excluding naturalization)
- Photos: for individuals - including old painted or drawn portraits.
- Photos_places
- Press
- Qualifications: as the name suggests
- Signatures
- Various
You can add as many folders as you want. For example, "Decorations" where we could put pictures of medals!
It can also be done by country by prefixing with the country code:
- FR_Acts
- FR_Army
- FR_Census
- FR_Immigration
- FR_Naturalisations
- FR_Press
Filenames structure
Most files relate to a main individual, in which case the choice of a file name linked to this individual seems legitimate.
- 000001_B_LAST First_YYYYMMDD
- Unique identifier of the person (do not use SOSA) on 6 characters to allow a size of 999,999 people!
- Letter corresponding to the act or document (here the birth)
- Identity lastname and first name
- Event date
That's it! This works for me. I adopted that from the start and I try to stick to my rule. Is this perfect? Certainly not. It's up to everyone to find their favorite classification, because there is no rule in this area. But above all, stick to it or bear the risk of getting lost!
Thierry N.
Thank you very much Thierry !
Document your sources
You will collect many official documents (acts, deeds) that you will need to enter in Ancestris.
Each record you find will enrich your genealogy with individuals, events, sources or notes.
This page will help you know how to enter a deed using sources and repositories.
Importance of documenting your sources
Whatever the origin, every good genealogist must display his/her sources: there is no good genealogy without sources.
The information that constitutes sources for a genealogy can be the result of
- personal research (civil status, notaries, cemeteries, various archives, etc.)
- sharing with other genealogists
- oral information collection
- family document study
Even if the source you have is not the best or is not definitive, you necessarily base the existence of a person or a fact on a source of information. This will be your source and you will keep track of where your information came from, even if it means finding a better source later.
Sources and Repositories
A source is therefore an original transcription on a medium which makes it possible to justify information entered in a genealogy. For example, a parish register, a decennial table, an act of civil status, an act of a parish register, a family book, a tombstone, a video, an audio file.
In addition, any source must be associated to a deposit.
A repository is the place of physical or electronic storage, the geographical site, containing the said original medium (town hall, departmental archives, cemetery, building address, etc.) or the website (of the county archives of a given region).
How to organize the information in Ancestris
A source is contained in a repository
In Ancestris and in the Gedcom standard, Source entities are contained in Repository entities.
The repository is filled in when filling in the source. The repository must exist at that time. Therefore, it makes more sense to create the repository before creating the source.
However, this reference to the repository is optional. We can therefore create the source and the repository at the time we need it during the creation of the source, or later.
The editors in Ancestris allow you to enter the entities in the order you want. In practice, in your research and in your data entry procedures, it is more common to enter the containers before the contents, especially since the same repository will be used by several sources.
Where to store the deed and the register?
The deed in the source, or the deed in the individual ?
If the creation of the individual is pretty straight forward, that is via the creation of the entity 'Individual', a choice exists for both the Source and the Repository.
Here are the available possibilities where we can write things in the Gedcom standard and therefore in Ancestris.
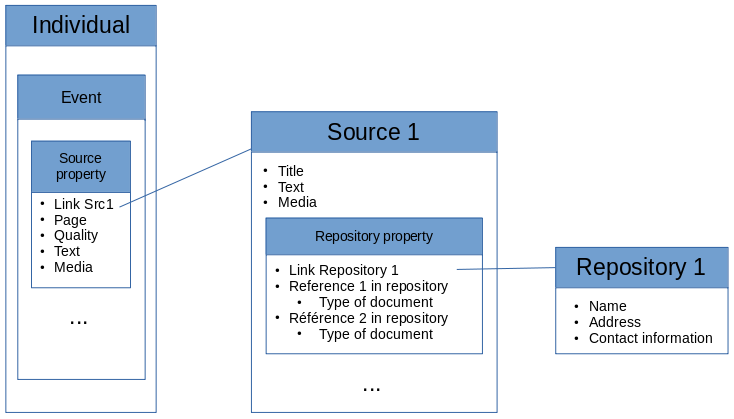
- Inside a source property, inside a given event of a given individual or family: it will therefore become a non-sharable piece of data. It cannot be referenced by another event. There can be several such properties for the same given event. Each property will include the following information.
- Link to a source entity. This link will have the possible following attributes :
- The page inside the source - Tag:
PAGE - The source quality, on a scale from 0 to 3 - Tag:
QUAY
- 0 = Unreliable or data resulting from an estimate
- 1 = Subjective (interviews, oral statement, possible bias, autobiography)
- 2 = Second-hand source, official data reported after the event
- 3 = Direct, official and instant source of the event
- The transcription of the text of the source - Tag:
DATAand subtag:TEXT - Links to multimedia files - Tag:
OBJE - The type of event cited in the source (may be different from the event of the individual to which it is attached) - Tag:
EVEN
- The page inside the source - Tag:
- Link to a source entity. This link will have the possible following attributes :
- Inside a Source entity : it will be a shareable piece of data. It may contain the following information.
- The source title, as a long and a short description - Tags:
TITLandABBRrespectively. - The transcription of the text of the source - Tag:
TEXT - Links to the multimedia files - Tag:
OBJE - Links to the repositories where the source can be found - Tag:
REPO
- For each repository, references in the repository, and its index (there could be several of them) - Tag:
CALN
- And for each reference, the type of media support of the source (audio, book, card, electronic, record, film, magazine, manuscript, newspaper, photo, grave, video) - Tag:
MEDI
- And for each reference, the type of media support of the source (audio, book, card, electronic, record, film, magazine, manuscript, newspaper, photo, grave, video) - Tag:
- For each repository, references in the repository, and its index (there could be several of them) - Tag:
- The event types indicated by the source, with their location and time period - Tag:
DATA/EVEN/DATEandDATA/EVEN/PLAC - The Risponsible Agent - Tag:
DATA/AGNC - The Author who created the source - Tag:
AUTH - The Publication information (when and where) - Tag:
PUBL
- The source title, as a long and a short description - Tags:
- Inside the repository entity : it will be a shareable piece of information. It may contain the following information.
- The repository Name - Tag:
NAME - The physical address of the repository - Tag:
ADDR - The Internet address - Tag:
WWW - A contact number (phone, email, fax) - Tag:
PHON,EMAIL,FAX.
- The repository Name - Tag:
We recommend a principle of efficiency which is to store information in a shareable place if it can be used for several events, or in non-shareable place if it ever be used for a single event, that is to say for a unique individual , or a unique family. See the shared information page for more details.
For the source, this is all the more relevant as it includes a text that is often long to transcribe. It is out of question to enter it several times. We note that this text could be stored in two different places, hence a choice to be made.
So now, a first question: where do we put a marriage certificate and the text of its transcription?
The principle of efficiency tells us that it is safer to enter a marriage certificate in a source entity rather than in a source property.
A marriage certificate could constitute a source of information about several events. That of the marriage of the spouses of course, but it also often informs us about the existence of other individuals, potentially on their name, date and place of birth. The absence of a parent of one of the spouses can also give us some clues about their likely death date.
It is therefore beneficial to enter a marriage certificate in a shared source, therefore in a Source entity.
And the next question is: but then, where do you enter the register which contains the certificate?
According to the Gedcom standard, the registry is rather entered in a source, and the marriage certificate is a page of the registry, which naturally fits into a source property. But then our principle of shared information no longer works.
In addition, the Gedcom standard could suggest to define a cemetery as a repository, and a grave as a source entity. If a cemetery is a repository, why shouldn't a register be a repository? Not easy therefore because in real life, the sources of information are not just arranged on 2 shared levels of information.
Possible choices
Here are possible solutions observed in practice for the example above. There may be others.
| Nb | Individual | Source | Repository | ||||
| Source property |
|||||||
| Event |
Page/ Quality |
Text/Media | Title | Text/Media | Ref repository / Media support | ||
| 1 | Marriage | -/3 | - | Marriage certificate |
Text + Media |
Section 3AB12- Baptism Marriage Burial Register of 1787-nb12 p219/ Manuscript |
National Archives of Boston |
| 2 | Marriage | p.219/3 |
Text + Media |
Baptism Marriage Burial Register of 1787 | - |
Section 3AB12/ Manuscript |
National Archives of Boston |
About choice number 1 above
- The useful information of the source property is the quality
- This information can only be in the event because it indicates the quality of the source to justify the event, not the quality of the source as such.
- The indication of page numbers or act numbers will rather be included in the reference to the register rather than in the page on the event side, or in the title of the source
- Indeed, if you indicate several repositories for a source (which would then obviously be in different form and with the same content), the act or page number no longer makes sense for several repository referenced at the same time.
-
If you enter the page number here (in PAGE) to indicate where the transcribed text is, this text should be placed at the same level (in DATA:TEXT), and not in a source entity, which would be completely inconsistent . Choice 2 below should be applied in this case.
About choice number 2 above
- When the register is a source, the text and the media clearly go to the event side
- The page number makes sense for the event
- The only place to enter the title of the deed is in the text of the source
How to decide? By looking at how many events you will have on average to attach to the same act, and how many acts you will have in the same register.
The closer the ratio is to 1, the more things will have to be stored in the same place, and the larger the ratio, the more they will have to be separated.
- if you think you have a lot of events for the same act, you have to separate the act from the event, otherwise you will spend your time re-entering the same act many times.
- if you think you have a lot of acts in the same register, the more it will be necessary to separate the register of acts. It might also be interesting in this case to merge the register with the repository, but it all depends on whether you have a lot of registries for the same repository.
Our recommendation is to favour information shared at the level of acts, therefore choice number 1 above. This is what the Cygnus editor does. The other two editors allow you to make the choices you want.
As you generalize, you may find it useful to make this type of summary table for all the kinds of sources and repositories you come across.
Associating a source with a repository
As we said above, we can create a source and then a repository, or the other way around.
The creation of entities is not documented here. This can be done from the 3 editors, from the contextual menu and from the Aries edit bar.
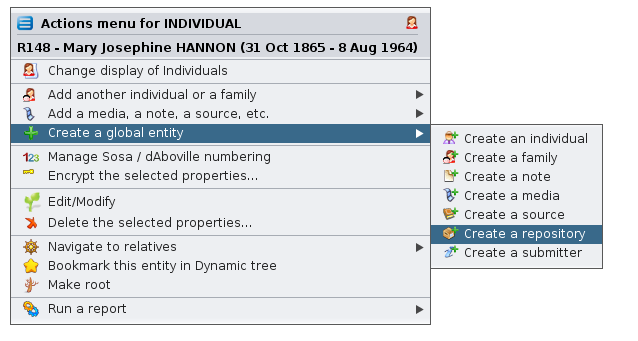
Example for the creation of a repository with the contextual menu from any entity.
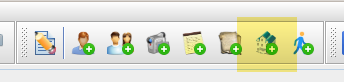
Creation of a repository from the button bar.
The most important part is the association between the two.
Several solutions exist depending on the editor used.
Using the Cygnus editor
With Cygnus, when you are editing a source, click on the Repository button at the bottom right.
Clicking on this button opens the window for choosing a repository, existing or to be created.
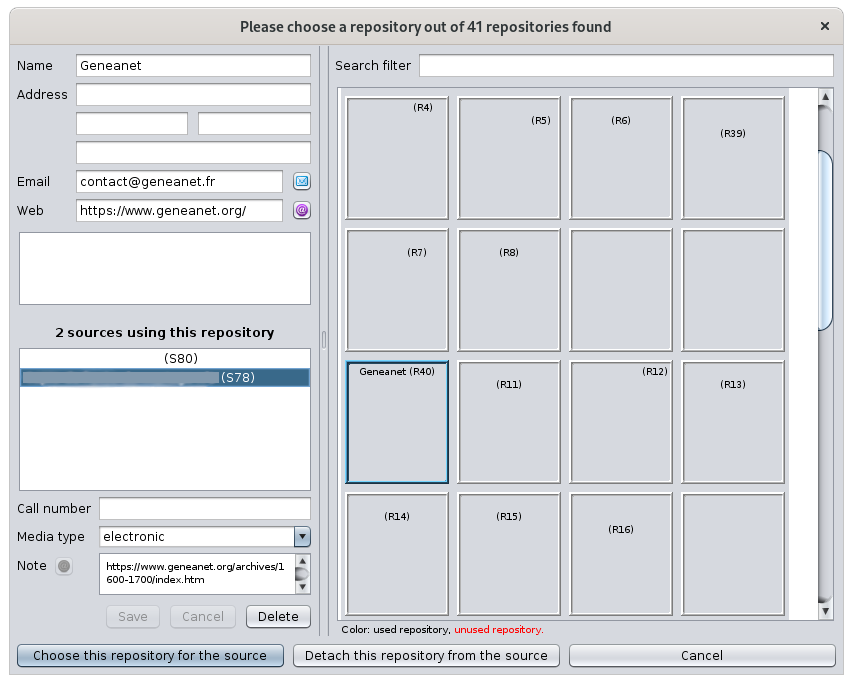
In this window, the detailed content of the repository selected on the right hand side, is showing at the top of the left hand side.
The part in the middle is the list of used sources referenced by this repository.
The data at the bottom displays the references, in the repository, of the source being edited, that is to say the one from which we clicked just before. In this editor you can only put one reference.
The page number of the register in which the deed can be found as well as the register name are to be placed in the Call number field.
Using the Aries editor
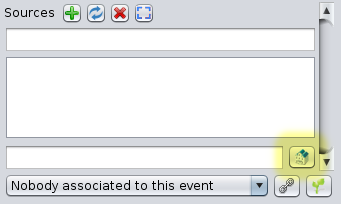
With Aries, when editing a source, either directly from a source entity, or from the source of an event, choose the repository tab then click on one of the two highlighted buttons.
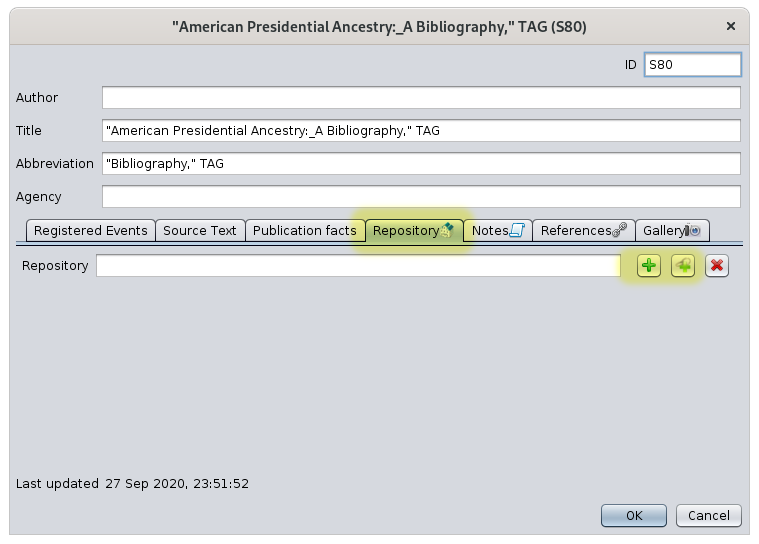
In the case of the Attach button, a list of repositories appears, you just have to choose one.
In the case of a repository that does not already exist, the following window appears.
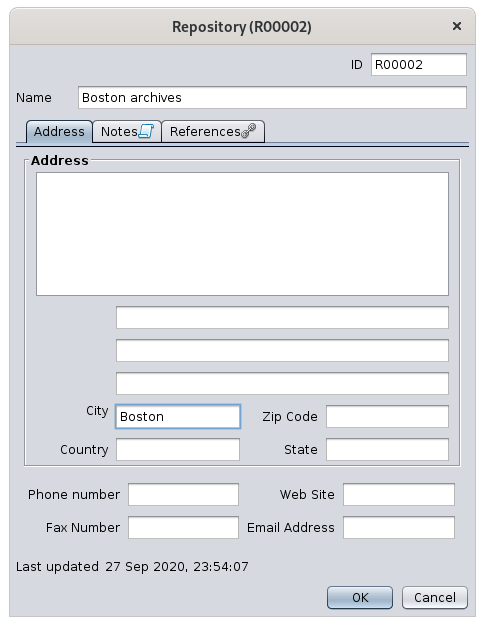
This window contains exclusively the data of a deposit to be entered.
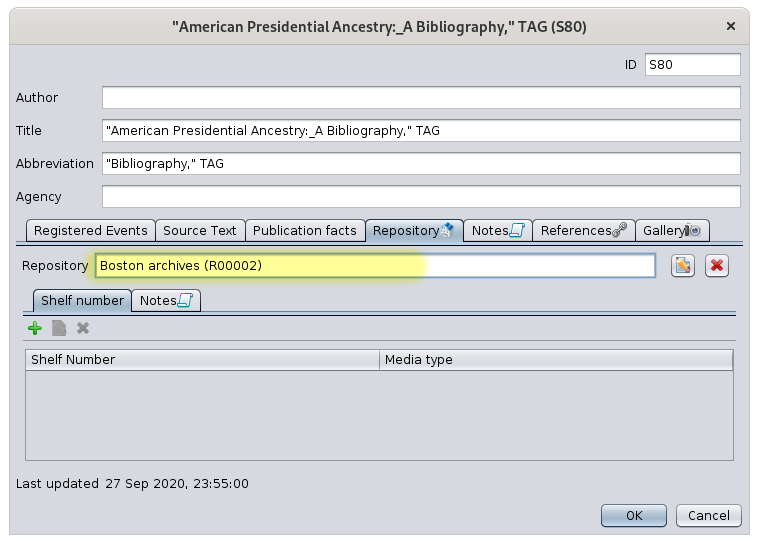
Once the repository data has been entered, you will return to the previous window where you can then indicate the index and the type of Media.
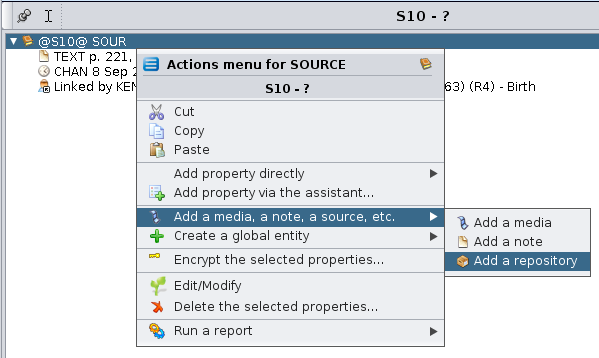
Using the Gedcom editor
From the Gedcom editor, go to the Source entity, then right click anywhere on the top panel of the Gedcom editor, and choose Add a media, a note, a source, etc. then Add a repository.
The following window appears, either to create a new repository, or to choose one from the list.

Assuming you choose to create a new repository, you then see this window, which shows the fields of a repository. You may want to complete the full address.
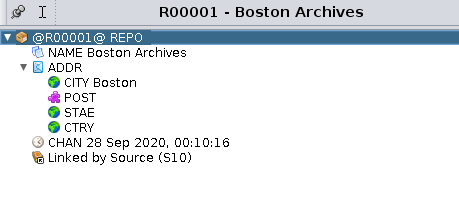
If you go back to the previous entity, i.e. the source entity, by clicking on the left arrow in the navigation bar, you see that the repository has been added.
The references of the repository are added by right-clicking the REPO line, and choosing "Add a property directly", then CALN.
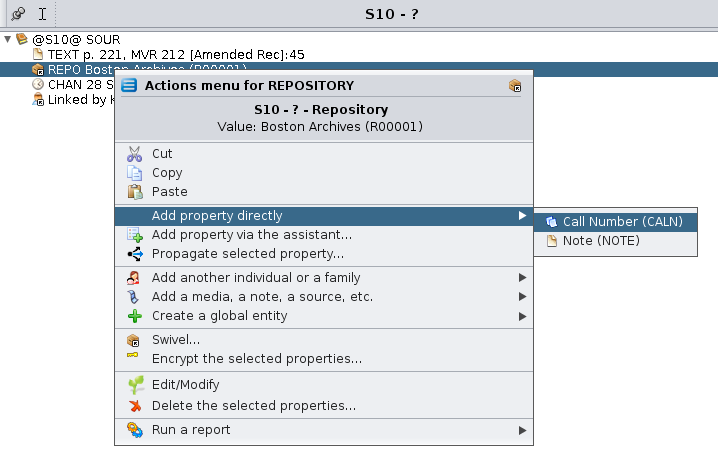
Then again by clicking on CALN to add MEDI.
You get the following result.

There you go.
You might have noticed the differences of efficiency and transparency of the respective editors.
Enter a deed
To enter a birth, marriage, death or other certificate, several solutions are offered to you to enter it.
Either it is one of several certificates that you have retrieved, or it is an extract of a statement containing all the certificates of a municipality.
In the first case, you will tend to want to use one of the three editors of Ancestris: Cygnus, Aries or Gedcom.
In this situation, you will decipher the deed, extract the data from the record yourself and enter it into one of the editors.
You may also want to use the Registers records, especially if the deed is part of a statement.
In this case, you will decipher the deed, but type it in along the flow, almost in the order it appears, and Ancestris will then allow you to "move" it where you need it using drag-n-drop.
Documenting a register
Entering a register is possible with Ancestris using the Registry records module.
This module is described in detail in the Registry records page. We invite you to read the corresponding section.
This module must be installed from Menu / Personalization / Extensions.
Once installed, it is available from the Tools menu.
Enter specific events
As an Ancestris user, you often give us special cases of events to capture.
One of the questions from a user today was for example:
One person was buried, then exhumed before being buried in another village.
How to deal with this, knowing that one cannot use an EVEN event as it would result in an error of sequence?
The answer to this question was given in the forum.
Please let us know of other questions of this type and the most relevant answers associated with them.
To be continued then.