Customize Ancestris
How to customize Ancestris. How to add or remove modules.
Preferences
This is where you set most of your usage personalization.
As soon as Ancestris is installed, you can immediately start using it.
However, if you familiarize yourself with certain settings, you can adapt Ancestris to your way of working and give your genealogy the look you want.
Preferences are accessible from several places.
Description
Selection bar
The Preferences window has a selection bar above with several categories of preferences.

Clicking on a category button brings up the preferences which can be modified under this category.
The entry field on the right hand side is a filter which makes it easier to find a preference. Type any keyword and press the Enter key. Searching is case insensitive. The panels dealing with the keyword will be enabled and the other panels will be disabled. Hit the Esc key or the Enter key with an empty field to clear the filter and re-enable all panels.
Below is a description of each category. In each category, tooltips are available to help you with the meaning of each setting.
Buttons
In its lower part, the Preferences window displays a few buttons.

Export... Button
This button copies your preferences to a file. This can be very useful when you have installed Ancestris on several computers. This will allow you to apply the same preferences on all computers without having to reconfigure each one individually.
Import... Button
This button retrieves preferences from a file. It is the reverse operation of the previous one.
OK Button
This button validates any modifications made in the Preferences window and closes it.
Apply Button
This button validates any modifications made in the Preferences window, without closing the window.
Cancel Button
This button closes the window without validating any modifications made in it.
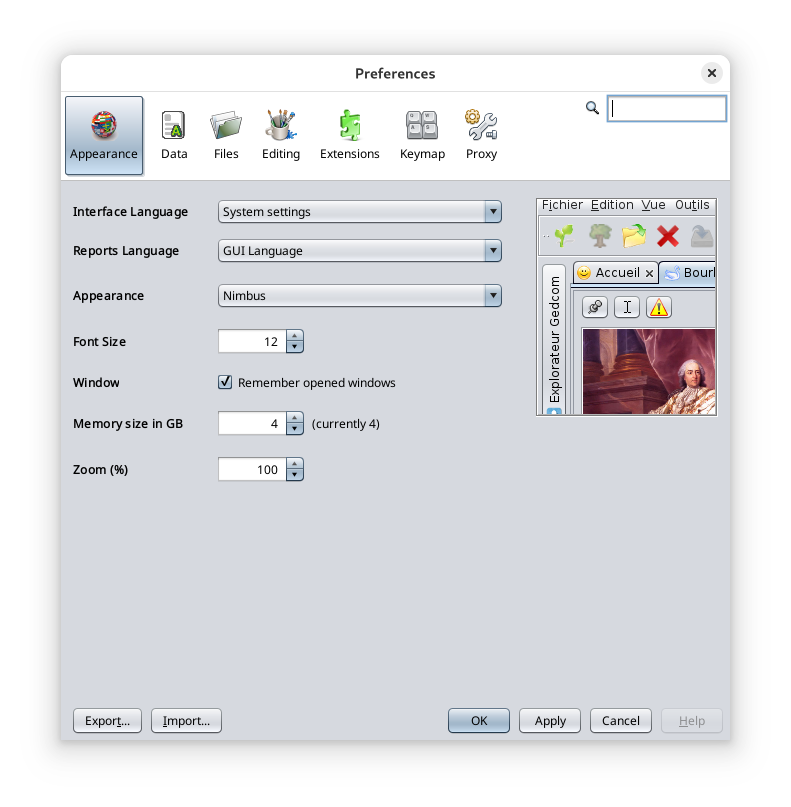
Appearance
This is the panel where you can change the general appearance of Ancestris.
Selects the display style of the windows, also called the look and feel.
For each style selected (Standard, Nimbus, Metal, ...), a sample preview is displayed on the right hand side.
Ancestris needs to be restarted to activate a new style.
Some of these "look and feel" are extension modules (InfoNode, JTattoo, etc.) that need to be installed to make them appear and use them. See the Extensions for more details.
Font size
Sets the size of fonts throughout the application.
Window
When the box is checked, the windows' sizes and positions will be saved when you exit Ancestris, and restored when Ancestris is reopened.
Memory size in GB
Forces the memory size allocation to Ancestris to operate.
If you have large family history files, it may be more convenient to allocate a larger number of gigabytes.
Data
This is the panel where you can modify the formats and contents of data elements of your genealogy. It includes two tabs.
General data
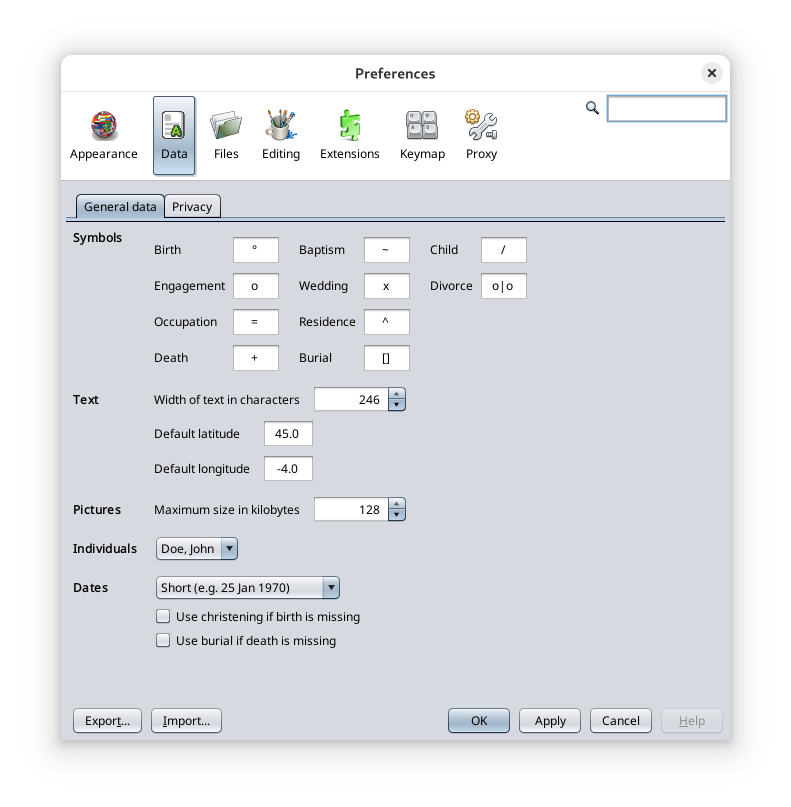
Symbols
Displays the typographical characters used to symbolize certain events (Birth, Marriage, Occupation, etc.).
Text
Defines the text width in number of characters when displaying notes, source texts, etc.
It is recommended to keep the default value of 246 characters wide.
Pictures
Sets the maximum size of images in kilobytes.
Individuals
Sets how to display names in terms of the order of the name elements.
Dates
The first line sets how to display dates.
The checkbox "Use Christening if birth is missing" asks Ancestris to approximate the birth date to the baptism date, when no birth date is available. Otherwise, birth date is left blank.
- For example for displaying the root person in the title bar of the dynamic tree.
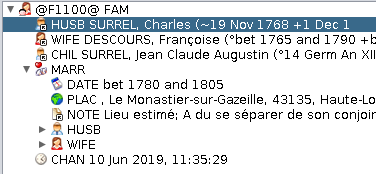
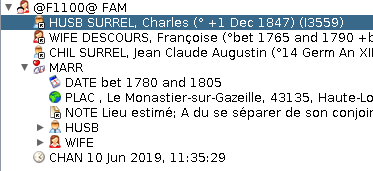
- Or for related persons (ex: husband) in the GEDCOM editor.
Here are two examples, the first with the display of the root person in the tree, the other one with the display of the husband in the Gedcom editor.
|
Case of "Use Christening is birth is missing" set to 'no': Birth date is left blank |
Case of "Use Christening is birth is missing" set to 'yes': Birth date is approximated (~) to baptism date |
 |
|
|
|
 |

The checkbox "Use Burial if death is missing" asks Ancestris to approximate the death date to the burial date, when no death date is available. Otherwise, death date is left blank.
Privacy
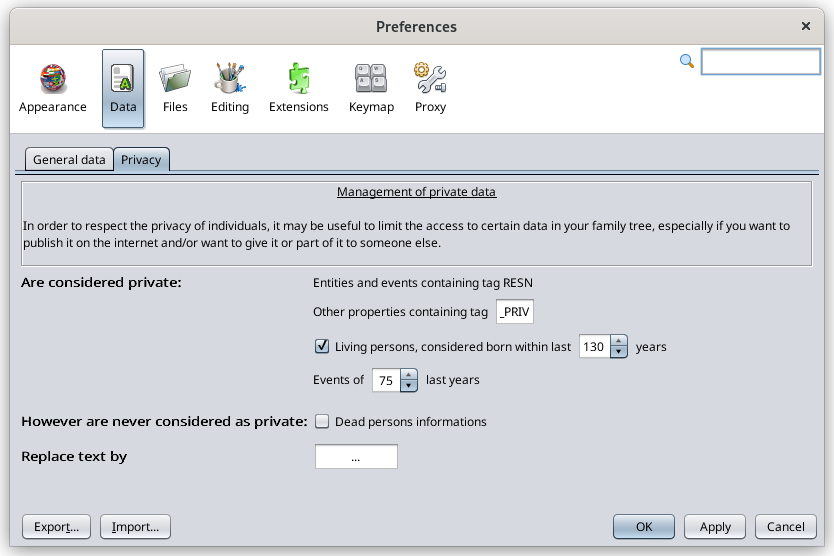
The Private tab helps you define your preferences when sharing your data with other genealogists, or for publication on the Internet.
You decide what confidential data you want to protect.
- Are considered private: any entity or property falling under the following 3 conditions
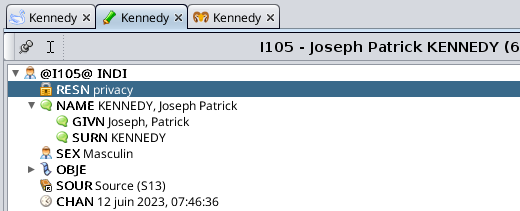
- Properties containing TAG RESN or _PRIV : all entities or properties containing the tag you specify will be considered private. '_PRIV' is the default suggestion for properties where RESN is not allowed.
- In the Gedcom editor, it will appear like this:
- In the Gedcom editor, it will appear like this:
- Living persons : all individuals born in the last number of years you specifiy will be considered private.
- Events of last 'n' years: all these events, but not necessarily the entities they belong to, will be considered private.
- Properties containing TAG RESN or _PRIV : all entities or properties containing the tag you specify will be considered private. '_PRIV' is the default suggestion for properties where RESN is not allowed.
- However are never considered as private: dead person information : check this box if you are ok to display deceased person's information.
- Replace text by is the string to display for private date instead of the real information. '...' is the default suggestion.
Files
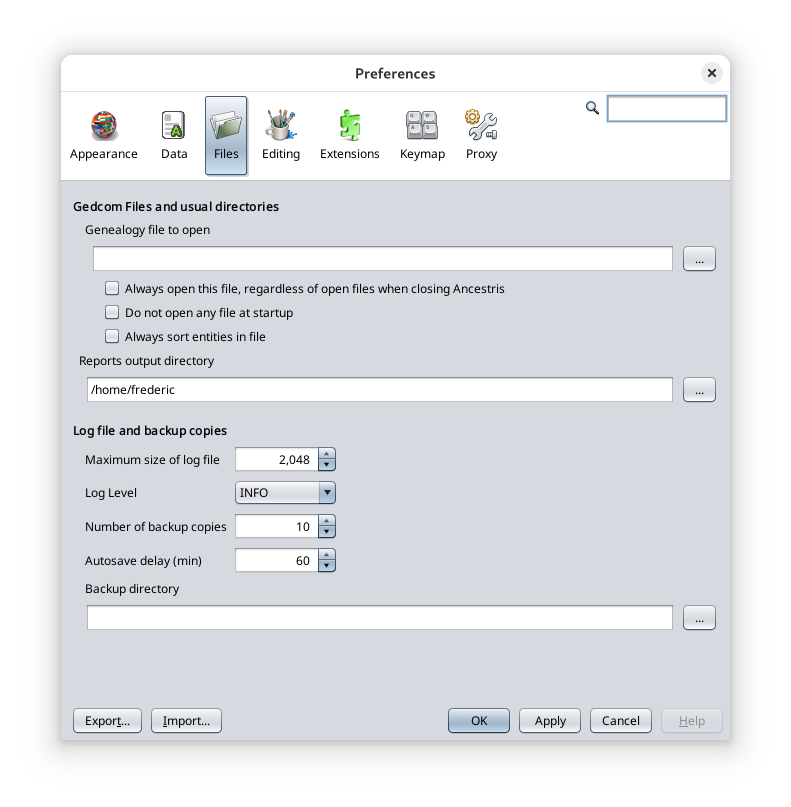
Gedcom files and usual directories
Ancestris offers the possibility to define a main genealogical file that you use most often. This file can then be opened using the Open <Default File> action in the File menu. You define it in the first text field Genealogy file to open.
Also, by default, when Ancestris starts up, it opens the last genealogical files that was open when Ancestris last closed.
The two checkboxes modify this behavior.
- The Always open this file regardless of open files when closing Ancestris check box forces Ancestris to open the default file at start up.
- The Do not open any files at startup check box tells Ancestris not to open any files at startup.
- The Always sort entities in file check box tells Ancestris to sort entities by entity type and then by identifiers.
The following setting is the Reports output directory. This is the directory where Ancestris will save user reports or error reports.
Log file and backup copies
Maximum size of log file limits the size of the log file. If the maximum size is reached, the log does starts removing the top lines.
Log Level tells Ancestris the level of details of the information to be collected by the log file. The more it is towards "SEVERE", the less it is detailed. The more it is towards "ALL", the more it is detailed. Be careful, the more detailed it is, the more it slows down your use since everything that happens in the software will be noted.
Number of backup copies defines the number of saved copies to keep for security reasons, in addition to the latest version. The name of each backup file is the same as the name of the main file, completed with the date and time of the recording. For example, if the number of backup copies is 3, each recording (Save action on the File menu, or <Ctrl-S>) will delete the oldest backup copy and keep four copies of the current genealogy: the most recent, plus the previous three copies with their timestamp.
Autosave delay defines the delay in minutes when Ancestris will automatically save your changes on disk. It is set to 60 minutes by default.
Backup directory defines the directory where Ancestris will create the backup files.
Editing
This panel define your preferences when editing genealogical information or when using the editors.
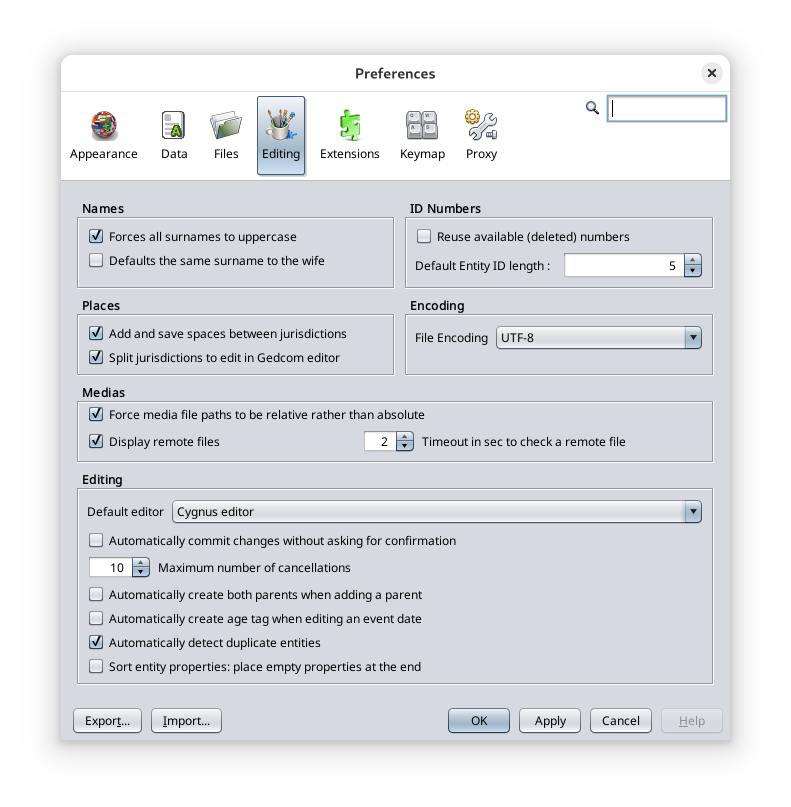
Names
These options relate to the names of individuals.
Forces all lastnames in uppercase converts a surname into uppercase when validating the entry.
Defaults the same lastname to the wife assigns the child's lastname to both parents when creating them.
Tag used to read given name defines the tag to use when reading the gedcom file, to get the common first name. The default tag is NICK.
Places
This option defines places jurisdictions display preferences. It includes two items.
Add and save spaces between jurisdictions: for better visibility, a space is added after each comma separating the various place jurisdictions.
Split jurisdictions to edit in Gedcom editor: separates the places jurisdictions when editing them in the Gedcom Editor.
- Example: Box unchecked. Places are not split.

- Box checked. Places are split.
Medias
This option relates to the path of media files.
Force media file paths to be relative rather than absolute forces the path of the media files located in or underneath the directory of the Gedcom file to be relative, even if they are entered as absolute. File paths of the other files will be unchanged.
Attention:
- The change to relative format occurs both when modifying a file path and when saving the Gedcom file. Thus, if the indicator is checked to ‘Force’, absolute paths will be changed to relative paths if the files are relative to the Gedcom.
- The concept of relative must be understood in a natural sense; symbolic links do not allow a path to be converted to relative.
This option is not reversible: disabling the option does not restore the paths to absolute values. To restore a path to absolute value, you must disable the option and reselect the file from its directory.
You can choose not to use this option and define relative paths yourself if you want to use symbolic links.
Check remote files allows Ancestris to check all remote files existence when editing them or when loading the Gedcom file or scanning files. It might slow down response times when too many files are remote in particular if some no longer exist. To avoid this, uncheck this box and remote files existence will not be checked.
Please note that when a remote file image needs to be displayed, its existence will necessarily be checked then, regardless of this setting.
Timeout is the number of seconds to wait when checking one single remote file. If the file can be checked in less time, the test will be positive. If after this amount of seconds the test cannot be successful, the file will be considered unfound. For archive web sites with slow response time, it will be necessary to increase that number.
ID Numbers
This option defines preferences for the ID number format of entities.
Reuse available (deleted) numbers: forces Ancestris to reuse earlier ID numbers that have been made available when their corresponding entities have been deleted.
Default Entity ID length: sets the number of digits for ID numbers.
Encoding
This option deals with the encoding of the file saved on disk. It is a technical parameter that defines the character table used to save the file.
File Encoding selects the character table. It is recommended to encode with the UTF-8 table.
Editing
These options deal with the behavior of the editors.
Default editor defines the editor to use by default, in particular through the context menu action named 'Edit/Modify'.
Automatically commit changes without asking for confirmation spares you from confirming with the OK button all changes you make. Regardless of this setting, for security reason, the Delete action confirmation will remain.
Maximum number of cancellations is the maximum number of changes that can be undone using the Ctrl + Z key or the Undo button on the Toolbar.
Automatically create both parents when adding a parent adds the placeholders of both parents when creating an individual's parent.
Automatically create age tag when editing an event date adds the age tag and calculate the age if the date of the event is changed. If the birth date or the christening date is changed, it recalculates all event ages for the individual.
Automatically detect duplicate individuals detects duplicate individuals each time you edit an individual. An individual can indeed become a duplicate when you change their date of birth, name, etc. even though this was not a duplicate initially.
When saving your changes to the person, Ancestris checks with the criteria defined in the Merge duplicates tool if a duplicate exists.
If a duplicate is found, it means that two entities are similar. You can then either merge them, ignore this detection, or declare it as a non-duplicate. If this duplicate is ignored, it may be detected again on the next update. If declared as non-duplicate, this pair of entities will no longer be detected as a duplicate.
Sort entity properties : place empty properties at the end places the empty properties last when sorting properties in entities.
Automatically validate entity with consistencies tests launch consistencies tests from the tool Validate Gedcom compliance and data consistency each times you save an entity with Aries or Gedcom editor (The tests are always launched with Cygnus editor)
Extensions
This panel defines the preferences of some extensions, also called modules. Each tab underneath represents a different module.
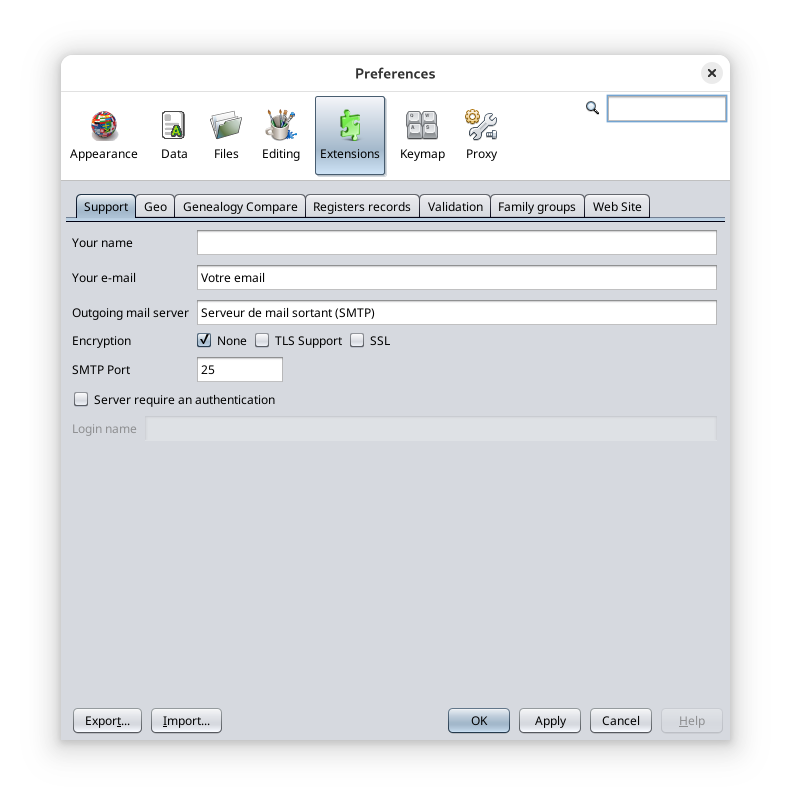
The settings for each extension are described in the Customization section of the corresponding module documentation page.
Proxy
This panel deals with the Internet proxy connection settings.
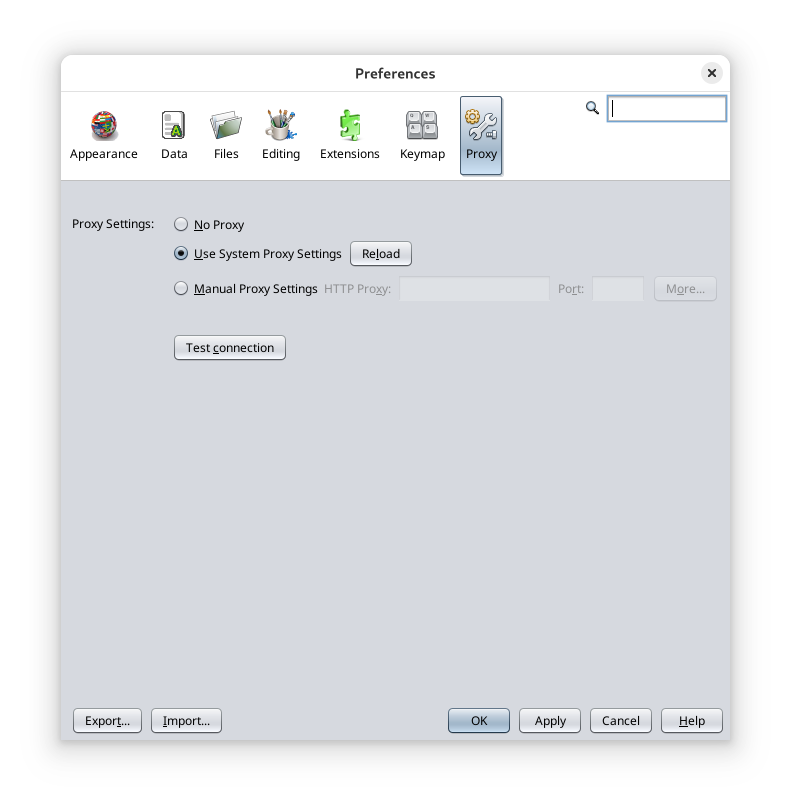
- First option: No proxy.
- Second option: Use System Proxy Settings. This is the default setting for automatic detection.
- Third option: Manual Proxy Settings. You will need to specify the proxy address.
The Test connection button allows you to check whether the connection has been correctly configured.
Keymap
This panel defines Ancestris keyboard shortcuts.
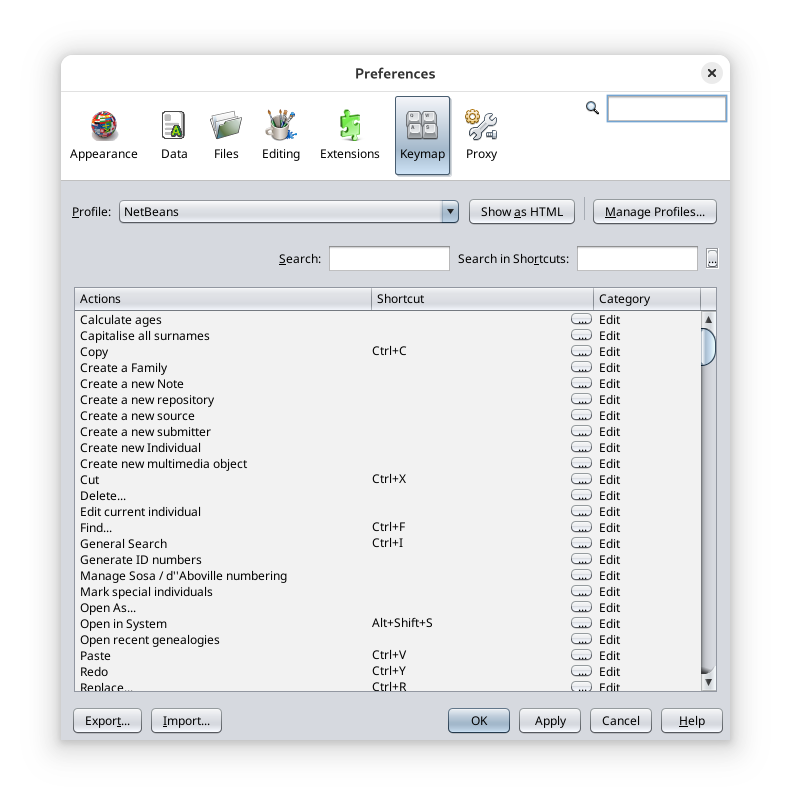
Profile selects one of the saved profiles. 'NetBeans' is the default profile.
The Show as HTML button opens your browser with the table of keyboard shortcuts. Very handy if you want to print them.
The Manage profiles button allows you to assign different shortcuts to different profiles. The window that opens to manage profiles contains several buttons.
- Duplicate creates a copy of the selected profile
- Restore Defaults restores the original content of the selected profile
- Delete deletes the selected profile
- Export copies the contents of the selected profile to an xml file
- Import creates a new profile from an xml file
- Close closes the Manage Profiles window
- Help opens help for this window (button currently unavailable)
Search allows you to filter the list of shortcuts according to their action.
Search in shortcuts filters the list of shortcuts, depending on a key used.
Shortcuts list
Each line represents the possible association between an action and a shortcut.
The Actions column lists the different actions of Ancestris.
The Shortcut column indicates the keyboard shortcut for the action when it exists
To the right of each cell, there is a button [...] which opens a context menu containing the following actions.
- Edit allows you to add a key combination or modify an already defined one
- Add Alternative (which is available only when the cell is filled in) allows to add another shortcut to the same action
- Reset to Default resets the shortcut defined during the installation of Ancestris
- Clear removes the shortcut
The Category column indicates the category to which the associated command belongs.
Export and Import Preferences
Remember that if you want to have the same Ancestris preferences on several computers, you must first export your configuration from the source computer and then import it on the destination computer.
It is also possible to make a copy of the .ancestris directory. See File configuration.
One click on the export button and you select the options you want to export.

You then indicate the file in which the selected options will be saved. This is a file in ZIP format.
Windows
Ancestris lets you save windows positions and sizes for each genealogy or for all.
This panel can be accessed from the Options/Save display settings... menu.
Principles
Scope of these window settings
Window settings define three window elements:
- the windows that automatically open for a genealogy,
- their position,
- and their size.
Whatever you define within each window depends on the specific view setting and does not apply to this page.
Reversely, whatever you do with the actions within this page does not alter individual window configuration within a window.
Three levels of windows Settings
Three levels of window settings have been defined for Ancestris.
Per genealogy
This level memorizes a specific opening/position/size configuration for a given genealogy.
Each genealogy can have its own settings.
These settings are either saved every time you close a genealogy, or when you chose the first action from the Window settings panel.
User-defined default
This level defines a general opening/position/size configuration that will apply to all genealogies, provided they do not have their own settings.
If you open a genealogy for the first time, it will open using this user-defined window settings if it exists, or the Ancestris default otherwise.
If you open a genealogy which already has its own window settings, you can erase it and the user-defined one will then apply if is exists, otherwise the Ancestris default will apply.
Ancestris default
This level if the default configuration if no other configuration has been defined. This is the configuration that is visible the first time you open Ancestris.
By default, only two views are open, the Tree view on the left hand side and the default editor on the right hand side.
Description
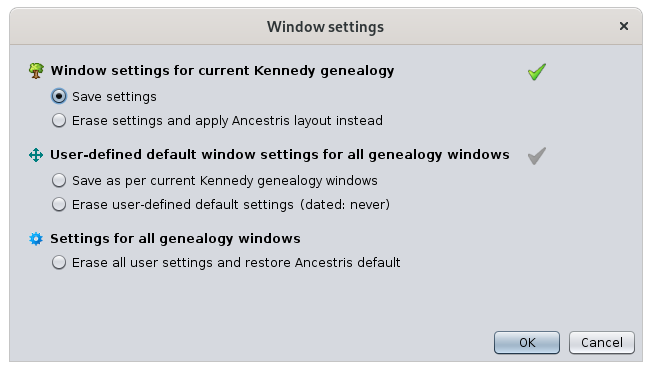
The Window settings panel shows the three levels described above and for each of the first two, you can save it or erase it.
Save settings
Saves window positions as they are currently displayed, only for the currently selected genealogy.
Closing the genealogy will also save window settings.
Erase settings and apply user-defined layout / Ancestris layout instead
Erases window settings for the current genealogy.
This will reposition the windows to your user-defined window setting or the Ancestris default window settings otherwise.
Ancestris will ask you if the current genealogy can be closed and reopen in order to apply the change.
Save as per current genealogy windows
Saves current window settings and defines them as the default settings when you open a new genealogy or reset its window settings.
Erase user-defined default settings
Erases your user-defined default window settings.
Erase all user settings and restore Ancestris default
Erases all window settings. Display settings inside each window will be kept.
Ancestris will need to close each open genealogy and restart. Ancestris will ask you for permission.
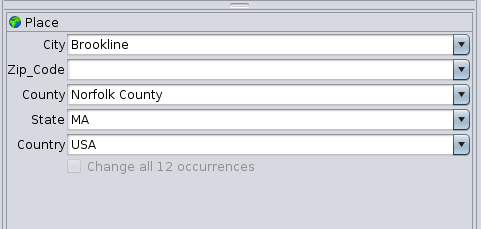
Set mark
You know if a window setting has been defined for a given level by looking at the green tick mark on the right hand side of the panel:  . The panel at the top of the page shows that a window setting has been defined for the Kennedy genealogy, but none has been defined for all genealogies.
Usage
The main purpose of the window setting panel is to let you save or erase window settings.
The above actions are pretty self-explanatory if you have one of thee above needs.
Here is an example of a need that is not directly visible through the actions above. It can be achieved using the actions described above.
If you want to reset a genealogy to Ancestris default settings even though you have defined a user-defined window setting
If you are happy to erase the user-defined window settings:
- first erase them,
- and then erase the genealogy ones.
If you would like to keep your user-defined window settings, you would have to use an intermediary genealogy to hold your user-defined window settings to recover them later
- Open any other genealogy. It will open using your user-defined window settings. Or else, erase its specific window settings. This other genealogy will hold the desired window settings that you want to keep.
- Erase user-defined window settings
- Select your initial genealogy
- Erase its specific window setting. It will apply the Ancestris default as desired.
- Select the other genealogy and save user-defined window setting.
Of course this is a rather unusual need and this method may sound like a complex workaround.
The purpose through this example is to show you a general way to keep any given window setting as long as you have a genealogy to hold it.
Blueprints
A blueprint is description used to customize the display of an entity in certain views of Ancestris.
Views using blueprints
Only the following views use blueprints. For each of them, an example shows what the blueprints could look like.
Dynamic tree
The Dynamic Tree uses blueprints for individuals and families. Blueprints are the areas displayed inside the coloured frames.

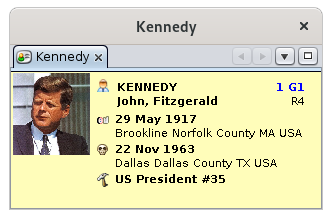
Entity card
The Entity Card uses blueprints for all categories of entities.
Blueprints can be reused for several views. Here, the blueprint used for individuals in the dynamic tree is used inside the Entity card.
Extended navigator
Below are blueprints used for the individuals of the selected couple. You may notice that they are not the same. The spouse blueprint does not display the Sosa number and displays the entity number above the name.
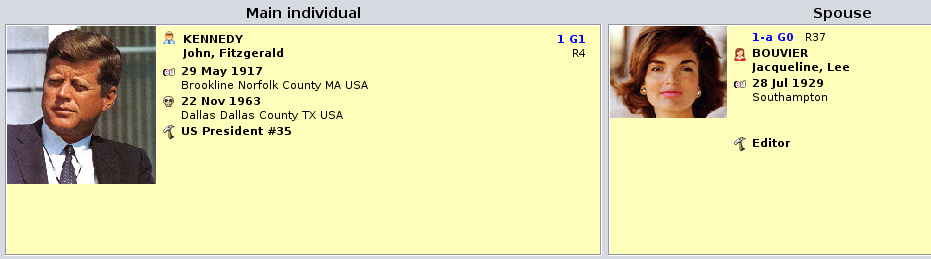
And this is a blueprint for each child of the selected family.

Gedcom editor
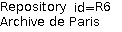
The Gedcom Editor uses blueprints in its lower part for all entity categories.
As for the entity card, the Gedcom Editor uses blueprints for individuals or families, but also for other entities.
For example here is a simple blueprint of a Repository entity.
Or a simple blueprint of a Multimedia entity.
Now that you have seen what blueprints look like and where they are used, let us see how they work.
General principles
A blueprint is a template defining what to display of an entity, and how to display it.
A blueprint is assigned to a given entity category (individual, family, source, etc.) for a given view (Dynamic tree, Entity file, etc.).
You can define your own blueprints rather than using the ones already provided within Ancestris.
Several blueprints exist within Ancestris and are already selected by default for each of the entity categories, and in each view where blueprints apply.
Blueprints constitute a way to customize Ancestris. You are free to keep blueprints as they are or modify them to your needs.
You can define your own blueprints, i.e. both the information to display for an individual or a family (name, address, etc.) and how to display this information (colour, font, alignment, layout, etc.).
If you want to make some changes to the available blueprints, you will need to learn a little more about them. This is the subject of the following sections in this page.
Technically, a blueprint is a piece of HTML code written into a file located on your disk. Refer to the paragraph Directory containing blueprints files for more information.
Managing blueprints
Managing blueprints consists in performing two types of activities.
- assign blueprints to entities and views
- build your own blueprints or delete them
This is done using the Blueprint window.
The Blueprint window manages the blueprints for one category of entity at a time.
The window is the same regardless of the category of entity, but it only contains blueprints attached to the given category of entity.
To access the Blueprint window for a given entity category, you must use the Ancestris context menu from an entity of the corresponding entity.
- Right-click on an individual in the Entity card view, then select "Change display of individuals" to open the Blueprint window for individual.
- Right-click on a family in the Entity card view, then select "Change display of families" to open the Blueprint window for families.
- Ditto for Notes, Sources, Multimedia, Repositories, etc. This can be done from the Entity card or the Gedcom Editor for the corresponding entities.
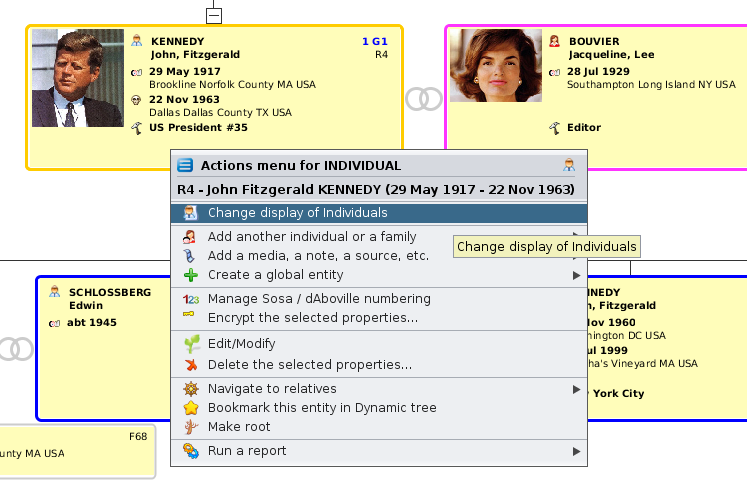
Here is how to access the Blueprint window for individuals, from the Entity card, Contextual menu by right-clicking, then choose "Change display of individuals".
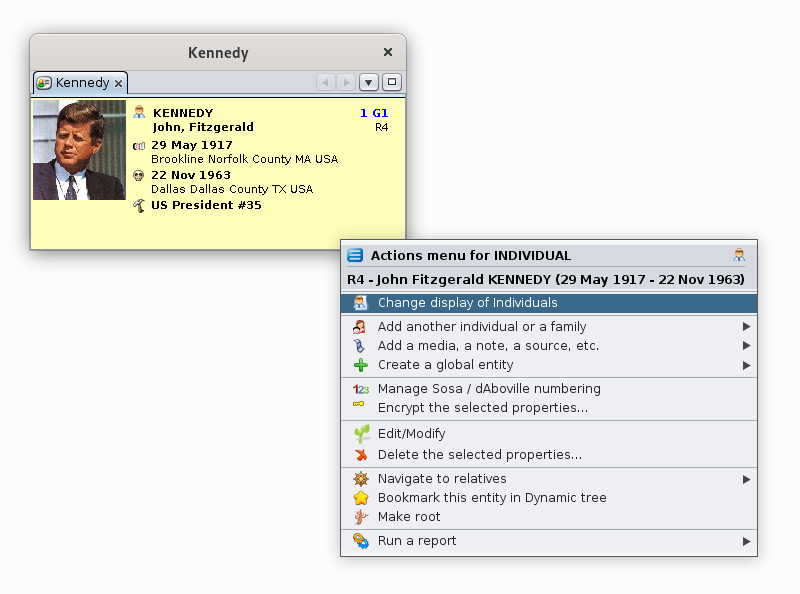
The Blueprint window for Individuals appears.
Whatever the category of entity, the operations in this window are the same. We will use the example of the Blueprint window for individuals in the description that follows.
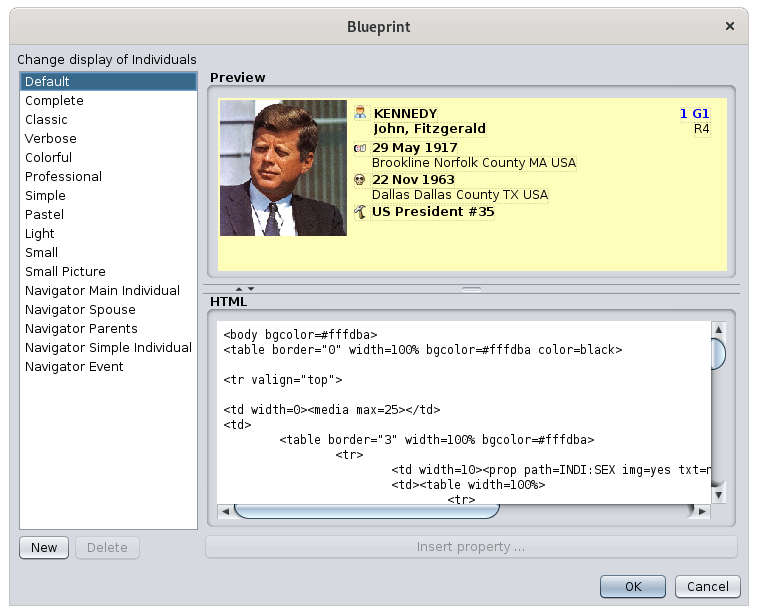
Description
The Blueprint window contains the following areas.
- The list of blueprints on the left shows the blueprints currently available for the previously selected entity category. To work on a blueprint, select it from the list.
- The preview area at the top right shows a preview of the blueprint selected in the list.
- The HTML editor at the bottom right displays the HTML code of the blueprint selected in the list on the left, and where you can edit the code. The horizontal separator bar under the preview area must be dragged up with the mouse to see the code below.
- Meaning of the buttons:
The Blueprint window size can be changed by pulling the lower right corner.
The preview area and the Text Editor area can be adjusted by moving the separator of these two areas with the mouse or by clicking on the arrows of the separator on the left:

Usage
The Blueprint window covers the following needs:
- Discover the available blueprints. To discover the available blueprints without activating them (therefore, without closing the panel), click successively on each of them in the left-hand side list, and check the result in the preview area.
- Choose a different blueprint. To assign another blueprint to the currently selected entity category in one of the views, click a blueprint in the list, then validate by pressing the OK button.
- Modify a blueprint. For security reasons, the blueprints already available cannot be modified. To modify an existing blueprint, you must first make a copy of it. Select it in the list, click New and give it a new name. Then use the HTML editor panel to make your changes.
-
Create a blueprint. To create a new blueprint, it is recommended to copy an existing one. See above.
-
Delete a blueprint. To delete a blueprint, select it in the list and click the Delete button. You are then asked to confirm the deletion which will be final. Note: for security reasons, blueprints provided with Ancestris cannot be deleted.
Case study
Suppose we have a simple blueprint without a photo for the individuals in the dynamic tree, and we want to insert a photo. The steps to do this would be the following:
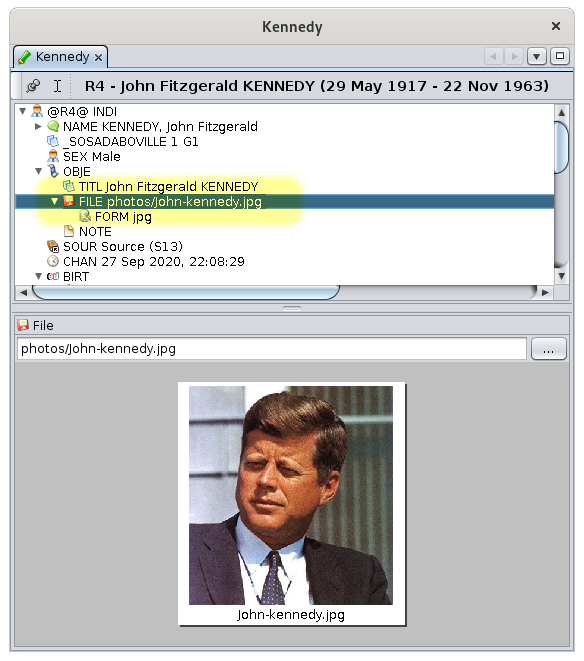
- Identify where the photo data item is inside the data of the individual. Use the Gedcom editor for that.
- Open the Blueprint window for individuals
- Create a new blueprint by copying 'simple blueprint' without image. Rename it 'MyBlueprint-Indi-Tree'
- Modify the blueprint to insert the photo property identified above, and adjust its size in the frame using the preview
- Save the blueprint and check the result
Each of these steps is detailed below.
Identify where the photo data item is
The Gedcom editor will show you where the photo items are located for all individuals. We see below that the photo is located in the FILE tag, attached to the OBJE tag, which itself is attached to the INDI tag. All together, you will need to remember that photo files are at the address 'INDI:OBJE:FILE'. That is what we wanted to know.
Open the Blueprint window for individuals
As we want to change the blueprint for Individuals in the Dynamic view, we need to first select an individual in the Dynamic view.
Then we right-click on the individual. In the context menu that appears, we choose "Change display of individuals".
Create a new blueprint
The Blueprint window for Individuals appears.
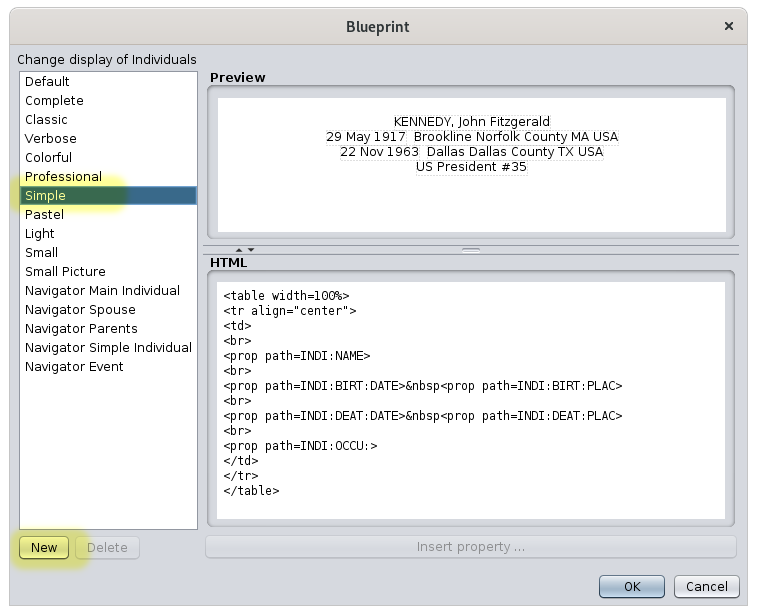
As we want to make a new blueprint as an extension of the "Simple" blueprint, we first make a copy of the "Simple" Blueprint.
To do so, we select it in the list. Then in the preview, we see what this Blueprint displays for an individual : simple text without a photo. What we want to do is to add the photo of the individual.
We then click "New". Ancestris asks the name of the new blueprint:

We type 'MyBlueprint-Indi-Tree' and press OK.
We are then on the previous Blueprint window with a new editable blueprint.
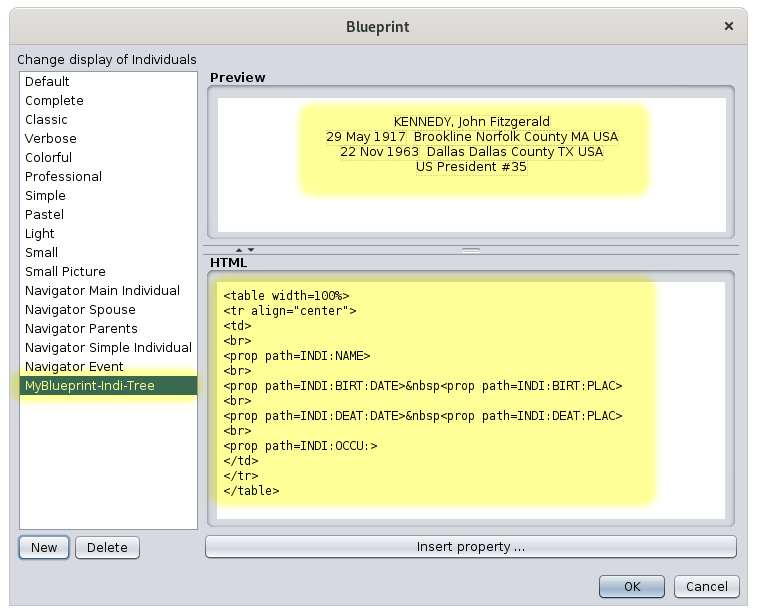
We have the new blueprint selected in the list on the left, the same preview at the top right, and the HTML code at the bottom right.
We see that this blueprint is editable, because the buttons "Delete" and "Insert property..." are visible and enabled.
We will now change the HTML code so that it displays the photo.
Modify the blueprint
We can see that there are 4 lines of properties in the HTML code: name, birth, death, occupation.
The HTML <prop> tag, and everything in it, is Ancestris specific. This makes it possible to manipulate the genealogical data of the Gedcom file.
We want to put the photo at the bottom of the display, so we insert another property, the one identified above, INDI:OBJE:FILE, after the 4 properties already showing.
We place the cursor under </table>, the label that marks the end of a table.
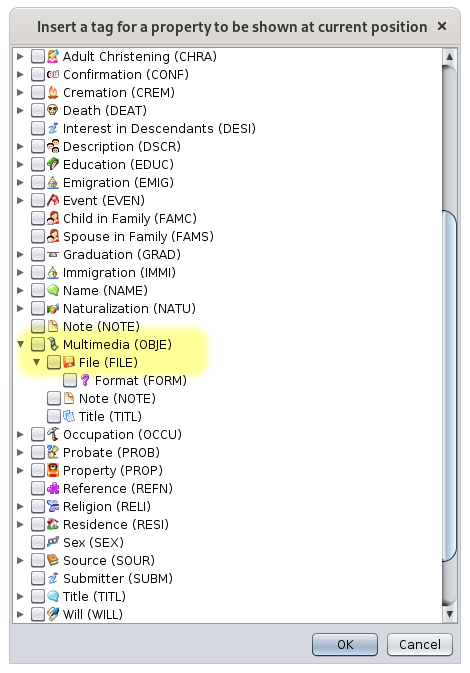
In this window, we find the Multimedia OBJE line, we unfold the flap to show the content of OBJE, and we see the line File. We check the box. And we press "OK".
We now see that the preview has changed.

But that's not finished yet, because in the preview you can see that the photo is too big. And we changed our mind as well. We want to position the photo at the top right corner of the text.
As the text was structured inside a table, it is in fact necessary to put the image in the table, to the right of the text. To do this, we modify the HTML code as follows: we move the line that we have just inserted in the table structure by adding a cell using the <td> </td> tags.
As we also want to limit the size of the image, we add an Ancestris specificity: we add "max = 20" at the end, inside the <prop ...> tag, which means to limit the photo size at 20% of the available width. The preview changes as you change the code. This is handy and immediately lets you see if what you are doing is right. Once the code has changed, the preview looks correct, and the window looks like this.
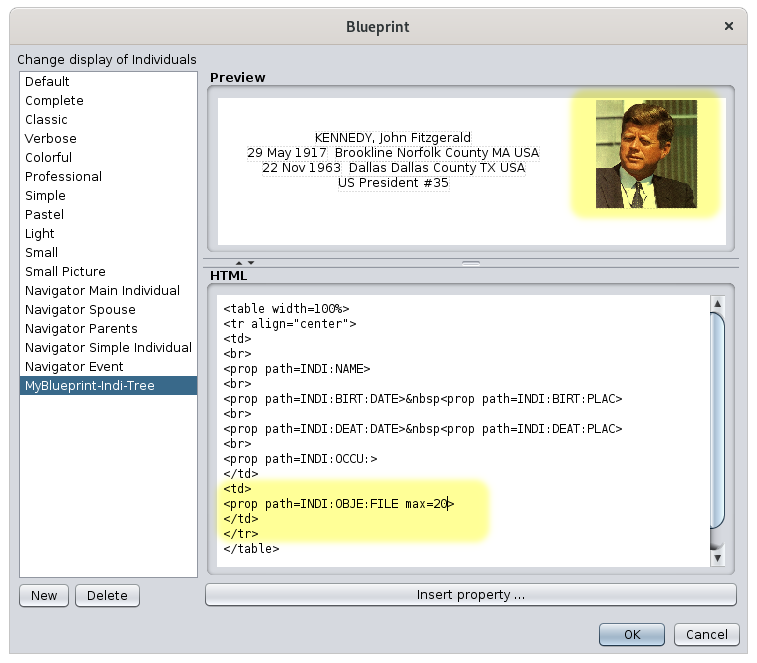
The code in yellow does its job: the photo is in a cell on the right of the table and limited to 20% of the width.
Save the blueprint and check the result
We can save our work now. We click on OK and we look at the dynamic tree at the same time. The blueprint changes.

It's good, we have what we wanted!
Going further
Of course, the hardest part therefore remains to know HTML on one hand, and to know the specificities added by Ancestris to handle genealogical data on the other hand.
As far as HTML language is concerned, there are many sites to help you. Please refer to them.
Regarding Ancestris specificities, the tags added to the HTML are:
- <prop> or <ifvalue>
- <name> or <i18n>
- <media>
- <mark>
The following sections describe how to manipulate them.
<prop> or <ifvalue> tags
<prop | ifvalue path="path:to:prop[?i][:end:of:prop]" [default="path:to:other:prop"] [format="format"] [max="n"] [length="n"] [img="yes"] [txt="no"] [underline="yes"]>
Displays the property of the entity defined by the path. If a default path is also specified, it is the one that is used if the first property is not found.
For multiple properties, a rank can be indicated in the path using "?i" where i is the rank of the property. Following this number, the rest of the path can be provided if any. See example below with the occupations.
The format, length and max parameters are explained below.
The img parameter can be set to 'yes' or 'no' to display the property's icon. By default, it is 'no'.
The txt parameter can be set to 'yes' or 'no' to display the property name or not. Default is 'yes'.
The underline parameter can be set to 'yes' or 'no' to underline the property's text. By default, it is 'no'.
Parameters in square brackets are optional.
Either 'prop' or 'ifvalue' can be used.
Case of names (NAME property)
To customize the display of the name, you can use the name sub-properties.
Example : <prop path=INDI:NAME > a.k.a <prop path=INDI:NAME:NICK> will display the full name and the nick name.
Example : John F. Kennedy a.k.a Jack
To add the nickname between parenthesis after the first appearance of NAME, add:
<prop path=INDI:NAME?1:NICK format="{($e}"><prop path=INDI:NAME?1:NICK><prop path=INDI:NAME?1:NICK format="{)$e}">
Case of places (PLAC property)
It is possible to force the level of jurisdictions that you want to see displayed for a place.
The syntax of the line to put in the HTML editor is of the following form
<prop path=INDI:BIRT:PLAC format="1 (4)">where 1 and 4 are the jurisdiction ranks in the Place criteria definition (see File/Properties).
Example: assuming that all our places follow the following format (as per the PLAC tag in the Gedcom file or in File/Properties):
Suburb, City, ZIP code, State, CountryStarting counting from the left at rank #0 : rank #1 is the City and rank #4 is the country.
In this case:
<prop path=INDI:BIRT:PLAC format="1 (4)">displays City (Country)<prop path=INDI:BIRT:PLAC format="1, 0">displays City, Suburb<prop path=INDI:BIRT:PLAC format="1, 3, 2 - 4">displays City, State, ZIP Code - Country
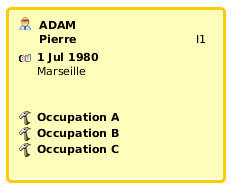
Case of a multiple property, such as occupations (OCCU property)
In the case of multiple properties, it is possible to force the rank of the property to be displayed.
The syntax of the line to put in the HTML editor is of the following form
<prop path=INDI:OCCU?2>This will display the second occupation of a person.
You can access to the last value with the LAST keyword. The last value can be the first of one person and the third for another one.
<prop path=INDI:OCCU?LAST >If you want to display the date of the second occupation of a person, the code would be the following:
<prop path=INDI:OCCU?2:DATE>It is therefore possible to display the first 5 occupations of every persons like this. In the Default blueprint, you would change the code and insert the 5 blocks like this:
<tr>
<td><prop path=INDI:OCCU?1 img=yes txt=no></td>
<td valign="top">
<b><prop path=INDI:OCCU?1 max=67></b> <br>
</td>
</tr>
<tr>
<td><prop path=INDI:OCCU?2 img=yes txt=no></td>
<td valign="top">
<b><prop path=INDI:OCCU?2 max=67></b> <br>
</td>
</tr>
<tr>
<td><prop path=INDI:OCCU?3 img=yes txt=no></td>
<td valign="top">
<b><prop path=INDI:OCCU?3 max=67></b> <br>
</td>
</tr>
<tr>
<td><prop path=INDI:OCCU?4 img=yes txt=no></td>
<td valign="top">
<b><prop path=INDI:OCCU?4 max=67></b> <br>
</td>
</tr>
<tr>
<td><prop path=INDI:OCCU?5 img=yes txt=no></td>
<td valign="top">
<b><prop path=INDI:OCCU?5 max=67></b> <br>
</td>
</tr>
For a person with 3 occupations, and using the code above, you would see the following in the tree view for instance:
Text formatting possibilities [format="format"]
This format only applies to monoline text.
format="$D": displays the full date of an event
- Example :
<prop path="INDI:BIRT" format="{$D}">displays 10 feb 1876 as the date of birth (BIRT)
- Example :
format="$y": displays the year of the date of an event
- Example :
<prop path="INDI:BIRT" format="{$y}">displays 1876
- Example :
format="$P": displays the full location of an event
- Example :
<prop path="INDI:BIRT" format="{$P}">displays Hyde Park,02136,Boston,Suffolk,Massachusetts,USA
- Example :
format="$p": displays the city of the event
- Example :
<prop path="INDI:BIRT" format="{$p}">displays Boston
- Example :
format="$n": displays the name of the related entity if it exists
- Example :
<prop path="INDI:CHR:XREF" format="{$n}">displays Marie STUART, the godmother of the event (CHR)
- Example :
format="$N": displays the full name of the related entity if it exists
- Example :
<prop path="INDI:CHR:XREF" format="{$N}">displays STUART, Marie (° 30 march 1909 + 16 December 2008) (I0298)
- Example :
format="$v": displays the type of related entity followed by the full name of the related entity
- Example :
<prop path="INDI:CHR:XREF" format="{$v}">displays Godmother : STUART, Marie (° 30 march 1909 + 16 December 2008) (I0298)
- Example :
format="$V": displays the entity number only
- Example :
<prop path="INDI:CHR:XREF" format="{$V}">displays I0298 if we use the same example as above - Example :
<prop path="INDI:BIRT:SOUR" format="{$V}">displays S134, the ID number of the SOURce entity supporting the BIRTh event
- Example :
format="text{$e}": displays the text "text" if the data exists, nothing otherwise.
- Example :
<prop path="INDI:NAME:SOUR" format="{(*)$e}">displays (*) if INDI:NAME:SOUR exists, nothing otherwise - Example:
<prop path=INDI:NAME:SPFX max=50><prop path=INDI:NAME:SPFX format=" {$e}"><prop path=INDI:NAME:SURN max=50> <prop path=INDI:NAME:NSFX max=50>displays surname prefix with a space in between but the space is only displayed if the surname prefix exists. In this example, note that the first 3 <prop> statements are plugged together without any space in between, while space can be always included between surname and suffix, because an ending space does not show anyway.
- Example :
max="n": limits the display to n% of the available width. Valid for an image or for text.
- Example :
<prop path="INDI:NAME" max=10">displays the full name truncated to 10% of the available width
- Example :
length="n": limits the display to n characters. Valid for a text.
- Example :
<prop path="INDI:NAME" length=10">displays the full name truncated to 10 characters.
- Example :
<media> tag
<media [path="path:to:media"] [max="n"]>
Displays the media of the entity. If a path is specified, the corresponding media is used, otherwise any first media found in the entity is displayed.
The "max" parameter limits the size in width as above.
Parameters in square brackets are optional.
<name> or <i18n> tag
<name|i18n [tag="tag"] [path="path:to:prop"] [entity="tag"] [underline="yes"] >
Displays the name of the label given by tag, path or entity.
One of the 3 attributes must be specified. tag takes precedence over path, which takes precedence over entity.
The underline parameter can be set to 'yes' or 'no' to underline the text. By default, it is 'no'.
Example:
<name tag="NAME">displays Name<name path="INDI:NAME">displays Name<name entity="SUBM">displays Submitter
<mark>
<mark path="path:to:prop" [test="value"] [repeat="n"] [default="path:to:other:prop"] [notpresent="true"] >
Displays a square marker on a blueprint.
The marker is only displayed if the indicated property (path) exists in the entity, and if the value of the property is the same as the value of the "test" attribute.
The repeat attribute is optional and specifies the number of times the marker should be repeated.
The default attribute is optional and allow to check this property if the property indicated by path doesn't exist.
The notpresent="true" parameter allow to display a marker only if the property doesn't exist.
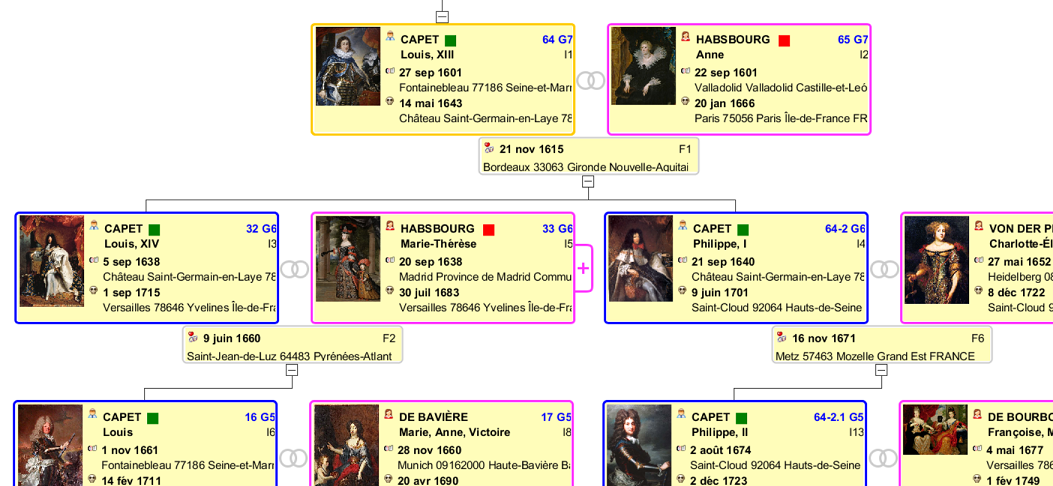
For instance, the following code displays a green marker for individuals whose name is CAPET, and a red marker for individuals whose name is HABSBOURG.
<font color=green><mark path=INDI:NAME:SURN test=CAPET></font>
<font color=red><mark path=INDI:NAME:SURN test=HABSBOURG></font>
This results in the following view in the dynamic tree for instance:
Another example . The following code displays 5 markers for individuals whose sex is unknown.
<mark path=INDI:SEX test=Unknown repeat=5>
<mark path=INDI:BIRT:SOUR notpresent="true"> : Displays a marker if no source is defined for the birth.
User example
Here is an example of marking provided by Sylvain, a user, to put a color marker depending on the source of an event.
<td width=0><table>
<font color=#38b020><mark path=INDI:BIRT:SOUR test="Acte de Baptême (S198)"></font>
<font color=#38b020><mark path=INDI:BIRT:SOUR test="Acte de Naissance (S199)"></font>

<font color=#3f81d1><mark path=INDI:BIRT:SOUR test="Acte de Baptême collatéral (S95)"></font>
<font color=#3f81d1><mark path=INDI:BIRT:SOUR test="Acte de Naissance collatéral (S500)"></font>
<font color=#3f81d1><mark path=INDI:BIRT:SOUR test="INSEE - Fichier des personnes décédées (S421)"></font>
<font color=#3f81d1><mark path=INDI:BIRT:SOUR test="Livret de Famille (S2)"></font>

<font color=#7326d1><mark path=INDI:BIRT:SOUR test="Relevé France Naissances/Baptêmes 1546-1896 FamilySearch (S411)"></font>
<font color=#7326d1><mark path=INDI:BIRT:SOUR test="Relevé Geneanet (S126)"></font>
<font color=#7326d1><mark path=INDI:BIRT:SOUR test="Relevé Généalogie en Corrèse (S252)"></font>
<font color=#7326d1><mark path=INDI:BIRT:SOUR test="Relevé Cercle Généalogique d'Alsace (S364)"></font>
<font color=#7326d1><mark path=INDI:BIRT:SOUR test="Relevé Allemagne Naissances/Baptêmes 1558-1898 FamilySearch (S657)"></font>
<font color=#7326d1><mark path=INDI:BIRT:SOUR test="Relevé Généalogie Entraire Recherche Côte d'Or (S657)"></font>
<font color=#7326d1><mark path=INDI:BIRT:SOUR test="Relevé Centre Généalogique de Haute-Marne (S725)"></font>

<font color=#ffa60d><mark path=INDI:BIRT:SOUR></font>

<font color=#ff053b><mark path=INDI:BIRT:DATE></font>
<font color=#ff053b><mark path=INDI:BIRT:PLAC></font>

<font color=black><mark path=INDI:BIRT:SOUR notpresent="true"></font>
</table></td>
This code puts a coloured marker for births whose source is filled in, with a different colour depending on the origin of the source, and a black marker otherwise.
Directory where blueprints files are stored
Blueprints are files of HTML codes that are stored in the User Directory, in a sub-directory called "ancestris/blueprints".
The blueprints directory itself contains several sub-directories, each of them having the title corresponding to the entity to which it applies: it is in each of these sub-directories that the different blueprints are located.
- INDI for blueprints about individuals
- FAM for blueprints about families
- OBJE for blueprints about multimedia objects
- NOTE for blueprints about notes
- SOUR for blueprints about sources
- SUBM for blueprints about submitters
- REPO for blueprints about repositoris
As these are HTML format files, you can open them with your favorite internet browser.
Tutorial
We have written a tutorial in PDF format. It is written in French. Please feel free to download it from here.
Extensions
Ancestris is a modular software where every major functionality resides in a module, also called an extension or a plugin. This is a great way to extend the possibilities of the software.
Most extensions are installed by default.
Those that are not installed by default are:
- Look and Feel: to change the look and feel of Ancestris interface
- Geneweb and CousinsgenWeb: French specific export tools
You can install or uninstall any extension at any time, including those installed by default.
Of course, if an extension is uninstalled, you cannot benefit from the corresponding functionalities.
The Extension Manager window is where you perform the corresponding operations.
Usage
The Extensions Manager window contains five tabs: Updates, Available Plugins, Downloaded, Installed, and Settings.
Each tab looks the same overall.
- the list of extensions on the left hand side
- a brief description of the extension on the right hand side
- action buttons at the bottom
Updates
The Updates tab displays a list of currently installed extensions for which there is an available update.
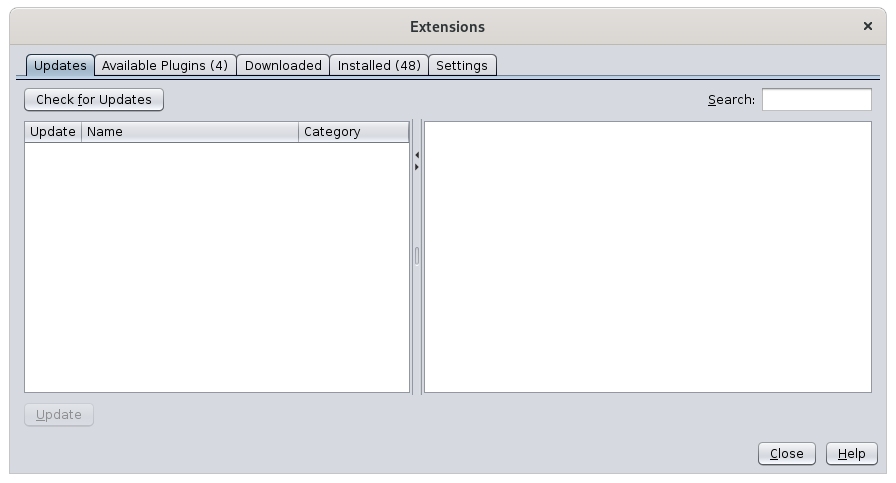
Each time you launch Ancestris, the application checks if there are any new updates for the currently installed extensions. When it finds any, it displays them in the left area. The Check for Updates button asks Ancestris to check for new updates.
The description of the selected extension is displayed on the right.
Select the extensions to update and click the Update button.
A wizard consisting of 3 successive panels will download the selected updated extensions, will ask you to accept that they are not signed, and will ask you if you want to restart Ancestris now or later.
Available Plugins
The Available Plugins tab lists the available extensions that you have not yet installed.
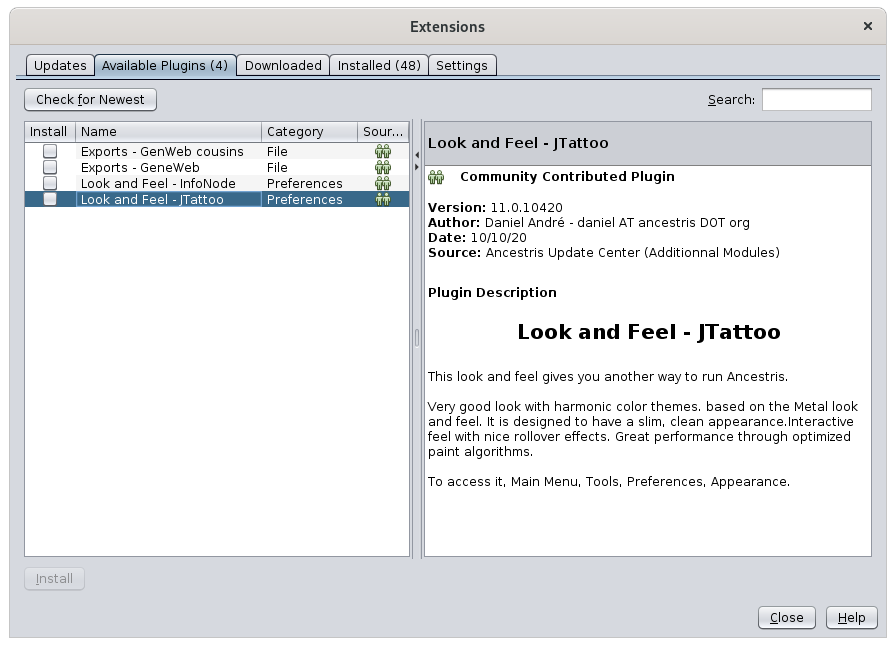
The number displayed in parentheses to the right of the tab title corresponds to the number of available extensions to install. These extensions not yet installed are listed in the left column: if you select one of them, its description appears on the right.
To install an extension, check the corresponding box and click on the Install button.
A wizard made up of 3 successive panels will download the checked extensions, ask you to accept the fact that they are not signed, and ask you if you want to restart Ancestris now or later.
Extensions will only be usable after restarting Ancestris.
Downloaded
The Downloaded tab allows you to manipulate extensions outside of the official Ancestris repository. You shouldn't need to use it.
These could be, for example, extensions that are in the development team's test phase, or that you could write yourself.
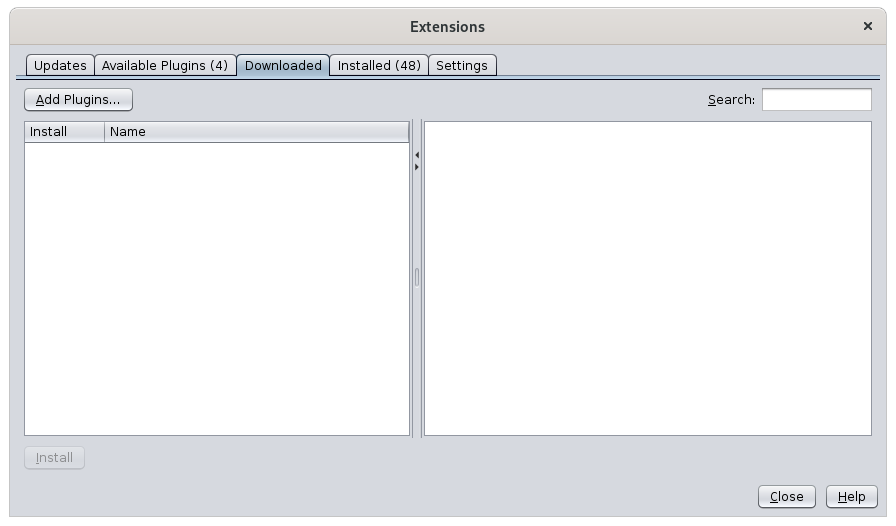
This tab allows in very rare cases to install an extension by hand instead of following the automatic process. This can happen if the internet connection is very slow or insufficient. In this case the support can tell you where to find the largest extensions - your browser could be more patient when downloading large extensions - and this is where they should be added.
To install an external extension, click on the Add extensions button and select it in the directory on your hard drive where it is located.
Once added, its name is displayed in the left column and is installed as before.
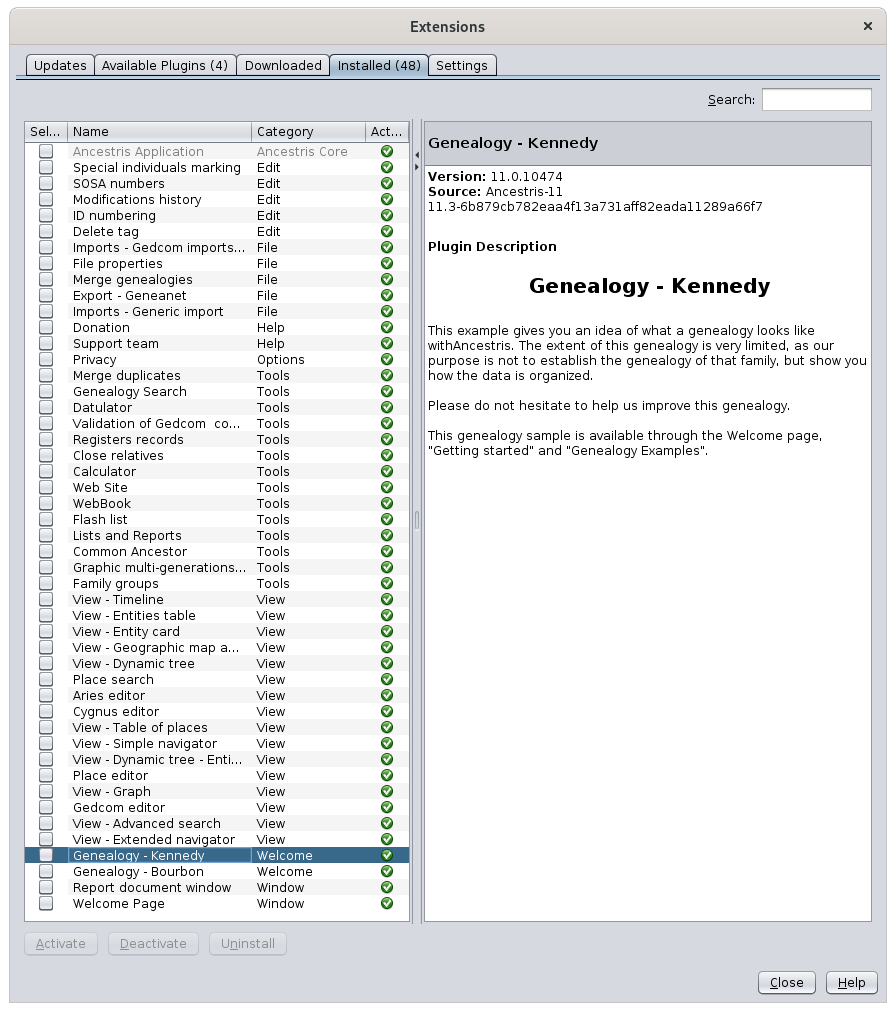
Installed
The Installed tab lists the extentions already installed.
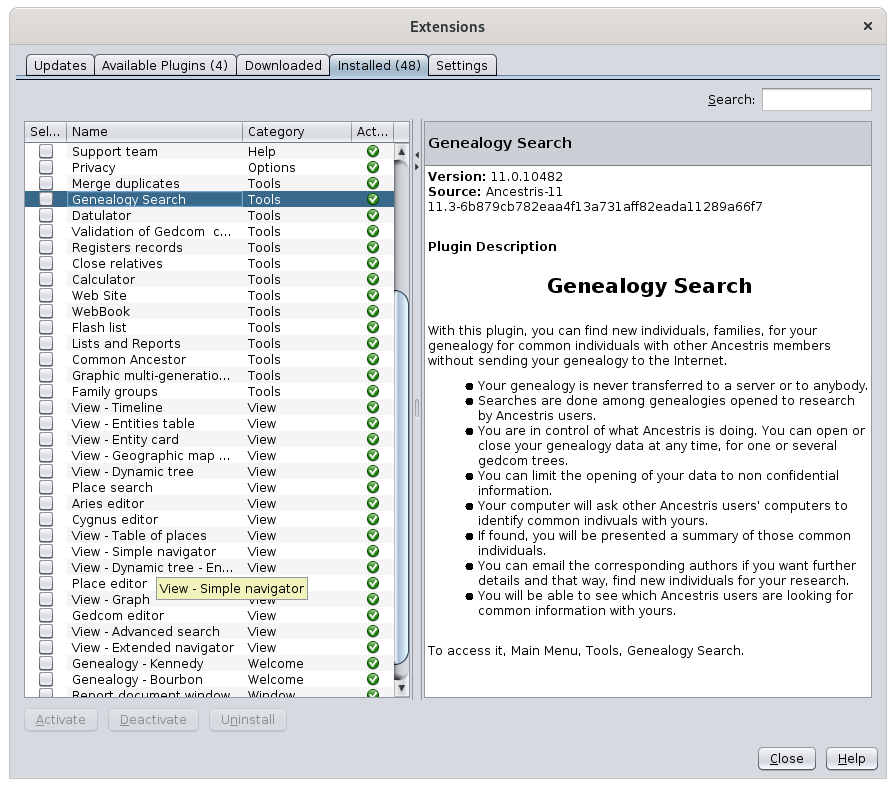
The left column lists all the extensions. The number of extensions is displayed in parentheses in the tab title.
The Active column displays whether or not each of them is activated. An active extension is associated with a green check mark at the end of the line.
Ancestris has extensions that are not visible to the user by default. Do not be surprised if some are unknown to you.
Disabling an extension makes it unusable in Ancestris.
Uninstalling it removes it from your hard drive as well.
To activate or deactivate an extension, check the corresponding box and click on the corresponding Activate or Deactivate button.
To uninstall an extension, press the Uninstall button.
Settings
The Settings tab allows you to choose how and when Ancestris should check for updates. We recommend you do not change those settings.
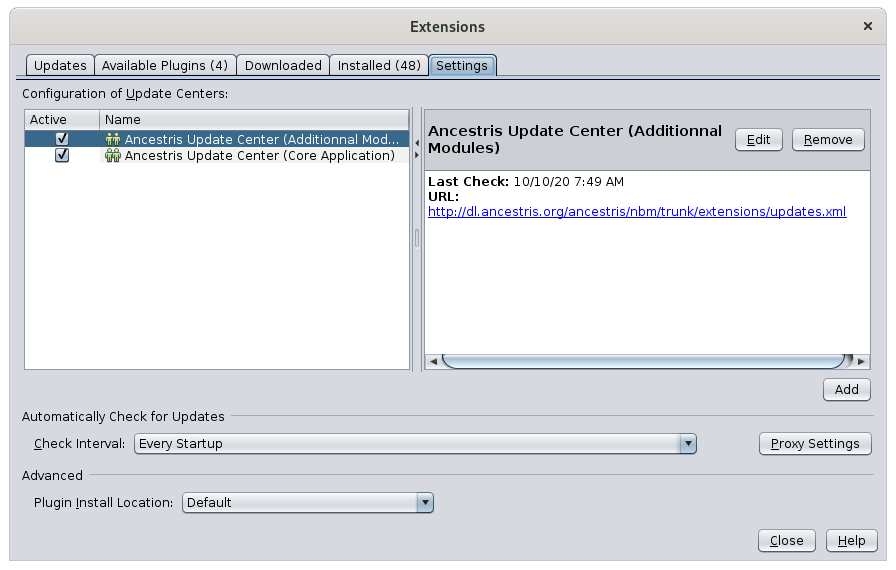
The left column lists all of the Ancestris update centres. You do not have to change anything here.
In the lower part of the tab, it is possible to select the check intervals for the updates.
If your computer is behind a proxy, you can change the connection settings by clicking on the Proxy settings button. In most cases, the default settings work fine.
Once you have made your choices, you will be asked to close and relaunch Ancestris for your changes to take effect.
Create an extension
If you want to start writing an extension, please check the Contribution page for instructions.