# Gedcom editor
The **Gedcom editor** is one of the three main editors of Ancestris.
[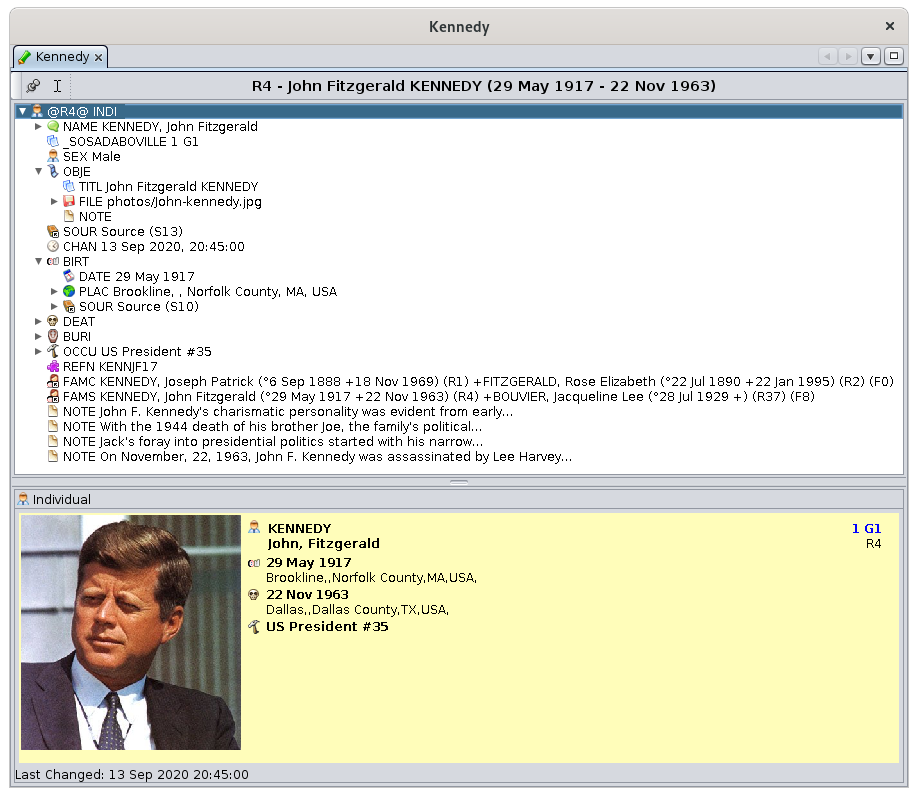](https://docs.ancestris.org/uploads/images/gallery/2020-09/en-gedcom.png)
The philosophy of the Gedcom editor comes from the will to be transparent and to be based on the way the [Gedcom standard](https://docs.ancestris.org/books/user-guide/page/gedcom "Gedcom standard") structures genealogical information.
Information transparency where the user sees 100% of the information stored in his genealogy, which makes it easy to store and control all of the data.
Willingness to comply 100% with the Gedcom standard for a better sustainability of ones work
The advantage is to have all the information for any entity in a structured form.
While both the Aries and Cygnus editors are visual and graphical, the Gedcom editor displays information in a text mode. This can be confusing for a beginner but it provides a lot of trust later on. This is because the Gedcom editor directly manipulates the hierarchical organization of the different entities in the Gedcom file using Gedcom labels and syntax.
It gives access to all the possibilities of the standard.
It displays only one entity at a time, from any [category](https://docs.ancestris.org/books/user-guide/page/entities "Entities") (individual, family, source, etc.). It allows you to modify the current entity (individual, family, etc.) as precisely as possible.
This makes it extremely simple to use, but requires time to adapt.
There is a solution for everyone, and Ancestris users often choose to use two main editors: Cygnus + Gedcom, or Aries + Gedcom. Some prefer to use only the Gedcom editor. Here is a comparison of the 3 editors if you still had to make a choice.
## Description
The Gedcom editor is divided horizontally into two areas.
- The upper area displays the tree structure of the different [properties](https://docs.ancestris.org/books/user-guide/page/properties "Properties") of the currently [selected entity](https://docs.ancestris.org/books/user-guide/page/relationships-between-windows#bkmrk-une-s%C3%A9rie-de-fen%C3%AAtre "Relationships between windows") and allows you to select one of them.
- The lower area displays the details of the property selected in the upper zone, for consultation or edition.
At the top of the editor there is a specific toolbar.
### Property Tree
The upper area displays a succession of lines, each of which corresponds to a property.
These different lines are organized in a tree-like manner: properties can depend on a superior property to describe its characteristics.
#### Tree structure
[In accordance with the Gedcom standard](https://docs.ancestris.org/books/user-guide/page/gedcom#bkmrk-le-niveau-z%C3%A9ro-de-ch "Gedcom structure"), the entity's main line is placed at the top of the list. It displays the reference containing its ID number, and the label corresponding to the category. All other lines depend on this main line.
It is imperative to make sure that each line keeps its place in the tree structure because each line:
- qualifies its higher level line. Example: birth qualifies an individual, date of birth qualifies a birth.
- potentially carries lower level lines. Example: birth is described by a date and a place.
- is in a particular order in relation to other lines of the same level and the same higher line. Example: the order of children for a family.
Horizontal and vertical scrollbars are displayed when necessary. However, in order to facilitate reading without having to use them, the tree structure is equipped with flaps allowing to show or hide certain properties. It goes without saying that hiding a line also hides the lines hierarchically below it.
#### Property Icons
For a better visibility, each beginning of a line in the tree displays the icon corresponding to the label associated with this line. Then follow the [tag](https://docs.ancestris.org/books/user-guide/page/tags "Tags") itself and its value.
If the icon has a navigation indicator like this : [](https://docs.ancestris.org/uploads/images/gallery/2020-04/entitelink.jpg), i.e. a small white square containing a short arrow pointing to the upper left corner, this means that the property is a link to another entity, and it can be double-clicked to display the related entity (individual, family, source, etc.).
For more details on the different icons associated with the properties, see the [Tags](https://docs.ancestris.org/books/user-guide/page/tags "Tags") page.
#### Italic properties
Some properties may appear in italic. These are properties that are not actually in the Gedcom file but are inferred when Ancestris opens the genealogy.
Example : you can see below that the GIVN label for the first name, and the SURN label for the last name, are in italic. They do not exist in the Gedcom file, but Ancestris derived them from the NAME label, which is in the Gedcom file.
[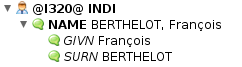](https://docs.ancestris.org/uploads/images/gallery/2022-01/en-italic-properties.png)
#### Unknown or misplaced properties
When the icon is a question mark, [](https://docs.ancestris.org/uploads/images/gallery/2020-04/questionmark.jpg)it means that the label of the property is unknown or misplaced in the tree structure, according to the Gedcom standard.
#### Invalid properties
When the icon is an warning sign [](https://docs.ancestris.org/uploads/images/gallery/2020-04/warning.jpg), it means that the value of the property is not valid, in accordance with the [Gedcom standard](https://docs.ancestris.org/books/user-guide/page/gedcom "Gedcom standard").
Anomalies are detected from criteria defined in the Ancestris preferences, Extension pane, Validation tab are only visible from the Cygnus editor.
In the following example, the date and place of death are invalid because their values are empty. Indeed, in the Gedcom standard, a line with a label cannot be without a value.
[](https://docs.ancestris.org/uploads/images/gallery/2020-04/anomalie.jpg)
#### Getting information on a property
When hovering over a line with the mouse, a tooltip appears describing what the property is used for.
In the following example, hovering over the line `PLAC Brookline, , Norfolk` displays this:
[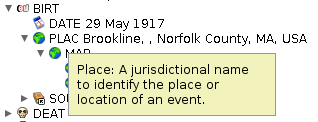](https://docs.ancestris.org/uploads/images/gallery/2020-09/en-gedcom-information.png)
### Details of the selected property
The lower area displays the details for viewing or changing the values of the property selected in the upper area.
It can display several elements:
- The description of the entity, via the [blueprint](https://docs.ancestris.org/books/user-guide/page/blueprints "Blueprints") corresponding to the type of entity
- The events of the individual's name to be entered on several fields
- A value to be entered for the type of event where it applies
- A date
- A small text to enter for a note
- The gender of an individual to be indicated among a given choice
- A multimedia file
- Etc.
The first line in the details area of the selected property is the name of this property, the [tag](https://docs.ancestris.org/books/user-guide/page/tags "Tags") name.
For example here, the property birth:
[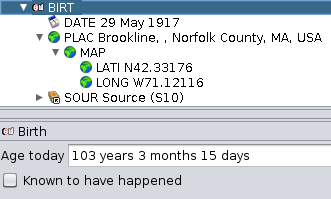](https://docs.ancestris.org/uploads/images/gallery/2020-09/en-gedcom-birth-detail.png)
When the selected property is a link to another entity, this first line is actually a button, as here for a link to its parents:
[](https://docs.ancestris.org/uploads/images/gallery/2020-09/en-gedcom-family-detail.png)
In this case, a click on the button selects the property in the related entity, the child in the parents' family in the example above.
A double-click in the lower area has the same effect.
### Toolbar
[](https://docs.ancestris.org/uploads/images/gallery/2020-09/en-gedcom-title.png)
The toolbar has a "**handle**" on the left hand side which allows to move it, and to put it in [vertical or horizontal position](https://docs.ancestris.org/books/user-guide/page/toolbar#bkmrk-personnalisation-de- "Toolbar"), on one of the sides of the window.
Then there is a **pin button** that can be in the raised or pressed position. This freezes the editor on the displayed entity when another entity is selected elsewhere in Ancestris.
The next button is the **cursor button**:
- When it is pressed, the selection of another entity in the editor will place the cursor directly in the relevant input field in the property detail. Example: click on the name (NAME), the cursor is placed on one of the fields of the name.
- Conversely, if the cursor button is not pressed, when selecting a property, the focus remains on the property tree and it is then possible to move there with the up and down keys of the keyboard for example.
Then the toolbar displays the full name of the selected individual.
## Usage
The main usage of the Gedcom editor is to visualise the entity data and to change it: you can select, navigate, add, move, copy or delete a property.
The actions to be carried out in the property details area at the bottom depend on the selected property: enter a place, date, simple value, etc. or modify the display [blueprint](https://docs.ancestris.org/books/user-guide/page/blueprints "Blueprints") of the entity.
### Selection of a property
The selection of a property line is done naturally by clicking on it.
The lower area instantly displays the details of the selected property, with a view to edit it, or simply to visualize it.
### Navigation to another entity
A navigation is possible in the Gedcom editor.
When a property line has a navigation icon [](https://docs.ancestris.org/uploads/images/gallery/2020-04/entitelink.jpg), a double-click on this line displays in the entity related to that property.
To return to the display of the previous entity, you can use the [navigation arrows in the toolbar](https://docs.ancestris.org/books/user-guide/page/navigation-bar "Navigation Bar").
### Adding a property
Adding a property can be done using the [Context Menu](https://docs.ancestris.org/books/user-guide/page/context-menu "Context Menu"), action **Add Property**, and selecting the label in the sub-menu that appears. The right click must be made on the line which is up one level in the hierarchically, so that the new entity will be attached to it.
When the sub-menu does not contain the property you are looking for, it is probably because it is not allowed there.
Some sub-properties are automatically added. When you need a sub-property, you have to redo the manipulation with a right click on the corresponding property.
Once a property has been added, its fields must be filled in with the appropriate information.
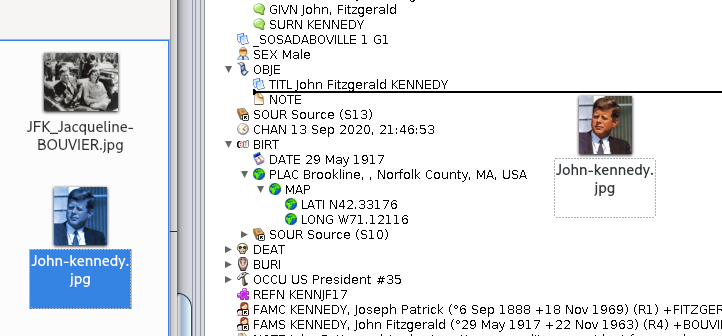
#### Multimedia file - Add a media property using drag and drop
It is possible to add a Media property directly from the file explorer of your computer through drag-and-drop.
It is actually possible to drag-and-drop a media from other software too (e.g. digiKam, etc)
To do this, simply drag and drop the file from the file explorer to the Gedcom Editor tree. You see below the black line just before releasing the mouse. Once the click is released, the property [](https://docs.ancestris.org/uploads/images/gallery/2020-04/file.jpg) will be added as a sub-property of [](https://docs.ancestris.org/uploads/images/gallery/2020-04/obje.jpg).
[](https://docs.ancestris.org/uploads/images/gallery/2020-09/en-gedcom-drag-n-drop-photo.png)
#### Multimedia file - Media file on external disk
Whatever your system, if you use drag and drop above, you should see how to specify the name of an external file.
On Windows, it is also possible to write the file with 3 slashes as follows: `file:///E:\images\image.jpg` where E is the external drive.
On Linux, it is enough to indicate the name of the disk as it is mounted on your system, which may vary from one distribution to another. For example :
[](https://docs.ancestris.org/uploads/images/gallery/2020-09/en-gedcom-external-file.png)
#### Multimedia file - Internet link
You just have to indicate the classic URL of the file: `https://www.siteweb.com/images/image.jpg`.
#### Multimedia file - Local and found
Ancestris helps you quickly identify if a file is local and if it exists on disk. Two user defined tags are used for this
- **\_LOCAL** is '1' if file is local, '0' otherwise.
- **\_FOUND** is '1' if local file exists on disk or is file is remote, '0' if local file is not found.
These values are read only and are updated when the Gedcom file is opening and when the FILE property is edited or checked for validation.
### Moving or copying a property
**Classically, moving and copying a property is obtained via the [Context Menu](https://docs.ancestris.org/books/user-guide/page/context-menu "Context Menu"), whose right click must be made on the line concerned by the current processing, or by Drag&Drop.**
#### Through the context menu
- To move a property, command Cut, then command Paste, with a new right click on the line to receive the moved property.
- To copy a property, command Copy, then command Paste, with a new right click on the line to receive the copied property.
#### By Drag / Drop
[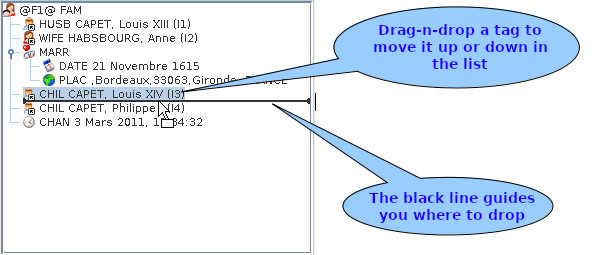](https://docs.ancestris.org/uploads/images/gallery/2020-09/en-gedcom-move-property.png)
#### Order of children, and properties in general
You can order the children in the desired order this way. Ancestris will keep the order displayed in the file.
This method applies to the order of all properties.
### Deleting a property
To delete a property line, right-click on the line to be deleted and choose **Delete the selected properties**. As usual, a confirmation window is displayed before the command is executed.
It is obvious that the deletion of a line also deletes the lines hierarchically placed below this line.
### Confirming an entry and saving the genealogy
Changes made in the lower part of the window need to be confirmed in order to be saved.
As soon as a piece of information is modified, the following buttons appear at the bottom right of the editor. Simply click **OK** to validate, or **Cancel** to cancel:
[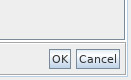](https://docs.ancestris.org/uploads/images/gallery/2020-04/okcancel.jpg)
These buttons may not appear. This is the case for users who prefer to automate this confirmation when navigating to another entity. This is a setting in the [Preferences, Edit pane and in the Editor section](https://docs.ancestris.org/books/user-guide/page/preferences#bkmrk-volet-%C3%89ditions "Preferences").
[](https://docs.ancestris.org/uploads/images/gallery/2020-09/en-gedcom-confirm.png)
Warning: in both cases, with or without clicking OK, your changes are not yet saved in your file on disk. But if you try to quit Ancestris, it will warn you and ask you to save all your changes.
### Modification of a place
When you want to modify a place selected in the properties of the Gedcom Editor, there are two ways to enter or modify this place. This display mode is chosen in the [Preferences, Editor pane](https://docs.ancestris.org/books/user-guide/page/preferences#bkmrk-volet-%C3%89ditions "Preferences for places"), in the section concerning places.
- Display all places jurisdictions on a single line:
[](https://docs.ancestris.org/uploads/images/gallery/2020-09/en-gedcom-place-one-line.png)
- Display the place with one jurisdictions per line:
[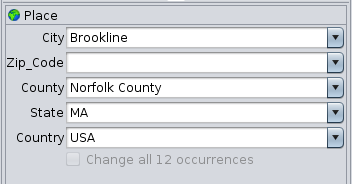](https://docs.ancestris.org/uploads/images/gallery/2020-09/en-gedcom-place-multiple-lines.png)
#### Auto-complete
As you can see above, for each field it is possible to display the list of values already entered by using the drop-down list.
The other possibility is to start typing a place name, and Ancestris will offer you all the places starting with these first entered characters. This is called "auto-complete". This makes sure the same places get spelt the same way and it saves typing time.
You can also see why displaying on a single line can be more efficient. It then allows you to enter all the jurisdictions of the place in one go.
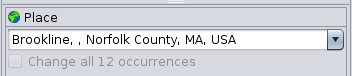
#### Global change of all identical places
It is sometimes necessary to apply a place correction to all identical places.
The Gedcom Editor not only tells you how many places are identical, it also lets you spread a correction to all the others at the same time.
To do this, check the box below the place fields:
[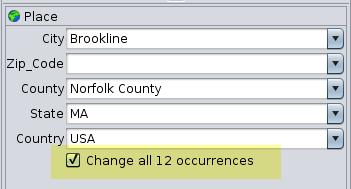](https://docs.ancestris.org/uploads/images/gallery/2020-09/en-gedcom-place-multiple-lines-replicate.png)
The confirmation window asks you to confirm.
[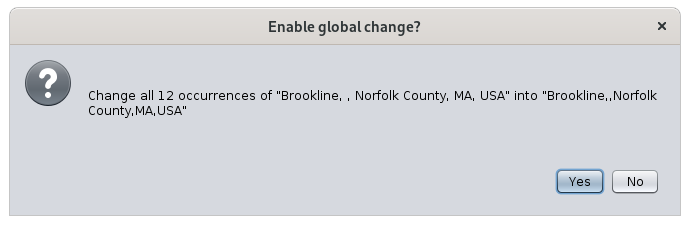](https://docs.ancestris.org/uploads/images/gallery/2020-09/en-gedcom-place-confirm.png)
Then validate your modification by clicking on Yes.
### Modification of the display of entities
When the entity first line is selected in the upper part, the one with the identification number, the corresponding [blueprint](https://docs.ancestris.org/books/user-guide/page/blueprints "Blueprints") is displayed in the lower part.
To change this blueprint, just right-click on the current blueprint and choose "**Change display**". Here is the part of the window corresponding to the change of the display in the Gedcom Editor for all individuals.
[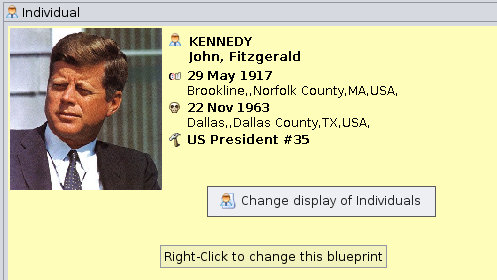](https://docs.ancestris.org/uploads/images/gallery/2020-09/en-gedcom-change-blueprint.png)
The Blueprint window appears. Follow the instructions in the corresponding [blueprint](https://docs.ancestris.org/books/user-guide/page/blueprints "Blueprints") page.